Russdl
-
Posts
1757 -
Joined
-
Last visited
-
Days Won
6
Everything posted by Russdl
-
@joe90 the plan is to finish the path in 20mm Cotswold stone, its just compacted type 1 at the mo. The garden strip is a long thin triangle going from the apex that is nothing wide and 4" below the path to about 3' wide about 8" below the path (all approximate)
-
Zinc angled standing seam.
Russdl replied to Makeitstop's topic in House Extensions & Conservatories
@Makeitstop Is it £3K? If it is, and just for the zinc then yes, I'd say it definitely is expensive. If it is and it includes the battens, ply and downpipes etc? Then it's getting better. Actually, where does the rain water go? From the zinc cladding aspect it looks relatively straight forward. -
Zinc angled standing seam.
Russdl replied to Makeitstop's topic in House Extensions & Conservatories
@Makeitstop so what is it, about 14m2 of zinc? You're going to say about £3K I guess. -
I need to separate a path from a thin strip of garden. The path is level, the strip of garden starts about 4" below the path and slopes down to end about 8" below the path. The thin strip needs to slope down to follow the line of a fence. Whats the best way to separate the path from the garden to ensure they stay that way? I was thinking of 12" gravel boards concreted in. Any better ideas?
-
Zinc angled standing seam.
Russdl replied to Makeitstop's topic in House Extensions & Conservatories
Yep, as I said it was a friend of a friend (actually someone who did work for a friend of a friend) and that price was just for the fitted zinc and best guess at what just the roofing panels would have cost as they are pretty easy to make and fit. It was all finished about a year ago. We looked at aluminium when we realised Tata wasn't going to work out. That was going to be very expensive but more significantly, it was a big company and their T&C's seemed pretty onerous, that may have just been standard blurb and once on site they would have been more flexible but it put me off. Then a friend put me in touch with a friend who had a man with a van who did zinc work. He was brilliant. -
Zinc angled standing seam.
Russdl replied to Makeitstop's topic in House Extensions & Conservatories
@gc100 that looks really good, especially the concealed gutter. Concealed gutters were on our wish list but I chickened out as things were getting more and more complex for us. -
Zinc angled standing seam.
Russdl replied to Makeitstop's topic in House Extensions & Conservatories
@Makeitstop yes it was a good couple of hundred m2 and it was a friend of a friend that did it which I think helped. It became impossible to compare prices because of all the ‘specials’ we were having that could only have been made on site. -
Zinc angled standing seam.
Russdl replied to Makeitstop's topic in House Extensions & Conservatories
@Makeitstop It took around two weeks to fit the zinc. That does not include the substrate. It’s tricky to give an accurate m2 figure for the zinc because of everything else that was done as well (gutters, down pipes, window cills and reveals, corner details to house etc etc) However it was circa £80/m2 for the supply and fit of the zinc roofs and walls. -
Zinc angled standing seam.
Russdl replied to Makeitstop's topic in House Extensions & Conservatories
@Gus Potter I think you’ll find the blue bin is actually not quite in line. I’ll have a word with it on the morning it clearly needs to smarten itself up. The zinc definitely has the potential to be unforgiving, 0.8mm thick, and as you mentioned earlier, without careful detail at the gutter you’ll get a definite line appearing over time where the two zinc layers overlap. -
Yep, truly inspiring and a very impressive final result. (How come the architect hadn’t spotted that they needed 15 degree roof pitch for their skylights?)
-
Zinc angled standing seam.
Russdl replied to Makeitstop's topic in House Extensions & Conservatories
Absolutely correct and something I was going to mention when I got round to digging out the m2 price because that won’t include all the marine ply and breather membrane our zinc is laid on. But the substrate detail holds true for any of the choices I would have thought. -
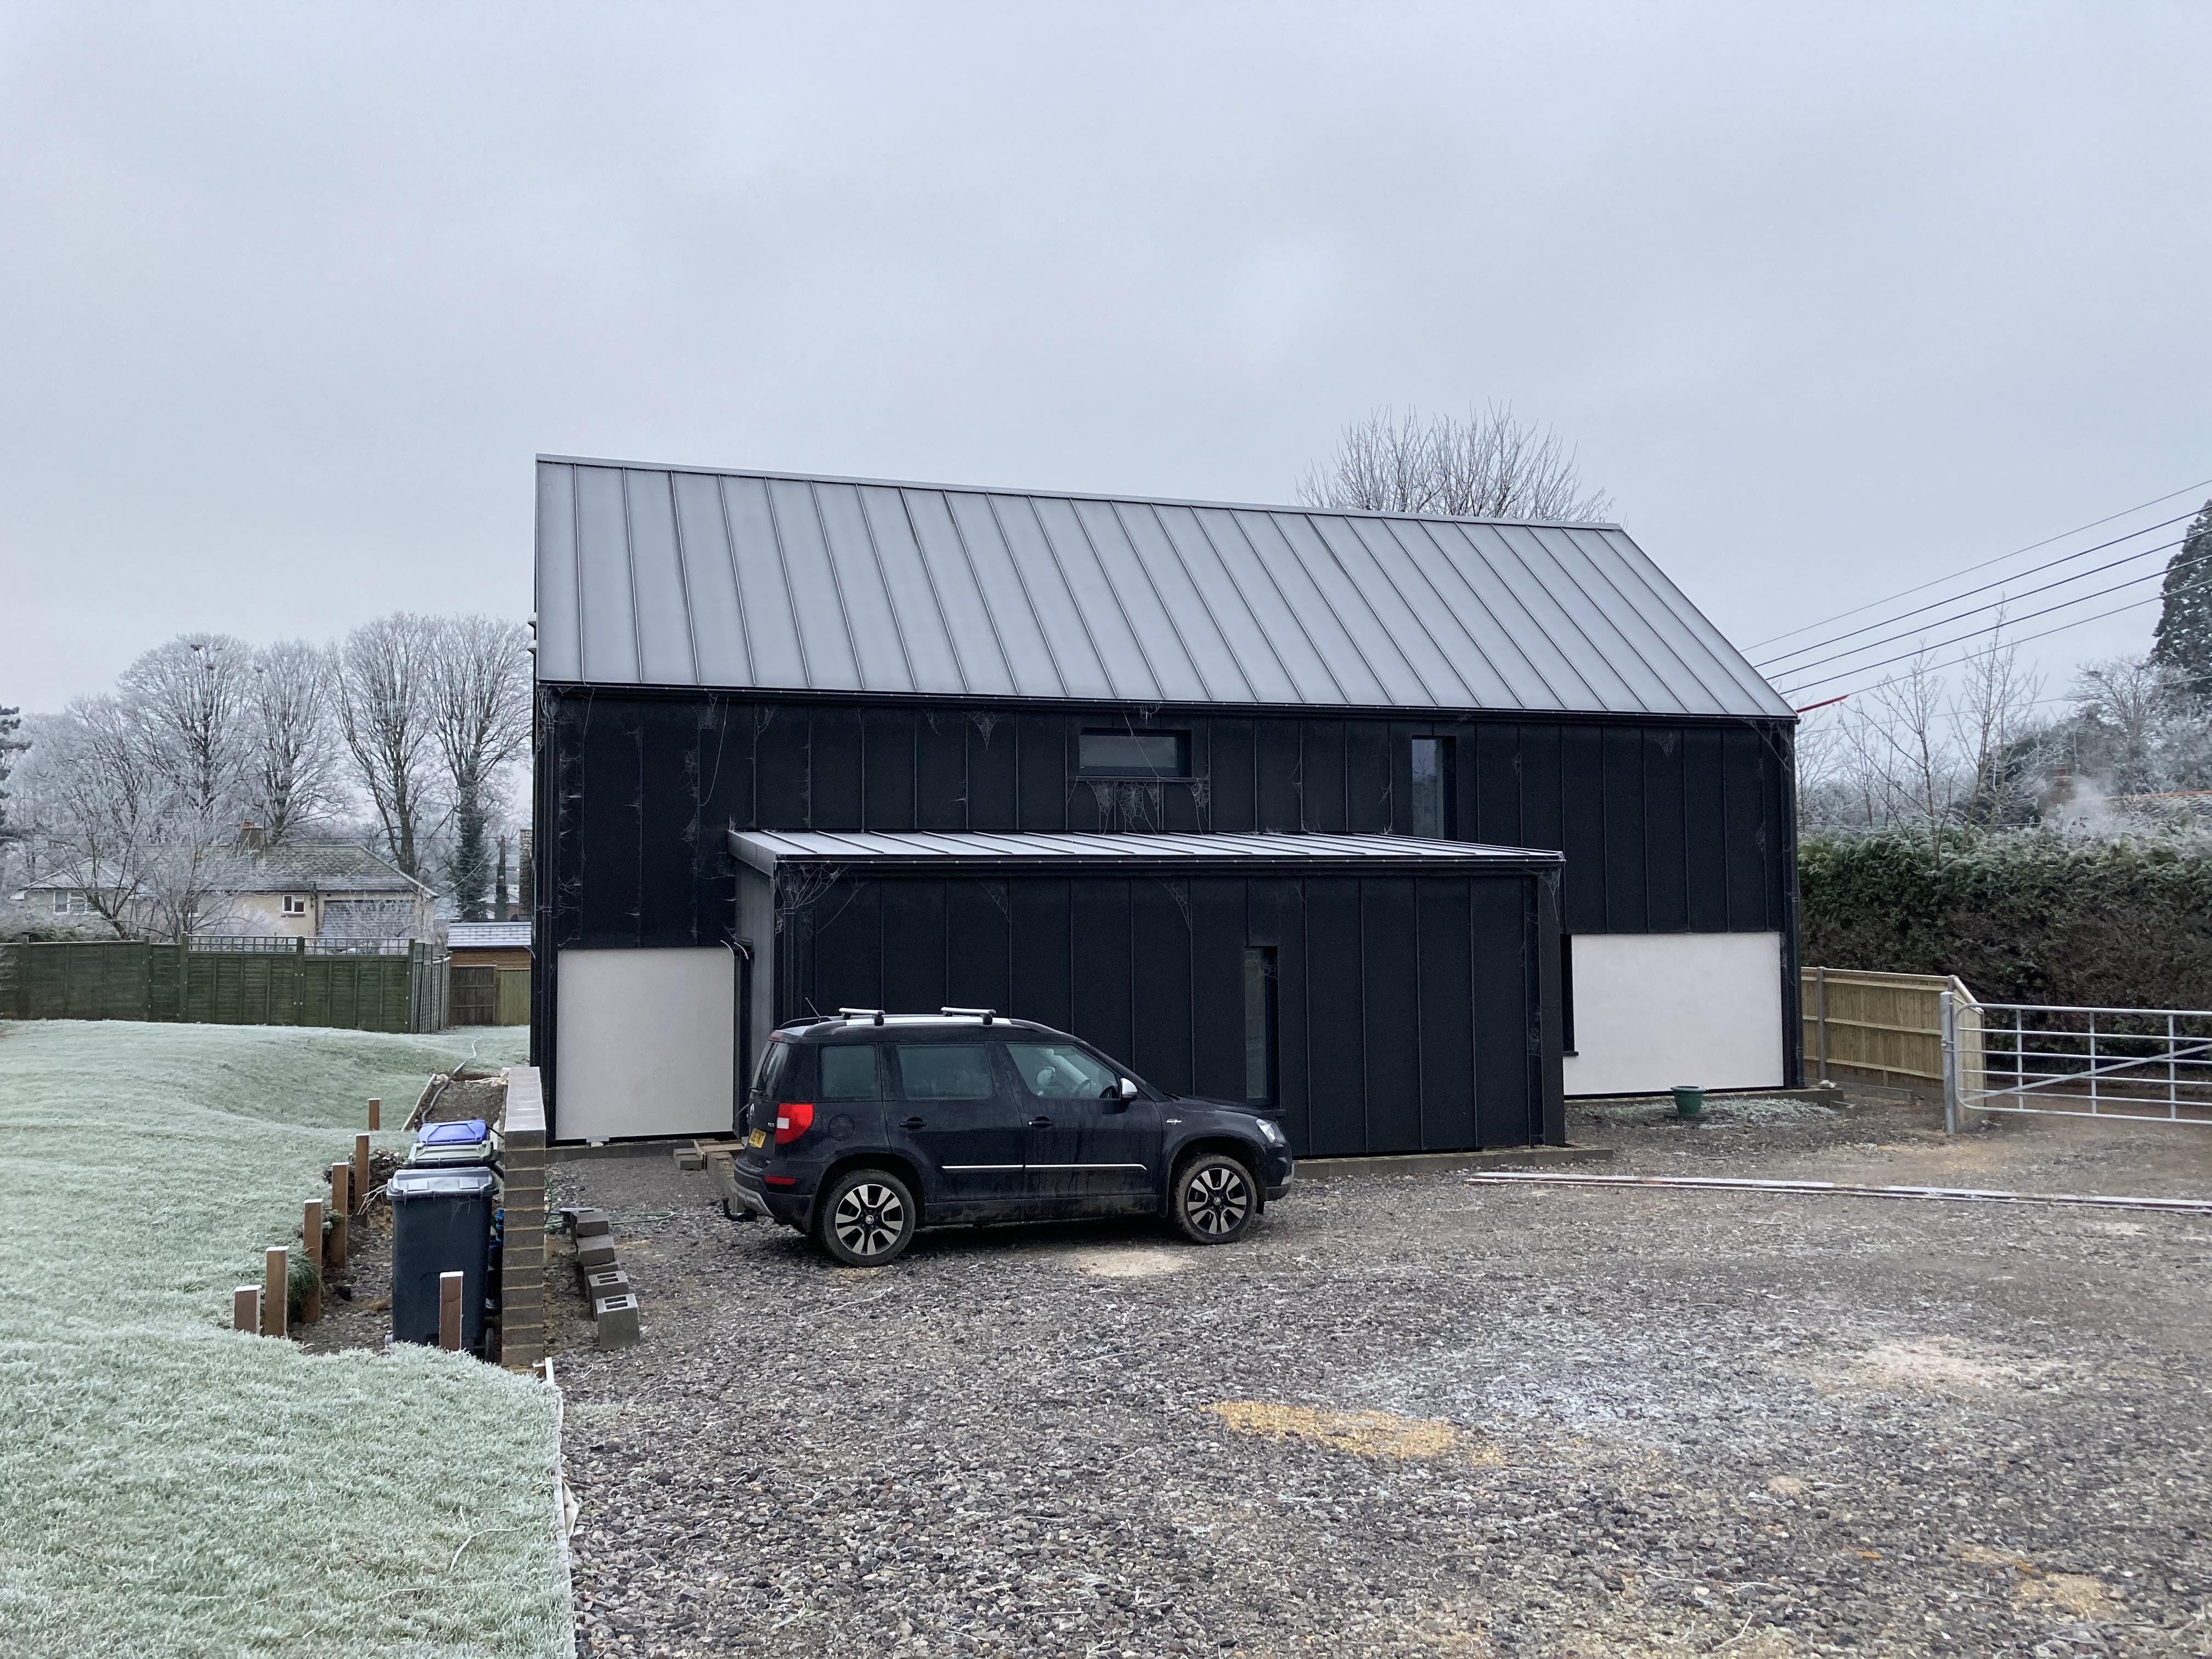
Zinc angled standing seam.
Russdl replied to Makeitstop's topic in House Extensions & Conservatories
Image will be easy. Here’s a frosty morning one (cobwebs n all) m2 price will take me longer.
-
Zinc angled standing seam.
Russdl replied to Makeitstop's topic in House Extensions & Conservatories
@Makeitstop we used zinc for the roof, cladding to some of the first floor and some corner details. We had planned on using Tata Steel and did their one day course, however with the Tata system we were going to struggle with some of the more intricate details and their communication was poor so we made an 11th ish hour switch to VM Zinc, and mighty glad we did. Had we gone with Tata the full length roof panels would have been delivered to site, we have difficult access so each sheet would have been carried from a flat bed 200m up a track. The zinc was done by one man in a Ford Transit. He unloaded his folding machine, unloaded a big roll of zinc, ran it through his folding machine and produced a custom roof sheet in a very short space of time. He hand made all the fiddly bits plus all the window reveals in such a way that the reveals could be removed at a future date to gain access to the inner workings of the exterior blinds should the need arise. It has once already. More expensive I’m sure but the custom element was invaluable to us. That was a bit long and rambling but in a nutshell, yes, glad we used zinc. Ours is very dark, bordering on black, it makes almost no expansion noise when the sun hits it, it can get very hot to the touch and cobwebs on a frosty morning stand out like a dogs danglies. I shall endeavour to work out a m2 price for you when I have a mo. -
if that IKEA app isn’t letting you show us what you want to achieve just sketch your ideas on a scrap of paper, take a photo and post that, it’ll save you time and get your ideas across more effectively I reckon.
-
Hello @Barn Becs. You’ll find more information and help on here than you could possibly believe, you’ve come to the right place. Good luck with your project. Where in the world are you?
-
Fire Rated Air Valves for MVHR
Russdl replied to Russdl's topic in Mechanical Ventilation with Heat Recovery (MVHR)
My specific concerns regard the air valves in the downstairs rooms (lounge, kitchen/dining, study) that have habitable rooms above (bedrooms). I really should go back to the BCO but he's been hugely vague over most things and as this will be outside of his sphere of expertise I'd like to be able to work it out for myself. -
Question is, do I need fire rated MVHR valves anywhere? I can't discern it from Approved Document B, but I guess it's in there. I can't find the answer here, but I guess it's probably here as well somewhere. I asked my BCO a while ago, he didn't reply. Before I try him again, I'd like to know. Is there a simple answer? Do we or don't we? Are there rules of thumb?
-
That’s nothing I’d given a great deal of thought to, in my situation I think decking lights in the wall behind the bath would be a lot more difficult to replace than an LED strip on the floor behind the bath, which in itself may be a tad tricky. LED strip it is.
-
@Onoff ??? (I had to Google it)
-
@Onoff hmmmm. Perhaps we’ll change our elec UFH...
-
And there’s me worrying about water proof connections for 12V lights ?
-
It looks like you just vomited up a whole heap of Scrabble tiles!
-
Can't wait!
-
@Onoff don't you go muddying the waters after @TonyT & @PeterW have provided some clarity for my befuddled head. Next thing @ToughButterCup will be back hawking candles!
-
It wasn't going to be, but I think it can, thanks again.