andyscotland
-
Posts
638 -
Joined
-
Last visited
-
Days Won
1
Everything posted by andyscotland
-
The airtightness might be solvable if you took your airtightness layer round the inside of the outer skin to a post at the corner of the door pocket, then made the outer edge of the door an L shape that could be pulled tight against a compression seal on that post. That would probably have to be assembled in situ to get a good seal. So less pocket door, more sliders with a false wall inside to hide them. Could be a pain for maintenance though, and a lot of detail to get right on the build. I never like using the word "impossible" as there is always a way to solve a problem, and in my experience it can seem lazy & undermine trust. If we can build bridges across the sea, we can put big sliding windows in a house. I prefer to say something like "It'll be very challenging to achieve that, off the top of my head I can think of X,Y and Z but there may be other issues too. I'd be happy to look at how we could make it work if you have the budget for me to spend time on that. But from experience I think it's very unlikely you'll want to pursue this when you see the cost and compromises involved, so my recommendation would be that it's not worth spending money on." It's more words, but it's more honest, and it leaves the client in control of their own value judgements. On occasion they have taken me up on it. And once, to my surprise, they saw the detailed costings and went ahead anyway!
-
You may have already, but I'd suggest double checking the hire company pricing on the nails : I've often found getting consumables with the hire can work out more expensive than getting them from Screwfix/Toolstation/online/etc. Depends on how many you need of course, especially if the hire co will supply (or sale & return) quantities smaller than a full box as gun nails tend to come in quite big packs.
-
Hi everyone, I'm self-building a garage conversion and small extension in Edinburgh as the first phase of updating our house. It's not been going entirely to plan - now about 4 years in to a "six month project" 🤣. In my defence I wasn't expecting to be getting a puppy, homeschooling through lockdowns, several months of recovery from a concurrent sciatic nerve injury & badly sprained ankle, and various other things that have come up. So maybe I'm actually doing ok! There have certainly been points I wished I'd never started - probably not as many as there have been for my wife but she's still here for now 😂 - but I think it'll be worth it in the end. The structure, glazing and external cladding is all done now, just finishing battening out the ceiling and approaching first fix. I originally trained in theatre production and through that as a City & Guilds qualified spark, plus a bit of joinery, metalwork etc. Not done that for a living for about 15 years though. The rest I've learned from previous DIY projects and of course the internet! I was on here a bit earlier in the project but drifted away as life took over, so I just thought I'd say hello again
-
- 1
-

-
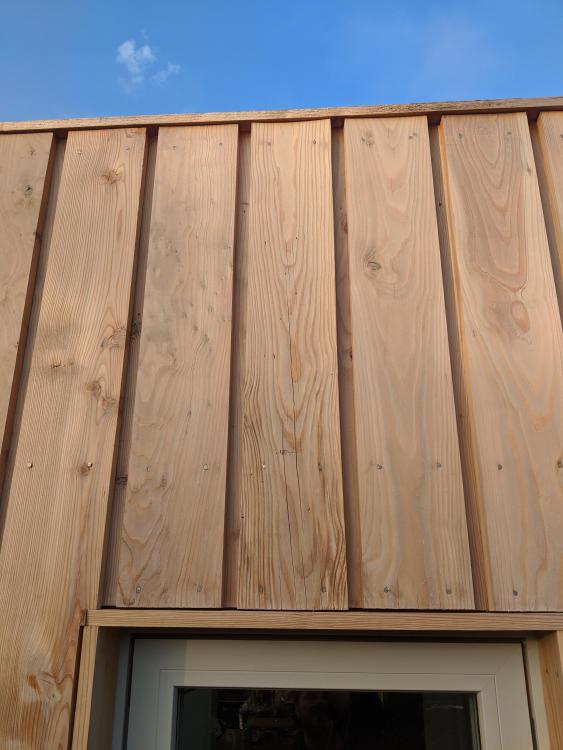
Was looking round my MiL's almost-complete extension yesterday and spotted a cladding plank that has quite pronounced shakes/splits compared to others. I've not seen enough cladding up this close to know if this is reasonable, I know timber is natural and will split a bit but this one looks quite pronounced, it's the only board like it so really sticks out if you actually look at the wall. Obviously just don't want it to develop into a bigger crack. Would I be unreasonable asking the joiner to replace it? There's also quite a lot of nails that are not fully home (head sitting a few mm proud of the surface) - they gun nailed it and I think under-drove them. You can see two examples on the left hand board. Is it fair enough to ask him to tap them in?
-
Domestic installers and EICs
andyscotland replied to Nancykitt's topic in Regulations, Training & Qualifications
Well there sort of is an equivalent to Part P in that you can go on the Approved Certifier register in which case you can bypass Building Control approval. Similar to the scheme for structural engineers, where if you use an approved engineer all you have to show is that they're on the SER register and that's all BC need. But of course it's meant to be an optional thing that gets a discount off the warrant, and you are meant to have the freedom to go the traditional route and just get the work/competence inspected (which is of course what the non-discounted fee pays for). But in practice down here that appears to be a nonstarter. It does continually annoy me that I've got both qualifications and years of fairly varied and complex experience (including temporary installs indoors and outdoors with generators, 300A three phase distribution panels, the works). And yet I have to try and tap up an old friend of a friend to do the paperwork for a socket radial and a pair of lighting circuits. Which wouldn't even need BC involved at all if they weren't going in a new extension. Not to mention the City & Guilds I did focused almost exclusively on domestic for a good chunk of the time, despite that not actually being that relevant to the kind of work I was doing at the time. So I spent a year learning safe zones and bathrooms and how to test a ring main to get the bit of paper I needed to run around a field smelling of diesel. And now I need the stuff the bit of paper actually covers the council aren't even open to a conversation about it. And annoys me even more that I'm allowed to do all the other bits of the build, for which I have not a single qualification on paper, without anyone batting an eyelid! As with @ProDave it's a load of nonsense to me too. -
Domestic installers and EICs
andyscotland replied to Nancykitt's topic in Regulations, Training & Qualifications
Hopefully you'll be ok up there but in Edinburgh they appear to have an absolute policy that the only thing they will accept as evidence of competence is a NICEIC/SELECT etc card. They have point blank refused to consider my qualifications/experience to do my own install (eg not "we don't think those are adequate" just "that's not relevant, the law says you have to be competent and you prove competence to us by being in a scheme"). They are insistent on having an EIC from a scheme member regardless of there being no legal requirement for that. So definitely check with your BC body before getting too far down the line. -
I've used it, both for loft and between floor joists (both retrofit). Worked really well, I like that it helps to regulate moisture/condensation risk, and it's extremely pleasant to work with compared to mineral/glass/fibre/stone wool.
-
Couple of thoughts: Damp might be an issue, as you say there's been one flood before, but also from the concrete, and/or it only takes someone to spill something / have an oil leak or whatever on their car to become at least an annoyance and/or do some damage to the contents / structure. The walls might be a bit wobbly with nothing to tie them together / hold them straight at the bottom. Might make it a bit less sturdy around the doors in particular. You could probably solve those quite cheaply / easily and get a better result without losing too much height by: Cover the area with a DPM with enough overlap to bring up the sides a bit Then a layer of thin OSB - 9mm should be fine. For a 2200 x 3500 base you'd have 3 boards running side to side. Screw the timber wall plate to the OSB perimeter from the bottom before you lay it. Your side-to-side walls can be in one piece along the long side of the sheet, it'd be easier to do the front-to-back as three pieces one on each OSB sheet probably so you can lay them one at a time rather than trying to build the whole floor upside down and flip it after. Once the sheets are in position you can put a second continuous piece of timber over the top to join it together. That should be pretty solid already, but to make it really robust you could screw a few bits of plumber's band / thin metal repair plate across the butt joints in the middle of the floor in a few places. Build your walls and turn/staple the DPM up the outside of them a suitable distance above the floor. That should give you a reliably dry, sturdier structure with not a lot of extra cost/effort and only 9mm extra height. Obviously for the best flood etc protection you'd want to continue the wall plate / turned-up DPM across the doorway, but that will give you a step over on the way in. If you'd prefer to have it flat / level I'm sure you'd be fine just stapling the DPM over the edge of the OSB there.
-
Ah yeah in that case doesn't sound like a good plan.
-
Is the concrete floor your finished floor / do you need to bond to it (eg tiles)? If not (e.g floating floor) then you could just lay a plastic VCL / DPM over the concrete and below the finished floor, bring that 100mm up the wall and tape it to the VCL. That would totally enclose that junction. May need to wait for the concrete to fully cure.
-
My hunch would be if it's max 3 years till this is a normal shed (assuming your 2 year build timelines are like mine?) it would definitely be easiest, most economical and probably ok environmentally to do as per @Nickfromwales You can easily run 3kW off a single 13A socket. You can also burst above it for brief periods without the fuse blowing. Obviously you want an actual 13A extension, not a 13A-plug-10A-cable which are common in DIY shops. A 1kW heater is probably fine, and even then won't pull that full amount the whole time, so you've plenty headroom for a computer, monitor and led lights I'd say, you'd be very unlucky if the heater and coffee machine both hit full load at the same time and for long enough to blow a fuse/cause any issues. If you were nervous you could always get a spark to fit a 16A garden socket (like a caravan site) tbh they're better for continuous load anyway and for weather exposure etc. Also tbf at the points the coffee machine is dumping 1.5kW into the room you don't need the heater anyway - it's all heat. You could skip the heater altogether and drink more coffee ? If you don't find an actual shed the right size/price/shape, it should be a straightforward stick build with a bit of timber and some sheets of OSB. If you make it multiples of sheet sizes you could knock it up very fast. Then gumtree or similar for people getting rid of windows and doors?
-
How long are you likely to have it? If it's a short-term thing then the cost/hassle of insulation might not pay off compared to just lining it and heating it more. I'd think if you line it with a cheap VCL to make it mostly airtight (and bug tight), by the time there's you, a computer and an electric heater for the really cold days it would be cosy enough. A caravan/tent can be brought up to an acceptable temp even with no insulation... Obviously not ideal environmentally although even there the embodied carbon in insulation etc might be a factor if this is only for 1-2 winters... You could line the inside with painted ply or MDF rather than plasterboard to reduce the damp concerns.
-
You're underground what did you expect ?
andyscotland replied to Pocster's topic in General Self Build & DIY Discussion
Just remember with corner slings that the load gets exponentially multiplied as the angle gets flatter. So if you go that route your hoist will need to be a good bit higher than the top of the cage/spreader frame to allow for a decent angle on the slings - 60 degrees is common. That will obviously then mean a longer pole sticking up, so more bracing to counteract the greater forces where it meets the wall. If you can instead do an up and over stirrup so you can put the hoist on a single point above the centre that would allow you to minimise the hoist height. But obviously creates more of a risk of tipping. -
Removing window bay - shortening floor joists
andyscotland replied to andyscotland's topic in General Structural Issues
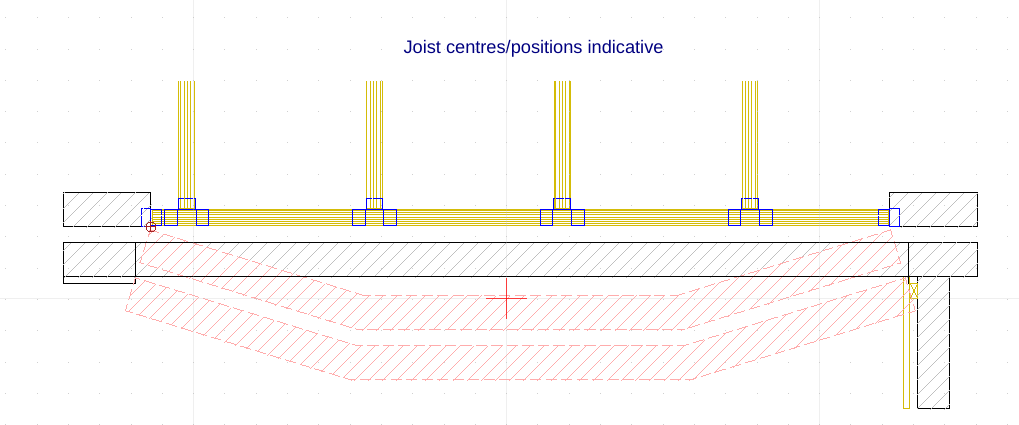
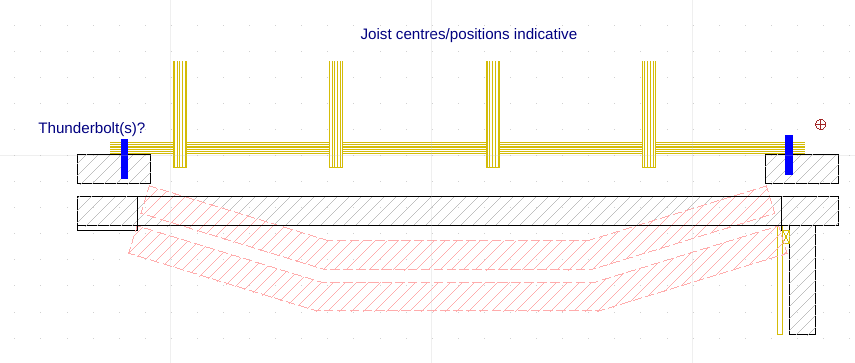
@nod thanks - like this? Would 50 x 150 be adequate for the joist spanning the bay do you think? How would you support the floor / joists during the work? I could probably drag some concrete blocks into the crawlspace and make a small pile under each joist, packed tight with timber? Or I'm just thinking, if the joist ends can be carried by a timber span could I actually fix the timber across the inside of the wall beneath the joists so that they're sitting on top? E.g. That would allow me to fix the bay joist into the inner skin first, hard up against the joists, then it would all be fixed in position and I could just demolish the bay / cut the overhanging joists? Obviously would need to fix the joists down and maybe add noggins which I could do fairly easily once the ends were exposed?
-
We're converting our bay window to a full-height door / window opening. The original plan was to keep the line of the bay, but SWMBO has suggested fitting a flat window instead. I can't work out / find any guidance on what I'd need to do about the existing floor joists. They currently project into the bay and sit on a sleeper wall just inside the inner skin - so will stick out past the new door / window if left unchanged. The bay is not otherwise structural - the walls/roof are carried over it on an RSJ in line with the house. I'm guessing normally you'd build a new sleeper wall to support them in line with the main wall and cut the ends off. But: I'm not sure what that sleeper wall would need by way of foundations? The bay is original so I believe the house foundations follow that line. I can't see it'll be feasible to dig foundations from inside the under-floor crawlspace (unless I do it Colditz-style with a trowel.... :() , so I think I'd need to remove the outer wall and cut the joists first to get access, but not sure how best to prop the floor temporarily to do that... Alternatively (and I'm fairly sure this is a non-starter...) we are going to build decking externally level with the door threshold. So spatially, I could leave the joists as they are now, continuing under the start of the decking. But obviously would need a robust way to protect the joists from the weather, and to close up the thermal bridge below the opening. Can't really see that there's a way to do that but it'd be a lot easier structurally! I'll ultimately need to put this through on a Building Warrant Amendment, just looking for some pointers on the best way to approach it particularly in terms of practicality and to help us (SWMBO!) decide whether to go this route or stick with the idea of keeping the bay shape. Thanks!
-
Disabled Access - Steps down/ramps
andyscotland replied to iSelfBuild's topic in New House & Self Build Design
We've stayed in a lot of properties marketed as disabled friendly and not a single one has ever had an electric bed or a hoist on site. Don't recall any with low worktops either. -
I did a 30-ish sqm L-shaped roof with 4 rooflights on upstands, having taught myself from online tutorials and advice here. The actual GRP wasn't a drama. However, the entire process took a lot longer than I expected - it takes a fair while to detail all the corners, upstands, etc both for the boarding out and then again for the GRP - and far longer than any likely spell of continuous dry weather in Edinburgh. So my boards got wet, and things went downhill from there... It might be possible to go faster with more hands, but I think when you've upstands etc to do there's a limit on how fast you can go even with help. Once I admitted weather-defeat and built a heath robinson tent over the entire roof and got it all dried again it worked OK and I'm very pleased with the end result. So, if you can get the weather for it, or you follow @SteamyTea advice to laminate the boards inside first, or you build a tent from the get-go, then it's a great product and it's very easy to DIY. But there is scope for a lot of drama and stress if you time it wrong / take longer than you think you will.
-
2 fan system. Do we really need one??
andyscotland replied to connick159's topic in Air Source Heat Pumps (ASHP)
Is the cottage being renovated, do you know what the U-values of the various walls / roof / floor etc will be? Possibly the houses where you've seen smaller systems are new-build (or newer-build) and better insulated than your cottage? It's really the level of insulation rather than the size of the property (roughly speaking) that makes the difference to the size of the heat source required. -
Disabled Access - Steps down/ramps
andyscotland replied to iSelfBuild's topic in New House & Self Build Design
That's very (unusually) impressive. We've never found anywhere with a hoist into the bed. My MiL has a "portable" hoist she can take in the car (it's enormous and very heavy), or two of us can lift her into bed with a lifting belt. The major thing aside from the entrance is the width of corridors and doorways internally particularly for turning, and whether there is space beside the bed to get the wheelchair right alongside with space to move for transfer. If we're using the portable hoist it needs a good couple of metres beside the bed and the bed to be on legs (not flat to the floor) so the base of the hoist can roll under it. It's most often the layout / space of the bedroom that rules out things that are advertised as wheelchair accessible for us. Wet rooms are nice but my MiL doesn't really use bathroom independently so that's never been a thing we particularly look for. Likewise grab rails aren't relevant for her (but would be for walking disabled) -
@zoothorn you can overlap the RHS and cut both sides (one straight one wiggly) as others have said, losing the tapered edge at the board joint (just means a bit more care to fill and sand that joint flush for painting). Or if you find that hard to conceive do my cardboard template then you can just cut the wiggly edge the appropriate distance from the TE factory edge.
-
Disabled Access - Steps down/ramps
andyscotland replied to iSelfBuild's topic in New House & Self Build Design
If/when you do we'll be early in the queue to book a trip! -
You could get a big bit of cardboard box and scribe onto that. Then cut it to shape, put it back in position and double check it and mark (or measure) where the straight, non-wall, edge overlaps with the plasterboard. Then you can put the plasterboard on the floor, put the card on top lined up to the correct width and use it to mark/cut the PB. Failing that, scribe the wall to the plasterboard as above, then put the plasterboard on the floor and use the same block to follow the line and scribe the offset wall line in the correct position. Also be careful with your plasterboard screws if you only have 15mm stud, I think better to put them in at a slight angle than to put them too close to the edge of the board.
-
Disabled Access - Steps down/ramps
andyscotland replied to iSelfBuild's topic in New House & Self Build Design
It can be... My knowledge from a work perspective is a good few years old now, but as I recall it was considered easier to show it wasn't reasonable to make adjustments for unaccompanied wheelchairs as their needs are quite substantial and the numbers of potential customers in that category very low. The advice I had was to decide what group(s) you felt you could reasonably service and then focus on making sure they had full access. And ideally write that up briefly so you can show a thought process if anyone asks. If you can demonstrate you've done everything possible for an accompanied wheelchair it's easier to justify not tackling barriers to unaccompanied. Similarly for blind/deaf/walking-mobility-impaired customers. On the plus side from travelling with my wheelchair-bound mother in law I know that there's actually quite a shortage of nice, especially rural, accessible holiday accommodation. So putting in a bit of thought now will help to open up a reasonably-sized market for your business and could well pay off. -
Disabled Access - Steps down/ramps
andyscotland replied to iSelfBuild's topic in New House & Self Build Design
Yes - and indeed it's a legal requirement for a business to make reasonable efforts to be fully accessible to disabled people. There's some leeway if it's e.g. a historic building that cannot be adapted, but any business operating from new/purpose-built premises would be generally expected to be accessible regardless of building regs requirements. Of course this legislation isn't generally triggered by any sort of pre-emptive council inspection, but retrospectively if a disabled person complains they've not been able to use your services. So compliance and enforcement is somewhat sporadic, but nonetheless the legal duty (and potential for fines/enforcement) is there. It's worth considering whether you're likely to have an unaccompanied wheelchair user visiting, or whether other aspects of your site/layout/services etc mean it's reasonable to say it's only suitable for wheelchair users that travel with a companion/relative etc. The flat bit before the door is only really crucial if the wheelchair user is on their own as that means they need the brakes off to unlock and open the door but doing that on a slope is not possible. Someone with an able-bodied pusher would be fine with just a ramp. However it would probably not be reasonable to limit to accompanied wheelchair users if the ramp/flat section is the only issue - the expectation would be you'd think about that and design it out given there are widely accepted and fairly easy ways to resolve that problem on a new build. I'd review that too - the hot tub is probably fair enough as accessible bathing is a complex and somewhat expensive thing to address. But the sauna/grill house might need a reasonable explanation as to why it's not accessible if a guest were to complain they didn't have access to your full range of on-site services. -
Looking great! I'm out of date with your plans on this but assuming the PIR ends up sandwiched between wood/OSB on either side then yes I would maybe just use a bit of tape/double-sided tape to hold it in place while you get the next layer on and then that will clamp it in place when you screw it down.