andyscotland
-
Posts
638 -
Joined
-
Last visited
-
Days Won
1
Everything posted by andyscotland
-
Minimum stairs in a new build - 42degree?
andyscotland replied to puntloos's topic in New House & Self Build Design
FWIW when I was a kid if I had a bookcase that opened to a hidden spiral stair to an attic playroom I would have *loved* it and doubtless been the envy of all my friends. It'd be a perfect treehouse/crow's nest/space station/whatever for younger imagination games and a brilliant hideaway as they get older. Depends on how much you value the trade-off of getting stuff up there (trapdoor and winch is not a bad workaround IMO, or just get everything flat pack and build in situ), and perhaps more importantly the fact it would undoubtedly mean you'd be hosting all the playdates for years to come! -
Fixing screw hole in top of shower waste pipe :(
andyscotland replied to andyscotland's topic in Waste & Sewerage
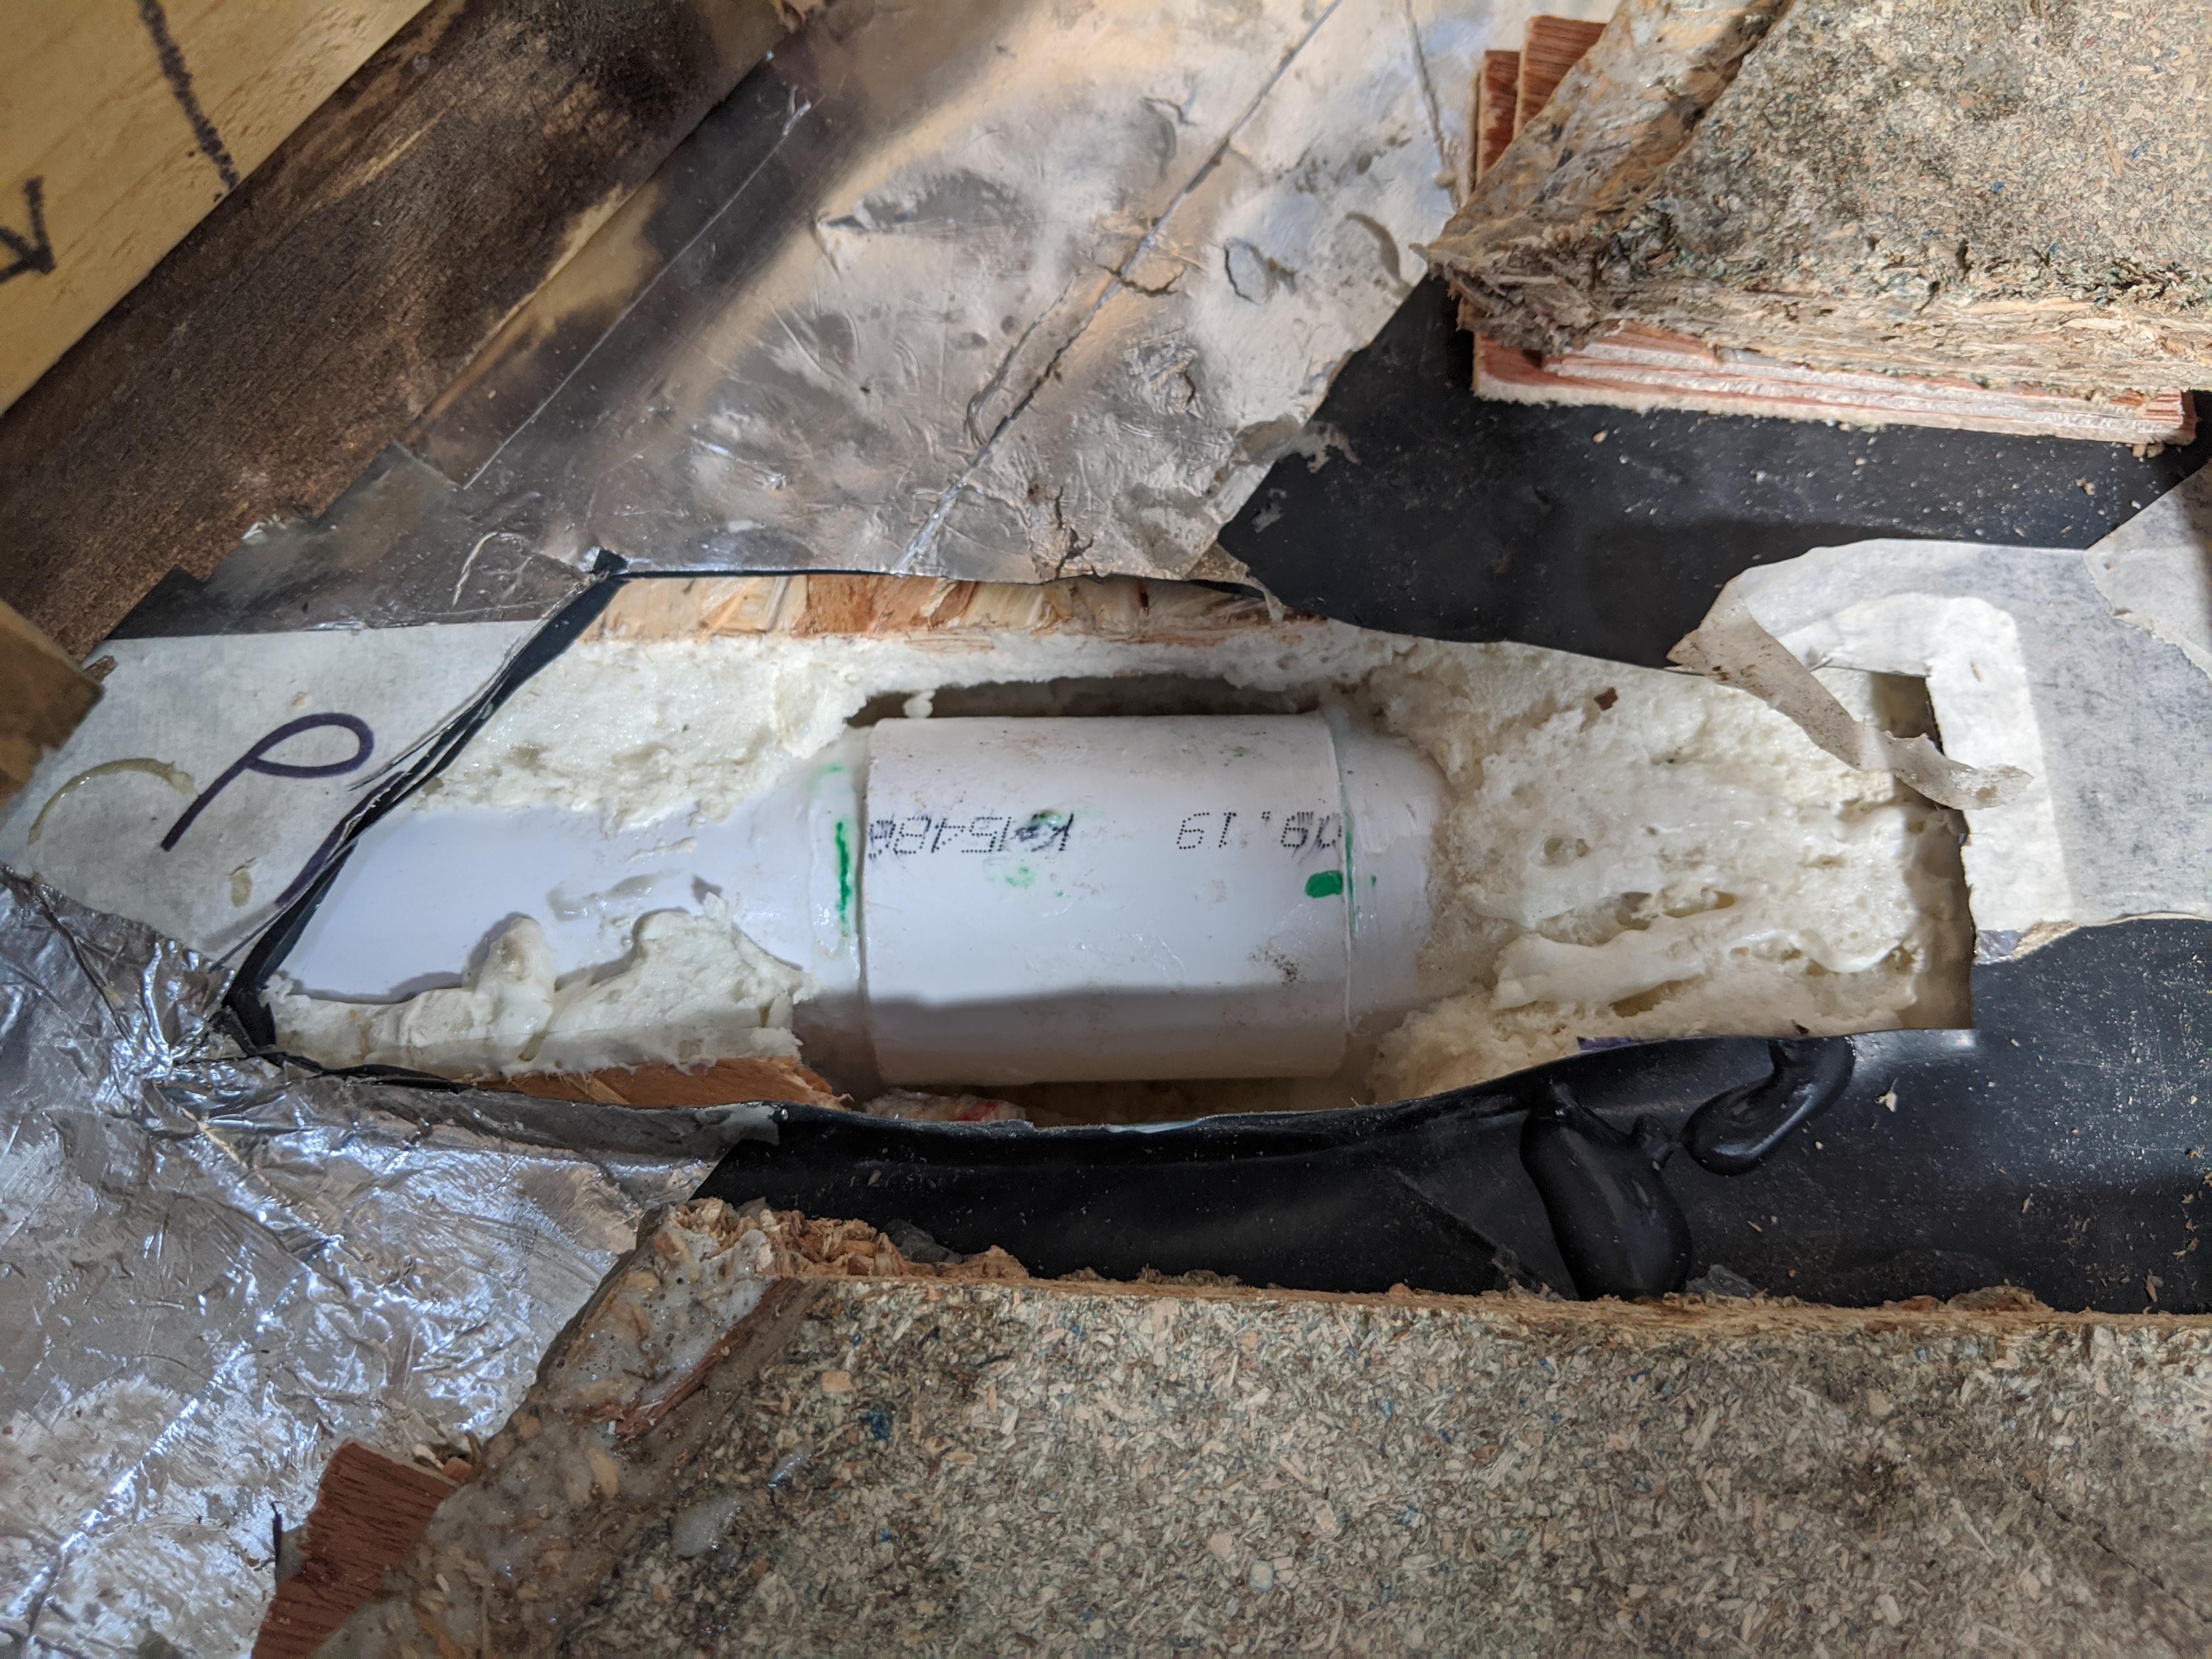
Good as new! (I hope). Will wait for it to set up and water test before I reinstate the floor. I'm thinking I will just put a piece of polystyrene in the gap where I've cut out the chipboard as the repair clip sits ever so slightly proud of the insulation. There's UFH overlay boards going on top and then laminate (and this will be inside a cupboard/below the CU anyway so not likely to get a lot of loading on that spot). When I finish the build I'm going to retrain as a keyhole surgeon. Thanks again for the life-saving advice folks.

-
Wanted: Broadband speed monitoring / logging program
andyscotland replied to ProDave's topic in Boffin's Corner
Nope, not remotely correct as I said in the second part of the post. The upstream connection it's measuring is the one from your house to the wider internet, nothing to do with what you're doing on the connection yourself. It sits beside the other devices on your network, same as any other device in the house, not in between them and the outside world. It does not / cannot see what websites you're accessing. Likewise it does not see passwords - even if you are sending them over an unencrypted connection which to be honest you shouldn't be anyway. If you send a password over https (as you always should) then nothing bar the browser on your computer and the remote server of the site you're accessing can see it. All that box does is make its own connections to the SamKnows servers to measure the download speed/upload speed/latency/jitter etc. It does not attempt to measure the performance of the connections from your own pc, although it does look at whether there is any traffic (equivalent to "is there a dial tone or is the line engaged") to identify good times to run its tests. It is functionally identical to your bash script, except it doesn't try to connect to Google and sends the results to SamKnows instead of a CSV file. And finally it doesn't send any of the data to a government department direct, it sends it to SamKnows. They provide various reports based on aggregate stats e.g. " BT lines in this area are 95% reliable/have an average speed of XMb/have good download speed but too much jitter to be usable for video calls". -
Wanted: Broadband speed monitoring / logging program
andyscotland replied to ProDave's topic in Boffin's Corner
I'd generally be cautious too, but the SamKnows one is part of a programme working with Ofcom/ISPs and only collects data on your upstream connection - their business model is they're funded by providers and regulators to research and report on connection quality. They're not e.g. selling data for advertising (which many of the commercial broadband monitoring sites do). The box is basically equivalent to a raspberry pi or similar running on your network and regularly running the same kinds of tests your bash scripts are but more sophisticated and with better visualisation of the results. And sending the connection stats back to them for overall analysis of how the different providers compare. It's not directly monitoring your own connections, where you're browsing, etc - it watches to see if there's activity on the network so that it can schedule it's tests when you're not using it (to avoid the test affecting your download speed/streaming or vice versa) but that's it. I haven't looked at the current version of the box, but the one we got a couple of years ago was internally just a dumb ethernet hub with the analytics hardware on one of the spare connections so it really couldn't see anything other than "is the network in use at the moment". In other words it sat alongside your connection, not as a "man in the middle". I think the code it runs was open source too, though my memory is hazy there. -
Wanted: Broadband speed monitoring / logging program
andyscotland replied to ProDave's topic in Boffin's Corner
@ProDave you could also take a look at https://samknows.com/solutions/consumers - it's a free monitoring box, if you fit the statistical sample of providers/connections/locations etc they're looking for and it captures pretty detailed and robust metrics that you get access to and can use to evidence a fault as well as feeding into their national monitoring program. We got one for my mother in law's last house a couple of years ago and it was very helpful in finally convincing BT there was an intermittent fault on the line. If they want you as a volunteer they post you a box and you plug it in and that's basically that. -
Fixing screw hole in top of shower waste pipe :(
andyscotland replied to andyscotland's topic in Waste & Sewerage
I guess at least if I did that I'd need less Type 1 this time as SWMBO would be quite happy to compact me into the hole... ? -
Fixing screw hole in top of shower waste pipe :(
andyscotland replied to andyscotland's topic in Waste & Sewerage
@Russell griffiths @PeterW @Onoff THANK YOU! I am still kicking myself, but when I've finished that I'll get to work and get it fixed.... Depending how that was meant to read: a) OK then, biggest mistake so far, things having gone relatively well to date (let's not mention the GRP....) b) Good point, just as I regularly tell my son "it was a mistake" is no excuse for "accidentally" hitting his brother over the head, I'd better admit it was in fact somewhere between careless and reckless.... Clearly after I've fixed the pipe I'll mark the line of it on top of the wood, rather than just on the membrane below the wood..... And then pay attention when I'm driving screws! Either way ? But still a bit ? -
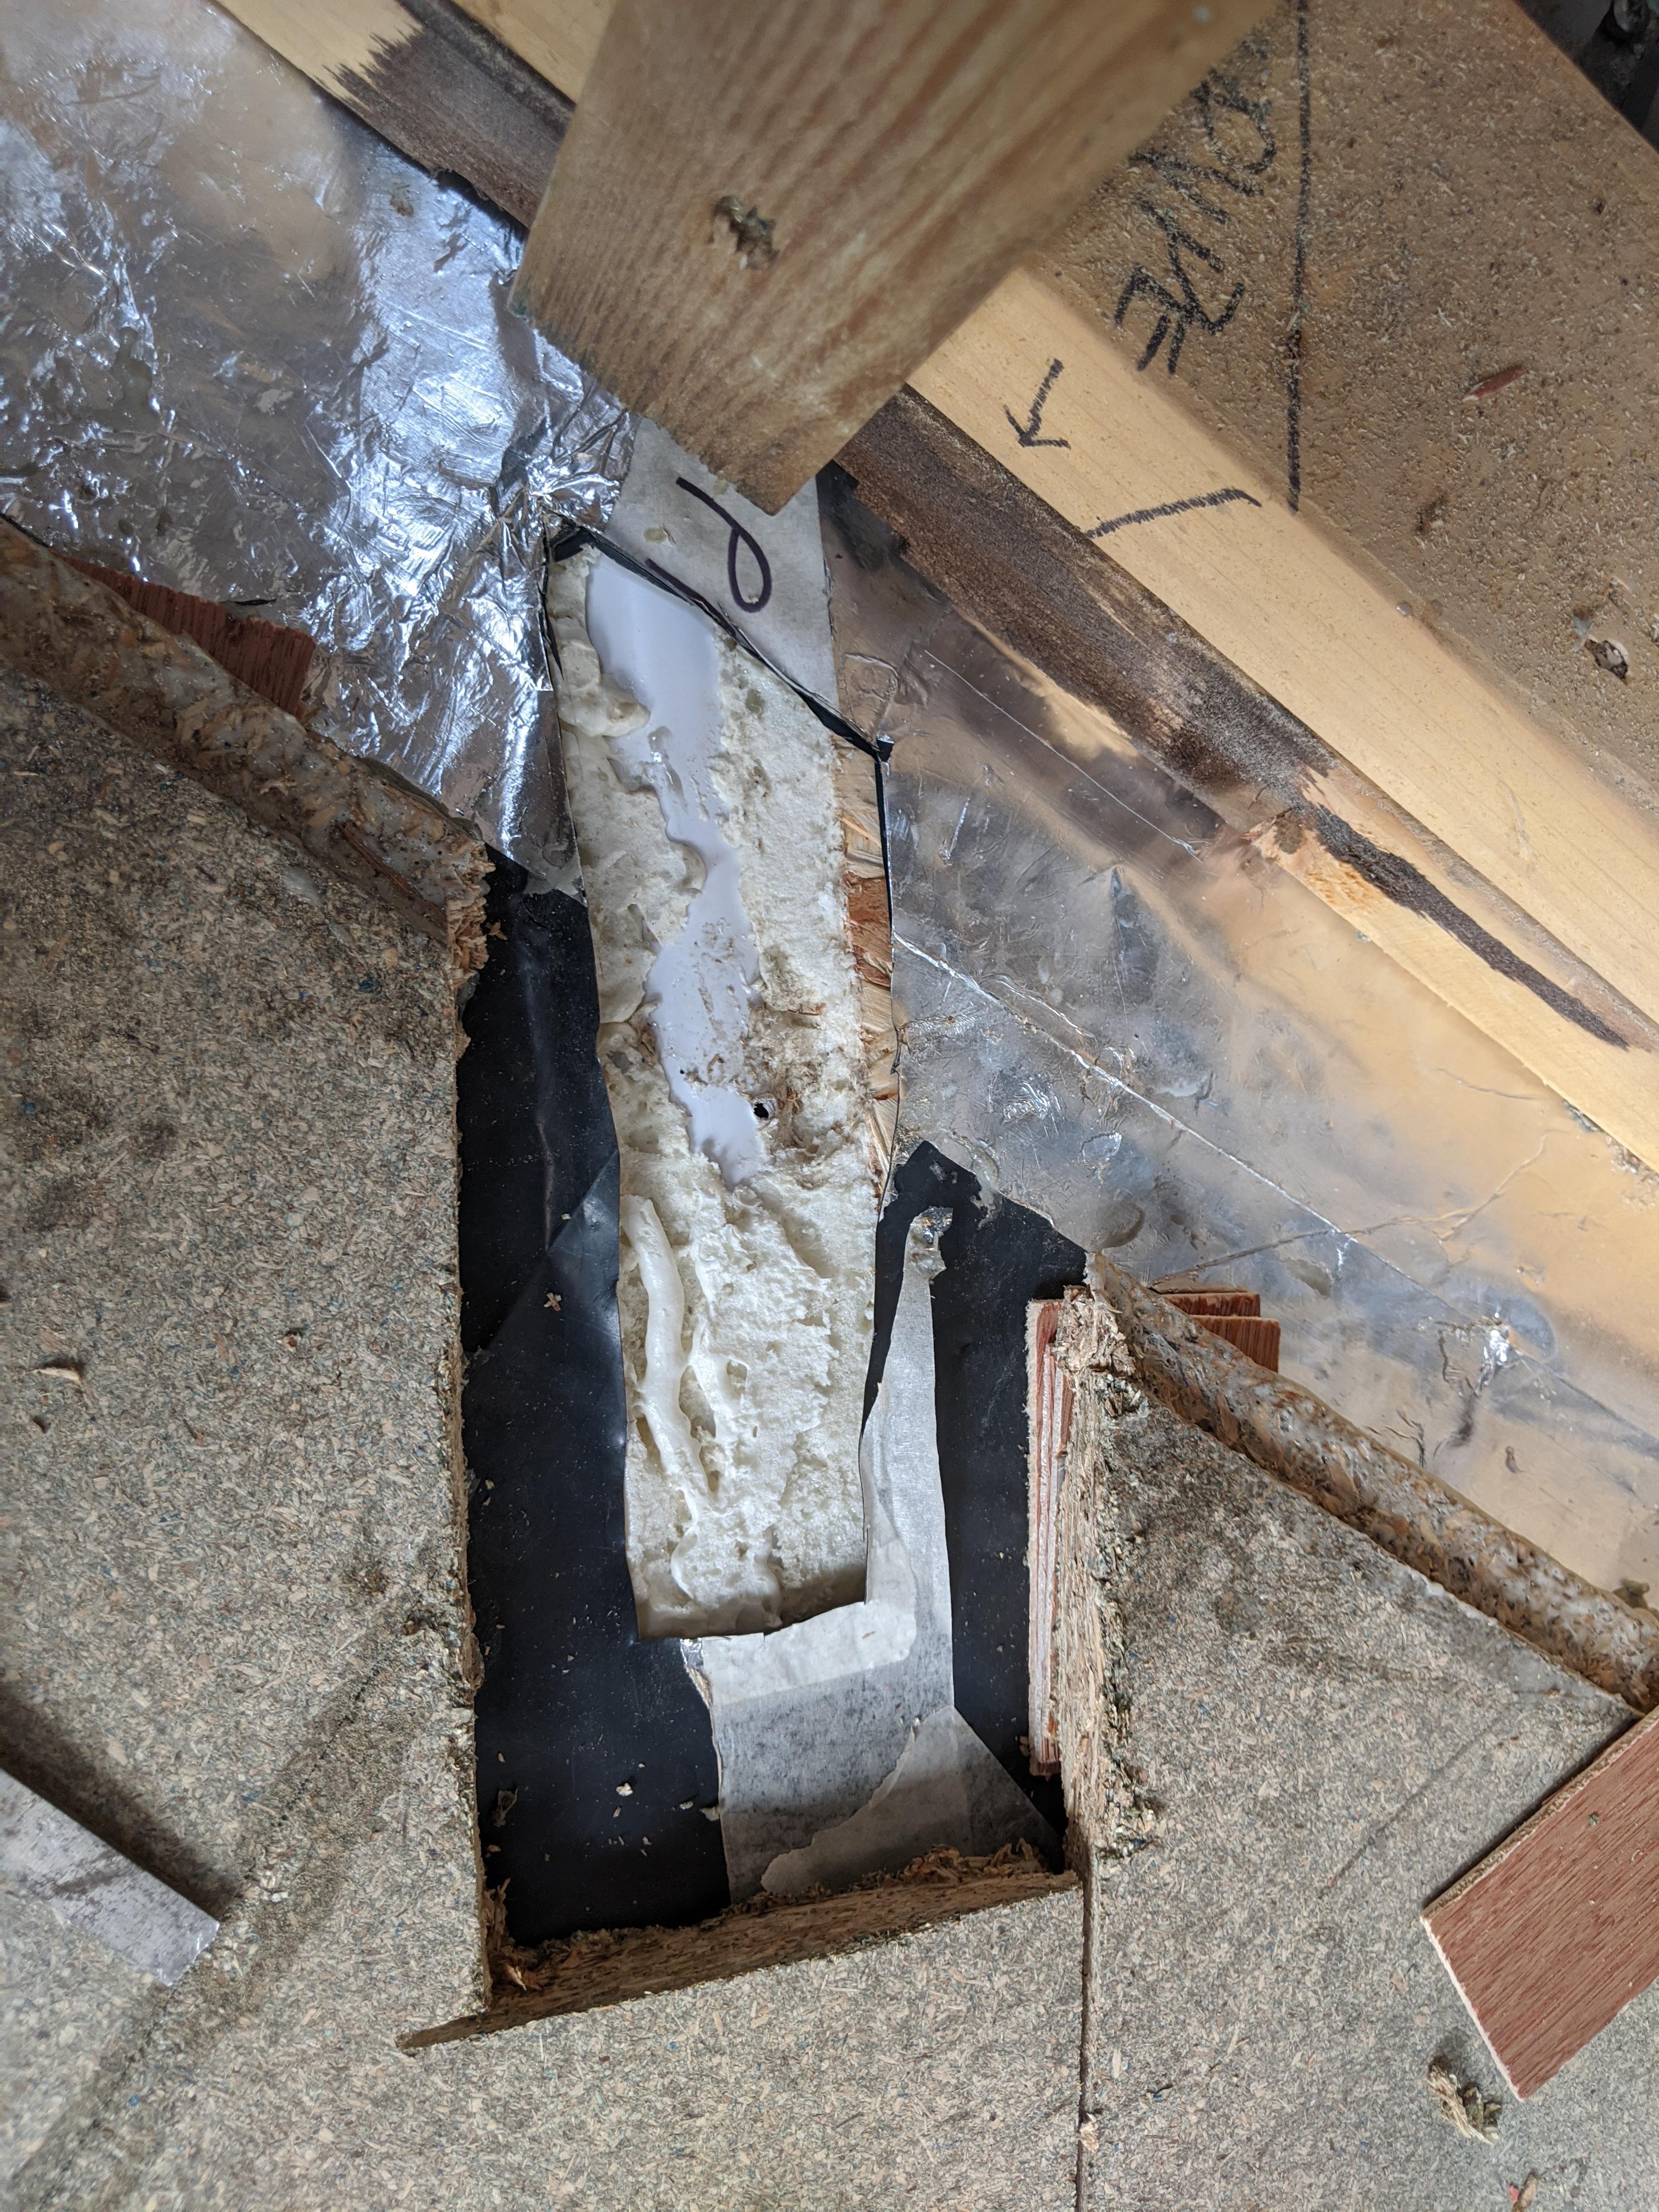
Oh sh*t. I have just made possibly the biggest mistake of my whole build. I have a wet floor shower drain set in the insulation layer of my floor (above the slab, below the chipboard). The pipe runs beneath the stud wall into the insulation layer of the adjacent room to the stack. I think I have just screwed a piece of chipboard flooring down into the top of the pipe. ?????? Is there any way to fix it? Could I somehow solvent weld a patch over the top (it's solvent weld pipe). Or do I have to dig out the whole pipe (which means lifting a chunk of glued and screwed floor and vapour membrane and even then having an awkward time joining the replacement pipe in - originally I made the whole shower drain / pipe / boss /stack section as a single unit and slotted it into the 110 in the floor before I built the wall over. I have a horrible feeling I know what the answer is... I could literally cry.
-
Wanted: Broadband speed monitoring / logging program
andyscotland replied to ProDave's topic in Boffin's Corner
How regular are the time/date stamps in your CSV file for the periods it was giving 1 but not working? My hunch is the issue is this bit `wget -q --tries=10 --timeout=20 -O - http://google.com > /dev/null` By default wget will gradually increase the delay between retries, I think starting at 1s increasing 1s at a time up to 10s. So the 10 retry waits themselves could take 55 seconds, and depending on the type of failure there could be up to another 200 seconds on the combined timeout of each request. I also vaguely recall wget can behave unexpectedly if a domain name resolves to more than one IP, which Google possibly does, as it may retry each IP address in turn (e.g. 10 retries * number of IPs). So it could be that it's failing for a fair period but the connection recovers in time for one of the retries to succeed and so it writes a 1. I'd set it to --tries=1 and probably drop the timeout much lower (benchmark what a "normal" response time from Google is and say triple it to give a bit of a margin - for most connections I'd think 2-3 seconds should be perfectly adequate). -
Umbrella?
-
I used one of these IKEA food bag clips, folding the tube in half before clamping as per @PeterW - a decent clothes peg might also do if you told the tube first.

-
I had exactly the same issue with a brand-new bailey kit like that. It turned out to be the rubber bulb pump leaks like a sieve from the "one way" inlet valve. I didn't have the sense to test the kit first, it was only after I'd dismantled, cleaned and reassembled a couple of joints that I tried that and found the problem ? and subsequently from some googling established this is fairly common with the Bailey kits and general practice is to put a plastic clip on the tubing to the bulb once pumped up. Some of the instructions actually show that, though no clip is supplied. Which, given they're pretty expensive for a few bits of plastic, I have to say I found fairly... disappointing...!
-
Almost believable but you included a photo...
-
Sorry didn't see your previous. Don't worry too much about the battens there will always be some timber/etc bridging the insulation in your kind of build the thing is to minimise the heat loss elsewhere to keep the overall/average down. Your sill/step plan sounds good. Don't know about "usual" but sounds sensible to me. The worst trip hazards are small / non-obvious steps so by having a very visible change in material and a bigger step up it will be safer and probably a neater finish at the edge of the carpet.
-
Can't you add a manifold/isolation at the connection point to the existing system? I'm doing similar, branch off the existing supplies to a new lever ball valve, then manifold, then isolation on each line.
-
That looks correct for the DPM/DPC it should span the cavity and slope to lead moisture/water out of the house. I've lost track of what you're trying to achieve here? If it's just to insulate then cut some PIR offcuts if you have them to fill up as much of the space as you can, then fill the rest with expanding foam, then trim level and fix the OSB back down?
-
Interesting. When I spoke to Marley technical they were of the opinion that uPVC pipe should only be concrete encased where unavoidable. They said it could cause more problems than it solved as the concrete was less tolerant to ground movement etc than the pipe so could crack and put pressure points on the plastic. If it was possible to use one of their standard details e.g. gravel and slab, they reckoned that was a much better option. I'm not an expert in any way, just reporting what they said...
-
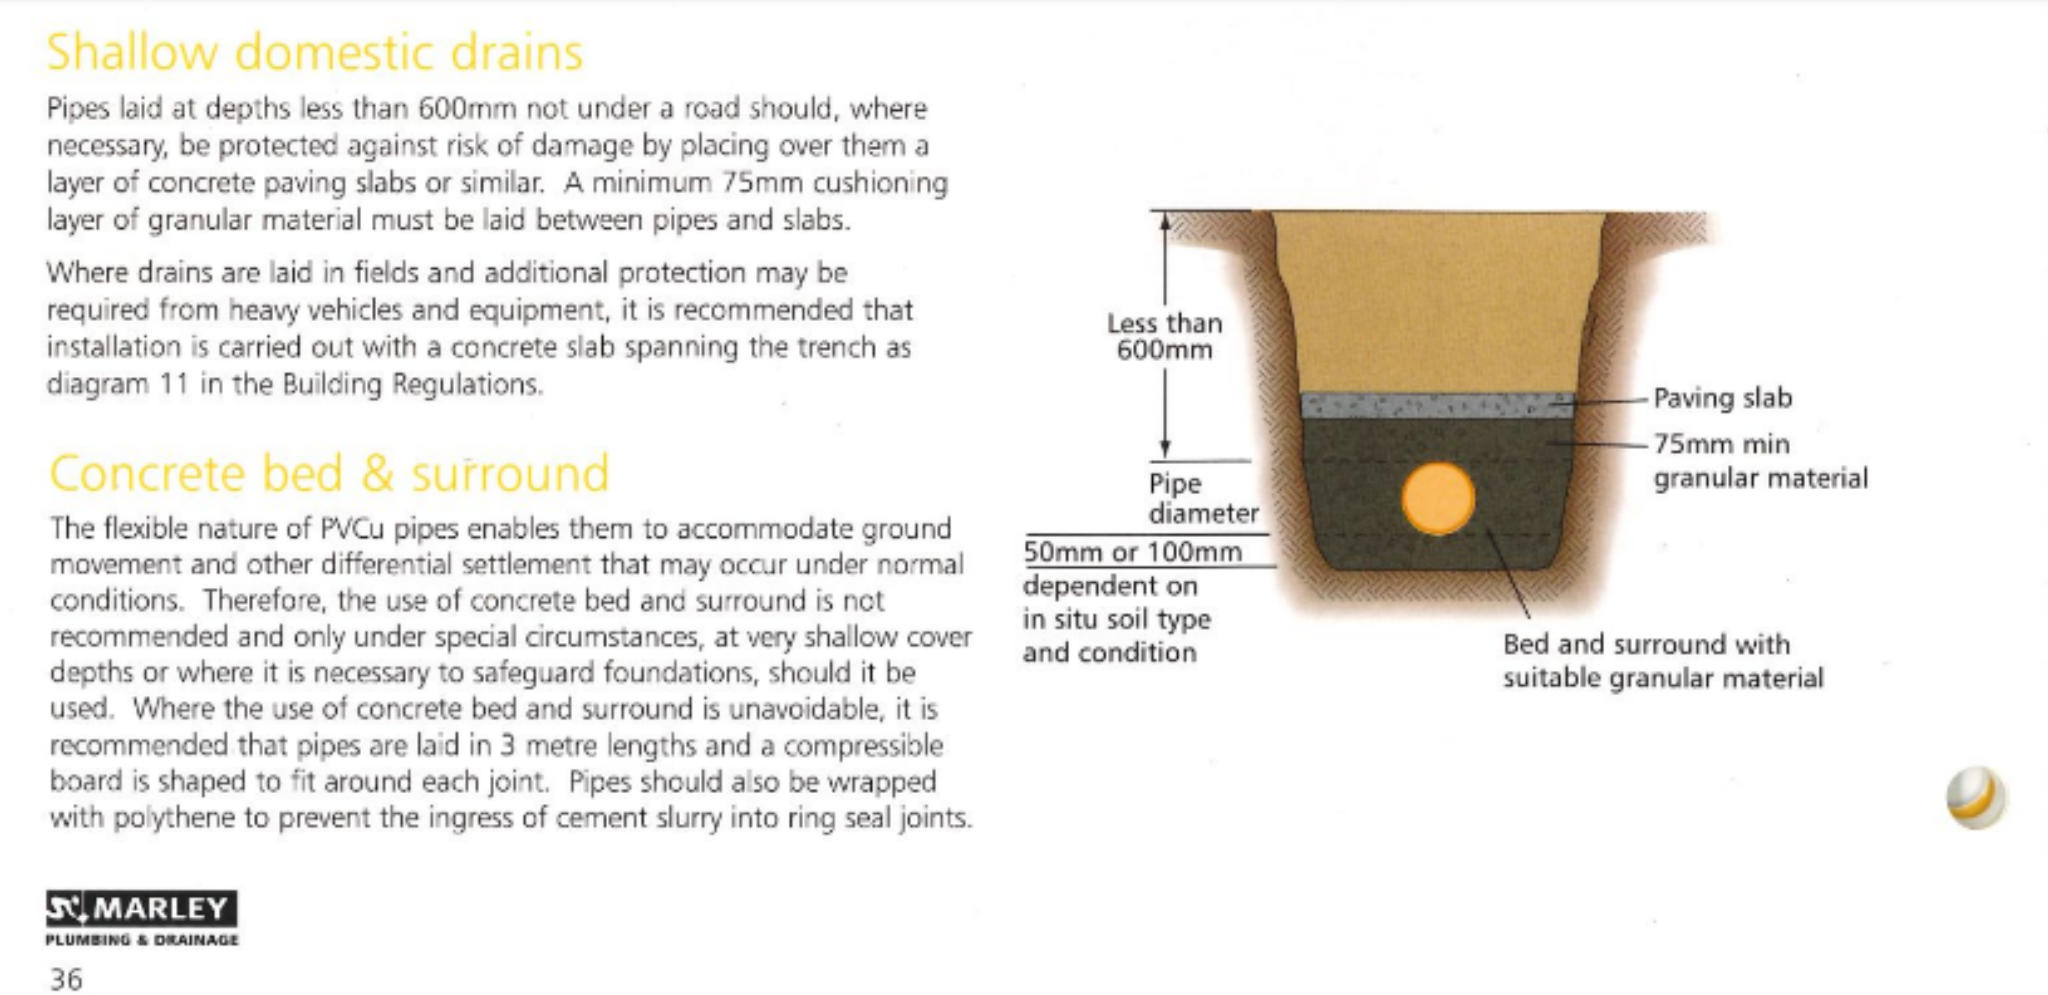
Marley say it can be shallower in non-trafficed areas so long as covered by at least 75mm gravel then paving slabs as per their installation document: I emailed to confirm what the "where necessary" meant in case there were exceptions to this, they said it meant where necessary to put it shallower than 600mm. They also said the paving slabs can be replaced with 50mm poured concrete if easier (I had spare concrete materials on site so did this, scored at regular intervals to encourage any cracks to span the width of the trench rather than randomly fracturing over the pipe. Yours seem very shallow though. A 100mm invert (assuming 110mm pipe?) means the pipe is only partly buried.... NB although the drawing shows the paving slab buried when I spoke to them they confirmed it doesn't have to be e.g. if very tight for depth you could have them under a paved path so long as 75mm gravel between the pipe and the path bedding.

-
This is an enormously common misconception. SSP is mandated by the government, but paid by the employer. Unlike e.g. maternity pay, there is no option for an employer of any size to reclaim SSP (except under the emergency changes covering SSP for people self-isolating due to coronavirus). Interestingly I vaguely recall seeing some research that small firms that made it clear any SSP comes out of the owner's pocket tend to see lower rates of sickness absence than elsewhere... I think the argument about self-employed not getting SSP / holiday pay / job security / pensions etc is that an employee essentially gets these as tax-free benefits on top of the figure that's used to calculate their tax bill, where a self-employed person has to save for / pay for them from their taxed income. It's not an argument (or at least, it's not correct) that self-employed people cost the state less. However this is also not really why the tax is different. The main motivation for taxing the self-employed/company directors differently is to encourage and reward risk-taking and entrepreneurialism which, when it works, boosts government coffers through job creation, innovation, economic activity, exports etc. If someone starts a small business and creates even a small number of jobs the tax take from those far outweighs the incentive to the business owner. The problem really lies in the enormous companies - already beneficiaries of a whole range of tax incentives and state cash - that have forced people who should be being paid and taxed as employees into false self-employment/contractor status to allow them to drive down working conditions and save on the Employer's NI. This is where the "oh but they don't get the same benefits as employees" line of argument first started appearing, because these companies can't point to any genuine economic justification for why things as they are.
-
Plywood wall covering OK at back of utility cupboard?
andyscotland replied to andyscotland's topic in General Joinery
Thanks both. Much better solution. I'd thought one layer to keep the thickness as low as possible as all my dimensions are snug but @PeterW's laminate would work. Now just need to see if I can source any materials in the near future! -
Plywood wall covering OK at back of utility cupboard?
andyscotland posted a topic in General Joinery
I'll soon be ready to start fitting plumbing / services in my utility room. I have a corner cupboard which will contain soil stack, hot and cold manifold, UFH manifold, consumer unit and the washing machine / tumble dryer. I was going to make the back wall of this plasterboard on 25mm battens (over PIR onto brick) as the rest of the space. I'm now thinking a sheet of 18mm ply would be easier, as then I could fit pipe/cable clips, valves, electrical units etc wherever I wanted without worrying about getting fixings into/through the plasterboard. Just wondering, if I do that do I need to paint the plywood with something special for fire resistance or can I use normal emulsion paint? Scottish Building regs if that makes a difference. -
Cable fixings, ceiling new regs.
andyscotland replied to Russell griffiths's topic in Regulations, Training & Qualifications
Yes these are the major concern, it's specifically installations like this that caused the firefighter entanglements/fatalities that led to this reg. -
Cable fixings, ceiling new regs.
andyscotland replied to Russell griffiths's topic in Regulations, Training & Qualifications
There are varying interpretations among electricians so the first question is what does the spark that will be signing it off (if any) think the regs mean? I would say no : the only way they could drop is once the joist fails. That is not "premature" : at that point the building is structurally unsound and any emergency services will be withdrawn anyway. I'd say yes, plasterboard may be dislodged during firefighting operations (by water as Jeremy says, or pulled down to access/check for fire in the ceiling cavity). Which would leave these cables and clips exposed. I'd say no, as option one if the 50*50 timber itself is burned through then you're well beyond "premature" collapse. Firefighters may remain if small bits of plasterboard are falling/being pulled down but if whole sheets are dropping off the ceiling complete with their battens that's a very different situation. The concern is primarily surface mounted cables / trunking systems. You're right to consider fixing though - a metal clip in a plastic rawlplug is likely to fail early in a fire. But a metal fixing direct into structural timber is not a concern as it will survive at least as long as the timber (and therefore the structure) itself. -
You either need to get the heating on, or get the doors and windows open, or both. The condensation is due to moist air inside (possibly timber / flooring that was delivered with a bit of moisture content acclimatising to your house, possibly any screed / plaster / other "wet" trades curing and drying. You can dry off with a towel to get the worst of it off, but warmth and fresh air will be the only way to get it totally dry. The surface of the foil tape is the same temperature (for all practical purposes) as the material it is stuck to. Potentially however it's making the condensation more visible because it can't soak into the timber - that's of course the foil tape's job, and is a good thing. It will likely clear up as the building materials acclimatise and you get the space heated. Likewise once you get the reveals insulated to reduce the severity of the "cold spot" where the wall meets the window. Correct - one reason why I said I'd do one or the other. You generally want to have the most effective moisture barrier nearest the room, and then let materials get progressively more permeable to the outside so that moisture has somewhere to go. You will be fine.
-
Is this in your intermediate floor? Why would a void there be cold? It will be the same temp as the room above, it's still above the insulation.