andyscotland
-
Posts
638 -
Joined
-
Last visited
-
Days Won
1
Everything posted by andyscotland
-
You could get some cheap garden netting and staple it onto the joists as you put the insulation up. Doesn't need to be anything special or particularly strong.
-
They will surely supply some form of mineral / rock wool insulation? It's a pretty standard product. Ask them what they have that's equivalent/closest.
-
It does seem a lot of joists, but there's almost certainly a reason. Possibly to do with the weight loading / span. Unlikely the builder used extra materials for the sake of it. If you look at the link I posted above earlier this morning, you can get the FrameTherm 35 (and most other insulation) in a variety of formats. It generally all starts off as a 1200mm roll, and you can buy it like that, or with the roll pre-cut at the factory into different widths. There's also some products that are scored, rather than cut, so you get score lines for both 3 x 380 and 2 x 570 on the same roll and then you cut/tear along the scores for the widths you want.
-
Thickness I meant width, which you've answered above. You won't get 500mm into a 300mm gap. I'd be tempted to try with the pre-cut 3 x 380mm, you might have to trim it a bit but my hunch is not. And even if you do you'll have the same wastage as you would if you bought an uncut roll and cut it to say 3 x 320mm with an offcut, so it's not going to make a difference cost-wise.
-
Ah, OK. So the 25mm PIR between those studs will help with the overall room temperature/heat loss, but won't affect the "point" heat loss/temperature of the plasterboard where it meets the window which is the main reason for insulating the reveal. The plasterboard at the "room" end of the reveal will be pretty much the same temp as the room / rest of the internal walls, but as it gets nearer to the outside wall it will get progressively colder. That increases the probability of getting condensation on the wall near the window. The impact of that will be somewhere on the scale of nothing - a bit of mildew/black mould - plasterboard softening and disintegrating. Exactly how bad depends on a lot of variables including relative temperatures, indoor humidity, etc. But you would almost certainly see the mould developing before anything fundamental went wrong. And there are loads of existing houses around with a bit of mildew round the windows... If you can get even a thin layer of something in there it will reduce the risk / severity. Or you could just board it and keep an eye on it, it wouldn't be the worst job in the world to redo the reveal with a bit of insulation down the line if it was necessary. But you might have no issue, or you might just need to give it an occasional wipe down with a bleach / fungicidal spray as you would in an old house. If you leave the insulation out then I would foil tape the timber in the reveal right up to the window and then put some silicon to seal it up to the window frame. That should avoid any moisture getting into the timber so if you do get condensation any damage will be limited to the plasterboard rather than anything structural.
-
I'm not sure... I would if I could, I suspect it would potentially be ok without. Timber does have some insulating properties (more than masonry for sure) but not enormous. I can't picture the makeup/layout of the studs/existing 25mm PIR you mention above, can you share a pic/sketch?
-
On the vapour control, I would have gone for sheet instead of taping, but I don't think you need both if the taping is thorough. On the reveals I guess depends on the value of your time/sanity. You may need more expanding foam than you think but if you have that spare as well then probably the cheapest option. If you need to get to a total thickness of 25mm then maybe make a little jig with a channel of 25mm batten or similar? Put the plasterboard in the bottom, the PIR on top, then you could run the saw/knife flat along the battens either side to get a fairly even cut?
-
Ah ok. In that case you could try the pre-cut 380mm but it may be a bit too wide and need to be trimmed. My hunch is it will probably compress/bow in ok. Ultimately you're only going to get 3 widths out of a 1200mm roll either way (as you will need at least a bit wider than 300mm). So it's the same amount of materials and the same number of cuts to get a 1200mm and cut it down with an offcut, or a 3*380 and trim each one.
-
What thickness are your joists? If the gap is 300mm then for the centres to be 400mm means the joists are 100mm thick which seems high?
-
Frametherm 35 comes in a variety of formats https://www.knaufinsulation.co.uk/products/glass-mineral-wool/earthwool-frametherm-roll-35 including pre-cut at either3*380mm widths or 2*570mm, so be careful what you order. If your joists are really at 300mm centres then the 380 might be a tiny bit wide so cutting your own is probably better. The length of the roll varies with the thickness of the insulation (fairly standard for all products, generally you get a roughly consistent weight/volume of rolled product so the thicker it is the shorter it is). 90mm frametherm is on a 6m roll from the look of it and 140mm on 3.9m.
-
Looks good. I think it would probably have been quicker and easier to sheet it than foil tape but it's done now. You can probably get away without doing both but maybe do a final check over the surfaces of the boards and tape over any obvious cuts/scratches in the foil coating. For the reveals you can get insulated plasterboard as thin as 27.5mm for the combined insulation/plasterboard which would work out much easier and probably cheaper than trying to foam fill all the gaps in a hand-thinned board. You can also get slightly thicker (e.g. 29.5/32.5) if you can accommodate a little more - but check the insulation material. Some of the 30ish mm ones are polystyrene so won't actually increase the insulation over 27.5mm PIR-backed. If you do have to hand-cut PIR then I think planing/sanding it down with a surform will be easier and more even than trying to cut with a saw but you will need to manage the copious dust. Bear in mind if the plasterboard will be clamped solid against insulation under the whole sheet then you don't need 12.5mm, 9.5 or even 6mm would be fine.
-
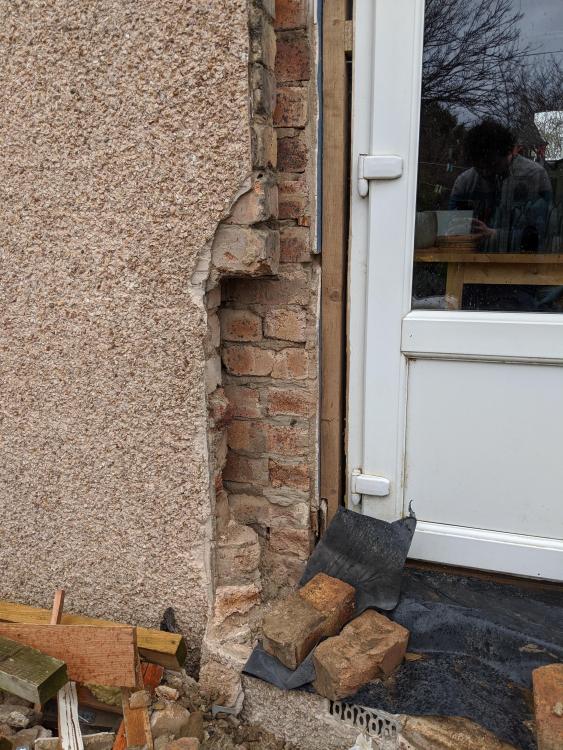
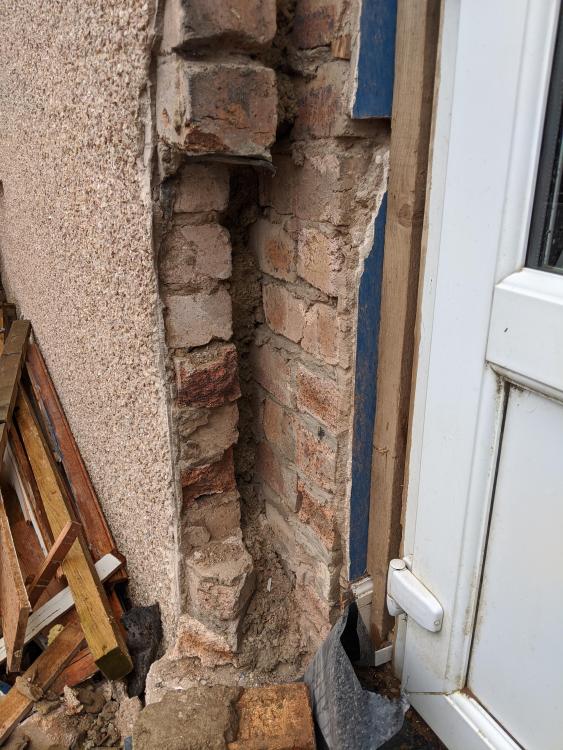
Rebuilding half-brick vertical gap in outer skin
andyscotland replied to andyscotland's topic in General Structural Issues
Thanks - I'd not necessarily been going to tie the skins together, there are existing wall ties just inside the cavity so I'd think so long as the new vertical half-brick section is secured to the outer skin it's unlikely to go anywhere? -
Rebuilding half-brick vertical gap in outer skin
andyscotland replied to andyscotland's topic in General Structural Issues
Thanks @Russell griffiths will take a look -
Rebuilding half-brick vertical gap in outer skin
andyscotland replied to andyscotland's topic in General Structural Issues
Thanks. On reflection I guess whatever I do that section of pebbledash will need replaced anyway so might as well. At least that's the obvious/"right" way to do it structurally. We both hate pebbledash and there's only a couple of square metres on the back wall so if the build comes in under budget (ahahahaha!!) I might just strip it all off and get it flat rendered. -
I'm converting our bay windows to doors, so taken out the old bay brickwork down to floor level. The outer skin of the bay was tied into the house wall with angled cut bricks. As a result I now have a missing section of outer skin about a half-brick wide by 9 courses high. I need to rebuild this, but am wondering if/how I should tie it in to the existing wall? Ideally I want to minimise the damage to the render/harling on the rest of the wall. Do I need to cut out some more half bricks to corbell it in properly? Or could I drill some threaded rod into the mortar joints to act like ties? Have attached a couple of photos, ignore the horrid pvc doors in the background they're just temporary so we don't have to live in a house with a giant hole in the wall...
-
I'd still do the upstairs walls, use mastic/silicon to seal the plastic as thoroughly as possible at the wall/ceiling junction. And I'd still do downstairs - even tho it's a workshop you will still be breathing in there (and possibly moisture coming off any new wood that gets delivered?) etc and the air temp will be higher than outside so there's still a condensation risk. You can probably get away without doing the downstairs ceiling, vapour between the floors isn't a major problem (as both sides of the ceiling/floor are at similar temperatures), the main reason to do the downstairs ceiling is to stop moisture getting there and then travelling along to the outside walls. If you did the wall and sealed it around the top, ideally going up between the joists over your offcuts of PIR, that won't be perfect but probably OK. That said I think you're insulating from below? In which case I'd reckon stapling a plastic sheet over as you go would keep the insulation in place rather than it drooping and getting in your way when you come to plasterboard... Slightly off-topic, but you'll find it hard work boarding the ceiling without a board lifter, especially on your own and especially with full-size boards. It's not so much the height, but the business of holding the board above your head, without it snapping or moving into the wrong position, while you get the first screws in. The first few screws won't hold the weight on their own (they'll just tear through the board if you stop supporting it) so you're holding the board for a while. Also it will droop, so when you pull it flat it will be slightly "longer" than it seemed and may end up too tight to the board before. It's not impossible - I replaced our kitchen ceiling like that, there wasn't space for a lifter between the cabinets etc. It was very hard going, and there were some larger-than-there-should-be gaps between boards that I had to fill afterwards. But there was only once I found myself stood astride the sink, balancing a plasterboard on my head and calling for my wife to help... You can make timber props to help. You need one that's just a length of scrap a bit longer than the floor-to-ceiling height, with a ~600mm T-piece screwed to one end. And one that's more like a bird-table with a cross-shaped base (may need some weights on it), vertical section slightly shorter than the room height, and a T-piece on top. Stand the bird-table by the wall, rest the end of the first sheet of plasterboard on it. Lift the other end up and use the T-brace at an angle to wedge it against the joists. Screw the board into position, working from the wedged end to the bird-table so that you're working all the slack/droop to the free end. Then move the T-brace so it's still wedged on the first sheet, but overhangs the join, with the top of the T angled downwards away from the first board. That will give you a ledge slightly thicker than the PB to rest the end of the next board. Lift the board into position, then slide the bird-table under the free end (helps to have already got it in roughly the right place - could also make it easier to move with some casters on the base if you have some lying around). Then screw the board up, again starting from the wedged end. It's just about viable to work like this single-handed, but you will find it hard to get the boards neatly aligned and are bound to drop the prop / get the board in the wrong place at least a few times. You may need to screw a scrap of timber to the floor at the bottom of the T-brace to stop it sliding out of position. A board lifter isn't that expensive to hire (or from a quick google you can buy pretty cheap ones which you might be able to re-sell) and will be a lot quicker, especially because once the board is up there you can move it around to get it exactly where you want it.
-
And might also be a selling point to them that it would also probably reduce the disruption/length of time they have to put up with the build...
-
If it's that narrow, no idea if it would be viable cost-wise over your distance but have you explored conveyor belts? You could just have the digger dump the muck on at one end and spit it out into the skip/whatever at the other, might be quicker than all the back and forward. You'd need multiple units, don't know how that compares to two dumpers + operators.
-
Get a big roll of plastic. Double sided tape it to cover the whole walls with as few joints and penetrations as possible. Anywhere it has to join, overlap by 15cm and use wide foil tape (also screwfix/Toolstation) along the joints. Overlap it with a horizontal plastic sheet covering the bottom of the ceiling joists. Take it into the window bays etc as well and seal it up to the frame with tape/silicon. Ideally join it to the VCL/DPM at the floor, or seal it round the bottom edges. You're aiming essentially to make a complete plastic bag inside the room. The double sided tape can be a generic one from Screwfix etc, just needs to hold the plastic in place while you put the plasterboard up: ultimately the plasterboard will hold it in position and clamp it onto the tape/silicon round the edges to keep the seal tight over time. You can also use some staples to hold it initially in places it wants to pull off the tape, then just put a square of foil tape over the staple. The cold side is the side nearest the outside. Water vapour will travel there from the room (e.g. through little gaps between cut bits of timber, through gaps that form as the timber shrinks, through tiny natural cracks that will open up in the grain of the timber itself, etc). Then it could condense into liquid water and start to cause problems. Same basic thing as when you wake up in a tent on a cold day and the inside surfaces are soaked with the water you breathed out in the night. The "thick shiny vcl outside of the timber frame" should be (and likely is) a breather membrane rather than a VCL. In theory that will allow vapour out of the wall and into the cavity before it condenses. In practice there can be a mismatch between the rate vapour gets in from the room and the rate it gets out through the breather/cavity : the more you can keep the moisture out on the room side the better. The external breather and internal VCL work as a "belt and braces" pair to make sure the wall stays dry.
-
As I understand it a VCL is required - it can be done by taping the foil faces of the PIR across all the timber but that's a bunch of hassle and not as effective as a standalone layer. It's variously described as Vapour Control Membrane / Vapour Barrier / Vapour Check (with some arcane technical differences). You don't need any of the fancy expensive ones though for your purposes. A roll of DPM or similar heavy duty polythene is fine (semi-transparent is easier for seeing the studs etc for fixing boards but I think a bit more expensive). Given how susceptible timber can be to damage from moisture accumulating through condensation on the cold side of the insulation, and that you can get a roll of plastic fairly cheap and have it up in no time, I'd say it's a no-brainer.
-
Couldn't you bring the DPM up to meet the dpc at the top of the cavity tray? You'd at least then only have the same number of layers in the inner leaf as your architect's detail. When you say it'll be visible internally if as per architect, is there no internal wall covering / skirting that could hide it?
-
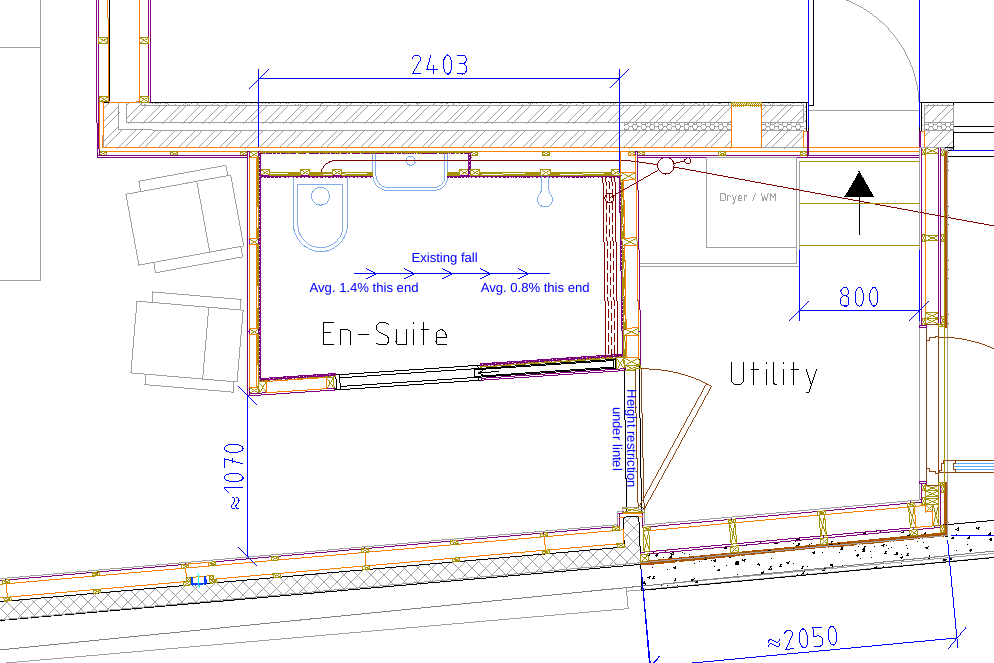
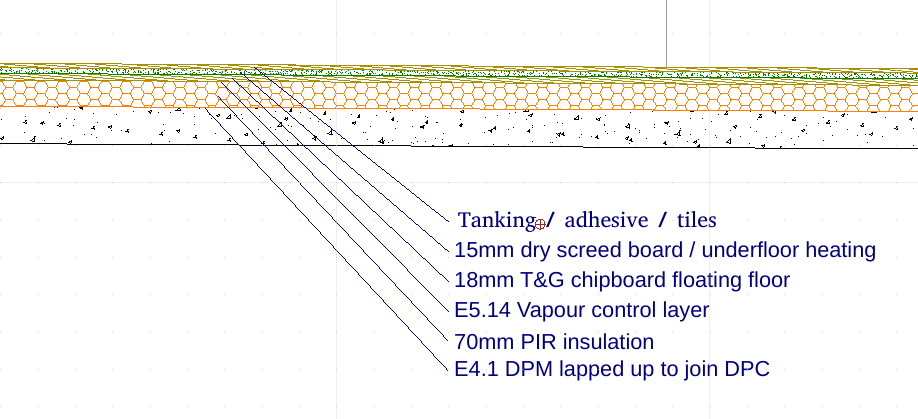
Fine-tuning floor gradient for wetroom
andyscotland replied to andyscotland's topic in Floor Structures
@Temp thanks. I'll give it some thought, but I'm really quite keen to go for level access wet floor if possible - we want the space to be as wheelchair-friendly as we can get it within the space constraints. -
Fine-tuning floor gradient for wetroom
andyscotland replied to andyscotland's topic in Floor Structures
Anyone any thoughts? Another mad idea I've had is to make up a jig and attempt to cut / rasp / sand the last metre of the PIR into an even taper following the steeper gradient in the uphill section. It'll be a messy job, but I reckon I can probably do it fairly accurately and it's only 1m2 and probably at most 10mm to come off at the downhill end. If I can get the PIR to follow the same gradient all the way down then the chipboard can follow that and the buildup above can be as planned. Might that work? -
Fine-tuning floor gradient for wetroom
andyscotland replied to andyscotland's topic in Floor Structures
Thinking about this a bit more today, I wonder if the solution is to skip the wet UFH under the bathroom and use electric tile mat instead. I could then use tile backer boards - possibly direct on the PIR? - with a pre-made tapered board in the lower half of the bathroom to increase the gradient there. Would have the advantage of simplifying the wet UFH controls/plumbing while still allowing the bathroom floor to have a longer heating period to dry it after a shower, perhaps at a different temp than the primary heating for the bedroom and utility. The only other thing I can think is to try and screed it but I think it'll be pretty thin and at risk of cracking... -
Fine-tuning floor gradient for wetroom
andyscotland replied to andyscotland's topic in Floor Structures
@AnonymousBosch yes of course, sorry - should have posted one last night but I was sitting in the garage scratching my head and typing on the phone Here is the plan view of the relevant section with rough annotations: And here is a section through the current intended floor buildup on top of the slab: Does that help?