Nick Laslett
-
Posts
687 -
Joined
-
Last visited
-
Days Won
1
Everything posted by Nick Laslett
-
Aluminium, Alu clad timber or timber windows?
Nick Laslett replied to Indy's topic in Windows & Glazing
Aluminium windows with U value 0.8, Passhive House certified. Filter by material. https://database.passivehouse.com/en/components/list/window?lat=52.283209228571344&lon=0.9176330340150688&cz=3 The frame depth will be 80mm approx. Aluminium windows used to use a hard plastic polyamide for the thermal break. Newer designs use PU-foam. Origin do a frame using an aerogel thermal break, which gets you a U value 0.9, just outside the PH threshold. -
Of course this topic has already been tackled by the dedicated Buildhub members. Most of my building searches lead me back here. Lots of options for the fans, those used for bouncy castles is one idea, this is something you might already have cluttering up your shed! My kids are both at college, so the bouncy castle hasn’t been out for nearly 10 years. I wonder if the fan still works? https://www.amazon.co.uk/ZWLE-Inflatable-Bouncer-Powerful-House-null250W/dp/B0992BTR4P/ref=asc_df_B0992BTR4P/?tag=googshopuk-21&linkCode=df0&hvadid=534946035793&hvpos=&hvnetw=g&hvrand=12472028111365706287&hvpone=&hvptwo=&hvqmt=&hvdev=c&hvdvcmdl=&hvlocint=&hvlocphy=1006886&hvtargid=pla-1411141262321&psc=1 Once you have the door fan set up to create some kind of positive or negative pressure, then you need a smoke pencil to detect the leaks. This appears to be a piece kit used by Chimney sweeps. https://www.chimneysheep.co.uk/product-category/smoke-pencil-draught-detector/ Or a thermal camera might work. https://www.test-meter.co.uk/blog/using-thermal-imaging-with-the-blower-door-method-for-airtightness N.B. This is in no way a substitute for a professional test. Just a backstop whilst still in the build process to check for things when they can be easily remedied.
-
Hi @SuperJohnG, @Russell griffiths mentioned in another thread recently that you can DIY an air blower to do your own preliminary searching for leaks. It was a bit scant on details , but I think if you have seen an air test being done you can work out what is required. I only mention it here, because this might be a better place to keep the details.
-
I’m just about to get quotes for my ICF rendering. Any thoughts on EWIPro?
-
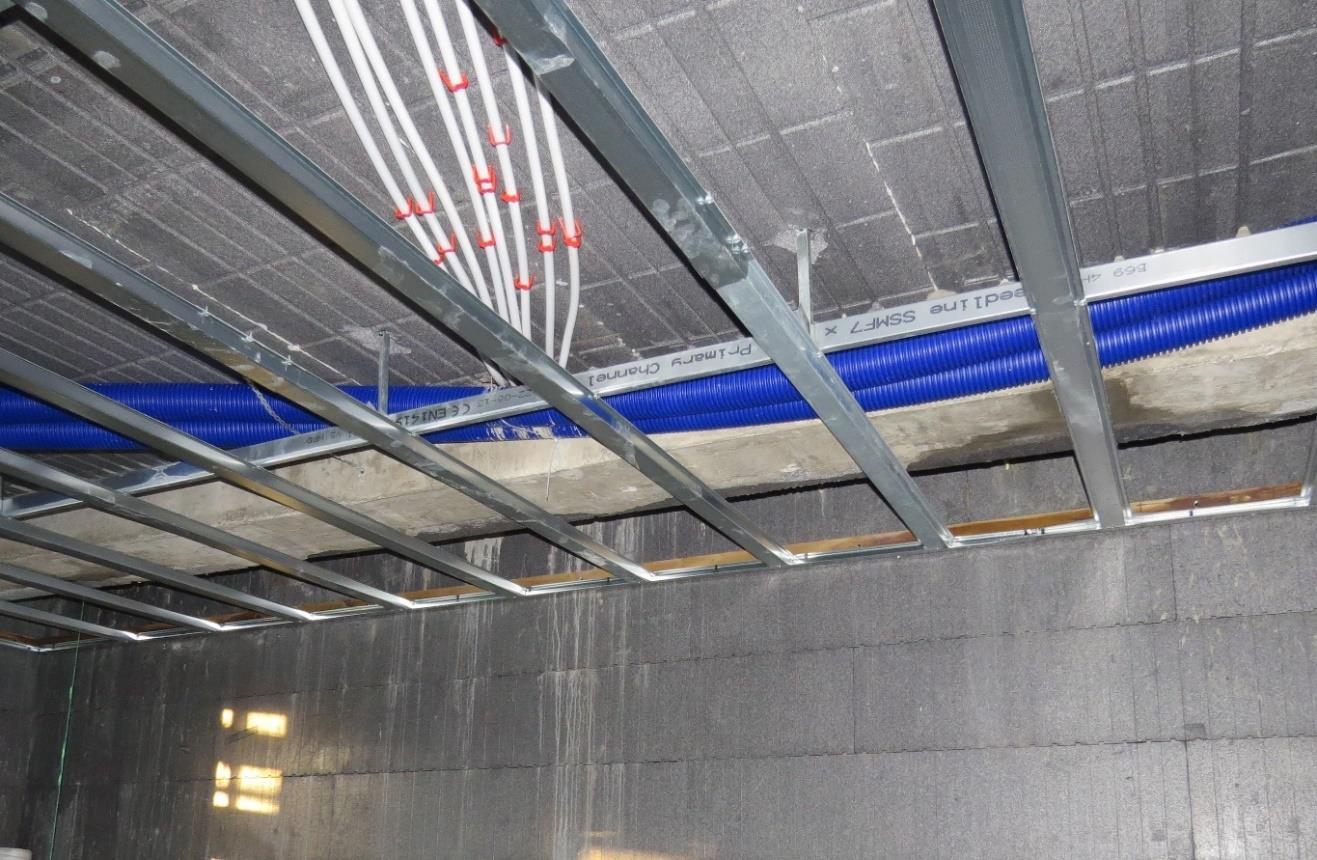
The Thermohouse house ICF blocks are 250mm high. To not fight the system, we made our ground floor 2750mm, 11 blocks high. The Thermoboard used for the first floor is 160mm thick + 90mm concrete, 250mm in total. So the first floor is 3m from FFL. For the drop ceiling, I’m not sure of the building regs requirements, currently I plan to have a perimeter box section that drops 250mm to take most of the services and allow 2x90mm MVHR ducts to cross over. For the inside section of the ceiling I plan for a 150mm drop. A big enough gap for 1 duct and in ceiling speakers with fire hood. So ground floor ceiling height for most of the space would be 2600mm. In a few weeks I will be starting this process, so I might find I can gain 10mm - 25mm extra height.
-
Good question. We will be having MVHR. There will be a suspended ceiling on the ground floor. For upstairs the ducts will run up through the floor, we put down small EPS blocks attached to the rebar when they did the first floor concrete pour. I have attached a picture from the manual. We are not at this stage yet.

-
My shell is complete, roof tiled, windows about to be fitted. I choose Thermohouse for my ICF solution. https://thermohouse.co.uk/technical-spec/ I also looked at Nudura, Amvic, Logix. The main reasons I went with Thermohouse, there system includes wall, floor and roof solutions, all in EPS. They use the Neopor graphite beads from BASF, which at the time I was specifying was not common amongst other EPS ICF providers. They use a galvanise steel web/flange instead of polypropylene. You can have supply and they will also do the build. They have a very good in house structural engineer. There website is easy to navigate and the technical manual and other available materials did a good job of covering the product and the built process. I was onsite every day and would say that you need someone with experience of an EPS ICF build. The process is simple, and easy to learn, but very different to other build methods. Pouring 2.7m high concrete walls could be quite daunting, but the Thermohouse house crew made it look like a walk in the park. The Thermohouse house floor product gives you a 100mm concrete first floor on top of 160mm EPS boards with steel joists encapsulated in the EPS. This fits with having a cast in situ concrete stairs poured at the same time as the floor. This was an important detail for me as I wanted a solid concrete staircase and this approach was very cost effective. We also put wet UFH in the first floor concrete. This might not be needed for heating, but could be used for cooling in the summer.
-
Also simplified install and system configuration vs UVC, and long term inspection requirement for UVC fail safes. Not sure if these do much to offset the long term cost of resistance heating. I do like having a separate system for DHW and heating, but clearly this is less efficient.
-
Hello Dan, Thank you for the update and clarifications. The PV divert was my main concern. The other re-heating issue seems to be improved too. I’m very close to having to commit to my DHW solution, the Sunamp needs some serious thought as from previous discussions I had discounted it.
-
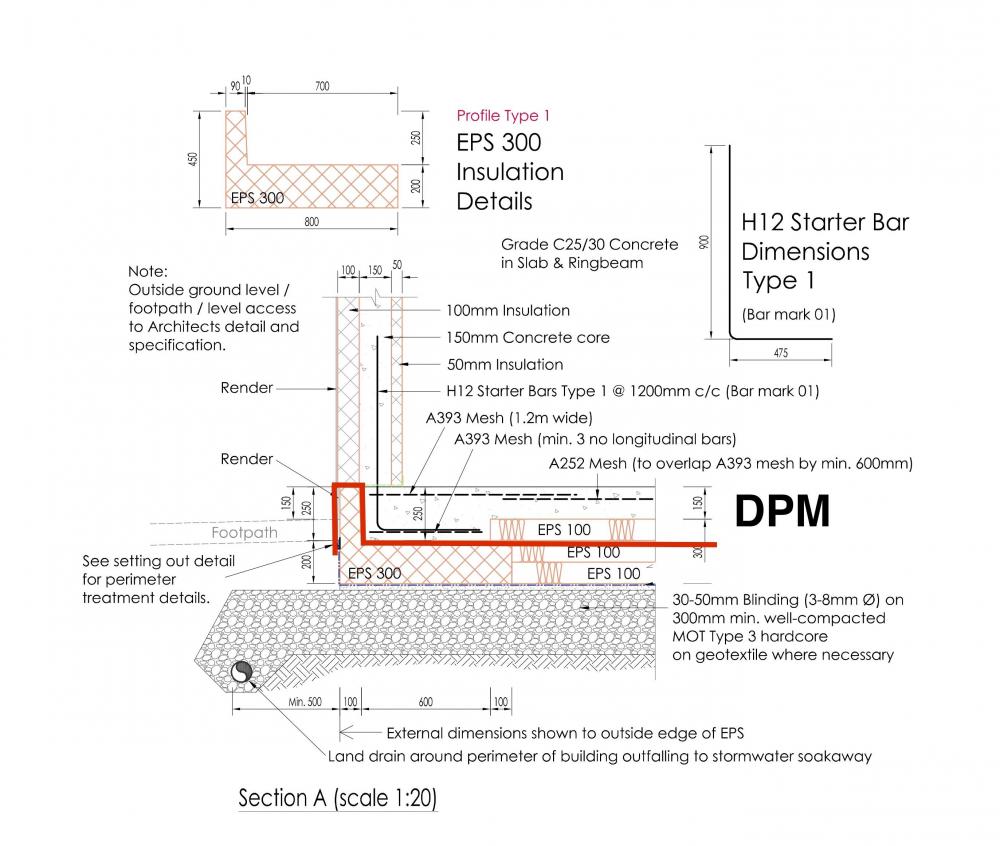
I assumed the shear weight of concrete in the wall helps slow the water ingress? On my build the ICF overhangs the insulated raft by 9mm, this is before the 10mm of render. The DPM laps over the top of the foundation insulation. Not had the rendering done yet, but assume there is a drip edge. They used PU foam when putting the blocks down, which I know is not water resistant. Perhaps I should use some TT Vapour Membrane paint along this edge. The good thing about EPS is that the water it absorbs, easily evaporates away, this is what makes it preferable to XPS. I don’t doubt that some water will ingress at this junction, but will it be substantial enough over the long term to cause issues?
-
Detailed design after planning permission
Nick Laslett replied to Babak's topic in New House & Self Build Design
I ordered direct from Kore and asked them to recommend an installer in the UK. At the time there was a minor delivery issue with the Customs Agent and my EORI number. Kore used the drawings from Tanner to produce the exact EPS blocks and provided details on assembly. The blocks took two days to assemble. The previous 2 weeks the groundworkers had prepared the plot up to the sand level as detailed by Tanner. There was a further 4 days for putting in rebar mesh and laying underfloor heating. Then a final day for the concrete pour. I organised the concrete supply, I order the rebar as per Tanner’s spec. The installer power floated the concrete. I was very happy with the whole process. Observations; unloading the EPS delivery is a major task. This was the only lorry driver during the build so far that was unable to get their lorry on the site, we used a dumper to ferry the blocks from the lorry. There were five of us doing the unloading, took at least 1 hour. Don’t throw away the EPS used for packing the foundations, this has been very useful for the rest of the build for making temporary work tables, platforms for timber, temporary window cover, many uses. I will be using weatherkem cement board for finish the perimeter of the foundation. Lots of posts here on this topic. The installer and the ground works did a great job and there was just 1 corner with a 5mm height variance, this was caused by the groundworkers. The ICF builder shaved the EPS here to make it level. -
Has anyone used THERMOHOUSE roof system??
Nick Laslett replied to NickK's topic in Roofing, Tiling & Slating
The panels are now installed. Some thoughts: This is my first build, so I have no experience of other methods. The roof boards went up very quick. They come pre-cut for length and pitch angle from the factory. Only the valley junctions need to be cut on site. They have a special circular saw with 30cm cut depth. Surprisingly on the flat sections the boards do not stop the water coming through. You need Wing Tek self drilling screws for attaching the battens, this is straight forward. Attaching the barge board to the gable ends is more tricky, screw depth is >170mm, the C section is 100mm high and you need to affix the board with 2 screws. With my tests I found that it is harder than you think to keep a drill perpendicular for that kind of depth of hole, easy to have 5mm of travel in your hole at that depth. I have a free AutoCAD DWG viewer on my iPad, DWG FastView. This has been an invaluable tool. Thermohouse have PDF and DWG files for most construction details: https://thermohouse.ie/download/thermoroof-details-cad-file-dwg/ When you look at the soffit detail, this is sort of backward to a normal roof, because there is no joist to affix too. The wall batten is the main fixing point. We have not done this yet. I will upload some pictures when I get the chance.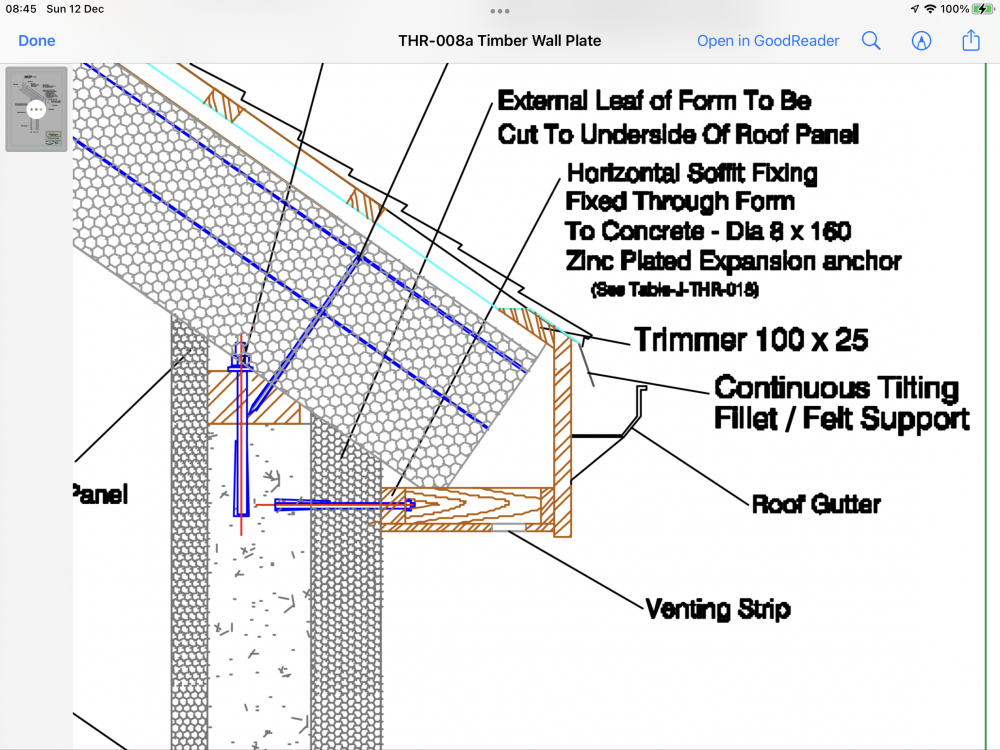
-
Airtight membrane / Vapour Control Layer
Nick Laslett replied to bissoejosh's topic in Building Materials
I agree. The other factor is how much the MVHR effects the condensation content in the house. Are we worrying about something that is a non issues? -
Airtight membrane / Vapour Control Layer
Nick Laslett replied to bissoejosh's topic in Building Materials
I was recently looking at this to understand the airtightness properties of my EPS roof. I was very surprised by how low the water vapour resistance rating was for Pro Clima Intello Plus. It made me realise I don’t understand this topic. Obviously the Intello allows the wall/roof to breath. Whereas DPM or TIMco DPS504 or VC Foil Ultra are practically air tight. But what is the outcome we are looking for? -
Windows are due to be installed at end of this month. I will post some pics then.
-
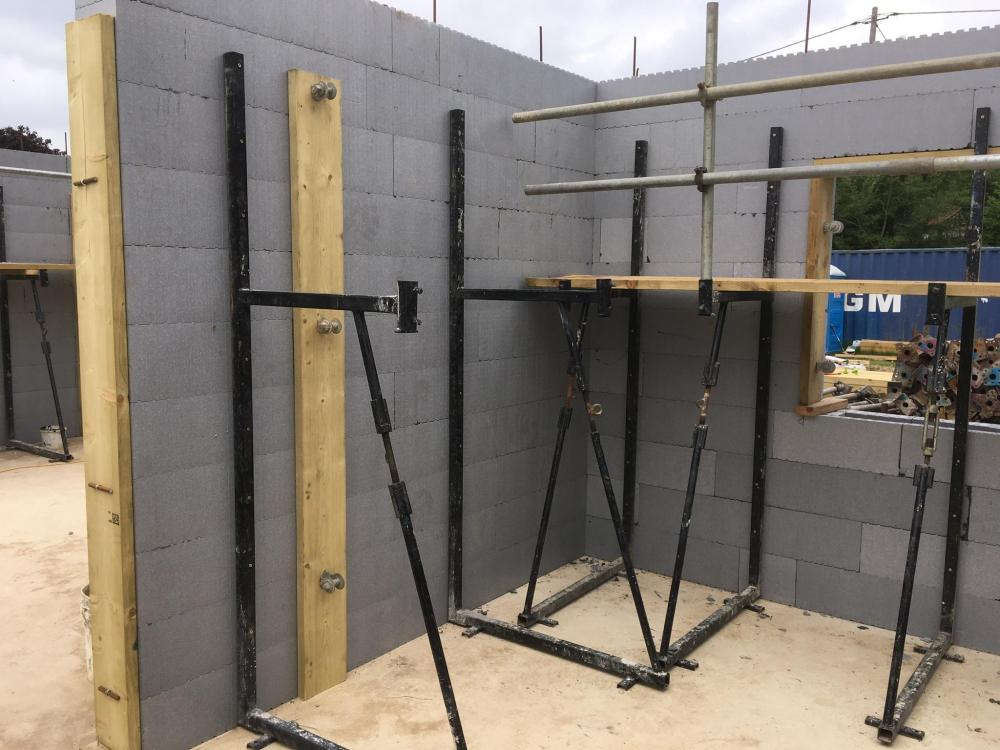
We have a power floated insulated slab with embedded UFH and ICF walls. We are having engineered timber for our finished floor. Be warned the slab takes a battering during the ICF wall build. The bracing needs to be bolted to the floor and makes a right mess. We had our main internal walls ICF too. I posted about the issue of the bolt depth and avoiding the UFH pipes elsewhere on the forum.
-
Just a heads up, we went with Smarts Alitherm Heritage system, which is the basis for a lot of these steel look aluminium frames. The frames are not deep enough to take a PAS24 compliant triple glazed unit. This may not be an issue, but worth knowing that these are double glazed only, anywhere you need 6.8mm laminated panes for PAS24. The best U-value you will get is 1.5.
-
Went down a bit of a rabbit hole today due to this thread: For my roof I’m using ThermoRoof boards from Thermohouse. These are 250mm thick EPS, Nepor beads, Class II density. I wondered how airtight these were and if I needed to take further actions. This led to reading about US Perms, one measure for water vapour permeability. Now I have discovered Sd-values, the EU equivalent. I’m not actually sure how water vapour permeability relates to air tightness. Sd-Values are explained really well at this website: https://blog.siga.swiss/en/what-is-an-sd-value/ The purpose of this topic was to capture some of this information. Hopefully it is of some use. Water vapour diffusion resistance expresses how strongly a building material hinders diffusion migration of water vapour molecules and is expressed in the form water vapor diffusion resistance factor µ number. The larger the µ number, the more vapor-tight the building material is. If the water vapor diffusion resistance factor is multiplied by the thickness of the component then the air layer thickness value is obtained, this is the Sd-value, e.g. 1µ x 1 metre = Sd-value 1m. EPS has a µ of 60, a 40mm thick piece of EPS has the following Sd-value: 60µ x 0.04m=Sd-value 2.4m The diffusion capability of the membrane is represented by its Sd-value. The Sd-value is the equivalent thickness of air, measured in metres, with the same diffusion resistance as the membrane. The higher the value the greater the resistance to the passage of water vapour. Indoor air normally contains more humidity than outside air. Because of diffusion, moist air from inside will seek to move through the thermal envelope to the outside. This is controlled by using a vapour control layer. The rule of the thumb is that the inside (airtight) membrane has to be 10 times more vapour-tight than the outside (windtight) membrane for the construction to be safe. A collection of µ values from DIN EN ISO 10456 https://second.wiki/wiki/wasserdampfdiffusionswiderstand Concrete = 130 Brick = 16 Plasterboard = 10 Plaster = 20 EPS = 60 OSB = 50 MDF = 20 These are all at 1 metre thickness, multiply by thickness to get Sd-value. Some Sd-values, where possible taken from product technical details: Pavatex DB 3.5 airtight membrane - Sd-value = 3.5m Pro Clima Intello Plus - Sd-value = 7.5m Gerband SD Control Airtight Membrane - Sd-value = 2.3m Siga Majpell 25 - Sd-value = 25m (the number in product name indicates this) Tyvek AirGuard Reflective Vapour Barrier Membrane - Sd-value = 2000m Aluminium foil - Sd-value = 200m Plasterboard 12.5mm - Sd-value = 0.16m Other websites used as reference. https://www.siga.swiss/gb_en/knowledge/building-solutions/thermal-insulation-the-ultimate-guide-to-a-safe-thermal-envelope Another website with example calculations for Sd-value https://www.giasxps.ro/index.php/en/electronic-library-polystyrene/77-xps-eps-comparison
-
Hello Adam, sorry, I didn’t mean to hijack or derail the thread. I have now read up on the European equivalent to perms, which I believe is Sd-value. I will make a separate post on this topic. I am also building an ICF house, when I researched tapes I found the Siga Wigluv tape specifically mentions EPS as a substrate. https://www.sigatapes.co.uk/Wigluv_100/p4850575_17610284.aspx
-
I believe like a lot of things, this is quite a complicated topic. Using data from USA, EPS is semi vapour permeable, 5 perms @ 1 inch. As you increase the thickness this permeability decreases. You also have different densities of EPS which effect the permeability. Type VIII EPS has 3.5 perms @ 1 inch. According to the ASHRAE handbook concrete has a vapour permeability of 3.2 perms @ 1 inch. A material is classed as non-vapour permeable at 0.1 perms. These are the USA standards. Materials can be separated into four general classes based on their permeance: Vapor impermeable 0.1 perms or less (Class I vapor retarder – considered a vapor barrier) Vapor semi-impermeable 1.0 perms or less and greater than 0.1 perm (Class II vapor retarder) Vapor semi-permeable 10 perms or less and greater than 1.0 perm (Class III vapor retarder) Vapor permeable greater than 10 perms (Not considered a vapor retarder) https://www.buildingscience.com/documents/guides-and-manuals/gm-guide-insulating-sheathing/view Some good commentary here around closed cell and open cell aspects of EPS. https://www.greenbuildingadvisor.com/question/is-rigid-eps-insulation-an-effective-air-barrier
-
Has anyone used THERMOHOUSE roof system??
Nick Laslett replied to NickK's topic in Roofing, Tiling & Slating
We are just having the roof panels installed right now. We used Thermohouse’s crew for the build as well. The architect we went with was Richard Hall at Arc8 Projects Ltd. Thermohouse has an in-house Structural Engineer, I feel this role is more critical, as ICF houses can be heavy. You can see the names of some of the architects from the case studies on the Thermohouse website. https://thermohouse.co.uk/projects/ I don’t feel that the architect needs to be familiar with the system, but the builders definitely need ICF experience. A lot depends on the level of handholding you are looking for; to obtain planning permission, appoint contractors, select suppliers etc. I choose the ICF build method and Thermohouse independently, so I needed people onboard who were going to support these decisions. Using the Thermohouse walls, floors and roof products can simplify things like air tightness, insulation requirements and services ducting because so much of this is delivered in their method. We wanted a poured concrete first floor with UFH and poured concrete stairs, this is fairly typical in a Thermohouse build. There are plenty of downsides to using ICF. One aspect of the Thermohouse approach is that all the wall length measurements need to be divisible by 150mm. -
Which multitool blade for brick and mortar sugery?
Nick Laslett replied to epsilonGreedy's topic in Tools & Equipment
I find the Bosch Professional website a good way to narrow down which blade type can do what. https://www.bosch-professional.com/gb/en/multitool-accessories-2865193-ocs-ac/ Use the filter button to select the material type. This works for all the different tool blades, grinder, circular saw, drill, etc. -
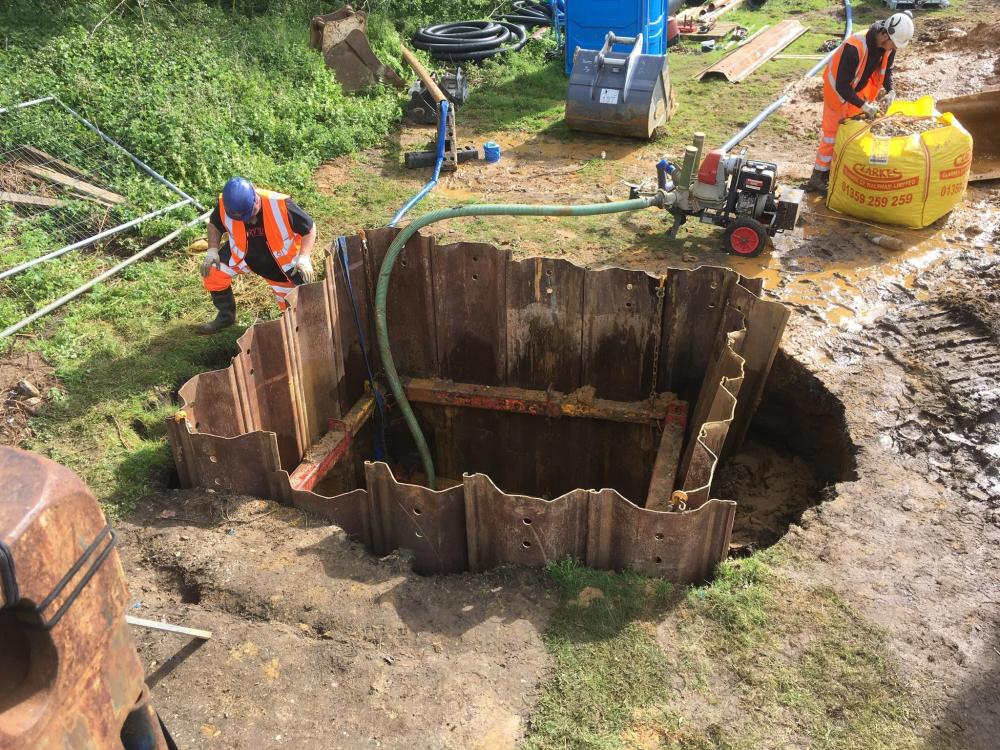
These pictures look all to familiar! My ground workers had two attempts at the STP install. High water table and running sand were the problems. First digger didn’t have enough grunt to get the shuttering all the way in. First hole was completely abandoned and a second attempt in a different location with a much larger digger was successful. The first day of the second attempt the digger hydraulics failed!

-
There are lots of good posts here on different UFH pipes. I tried to research the topic, but things like the 3 different types of PEX A, B or C. Different oxygen layers Al or EVOH. Number of layers and mixtures of material make it a challenge to understand. Wunda do 2 types of pipe 16mm Hdpe-Al-Pex for in screed and 16mm Pert-Al-Pert for overfloor, both with lifetime guarantees. https://www.wundatrade.co.uk/shop/home/water-underfloor-heating-solutions/joist-floor-heating-pipe/16mm-hdpe-al-pex-pipe/ https://www.wundatrade.co.uk/shop/home/quick-shop/wundatherm-quick-shop/pipe-quickshop/16mm-pert-al-pert-pipe/ Not many suppliers are specific about their pipe being okay to go into concrete slab. I used the 16mm Hdpe-Al-Pex for my install. But my build is a long way from being finished, so difficult to know how to make recommendations about the UFH pipe. It survived the concrete pour and the ICF wall braces.
-
Cold bridge created by groundworker mistake...how to resolve?
Nick Laslett replied to Thorfun's topic in Timber Frame
Can you not just have an eps block on the side covering up the exposed concrete? Like if you were doing an external EWI on an existing build.