


Mike
-
Posts
1540 -
Joined
-
Last visited
-
Days Won
8
Everything posted by Mike
-
Solid wall Internal Wall Insulation (Warm Batten) design
Mike replied to Annker's topic in Heat Insulation
I've mostly constructed single-sided metal stud partitions to create a void that's filled with either 100mm or 145mm of hemp-based insulation (100mm wedged behind the studwork everywhere, plus 45mm within the depth of the metal stud itself where external rain penetration is unlikely or impossible). In case you're wondering, the use of timber for studs in virtually unknown here in France. In a few places where space is tight - reveals, for example - I'll be applying 20mm of cork insulation direct to the existing wall, probably bedded in a thin coat of plasterboard adhesive (scheduled for late November). In preparation, the plaster on brick/stone walls was hacked off and replastered in sand - hydraulic lime to even it up and improve airtightness. -
Installing a small MHVR system
Mike replied to Mark-R's topic in Mechanical Ventilation with Heat Recovery (MVHR)
Yes, it's a cheap win. Heat is typically lost through insulation over the course of days, but is lost through air leakage within minutes or hours. -
Installing a small MHVR system
Mike replied to Mark-R's topic in Mechanical Ventilation with Heat Recovery (MVHR)
True, and improving airtightness should be a priority where feasible. But efficiency doesn't have to be the objective, particularly if rooms are stuffy with mould growing, though there are indeed other options apart from MVHR. -
At a guess, they still have a shortfall in alternatives after loosing & taking nuclear plants off-line with the Fukushima disaster?
-
Installing a small MHVR system
Mike replied to Mark-R's topic in Mechanical Ventilation with Heat Recovery (MVHR)
Welcome to the forum - an interesting challenge. What's wrong with the loft? A loft / garage / kitchen (or anywhere else) would be preferable, even if the bedroom is little used. Not that MVHR is very noisy, but at night noises seem louder, and I'd not consider it myself. It may be better to wait and incorporate it into one of those future extensions you mention. Unless you can easily swap the hot water tank into the wardrobe & put the MVHR where that is - probably unlikely though. For efficiency, the best place to look is https://database.passivehouse.com/en/components/list/ventilation_small? - the Efficiency Ratio is the most important number, but not the cheapest units. It's good if it's a solid wall. (Over)sizing the unit so it runs at low speed is a good way of minimising noise in general. Not in principle. Very short lengths - just enough to undo the connection - are OK. Not sure that many people do it though. Swapping the gas hob for electric would significantly improve the air quality. -
You've got it - that's what you're looking for: Hot water temperature at supply connection min. 2 °C higher than mixed water temperature :)
-
Worth knowing that you don't get a coanda effect from flush vents - that is, the air from the vent will tend to flow downward, rather than dispensing along the ceiling. Some non-flush vents are designed to exploit that effect, others will no doubt benefit from it incidentally. That's not necessarily a problem but, for example, you might not want to place one directly over a bed, despite the low flow rate of MVHR.
-
Stack manifolds?
Mike replied to Mr Blobby's topic in Mechanical Ventilation with Heat Recovery (MVHR)
It should be very rare to non-existent if you keep filters in place all round, but the access adds reassurance in case it's needed. I suspect the incontinence of mice may make things worse, rather than better! -
Check their product datasheets - they say otherwise.
-
You may need to come up with an alternative solution. Easiest would be to fit baffles in the pipes where they leave the manifold - I forget who makes them, but I'm sure someone will know. Otherwise maybe a DIY solution - for example cut some EPS offcuts to fit your rectangular spigot and put holes in them to achieve the flow you want.
-
75mm Duct Insualtion?
Mike replied to Marko's topic in Mechanical Ventilation with Heat Recovery (MVHR)
Under the loft insulation is good. -
Stack manifolds?
Mike replied to Mr Blobby's topic in Mechanical Ventilation with Heat Recovery (MVHR)
Those two oval-shaped bits of metal on the top are to allow access for cleaning. If you want to be able to access them, the unit stacked on top needs to be movable. -
Try Grohe - not the same as Hansgrohe. Their thermostatic mixers (at least the ones I've come across) require the hot water to be 2°C warmer than the mixed temperature. In other words, if you want a shower at 40°C, you need the hot water supply at the shower to be 42°C. I'm sure Ghrohe aren't unique in that. BTW, Grohe's thermostatic showers have 'therm' in the name, to distinguish them from non-thermostatic. As in Grohetherm.
-
You can indeed use only 2 zones and meet Plat L. If you have a well insulated home that's likely to be recommended by everyone here, as above. However official 'best practice' is still for one thermostat per room so, in the absence of any instructions from you to the contrary, your designers have a valid reason for having designed it as they have. As they seem to be supplying and installing it, I imagine they have a financial incentive too. Your options now include: persuading them to simplify the design according to your new request installing their existing design anyway (after getting their confirmation that it can achieve the temperatures you want - probably not an issue) cutting your losses and going elsewhere / designing it yourself - for example using LoopCad
-
Partitions: Timbers studs Vs Metal C studs
Mike replied to MortarThePoint's topic in General Construction Issues
Resilient bars help reduce impact sound. Double boards help reduce airborne sound. It would be unusual to construct a partition that's enhanced to resist impact sound only. -
If you can prove roughly when they were taken, it may be worth showing them to the SE as evidence that this is not a recent problem.
-
Yes, I spotted that on the previous page, but it's interesting to learn more about how and when you use it, and your reasoning and experience. If it was run all the time, or faster, I'd expect that the humidity would fall a bit more, but it seems that you've got it in a fairly comfortable range, and it's good that it solved your humidity problem. PIV isn't too far off from MVHR in terms of renewing the air, so the data is still very useful in helping me determine a potential internal humidity range, despite all the variables that come into play. There are a few studies published suggesting that a family of X people may generate Y litres of water over the course of Z time, but that's just not helpful in this context.
-
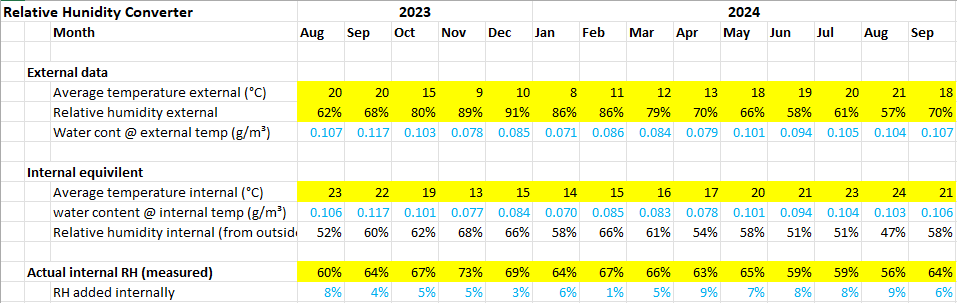
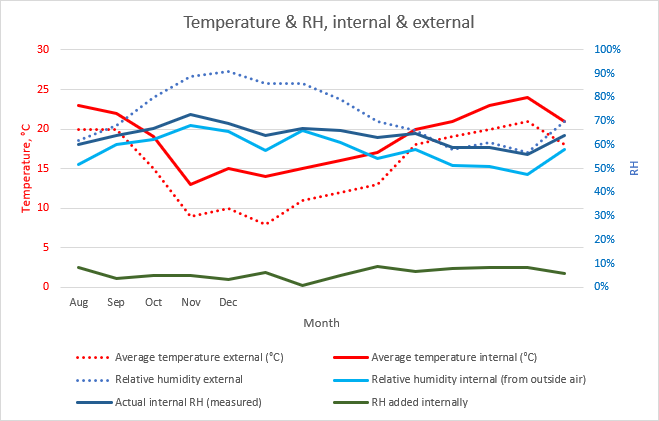
I've added the rest, plus an extra line to separate out how much additional humidity is being added internally (as opposed to due to the humidity of the external air): And turned it into a graph: Very helpful - thanks again!
- 44 replies
-
- 1
-

-
- mvhr
- relative humidity
- (and 3 more)
-
Thanks @marshian - great to see some real data :)
-
A good plan. Also look at other ways of improving airtightness - plenty of threads on that already. That could be a bit tight. Note that the extract duct will need to slope out towards the exhaust vent at a minimum of 2% incline, to allow condensation to drain out. Potentially. Zehnder 'Luna' S125 are adjustable that way, and there's a matching extract E125. If you've not already found them, take a look at the Zehnder ComfoWell system, which combines silencers and manifold in one. They may give you more space to play with. The Comfowell system had a module that can accept filters. The most space-saving method is to buy a variant of the Zehnder Comfoair that has one internally. In warmer parts of the UK it's often omitted - the unit will then regulate the airflow (or even cut it off) if necessary, which can be OK for short periods. A sketch of the floor plan may help people come up with ideas. Fitting seals to the cupboard door will probably enough for airborne noise, if the door is fairly solid. Vibration could be another problem, depending on what you're fitting it to (floor / wall / material, etc).
-
I'd come across it, but not studied it until today, thanks to your prompt - thanks! I see that they're marketing the technology as Hygrobrid, but the product as Majrex, which makes it easier to find the product information: https://www.siga.swiss/global_en/products/majrex Where it's feasible to seal all penetrations against vapour ingress it it does look interesting, particularly for anyone designing a flat roof, which in theory would be ideal for me. However, In my particular case I'm sure that some moisture vapour will bypass any vapour membrane via the partitions that pass through the ceiling level up to the underside of the floor sheeting above. In those circumstances although Majrex lets vapour out 3 times more quickly than when it's letting it in (g-value vapour resistance @50% RH 'out' at 25 MNs/g, and 'in' at 75 MNs/g), Intello lets vapour out twice as fast as Majrex (g-value @50% RH about 13 MNs/g). Though it lets in nearly 6 times as fast as Majrex too. I can't spot a chart for Majrex that shows g-value for other humidity levels. So the question becomes which product keeps moisture levels in the insulation lowest for longest (or the opposite). I don't have an objective way to answer that, but Majrex is now a candidate, if I choose to add a membrane.
-
1. What are you measuring temperature & humidity with, and has it been calibrated / checked for accuracy? 2. You can download a small spreadsheet from this thread that will calculate the internal RH based on the external RH & internal + external temperatures. Variation from the calculated figures are the result of lag or other moisture sources / sinks. It may be of interest. As I recall, the reasoning is that that's roughly the point where annual costs exceed savings (and when your EPC rating will suffer) - so uneconomic, which isn't the same as pointless. FWIW I've seen 5ACH quoted as the determining limit Europe. But it is universally agreed is that the more airtight the better, and with care and attention under 3 is readily achievable.
-
We're featuring on Grand Designs next week 🎥
Mike replied to thefoxesmaltings's topic in Property TV Programmes
Zara, Giuliano, congratulations! Just watched the programme and you did a cracking job. It's rare to see a GD episode that goes so smoothly! I was impressed to see how you got stuck in, even though that was a crazy way to get the slates up to the roof. And great that you had Jim's assistance - he looked like a real asset. I only spotted one thing that I'd change, but will keep it to myself. I hope you get some doors soon (if you don't already have them) and that you have a wonderful time living there :) -
+1. However without UFCH the floor will be several degrees below air temperature in mid-winter, so it's not surprising that floors feel cold. With UFCH (provided the house is air-tight and well insulated, and provided all rooms on the floor are heated to the same temperature) there is also typically 2 or 3°C less variation in air temperature between floor and ceiling, compared to using radiators. All other things being equal, UFCH can therefore provide better thermal comfort but, as mentioned above, it shouldn't be the priority - airtightness, insulation and MVHR should come first.
-
No need to worry about urban popularity. Once painted, most people wouldn't easily see the difference, if the plastering is done well. You won't get the glass-smooth finish of gypsum, but lime can still be finished smooth. Clay-based paint is a more durable alternative to lime-based, proving a good quality matt surface, and I'll be using it here on my current project in very urban France, alongside the linseed oil paint on the windows. So no need to worry about urban popularity. I'd be much more concerned about the structural stability of the wall. Stick to the way it's been done for centuries, rather than looking for questionable high-tech solutions.
