


Mike
-
Posts
1540 -
Joined
-
Last visited
-
Days Won
8
Everything posted by Mike
-
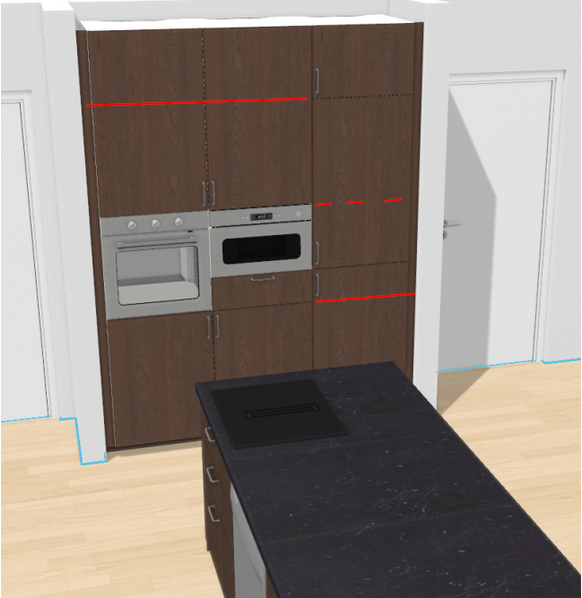
+1. Allow at least 300mm for safety. I'd be more concerned with trying to line up the doors, if that's possible:
-
Rendering fail...recovery tips please
Mike replied to machtucker's topic in Landscaping, Decking & Patios
It doesn't look bad, and you can make a lot of pizza for the cash you saved :) If you really want to smooth it off, then I'd hire a polisher & diamond grinding wheel. There's a risk that more may come off than you intend though. -
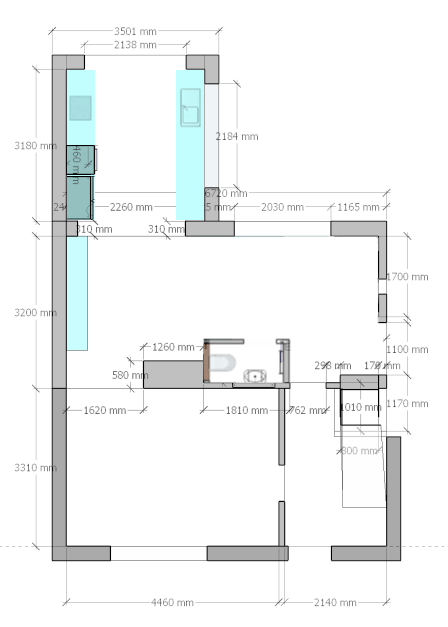
Based only on the floor plan,if an extension is out of the question, then I'd suggest something like this (with or without WC - shown here in an alternative position, though I'd leave it under the stairs):
-
Brick bond at window reveals for non metric sized openings?
Mike replied to ruggers's topic in Brick & Block
You mean by having a sill that projects 50mm either side of the window width? Traditionally these were added for additional strength during transportation and should always be cut off, though that doesn't always happen. -
Brick bond at window reveals for non metric sized openings?
Mike replied to ruggers's topic in Brick & Block
You always want alternating (vertically) full & half brick at the reveals. Ideally set out the windows so that you have no cuts between building corners and the windows, and none from window to window, then use cut bricks above and below the centre of the windows. It's better (less obvious) if you use two ¾ length bricks (or similar), rather than one ½ brick, assuming you're laying them stretcher bond. And keep all the cuts vertically above one another. So you can go ahead and order the sill lengths you need. BTW, if you're building the brick fist and adding the windows later, add 10 to 15mm to the window width to give some tolerance, when calculating your sill lengths. -
The best solution is to find a problem with the pole or the cable... ...so there was presumably a problem with the other poles, maybe this one too?
-
Steel Ridge beam to rafter connection details
Mike replied to OldSpot's topic in Roofing, Tiling & Slating
Yes, that's a variation of what @markc suggested in your other thread on the topic: -
Yes, you can. Building Regulations Requirement M4(l): Category 1 - Visitable dwellings, section f - states that 'all-mounted switches and socket outlets in habitable rooms [should be] reasonably accessible to people who have reduced reach'. And the definition of habitable rooms excludes bathrooms and utility rooms.
-
New self-build project - design method question
Mike replied to Benpointer's topic in Surveyors & Architects
Any planning permission in a sensitive location will normally have a condition removing the Permitted Development rights, so probably not. That could include a lift to the 1st floor, if you have space (and keep the 2nd floor). -
Oven right next to fridge isn't ideal due to the heat. Ideally stick the fridge next to the food prep area. Don't have the hob quite so close to the end of the kitchen run - allow 300mm to avoid handles projecting where they may be knocked off. Google the 'kitchen work triangle'. On a bigger scale, is this really the best place for the kitchen? You effectively have 3 / 4 corridors running through it (lounge to extension, 'door' + external door to lounge and extension, and all of these to the WC) which isn't good. Maybe post the ground floor plan here for some fresh ideas.
-
If the vendors already have plans, make sure that sticking to them is not one of the conditions of sale. It probably won't be, but have come across similar in the past.
-
+1 to both of these. And also check that you have at least the legal minimum. In the Alps you need a minimum resistance 4.4 m².K/W (u-Value 0.227) https://rt-re-batiment.developpement-durable.gouv.fr/IMG/pdf/fiche-ravalement-refection-toiture-amenagement-travaux-isolation.pdf
-
+1. Centre of the TV at (or close to) eye-level when sitting...
-
Insulation Required - Mansard loft conversion
Mike replied to JohnMarsden's topic in Building Regulations
From memory, it's treated as a wall if >70°, as a roof if <70°. But do verify that - I may be wrong / it may have changed. -
Skew-nail them - it gives you more distance to play with. And stagger the battens, so that they joint over different rafters.
-
Try to identify who made the building / who makes something similar & ask them if they can send someone? You'll only know that by stripping off parts of the shell. In addition to the timber, I'd suggest that the joints between sections would need to be exposed to verify their structural integrity.
-
For airtightness I'd either use Iibruck FM330 foam or a bead or two of Orcon F adhesive in the joint, with a mastic or timber bead to hide the joint.
-
Medium Concrete Block Shrinkage
Mike replied to HHHAMSTA's topic in General Self Build & DIY Discussion
Sounds more typical of aerated concrete blockwork, though a medium density wall of 13m without a vertical movement joint is pushing it. Chance are it will be generally good, but you may get a few. Probably not. Consider retrofitting a vertical movement joint, if you want to try something that might help. For example resin-bond wall ties in every block course between inner & outer leaves either side of where you want the joint, saw through with a 350mm disk cutter (proper safety gear essential), then fill (or call in an expert). Personally I'd probably leave it. If you use dot-and-dab, make sure it's done properly and apply a parge coat first. I'd choose plaster every time. -
Steel Ridge beam to rafter connection details
Mike replied to OldSpot's topic in Lofts, Dormers & Loft Conversions
+1. -
No, not horizontal plastic to horizontal liquid DMP. You'll have to make something up.
-
For other options, see https://database.passivehouse.com/en/components/list/ventilation_small? - the Efficiency Ratio is the most important number.
-
From your earlier post it seemed that you have the polythene DPM under the concrete. If it's on top, then forget using polythene and apply liquid Aquaseal across the entire slab and up the walls as the DPM. And yes, that would complicate screwing the battens to it considerably - I've never tried that.
-
Check the manufacturer's installation guide / BBA Certificate to verify that that is permitted above OSB. For example, when using Ply/OSB sheathing, Tyvek Supro says (the bold text is theirs)'These vapour resistant board materials do not allow adequate vapour diffusion and therefore should not be installed in non-ventilated applications above insulation. Ventilation at eaves and ridge and a continuous 50mm cross ventilation path must be maintained beneath the sheathing in accordance with the current version of BS5250.' The only way of providing such ventilation beneath the membrane would be to install it on top of the counter battens.
-
Yes, looks like efflorescence. You can treat if with a weak acid solution, from a builder's merchants, of it bothers you.
-
Close. Along the length of the fascia, roofing felt is traditionally laid on top of a timber 'tilting fillet' that supports the edge of the tiles at the correct height, and prevents the felt from sagging behind the fascia board. Modern high-performance felts aren't intended to be exposed to sunlight for extended periods, so will disintegrate where exposed at the eaves much faster than traditional felts. An eaves tray is fixed underneath the roofing felt to remedy this weakness, spanning over the top of the fascia board to discharge any rain into the gutter. You need both the tilting fillet and the eaves tray to do the job properly, so that you can install / maintain / repair / replace the fascia without disturbing the tiles. On a solid roof, the tilting fillet goes on top of the counter battens, and you nail the eaves tray to the counter battens too. No need for an additional batten if the fillet is correct. If you have over-facia vents, you'll need a 10mm / 25mm wide gap between the fascia and the tilting fillet (to maintain your 10,000mm² / 25,000mm² per metre ventilation) so that the air can get into the void between the counter battens under the felt. The eaves tray will be over the top of the vents, so won't be in the way.

