

Crofter
-
Posts
3484 -
Joined
-
Last visited
-
Days Won
11
Everything posted by Crofter
-
Thanks for that feedback I'll check it out. The TV itself is a Samsung smart tv, but now too old for most of the apps to be supported. One of the reasons I will never be an early adopter!
-
We're about to open our holiday let and need to decide what we're offering in the way of TV. People are only going to be staying for a few days at a time so simplicity is key. A good proportion of visitors will be from overseas as well which could complicate things and make written instructions less useful. Terrestrial reception is very poor and a dish sounds like too much trouble- no guarantee of getting a good line of sight anyway. We use a Fire Stick ourselves and find it very intuitive. Not without its glitches, and removal of support for YouTube is a big step backwards. Any other streaming devices to consider? As I said, ease of use is everything. I'm told people will often want to log into their own Netflix accounts, so actual content provision isn't that important and I'm sure free to air stuff will be good enough.
-

Bigger window for the bedroom?
Crofter replied to ultramods's topic in New House & Self Build Design
This version works for me. But I hope you're not going to be giving your neighbours too much of an eyefull! -
Whether or not it will sit happily in pea gravel is entirely down to your ground water conditions. If the water table is low, then the tank won't float up out of the ground when emptied. But in areas of high water table pretty much any design of tank or treatment plant will need to be concreted in place.
-
Eek, didn't think about that!
-
Aaaaaand we have Wifi! Writing this from the comfort of the reclining sofa. In the end I resorted to a power-link wifi extender, using an extension lead running down from my shed. Crude but it works! Will consider swapping over to something else when I get a chance, maybe something that doesn't involve running 240v cables across the garden.
-
Thanks everyone for your kind words. It's certainly a bit of a group effort to get here. We've now gone live on AirBnB but any BuildHubbers should just contact me directly for your BH discount (hang on isn't this blatant spamming???)
-
Understanding building regs about stoves (Scotland)
Crofter replied to ProDave's topic in Stoves, Fires & Fireplaces
The spigot on the back of mine was definitely an 80mm, same as the galv pipe. But mine is the through-the-wall kit, and I think yours is the through-the-floor? -
Very good points. We still have three weeks to do the snagging. There's not really anything that can't be worked around, e.g. for internet I can run an ethernet cable down from our own house. It's going to be a busy race to the finish line though!
-
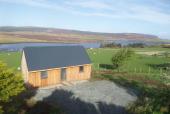
One final push today saw all the furniture and curtains put in place- a big group effort with much input from the in-laws. I'm very fortunate to have a MiL who is an ace seamstress and who has a bit of a thing about Harris Tweed. To say I'm chuffed is a bit of an understatement. It's been over four years since the concept of this project first appeared, and three years since work began in earnest. Today we finally saw the culmination of all that effort as the building site was transformed into a home. It's exactly what I imagined: cosy, welcoming, stylish. We'll be listing it on the booking websites tomorrow (most likely a combination of AirBnB and Booking.com) so that will give me the impetus needed to tackle the lengthy snagging list and major outstanding jobs, most of which are on the outside. Some of the cladding details (corners and window reveals) aren't finished yet, the soffets need to be completed, and the biggest job of all is the decking. There's also the creature comforts of WiFi and TV to sort out. I know people come to Skye to get away from it all, but I bet the first thing they will ask for is a WiFi password Once again, huge thanks to everyone in the BuildHub community who has held my hand throughout this whole project. It's a lot smaller than many other builds, but it's been exceptionally hands on with me personally tackling almost every trade, from drafting the plans to building the kit; I even got an excuse to do some digger driving a couple of weeks ago.
- 23 comments
-
- 13
-

-
MVHR: More extracts than supplies?
Crofter replied to Crofter's topic in Mechanical Ventilation with Heat Recovery (MVHR)
Thanks for the replies. I haven't made any real effort to balance the system yet, but the unit does seem inherently quite loud even with no ducts connected. I'm not aware of any facility to alter the fan speeds other than the basic high/med/low- but worth investigating. Most of the noise seems to be from the extract vent, rather than from the supply or vibration from the unit. -
MVHR: More extracts than supplies?
Crofter replied to Crofter's topic in Mechanical Ventilation with Heat Recovery (MVHR)
There's low, medium, and high settings. Noise at low is still quite bad. I'll see if I can get a reading using a decibel meter app. I'd say it's approximately the same as a fridge though, so around 38-40dB. -
MVHR: More extracts than supplies?
Crofter replied to Crofter's topic in Mechanical Ventilation with Heat Recovery (MVHR)
MVHR is now temporarily installed for testing (and to let me use the shower!) I've suspended the unit using rope, not ideal perhaps but it was quick and easy to get me up and running. Only one extract (above the shower) and one supply (at the front door, about as far from the extract as possible). I'll add second extract at high level in the kitchen/lounge. The unit was supplied with the cheap and nasty flexible insulated ducting. I'm using this at the moment but could swap it out later. All of the runs are within the loft space so easy to access. Everything appears to be working well, but it is pretty noisy. I've bought two in line attenuators which didn't seem to make much of a difference. Most of what I can hear is from the extract, all I've now set it up with both attenuators in this duct. The only way I can get the noise down to a reasonable level is to open up the supply vent all the way- it gives a whooshing sound when partially closed down, presumably as the airflow accelerates through the reduced gap. So... Are better quality vent terminals available that will reduce the noise? What's the best position for attenuators- close to the unit, or closer to the terminal? What effect will duct length have? The unit is oversized for the house and could easily handle longer runs. The ducting and terminals are only 100mm. Maybe I should double up, or switch to larger ducting, to reduce velocity and therefore noise? What sort of arrangements have people come up with for DIY attenuators? Thanks -
Understanding building regs about stoves (Scotland)
Crofter replied to ProDave's topic in Stoves, Fires & Fireplaces
Just to follow this up: I had a closer look at the wall behind the WBS yesterday, and there are hairline cracks following the join lines of the cement board immediately behind the stove. However these are actually in the paint, not the plaster itself. So now I'm wondering if it was to do with different drying rates on the various materials? It could be that the cement board and PB have different thermal expansion properties, but the whole thing is skimmed with plaster which has not itself cracked, so it's a bit of a puzzle. Anyway, it's hardly noticeable and not the end of the world to run a paintbrush over it. I'll see how long it takes for the cracks to reappear, if indeed they do. -
Do we need accessibility features for every single new home? If it is causing other problems, maybe the system could be arranged such that incentives are put in place to ensure at least a certain proportion of dwellings comply.
-
We used to have one with no ice dispenser or water chiller. Made for much more space for food. No plumbing either! It was a Beko btw, bought graded off eBay.
-
Any housing solution that doesn't address the role of buy to let is working with a hand tied behind its back. Not that I blame individuals for choosing to invest this way, maybe if there was more pension security or other safe investments it would help though. Also build to let should be encouraged as an alternative.
-
On a related note,a report came out a week or two ago suggesting that if current trends continue, one in three millennials will never own their own home. See e.g. https://www.ft.com/content/c9c523f0-4195-11e8-93cf-67ac3a6482fd
-
Understanding building regs about stoves (Scotland)
Crofter replied to ProDave's topic in Stoves, Fires & Fireplaces
I've got the exact same stove as Dave is planning to use, and have a 600mm wide strip of cement board running up the wall behind it- the wall is plasterboard everywhere else. Plaster skim over the whole lot. There has been some cracking but I put this down to movement in the floor joists, caused by the weight of the hearth. I had to build it up using paving slabs as I couldn't get breeze blocks locally. It's no worse than I have had at the corners of some windows and I'm not too worried about it. -
Understanding building regs about stoves (Scotland)
Crofter replied to ProDave's topic in Stoves, Fires & Fireplaces
Could you install the stove after everything is signed off? Btw I've used cement board rather than pb behind my stove as it is rated as non combustible. -
Top hung posi joist - nail or screw to wall plate?
Crofter replied to bissoejosh's topic in Floor Structures
The usual rule of thumb is to use screws in tension and nails in shear. -
I don't have any particular insight but I'm well aware of the company and was tempted to go with them. I've ended up copying many of their ideas in my own build. £60k seems cheap for a house but the internal work, founds, and services/access could add up to the same again.
-
I've come to the conclusion that it's a false economy to be really tight on materials. When you know you can only afford to waste one or two tiles/boards I find I work much slower and am constantly checking and rechecking everything as one wrong cut will be fatal. When you cost in your time it's cheaper to just buy a few spares!
-
I've always floored past the plinth, just easier as it's one less edge to worry about, and looks neater as you can use the plinth to hide the edge instead of a bead.
-
My local BM stopped doing normal battens and now only does blue ones- so I had to use them even on internal work. Annoying, cos the blue stuff comes off on your hands, and I found them very prone to splitting compared to regular ones.
