

Crofter
-
Posts
3484 -
Joined
-
Last visited
-
Days Won
11
Everything posted by Crofter
-
So my trusty little cordless sander has thrown me a wobbly, I was getting stuck into a job and it's started shedding discs- looks like the velcro on the pad is totally worn out. What would be the best way of fixing this? I can buy a whole new backing plate but it's about half the cost of a new sander which seems a bit crazy. I see you can buy velcro disks on their own for a fiver or so- what would be the best way of sticking one of these on?
-

Building in a Specially Protected Area (Scotland)
Crofter replied to a topic in General Self Build & DIY Discussion
No No I can't say I have. -
That's a good idea to use the truss as a template for the gable frame. I came up with the same idea shortly after realising that my roof and my gables didn't quite match. Oh well, I'll get it right on the next one
-
If you have the patience to wait for stuff to come up secondhand, you can save a small fortune on the appliances. E.g. my Bosch single fan oven was £50 and looks/works like new.
-
Screw piles do sound ideal. How do they cope when you hit a big stone?
-
Here's a left field idea. Make a sort of raft/palette from treated wood, that sits on the ground following the angle of the slope. Anchor it wherever possible by stakes, ratchet straps to convenient trees, etc etc. Then fix legs into it, cut for angle and length to create the level support needed for the shed.
-
Like a cantilevered anything. Something supported via a beam sticking out sideways. IMHO you'll probably find that puts too much weight on the top of the slope at the edge, causing it to sink/collapse. Almost certainly not a practical solution unless the majority of the shed's weight is not going to overhang.
-
I wouldn't bother with the mini digger. In fact I dug my holes by hand. Yes you need to go down until you hit something firm- biggest problem is likely to be water from the steam seeping into the hole.
-
Piles, in building terms, are long posts made of precast concrete, steel, or wood, driven into the ground until they can support a determined loading. Generally used on larger projects like bridges, and where there is a deep layer of soft ground. A shutter is a mould that you pour concrete into. Can be wood, plastic, metal, or even cardboard tubes.
-
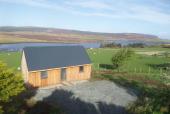
Not dissimilar to my own build, although a more extreme slope. I went with individual concrete pillars, different heights to create a level support structure. Each pillar was made by digging out an approximately 800x800 hole down to firm ground, then pouring this up to ground level with rebar to tie it into the next pour. The second pour was a 450x450 shuttered column. I cast a 20mm diameter threaded rod into each column, and this holds down the building. My build was made using a hefty Douglas Fir ring beam as a sort of 'chassis' upon which the floor and frame are built. Of course for a small and lightweight structure this could all be overkill. You might get away with big strainer type posts set into the ground, especially if the cabin going on top is a strong monolithic box.
-
I'm getting stuck into the design for my decking, the last major part of the whole project. Quick question: the steps will be 1050mm long, and made from 28mm boards. Obviously this will need some sort of extra support, just wondering what would be quickest/easiest/neatest. Could I buy some extra spindles and screw these onto the bottom, running the length of the step? Spindles are only 41x41 section though so maybe not quite enough support?
-
Agree the Powerfix gun is good. I'd always used cheap open frame guns before, and didn't really expect an enclosed one to be any better, but it's been one of my better purchases. The smoothing tools are also very good to have.
-
There's actually been next to no wind! Have had a couple of day sails though, already used the boat more than in the whole of last year. First review is now online, five stars, onto our third lot of guests and so far all looking good. We've only got one space left for the months we have opened up for bookings. Breathing a big sigh of relief here
-
It's been a long journey, but our little cottage is finally up and running as a holiday house. First guests just checked out and left us with some very kind words having thoroughly enjoyed their stay. Of course it's not exactly 'finished' but it's certainly usable. I'd have liked to have had a few extra days to tidy things up, but all the essentials are in place. There's decking still be be built out the front, I'm hoping to get this done in a gap between changeovers soon. I must say it feels pretty good to get to this point.With over three years of very hard work behind us, and a lot of faith that it would all be worth it, we are finally seeing money coming in. And having had to down tools I am going to have this curious thing called 'free time' again... although I'm sure I'll manage to fill it all
-
Buying smart is definitely worth the time and effort. I'm still a bit annoyed with myself for letting the electrician source most of my fittings- when I saw the itemised bill I was gobsmacked at how much things cost him. E.g. £35 for an isolator for the hob... When a 13A socket would have done the job at about £1 (it's an induction job and came with a plug on it). I managed to stop him buying me a £70 immersion controller and am using a simple timer instead that cost £10. It all adds up.
-
Of course if you have the time, and you know the detail of the build, you can do a very detailed QS exercise. I did this for my project and was amazed to find that it worked out within a few hundred pounds of the actual cost (ignoring some optional extras that weren't in the original budget). There was an element of luck involved, as some things cost more than expected, and some things I didn't even realise I would need until well into the build, but this was largely balanced out by my major materials costs coming in lower than estimated. This happened because I had simply phoned the nearest BM for one off prices for OSB, timber, etc, but at purchase time was able to get a much better deal due to the size of the order.
-
There definitely is an economy of scale factor. A simple consideration of volume: surface area tells you that smaller houses need more materials per m2 than big houses. In addition there are many fixed costs such as fees, services, and to some extent fixtures and fittings (you still only need one oven, one front door,etc) My build was at the extreme end of the DIY scale. I designed and built every aspect of it, but had a digger driver at the start to create the access (major work involving rock breaking and building up ground), and I also had a plasterer, an electrician, and a plumber who signed off the UVC. I had no causal labor or any other site workers, so apart from those three guys it was all materials costs only. It has worked out at just shy of £1000/m2 including all fees and services. My site was not the cheapest to develop, thanks to that access issue and an expensive sewerage treatment system that gobbled up nearly 20% of my budget. The spec was reasonably high including 3G windows. If I had doubled the size of the house,I think my cost/m2 would have been slashed. I just couldn't afford to spend any more, and doing all the work myself has already taken me three years.
-
One of my neighbours asked me yesterday- "When are you going to be finished?" I replied "First guests are arriving on Saturday" (it's a holiday let). He also has a holiday let and just smiled and knowingly said "yes, but that doesn't mean you're finished, does it?" It's going to be a race to the finish, for sure. The good thing about this build is that I cannot simply kick things into the long grass. If it was my own house, I would have moved in months ago and put up with various bodges and unfinished details. Still got some cladding details around windows to do, guttering, and a couple of ditches to fill in. Saturday is ages away... isn't it? We have chosen not to build the decking yet, and I would like to do a bit more landscaping, but these things will have to wait. As to serial self building- yes, I can see how you can get the bug. Right now I would run away screaming if I was told I had to start another build all over again, but in the course of this project I have learned so much that it seems a waste to never do it again. I have also come to appreciate how terribly designed and finished my own house is. So I think selling up and building a new house for the family is very much on the cards, but not for at least a couple of years. And it would be great to be putting all of this thought, effort, time, and expense into something that my family was going to enjoy.
-
Hi, I trying to find out if mdpe pipe inserts are universal
Crofter replied to rob dayglo's topic in General Plumbing
Not entirely sure, but usually pipes are sized by their outside diameter (certainly for anything that uses compression fittings). Wall thickness can vary so anything that fits inside the pipe, like an insert, might not work. -
My own little build has worked out at just a fraction over £40k for a 43m2 (net) single storey house, price includes all services, fees, access, interior fit out, but it was about 99% DIY labour which obviously kept the cost down. Creating the access and installing the sewerage and other services took almost half of that budget. On a flat site with mains drainage the project would have been significantly cheaper. I could also have cut back on the spec, e.g. no alu clad 3G windows, no plaster skim, budget kitchen, and saved a few thousand that way.
-
The Build - Oak framed car port
Crofter commented on Redoctober's blog entry in Our Journey North of the Border
The ceiling joists and the rafters will form a truss in themselves. Looks amazing, and no worries about it blowing away or collapsing under a bit of snowfall! Puts my garage to shame (I live in fear of both these events...) -
All I know is what the driver happened to mention to me, as related above. I don't think PIR can be recycled so saving it from landfill has to be a good thing. If you're after a natural insulation product, blown cellulose is pretty high performance and with good green credentials- I would probably have used it if it had been available locally (a contractor has to install it).
-
My concern with freesat is that I might not reception. I bought a dish for my own house, just across the road from the holiday let, and wasted hours trying to find a signal. Eventually the wind ripped it off the wall so that was the end of that. The aerial went the same way, we now stream everything.
-
I'm a wee bit reluctant to buy another tv since we already have a Samsung 40" that was top of the range a few years ago. Is a smart tv really any easier to operate than a tv with a streaming dongle plugged into it?
-
I'm concerned about a smart tv becoming obsolete very quickly. The one I have was my in laws' and is already outdated. We have a Nespresso and the local broadband is being upgraded a we speak. Like you,I don't really rate TV- more of a Radio 4 type
