Search the Community
Showing results for tags 'flooring'.
Found 20 results
-
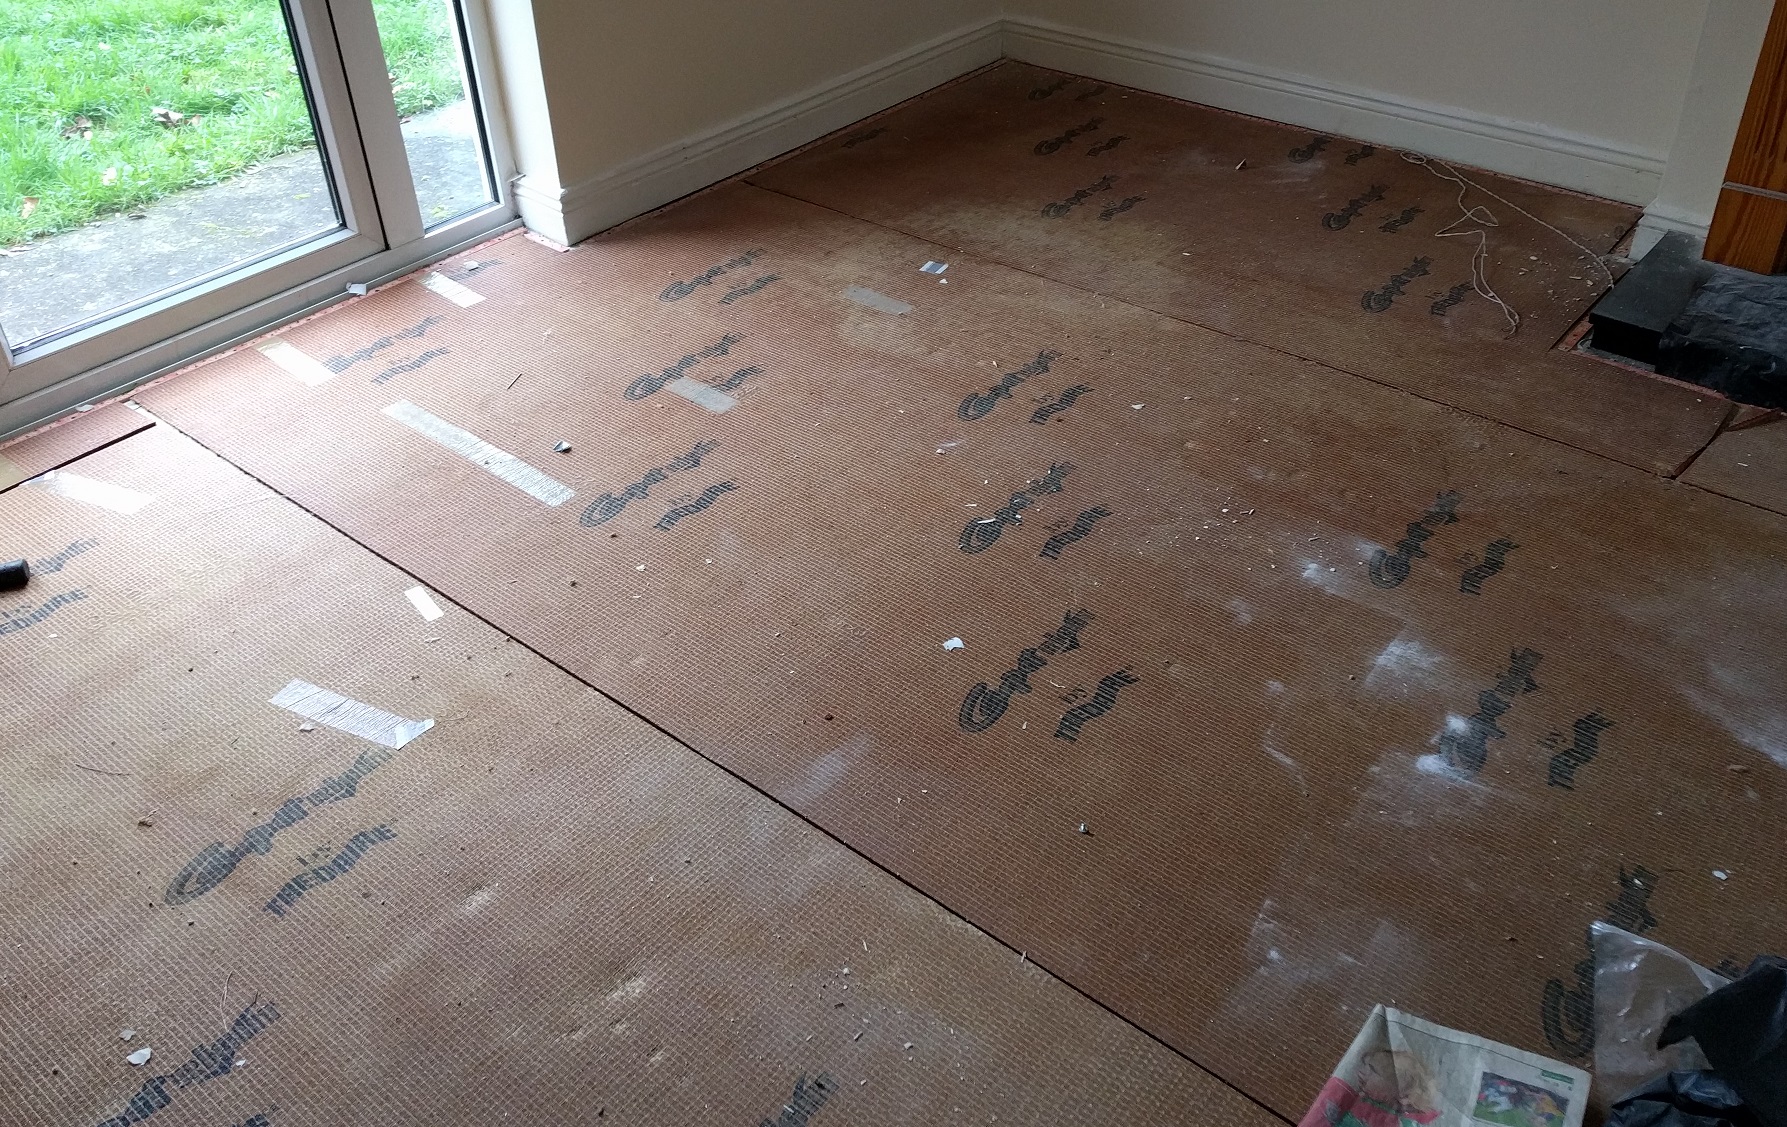
Hi All, Carrying out a DIY small infill extension and can almost see the light at the end of the tunnel! I am looking for suggestions on how to bring the extensions floor level up to the existing property. The extension is the area where you can see the green vapour barrier in the photo. Underneath is Celotex insulation and the joists of the existing house finish on a course of bricks under the plyboard surrounding the green vapour barrier. I had initially planned to lay 50mm of screed to meet the floor boards of the existing house, however is there an easier/cheaper alternative to screed that would be acceptable with building control, such as laying a wood frame with ply board on top which I believe is referred to as a floating floor? Many Thanks Joe
-
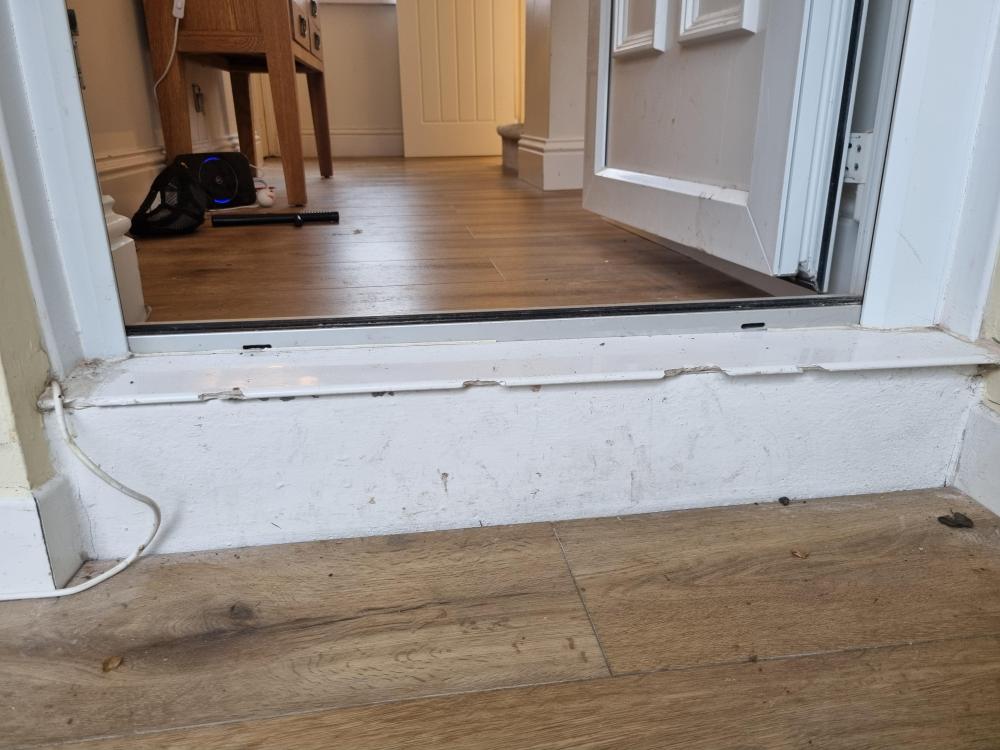
I have a 1970s house with a small internal porch with patio doors. The door leading to the hallway is an external door and there's a concrete step up into the hallway. The step is even raised up from the hallway flooring by about 2 inches. I'm renovating the whole house and I need to find a way to make this step area look nice. I plan to do the following: -Remove porch patio doors -Add external door and long pane side window instead -replace external door into hallway for an internal door (we won't need 2 external doors) -porch plastered -tall skirting boards in porch -fit new herringbone flooring in hallway (Planning to keep existing porch flooring) The only thing I can think of to fix this step is to remove the top section of the concrete step so it's level with the hallway floor, so the new herringbone flooring can run right to the end of the step. Then possibly use skirting to cover the front of the step in the porch under the door? Either that or just plaster and paint that section? I feel this would very quickly become dirty though as it looks now. My husband is reluctant to remove the top half of the step and has suggested an easier option to just putting some beading along the raised step in the hallway side, and putting pvc plastic like a sill on the raised step. I feel this would look terrible !! There has to be a way to make this look nice, surely thousands of people has fitted wooden flooring around door steps? Please help, any ideas or photos of similar situations would be most appreciated!! I want to transform this entrance area to make it look new and modern.
-
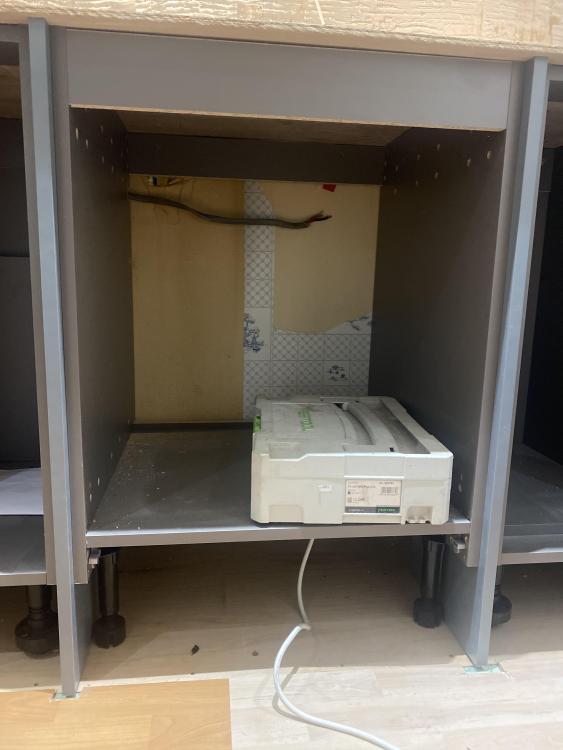
I’m looking to install herringbone LVT click flooring. How do I fit it under these decor pieces that go to the floor? My kitchen fitter has installed them to a height so they will land sitting on the finished flooring (so I’ll be working with a gap of 5.5mm underneath once I remove the existing laminate floor). DIY job or PRO?

-
We had external wooden cladding removed from between ground and first floor in our uk 60s build and this is what was revealed. It's now been clad back over in hardie plank but I wanted to know if people knew what the plastic was protecting and what would have been directly behind it e.g. ends of the floor boards (or would they sit above/below or behind something else), a beam or cinder blocks or something else?

-
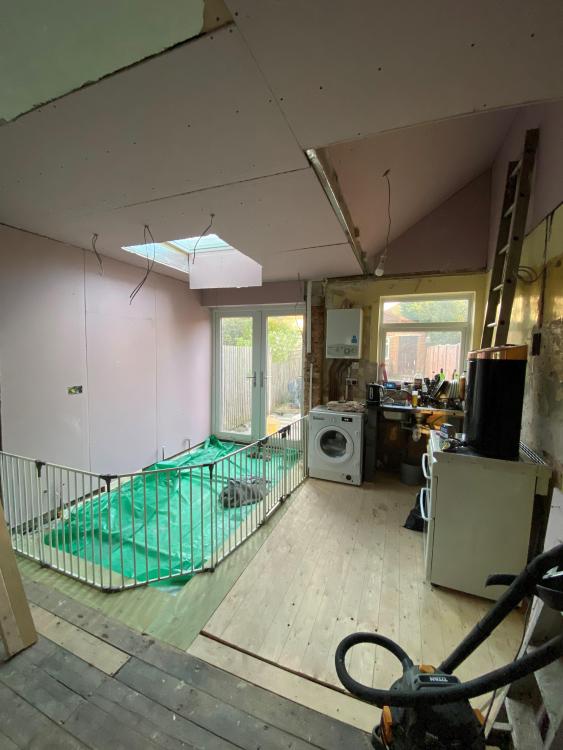
Yet another chapter of my house adventures! The place I've got has a smallish galley kitchen (225cmx405cm, before insulation). It was set up in 2015, with medium-range furniture that my girlfriend rather likes though the architect does not. (It's Mobalpa - the sort of thing that is (I believe) quite a lot more expensive than IKEA without being twice as good; it's not solid wood. The counter is some sort of sturdy black laminate - thank goodness, as I am largely the one who cooks, and I can be messy, apparently, or so have I had it screamed at me. I most definitely do not want to prepare food near somebody else's granite countertop ever again.) Our original intention was not to touch the kitchen, and to insulate the floor from below (it's right above a coop corridor). However, the walls were uninsulated, and the architect was particularly concerned about the overall soundproofing of the streetside wall being compromised if the part corresponding to the kitchen wasn't. So, in the end, the workmen carefully took the kitchen apart - and noticed the long wall was in rather poor condition; we will insulate it after all. In the process, they also had to destroy the current floor - a good thing, since it was vinyl poorly laid on damaged old tile. I will spare you all the things I have been told about how anything I could do to the kitchen decor can only make it worse - I will probably just (a) raise the cabinets and (b) install some extra shelving on the other side. The question now is: given that I have the freedom whether to put the insulation under the floor rather than on the corridor ceiling, what should I do?For that matter: given that I'll get a reversible heat pump, does it make sense to get under-floor heating that can be used also for cooling? That would free up space currently used by a radiator. Or is getting UFH in only one room impossible/too expensive? Or unfeasible (in that it would necessarily create a height difference - though we would presumably insulate the corridor ceiling, as originally planned, as opposed to insulate above)? If we do put in UFH, what we should put above it - synthetic flooring, since it is thinner? I include both the floorplan and an image of the kitchen before renovation.

-
We have installed a wet UFH in all of downstairs and we’re really struggling with what type of flooring to get. We are a farmhouse with children and dogs so need something that can’t be easily damaged and doesn’t matter about getting wet. Does anyone have any recommendations? We are looking at wood effect porcelain tiles but I’m really worried it’ll look too fake….
-
Help. I’ve just moved into a new property and due to the age (only 5 years old) they have fit their camber flooring with glue not nails/screws. They floor boards squeak and I need to know where the joists are! I have been told a stud finder will work but I don’t see how it could as it would be already detecting the wooden flooring so how would it know where the joists are? Can anyone help me to find the joists. Thank you so much
-
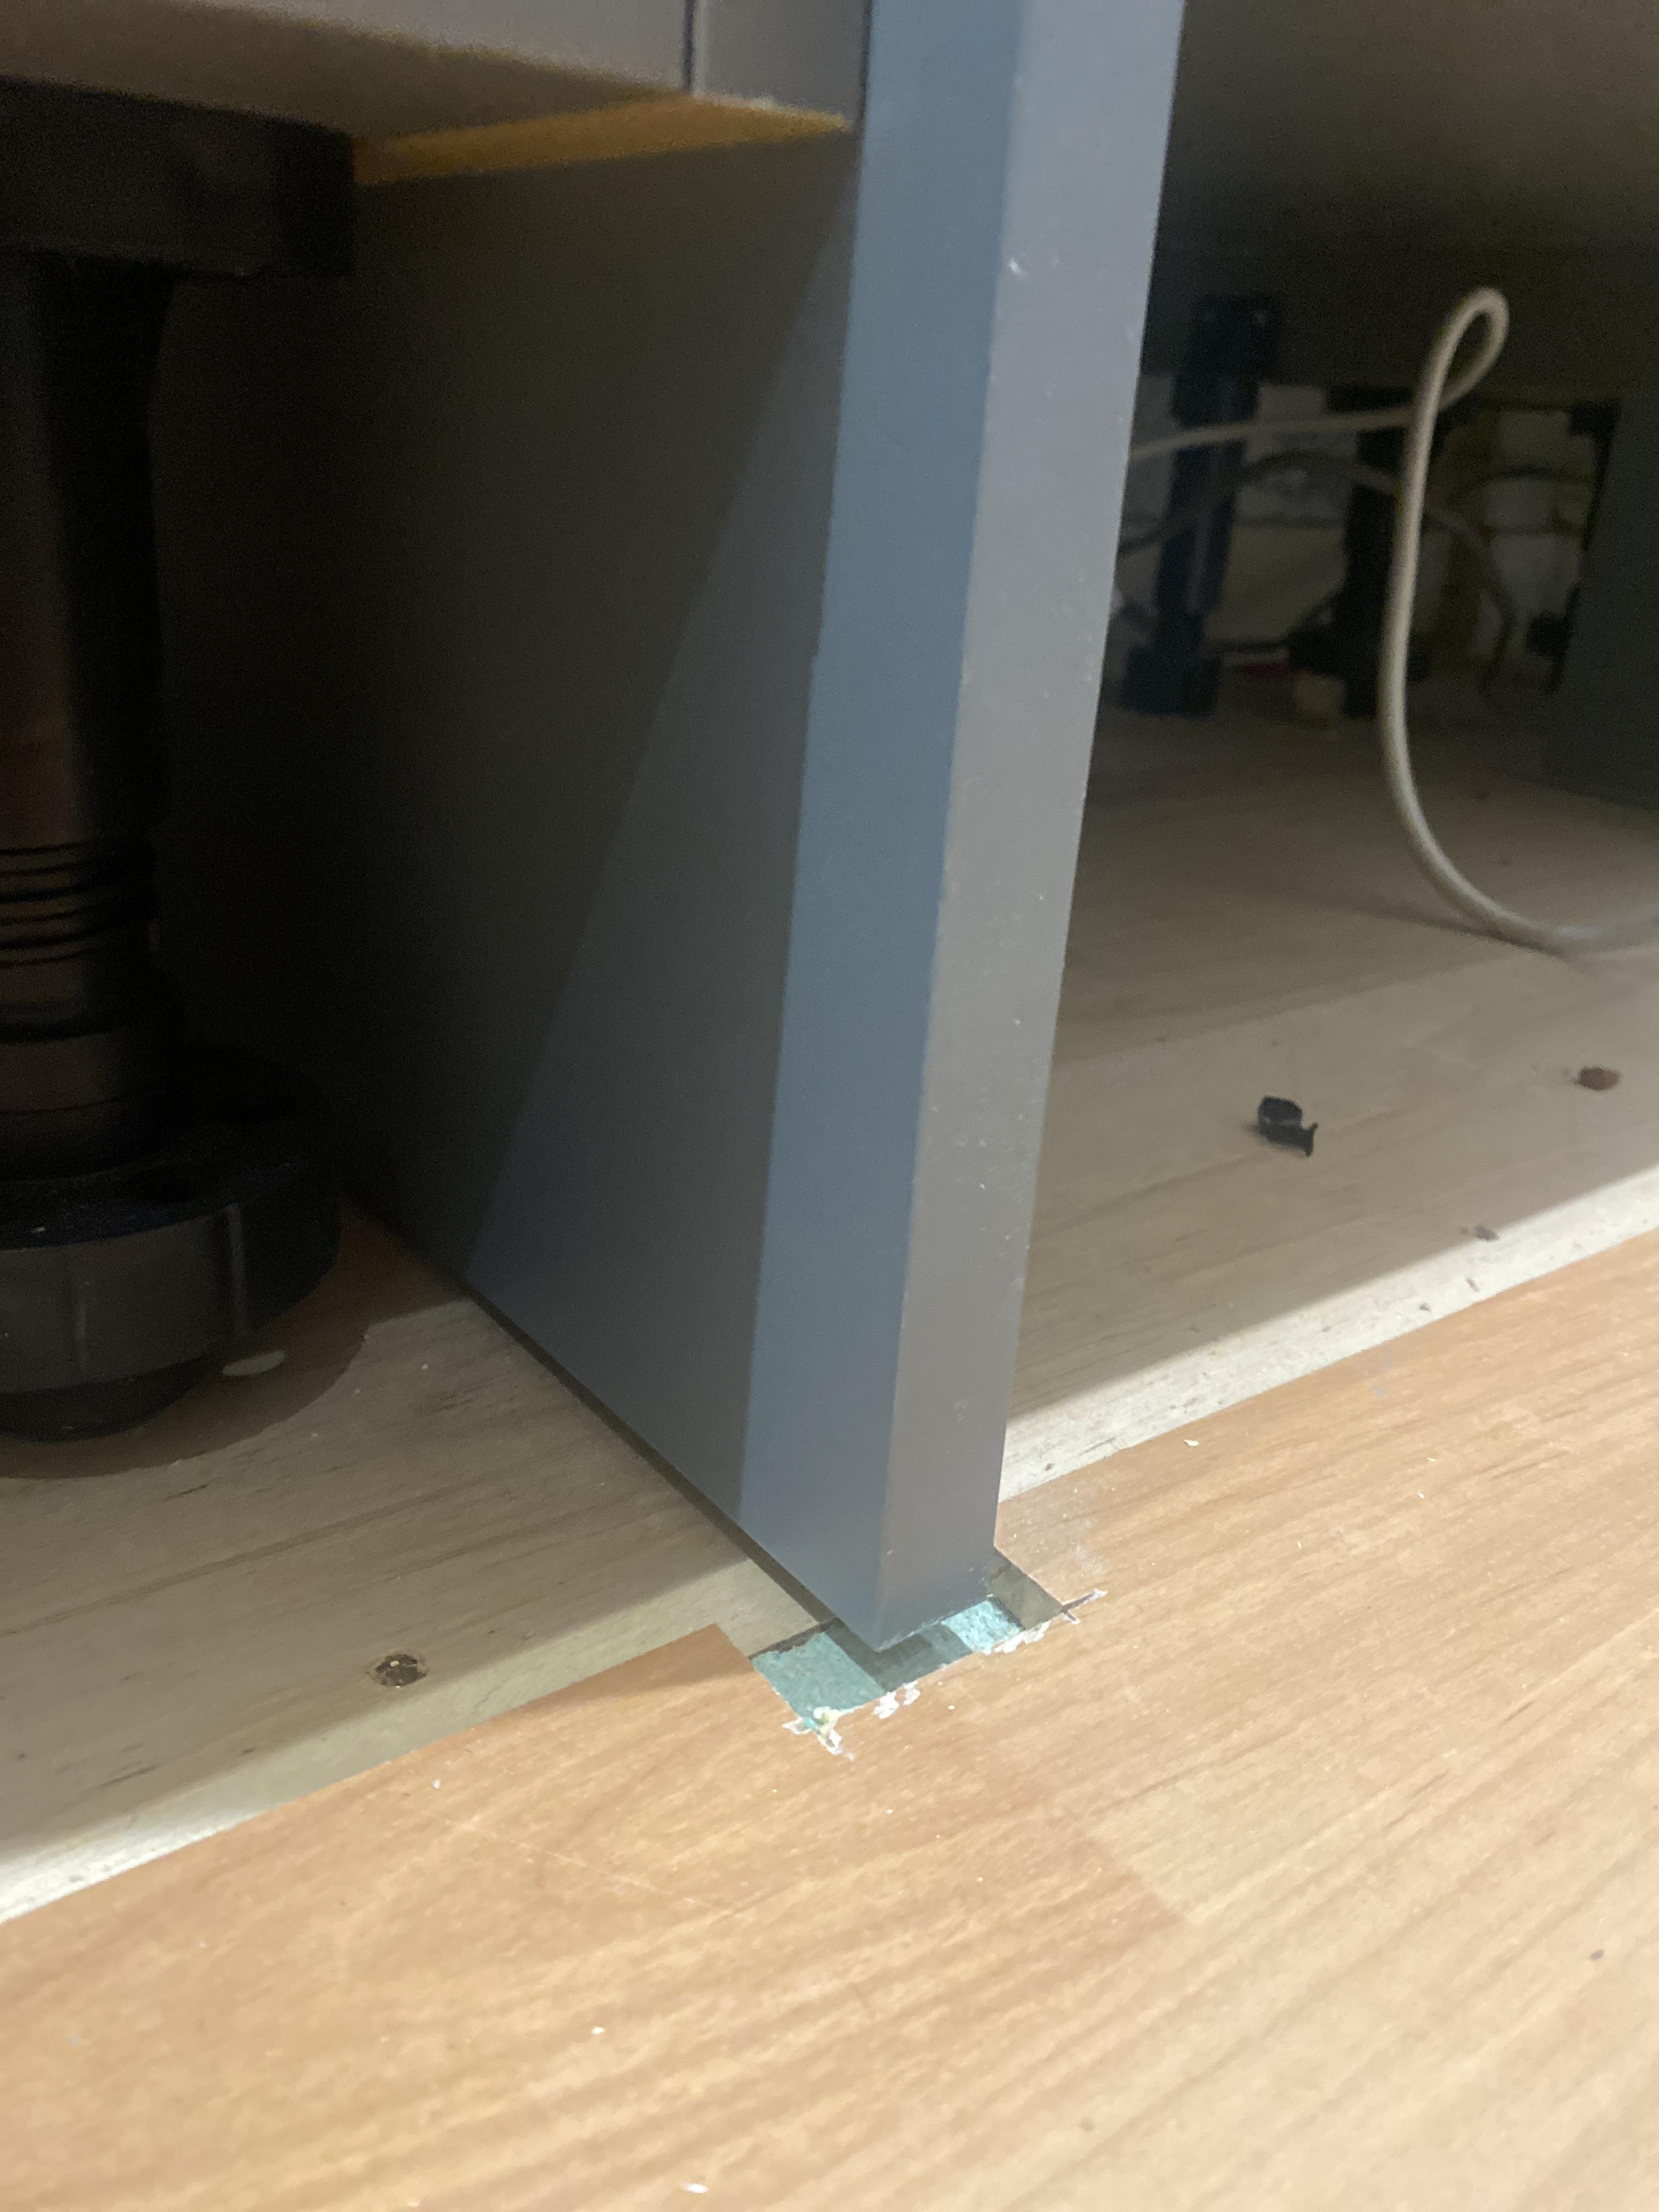
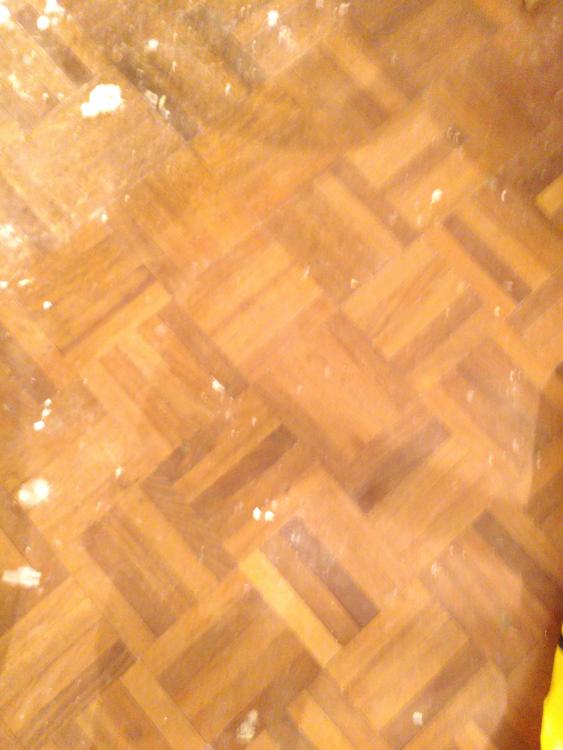
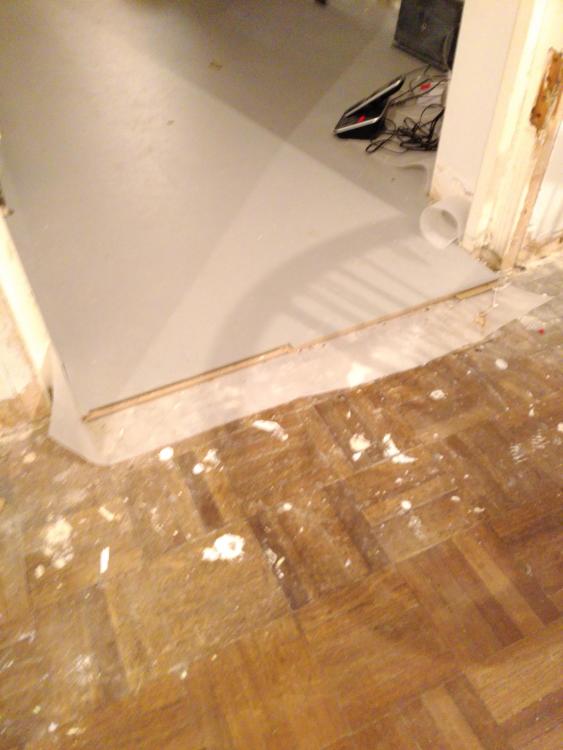
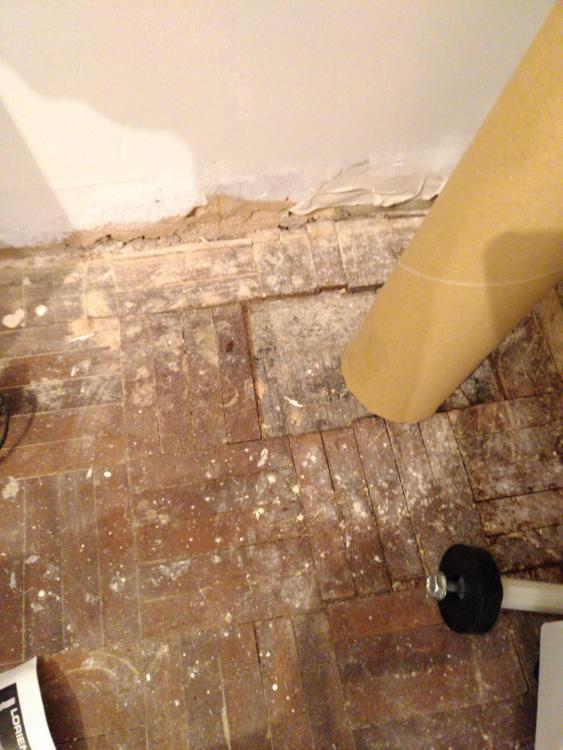
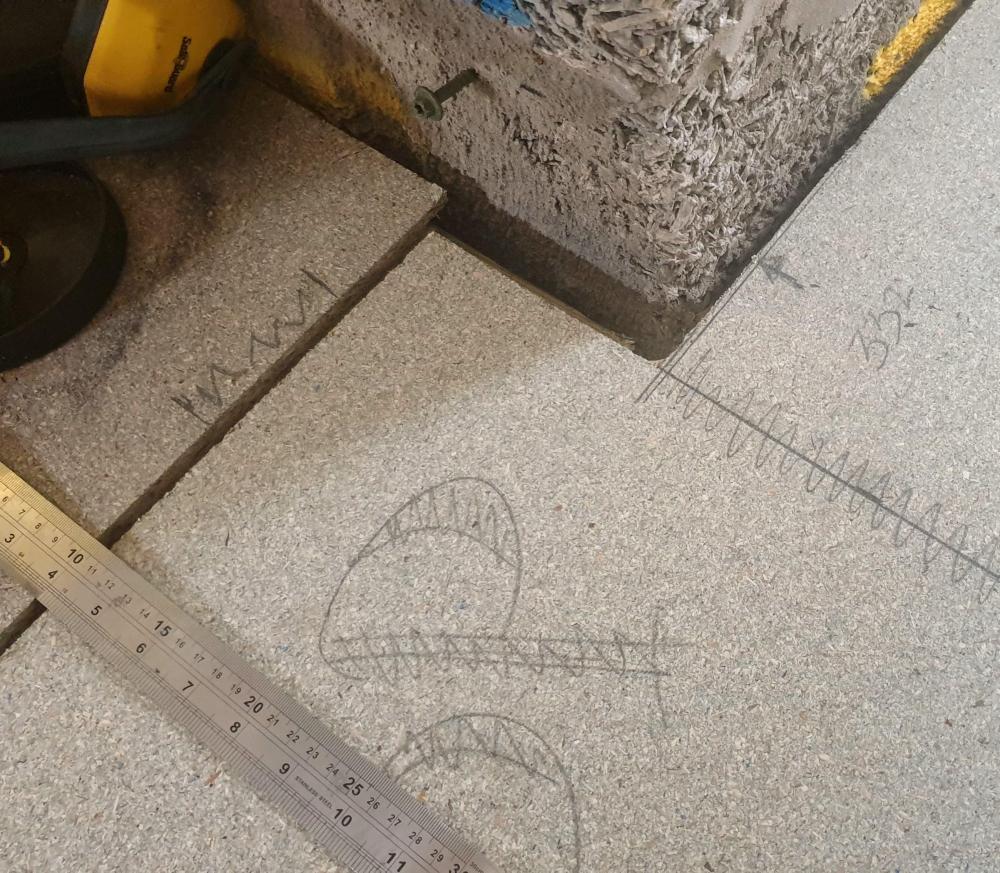
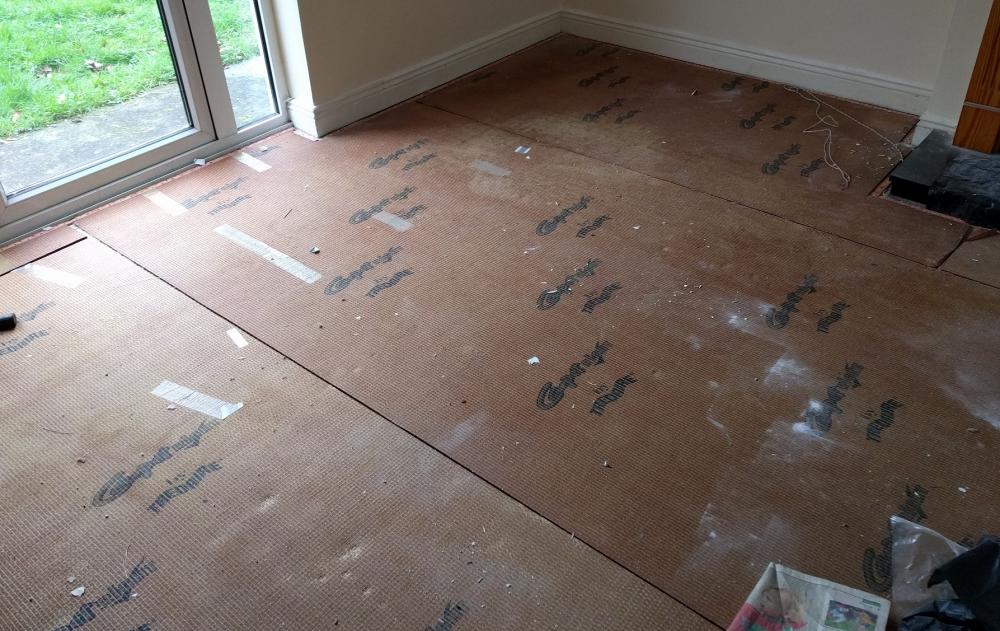
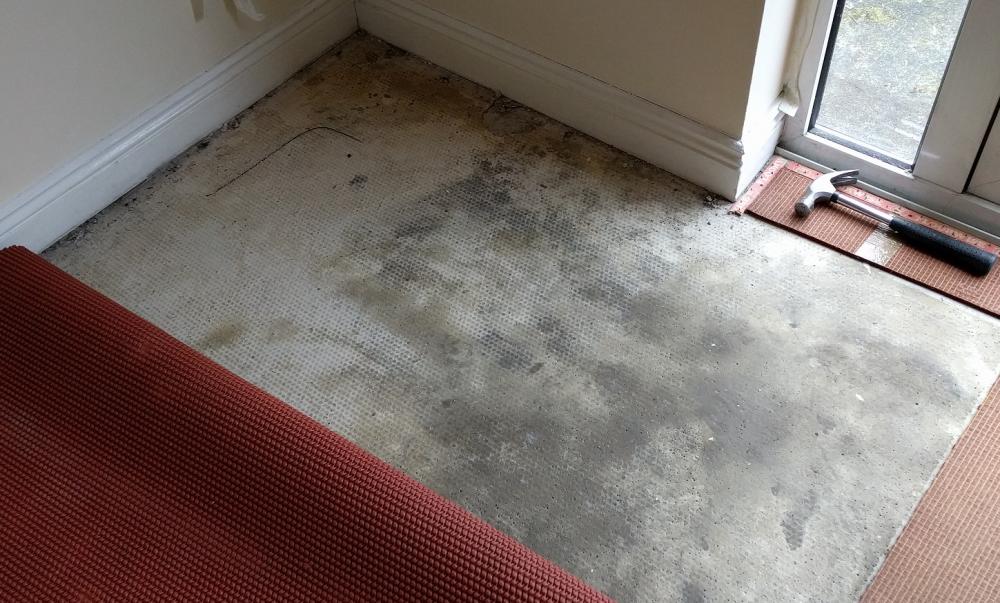
Hello, I'm after some guidance on how best to proceed renovating some nice parquet flooring. My goal is to get the parquet flush with the Forbo layed in the hallway and restore it to a great condition. The build up is concrete with what looks like a bitumen adhesive. Wondering if I lift the floor and pour screed or can build up by laying chipboard at the necessary thickness then re adhere the parquet, sanding, filing then finish. I've attached a couple photos and thanks in advance! James
-
Hi all, I've been working on my flat roof construction and have plenty of 18mm T&G OSB3 sheets left. I was planning to use these for the first floor flooring in the house refurbishment, but have been told by a local building that I should use chipboard flooring instead. Any idea why this would be? thanks!
-
 It was all going well: too well - the laying chipboard flooring that is..... But some time or other I had to solve the problem of what happens when the joists change direction. Half the joists run north south, half east west. And they meet at the top of the stairs. That was the place where two cut edges have to sit side by side : and I tackled that little joker yesterday - Oh dear: North South joist on the RHS, East West joists LHS. They meet under the left-hand gap. Its the gap covered by the rule that I'm concerned about. The joint sits squarely across a wide joist. Both bits of floorboard can be adequately stuck down and screwed into place firmly. Debbie wants it to be covered with bamboo. The gap will not be seen. But I know the friggin' thing is there.... GGGGrrrrrr. I've worked really hard to get it all mm perfect. IGNORE : REPAIR : REPLACE? Knock down and start again? (Nein Danke)
-
Would you be kind enough to run your eye over this, please? The list below is gleaned from a mixture of YT videos, the LABC and NHBC standards and several flooring threads on BH : thanks to @ProDave, @Big Neil, @Simplysimon, @Hecateh, @PeterW, @Mr Punter, @Declan52 , @bassanclan @Oz07 and others. I have 46 sq meters of floor to lay on the first floor on joists which are laid at 400 centres: you know, the ones that de-bagged me Since the floor is a structural member, and the roof is on - we are dry, the sensible choice seems to be 22ml chipboard T+G, (although 18mm will do for 400 centers) laid at right angles to the joists, long edges at room perimeters must be fully supported on either a joist or a nogging in any case, noggins must support the short edge laid ' brick-bond ' (to ensure minimal waste and maximum T+G contact) D4 adhesive : gloves to prevent contact with the glue (thanks, @Declan52) screwed every 300mm, screws 50mm long (at least double the depth of the board) and at least size 8s with a 10ml gap all the way round vertical abutment(s) leave a small loose panel in each room so I can fish wires through later (thanks @ProDave) I'm using sheets that are 2400mm by 600mm and my BM is charging me £8.88 / sheet. Missed anything? As every, many thanks in anticipation. Ian (PS, forgot to ask about screws spec: are there any screws that are specially for boarding out?)
-
Looking to bamboo my open plan kitchen/living area. Should you run flooring up to the plinths in a kitchen, or all the way to the wall, prior to kitchen cabinet being fitted? Can't seem to get a clear steer on this Scott
-
Having spent the summer months pottering in the garden, and generally ignoring the list of outstanding things to do inside, I finally summoned enough motivation to get things finished off. Fortunately, the list was fairly short so once started, was completed in a reasonable timescale. In the kitchen we tiled the splashback, fitted a decor panel underneath the bridging units (rather than having to see the underside of the units) and fitted a breakfast bar. Picking the tiles was probably the most challenging part, but we finally found something we both liked and agreed upon, and seems to work pretty well as a contrast to the units and worktop, as well as matching the colour scheme of the wider room. The decor panel has nicely finished off the underside of the bridging units. Ideally, this would have been done at the time the kitchen was fitted, and although was something I raised in the kitchen showroom, it was decided that it wasn't required... The breakfast bar was formed from 450mm deep lengths of worktop, the uprights specified as shelves so they were finished on all sides. A very simple construction secured to the back of the island by means of small brackets to a batten, and fix-all to the wall and floor. The height is set at 1000mm, which although taller than a standard breakfast bar, does give more leg room when sitting at it. I have to admit I wasn't keen on the idea of a breakfast bar, but have been won over, and it is a really usable addition to the room, primarily as a place to sit and chat when someone is working in the kitchen. I think solid oak worktop would have been preferable, but the final choice was down to asthetics, and again colour contrast was desired. In the utility room, I built a bench / shoe storage. A very simple but sturdy construction, I used oak worktop off-cuts for the uprights, and formed the shelf and top, using off-cuts from our oak door frames and door stops, glued to an off-cut of plyboard, all finished with Osmo. From a cost point of view, the materials were all free as they were scrap. The only cost was my time, a little wood glue and a few sanding pads for the orbital sander. Having built the bench, I had a couple of pieces of oak worktop left which I used to make a couple of little side tables. I had intended these to be only temporary, but like them so much that I plan to keep using them rather than replacing them. Elsewhere we had a couple more spots on our oak floor where it hadn't bonded to the slab. These only became apparent as we moved furniture around. I've previously relayed the reasons for this issue so won't repeat them. We used the same method of 'repair' using this product: http://www.fixafloor.co.uk/ but instead of drilling a larger hole and using a plug of timber flooring to finish, I drilled a hole of 4.5mm, injected the adhesive, then once cured 24 hours later, finished the drill hole flush using melted furniture repair wax. This in my view is a better method of finshing, looks less intrusive and was less time consuming compared to plugging. See below for comparison pictures. Filling all the nailheads on our oak skirtings and facings was not a task I was looking forward to, but in the end only took a couple of hours. Using a tip I picked up many years ago from a decorator, I used linseed putty, mixing 50/50 some natural and mahogany coloured putty for a final filler that was pretty well matched to our oak. Very easy to use, the putty remains flexible with the only finishing required being a wipe over the filled area with a dry cloth to remove any reside. Other than that, it's been settling into a routine of annual maintenance - servicing our MVHR (filters and cleaning the core), renewing the white silicone in our showers and servicing the treatment plant air pump. Next entry - Heating and DHW - How our ASHP based system has performed over the last 12 months.
-
 Hello folks, As I've recently said I'm really impressed by the comprehensive answers to other topics in the forum. This is the reason why I'm sure someone of you will have the knowledge to help me. My problem: The oak wood floor in my bedroom is suffering from some kind of hazy buildup. I'm not sure what exactly caused this but it looks very much like a cloud. I think that a service like a floor sanding can solve this problem but I don’t have such budget at the moment. So I'm wondering if any of you can share experience in dealing with such problem. I've found a possible solution online (with ammonia) on this website but I'm not sure if this is the right thing to do in my case. I would appreciate if someone says if it's adequate option, because I don’t want to do more damage to the surface Thanks in advance.
 -
Hi, I've finally gotten the old carpet removed from the living room floor. Walls & ceiling painted and am putting down laminate flooring shortly (skirting to be removed first!). I'm looking at the old carpet underlay and wondering if I should leave it in place or do any prep work on the concrete slab if I remove it? I am considering putting the laminate underlay directly on top of the carpet underlay for extra insulation but is this appropriate? I did laminate on an upstairs bedroom recently and put the underlay on top of the bare floor but this is ground floor concrete so want to ensure I'm taking appropriate measures before covering it up. Thanks!
-
We were set to buy engineered wood flooring and tiles for our ground floor when our builder told me his brother had laid Karndean flooring of “wood” and” tiles “ in his own house and he could not tell it from the real stuff. I have always thought “ pretend” flooring would never look like the real stuff. We also have UFH and been told Karndean is better than wood for this anyway. The wear layer on Karndean is only 0.4mm but it will never need re treating ( like wood) so with care will need no maintenance. A big dilemma for us, I would like to hear your opinions on this matter please folks ?.
-
Hello everybody. I am an independent craftsman and stock many of my tools in my transporter. So the floor is naturally stressed. So I had considered covering the floor with a robust covering. Only I do not know which material is best. A seller offers Nordic birch [commercial link removed]. What do you think? Do you have other ideas? Thanks for your help.
-

Floors, plastering and time to recover!
TheMitchells posted a blog entry in Scooby Cottage renovation.
Its been a while since the last blog and lots has happened. We'd been busy with other things and planned to crack on with the house but while on the way to our house a couple of weeks ago, the OH was hit by a car which failed to give way at a junction. He was riding his cycle, got thrown up and across the road, landing on his head. Luckily, nothing was coming the other way, and he was wearing a helmet which took a lot of the impact and somehow, apart from lots of scrapes, his main limbs were fine, it was just his head that was badly hurt. He suffered a fractured cheek and eye socket but luckily, his eye appears okay. There were no fractures of the head or neck so after a night at the hospital he was sent home. A week later he had an op to fix the cheek and is now recovering from that. His good looks have returned with only a small scar around the eye. Another week and I'll be sending him back to work - he can do the painting at least! And in case you are wondering; the car driver was reported for careless driving and has admitted liability. Back to the house and a few pictures of the plastered bedrooms. What a transformation from their origonal state. The old windows had plasterboard added right up to the glass so I did take it all off and redid the reveals. It looks so much better now. The new cupboard on the landing and door to the front bedroom. and the back bedroom; This is the wall in the last blog which was my first plasterboarding attempt - it looks much better now. We are looking to start on the bathroom downstairs next. I have been busy sourcing everything and once the OH is back to normal, it should leap forward. The stud wall is in place, the bath is sitting in the bedroom and I am waiting for Nicholls to give me a good price on the rest of the furniture. More to follow...............- 7 comments
-
- 3
-

-
- plastering
- flooring
- (and 1 more)
-
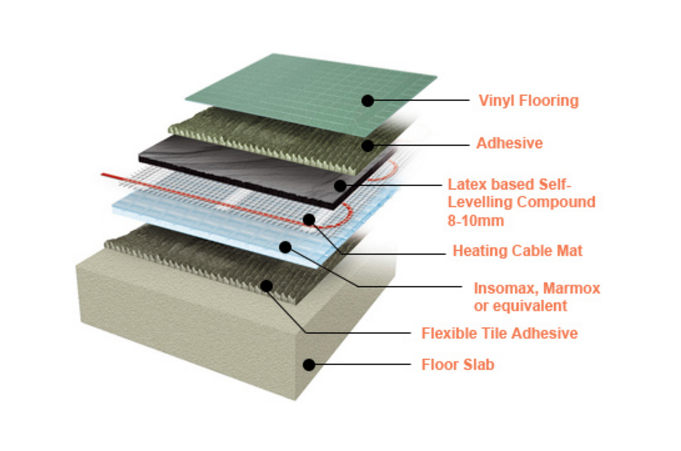
This is the suggested build up of our floor (from the slab upwards ). Because the architect has a cruel sense of humour he has specified German stuff ... again. Achtis Technical This is how it goes; And you can bet my bottom dollar that it'll be more expensive than necessary All I want (ahem ...well we want... ) is a warmish floor. And we've got 25mm to do it in. In the words of @Construction Channel, 'How hard can it be?' We'll be using a bit of electricity to walk on, and we'll have grand kids doing their best to scratch the Hell out of it, not to mention the odd dropped angle grinder. Why oh why does the world need so many flooring products? (Sorry, 'solutions') Comments; suggestions, please. Ian
-
Check this out for a flooring that'll save you a few pennies, or not