Iceverge
-
Posts
4384 -
Joined
-
Last visited
-
Days Won
31
Everything posted by Iceverge
-
For info, the above method works well without cavity closers for EPS blown beads, getting a really consistent and easy and cheap to install well insulated window. You can even pre install the membrane, tape and J beads before the window is in situ.
-
I would. 1. Parge the walls. 2. Cut a strip of membrane the length of the perimeter of the window and about 50mm deeper than the reveal depth. 3. Starting at the 6 O'Clock position lay the membrane on the sill, up the reveal, across the top, down the reveal and back to the 6 o clock position. Use some dabs of silicone to hold it in place. Be sure to push it well into the corners. 4. Careful mark 10mm (or more depending on your window design) with a pencil around the perimeter of the window and apply your split airtight tape to seal the window to the membrane. 5. Fold the 50mm remaining piece of the A/T membrane onto the wall and apply a double bead of airtight mastic to seal it to the parge coat. It may need some cutting and trimming at the corners. 6. Screw a J bead to carefully cover the edge of the A/T tape on the window perimeter. 7. Slot in plasterboard with a few dabs on the reverse and mechanically fix through the membrane to the brick reveals. Squirt some Illbruck FM330 behind there if you're anxious about any hollowness. You may need to use some small packers to get perfectly consistent reveals. I would avoid paint on airtighess near windows. You are lightly to spend longer masking it neatly than using actual airtight tape and it doesn't adhere as well either.
-
 Drill 10mm into the wall free hand. Then put the block in place and with 2x normal wood screws through it adjust them to push the block into level using a spirit level. Then finish drilling the hole correctly.
 -
@ToughButterCup How about just drilling a block of timber first on the bench at 90deg and using it as a guide to get the hole started.
-
A perimeter upstand of say 25mm PIR will reduce the conductive heat loss from the slab -> walls -> ground. I'd you're not bothered about this you can just pour to the walls.
-
Get a long (greater than the wall width) bit to make a pilot hole with a slight fall to the outside. This will ensure both holes line up. Drill a piece of 50mm timber with 2x holes 125mm apart. Make the middle one perpendicular to the timber and the outer one slightly angled outwards. Peg the pilot hole to one hole of the timber and use the other hole like a compass for your stitch drilling. It will ensure a neat circle that will be slightest bit conical towards the inside making it easier to chip out. Then get hammer and chisel and get tapping. This can be tedious. Now repeat from the inside. I had 3 holes through 215mm block, 250mm cavity and 100mm block to do. They took an hour each with a cheap SDS.
-
Thicker walls are the only way if you want to stick to a masonry cavity wall. A 150mm cavity with full fill cavity batts like Dritherm 32 or EPS Beads would be the same U value of 0.22. PIR boards are almost impossible to fit correctly in a cavity wall, even with well intentioned builders. I wouldn't consider them on those grounds alone. Have you considered SIPs or timber frame if thickness is really such an issue?
-
A diverter for an immersion in your DHW tank would be the cheapest way IMO.
-
Normally if you were to retrofit cavity wall insulation like EPS blown beads or mineral wool then the supplier would insist on removing the existing cavity wall insulation to be able to guarantee against water ingress. However in the situation where you have EWI they should be happy to just top up the existing. Do you have any pics of the house as is? It must be relatively modern if there's mineral wool batts already in the cavity. Airtighess and insulation are separate things entirely unless you use something like closed cell foam or open cell foam/cellulose in a timber frame. Any pics/cross sections drawings of the house would help. Is it detached? What kind of roof do you have? How sticky are the authorities about external alterations?
-
It's good. My Mrs doesn't normally have it turned all the way up .
-
https://passivehouseplus.ie/news/marketplace/passive-purple-used-to-seal-beattie-passive-enerphit Here's an example of an Enerphit where they did just that.
-
This is the rescue for me. Airtightness won't be an issue if you do it externally to the current skin of the house before EWI with a parge coat or membrane or paint on sealer. You can likewise build the new roof as a hybrid/warm roof and use a ply/OSB layer fully taped as your airtight layer. External airtightness is more straight forward than internal anyway. Given the roof hasn't been done extend it to give as much of an overhang as possible and you can then have enough insulation to make the build a passivhaus too.
-
@Jim30 How well handed are you? Blocklaying, timberwork, pouring concrete plumbing, roofing. Nothing is too difficult if you're prepared to throw time at it. Joinery and plastering might be best left to the pros, depending on your competency. I drew up a 100m2 house somewhere if I can find it. Do you(or your planners) have any preference regarding style? I would steer away from ICF as the materials are dear and you'll need propping, concrete pumps etc or a telehandler with a concrete skip. For DIY the risks are higher as a bad mistake during a pour could sink the project. You can buy timber joists, OSB, nails and concrete blocks from every builders merchants in the land. Lots of ability to shop around and you'll never be tied to one provider or be exposed to the risk of them going bust.
-
Plus one. Will help with airtighess too.
-
Strip foundation to a U value of 0.16 were about €5k cheaper than an insulated raft for us in 2019 over approx 100m2. Oak frames are very dear to get to passive standard and with sips you end up doing the structure twice. This is worth a read.
-
I wonder if waste wood could be readily turned into insulation. I don't see why not. I can't think of any better long term use🤔. Burning it is great fun but not a tremendous use really, much like killing the hen rather than keeping her for a daily egg.
-
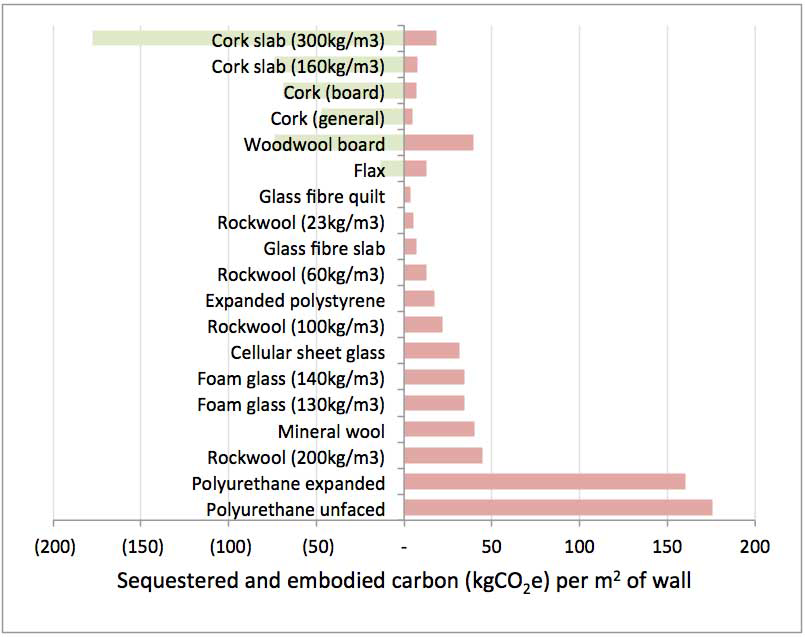
Did you get a chance to read that report, or even skim it? Alternatively why not woodfiber batts or hemp/flax batts or blown woodfiber insulation to keep the embodied energy as low as possible. If you're dead set against borates these may be contained within too. Mind you most mineral wool has formaldehyde so you pays your money, takes your chances.... Taken from the excellent greenspec.co.uk website. I really like natural insulants but the only one which my cheap ass would(did) pay for is cellulose.
-
What's the roof pitch? Any pics? Warm roof tends to be safer for rot/decay unless you can really guarantee the workmanship.
-
This is one of my favourite houses for inspiration a similarly tight site. The layout would need to be different for your situation. It's a passivhaus too but it'd be economical to build due to the simple shape. https://www.annethornearchitects.com/#/meetinghouselane/ More details at. https://passivehouse-database.org/index.php?lang=en#d_5319
-
Cement mixer hire or buy?
Iceverge replied to CalvinHobbes's topic in General Self Build & DIY Discussion
Be careful if anyone else uses it that they wash it too. I had a ladder and a wheelbarrow that weren't so lucky. -
First year Heating Energy Use in Passive(I hope) House
Iceverge replied to Iceverge's topic in Boffin's Corner
About 8 to 9 degrees I think. I'm not to familiar with HDD. I don't think it accounts for sunlight so that can vary the energy balance quite a bit. Clear skies and cold temperatures require less heating than cool overcast days. -
First year Heating Energy Use in Passive(I hope) House
Iceverge replied to Iceverge's topic in Boffin's Corner
Will check. -
First year Heating Energy Use in Passive(I hope) House
Iceverge replied to Iceverge's topic in Boffin's Corner
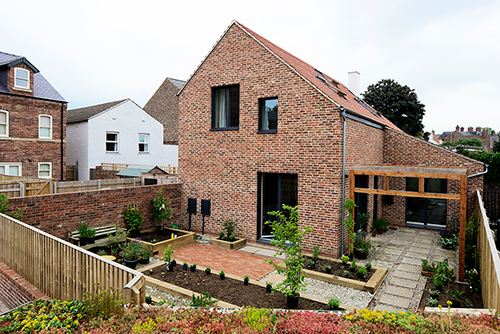
An update and comparison for years 2021/2022 and 2022/2023 I've adjusted the dates to the end of April to ensure I encompass a complete heating season. April 21 to April 22 9639 kWh April 22 to April 23 9125 kWh Total 49kWh/m2/annum energy usage. For weather comparison heating degree days at 15.5deg from a local station were April 2021 to April 2022 HDD 1916.7 April 2022 to April 2023 HDD 1919.5 So for an almost identical heating demand we had a reduction of about 5% usage. I don't think the house was running colder. It has dried out a bit however. This equated to about 3100 kWh of heating supplied to the house or 16.75kWh/m2/annum. Disappointingly still outside the PHPP predicted amount. Peak heating load has never exceeded about 1500w (supplied by 2 resistance heaters) which betters the PHPP prediction so far. Annual cost this was broken down to 1350kWh @ €0.47/day-unit and 1650kWh @ €0.14/-night-unit so €533+€231 per night unit so our years heating costs were €764. DHW is still about 10kWh/day @ €0.14 so about €511 per year. I've bought a Daikin FTMX25R A2A heat pump to be installed this summer so that should take the heating bill to less than €200. Solar PV is the eventual plan for the DHW hopefully taking that to less than €200/year too. I've been searching my head for the reasons the house isn't matching PHPP. We're about 600kWh short. My leading theories in no particular order. 1. I have a very old copy of PHPP and it overestimates internal gains for modern appliances. 2. Our MVHR is closer to 75% efficient rather than the stated 86% (I only DIY balanced it) 3. My wretched family have been letting windows and doors open! 4. The EPS beads k value of 0.033 is optimistic. 5. Thermal bridging at the wall floor junction is greater than accounted for. 6. The thermal bridging around the windows is greater than I accounted for. Some thermal pics of the windows from the inside taken with my Flir One. The colours are representative not absolute. If there is a spread of 2 deg or 20 degrees over an image the display will still use the whole yellow to blue colour spectrum available. And the outside. Note the dot to the left of the window below. That's the extractor fan exhaust. It has 2 x anti backdraft airtight magnetic shutters but still you can see the hot area. External areas are hard to quantitify as the emissivity of a surface seems to make a big difference. A shiny surface will appear different than a dull one despite both being the same temperature. You can see my thermal reflection in the window too. Things that I have ruled out. 1. Full fill of the EPS beads. I checked all areas with the Thermal camera and found no gaps. I climbed into the attic and checked the areas of the eaves where the EPS beads were pushed up under the DPM cavity closer and found no settlement. 2. Air leaks. We had a small gap at the corner of a T&T window that was whistling slightly in very strong winds. Once adjusted it became silenced. No other leaks have been noticed, even in gales. 3. High thermal bridging through SS wall ties. The thermal imaging could find no evidence of this internally or externally. I did consider externally insulating the Window frames with pre rendered EPS sections to reduce heat loss but doing the sums on it suggested that we would still need some heating and the investment would be about the same as an A2A for far less energy savings. The house is comfortable, never chilly with young kids. Despite having no UFH the floors aren't cold. There's no smells with the MVHR. It's very quite too. It takes days to get a meaningful change of temperature. Last year in 30deg plus for a few days the bedrooms never got above 23 deg. It may have been less had we kept all the external doors and windows closed, but as it turns out we're not beyond enjoying the fine weather. The bedrooms have only about 2.4m2 of glazing each over 2 windows on opposite walls which helps both control the solar gain and cross ventilate. Similarly even after 24hrs of a power cut in the Snow in Feb 2022 the house was 19-20 deg. Questions and comments are welcome. -
There's no reason it couldn't be redone in the future.
-
Softening the feel of a concrete slab floor
Iceverge replied to Sparrowhawk's topic in Floor Structures
Good to hear. What would you attribute the slight dip to? I'd have thought 2 X 9mm might be a bit thin without the battens. The Avantech details from the US suggests 2 X ¾ layers. What do you think?