

Jeremy Harris
-
Posts
26430 -
Joined
-
Last visited
-
Days Won
360
Everything posted by Jeremy Harris
-
Sorry, this is a very delayed update, as I didn't get around to painting the garage until yesterday. The cheap'ish pressure sprayer works very well indeed. There's a very slight knack in getting the pressure setting right, but overall it's not too fussy, so you can be up and spraying well after around ten minutes. It is blindingly quick; it will empty a 5 litre can of paint in around 10 minutes. The finish is very good, much better than I can get with either a brush or a roller. It sprays thicker emulsion more easily than thinned emulsion. I made the mistake of thinning down the first mist coat, and it really wasn't needed. It applies a LOT more paint than you can get on with a brush or roller, and runs don't seem to be a problem at all. The only limit on how thick a coat you apply is really the finish, it noticeable degrades if you go too mad. The big advantage of being able to apply more paint in a single pass is that you need fewer coats. Two coats of white was absolutely fine and just a single coat over the green finished ceiling boards was enough, really, the second coat didn't make the finish any more opaque, just gave a better surface. Spraying a 2.35m high ceiling from floor level was a doddle, with no need for any extension on the nozzle. I reckon I sprayed the whole 6m x 4m ceiling in around 5 to 6 minutes, including taking time to go around into the corners. Painting a garage isn't a great test, especially as the wall lining is OSB, but I reckon the smooth ceiling boards were pretty close to plasterboard in terms of smoothness, and the finish looks good enough to me. The main downside of the thing is the time it takes to clean it after use. After spraying 10 litres of paint in around twenty minutes, I then had to spend about half an hour washing the thing out and cleaning and drying the gun parts, then lubricating the pump ready for the next time I use it. The other key point is that you have to mix the paint really, really well. Mixing by hand with a stick isn't good enough, it really needs a paint mixer paddle on a drill. Time spent mixing the paint is well spent, as if there is one lumpy bit it will block the pick up pipe filter, which then has to be cleaned and the system re-primed. There is very little over-spray, so there's no need to go mad with masking, but there is a fair bit of dry bounce back if you don't keep the gun dead square and at the right distance from the surface. This bounce back is just like white dust, the paint particles are so fine that they dry in the air, but they do settle on any horizontal surface. They don't stick, though, so if you haven't put dust sheets down you will have a fair bit of cleaning up to do afterwards. You can spray right up to the edges of doors, windows etc, just by using a large bit of stiff card, with a straight edge, in your spare hand, as a movable mask. It's not like air spraying at all, in that the paint pattern from the gun is very well defined, with almost no over-spray. Overall I think this was a good buy. I hate painting, with a vengeance, so might well have ended up paying someone to do this job otherwise, and that would have cost at least as much as this spray system. For anyone looking to paint a large area I would highly recommend thinking about buying or hiring one of these units. Mine was pretty cheap, and looked new to me, and cost less than a day's labour for a decorator. Add in that there are no consumable costs, like rollers, trays, etc, and it looks even better value. As a final point, there is a safety issue that should be mentioned. These things run at pressure-washer type pressures, and can inject paint through your skin if you're daft enough to put you hand in front of the gun. The consequences of that could be very serious indeed, so best to wear gloves and be aware of the danger.
-
I tried a bit of motorcycle chain lube spray, hoping that would stay in place on the sliding part, but it hasn't really helped much. I might give the silicone stuff a try, as somewhere I've got a small spray tin of the stuff for lubricating car door hinges and stays.
-
I recently fitted the two section Screwfix one to access my garage loft. There are two issues with it. The first is that the plastic sliders on the top brackets are very stiff, so stiff that sliding the ladder up or down is pretty hard work. Short of making new parts I can't see an easy fix, as they are moulded from something like nylon, and are riveted together, so not that easy to take off and machine the grooves out a bit. The second issue is that the ladder itself flexes a lot, far more than the two section alloy one we had at the old house. It's OK for very occasional use, but it's not the most reassuring ladder to use, because of the sideways flex.
-
Years ago, a boat builder friend decided to try and optimise the space in his very tiny bathroom in his cottage. He moulded up a large GRP box, then made up a rotating bath/washbasin and worktop contraption that fitted to bearings at either end of the tray. The tray was recessed down into the floor and had a drain running from it. It worked pretty well, as it allowed both a bath and a washbasin and worktop to be fitted into the same space. Most of the time it was just a toilet and washbasin, but if you wanted a bath you just undid the lock, swivelled the thing over so the bath was on top and locked it in place again. The taps were on the wall, so worked for both the bath and the washbasin. He managed with it for years, but had to build a proper bathroom when he got married..................
-
 It looks as if the system could be properly re-installed easily enough, using rigid ducting, and with much better duct insulation, plus insulation around the MVHR unit. Ideally, the MVHR and as much of the ducting as possible should be inside the heated envelope of the house, but failing that it needs to be very well insulated. As mentioned earlier, I very much doubt that doing anything to the MVHR will change the house overheating problem, as MVHR just doesn't shift enough heat around to make a significant difference. The overheating is almost certainly being caused by solar gain, most probably through the windows. Modern glazing units work as partial one-way radiated heat transfer paths; they have an internal long wavelength IR reflective coating that reflects heat back into the house, but which lets heat in from the sun.
 -
One problem is that the cameras aren't (yet) IP cameras, so the video to the recorder is just ordinary composite video. The recorder does the motion detection, but isn't clever enough to only record from the camera that's triggered the motion detection, although the detection area within the field of view of each camera can be set, using a grid of "Os" and "Xs". I've currently set the offending camera so that the whole grid is off, so now the recorder only activates when one of the other cameras triggers it. This doesn't happen often, and nine times out of ten it's the drive camera that triggers, usually by a cat, or maybe one of the resident ducks. Once triggered, the recorder captures video from all the cameras. AFAICS, there's no easy way to add a blocked out area, and anyway, if there was it would block the head and shoulders view of anyone by the front door, which would rather defeat the purpose. The idea behind fitting the internal cameras facing the doors was to be able to get decent images to ID anyone, as the external cameras are wide angle, plus they are pretty obvious, so someone with a hoodie or whatever could easily disguise themselves. The internal cameras aren't obvious, and probably wouldn't be spotted, especially the front one from outside, due to the reflective film on the glazing.
-
That camera is hard wired and fixed, partially hidden under the landing, so it only has limited adjustment. It's been there for a couple of years and until the hedge came down over the road it wasn't a problem, as it's set to look at the inside of the front door, with the centre line of the camera well above the road, so it can't record anything other then the very top of a tall truck there, and tall trucks can't really get down that lane anyway. The main issue is that our house is way above the lane and the height of the house opposite, and so this first floor window is about level with the centre of our front door, which is all glazed. As far as I'm concerned, I can't see how it's my problem, as the system has been running OK for a couple of years without the cameras looking where they shouldn't. I didn't even know that bedroom window opposite was there when they were fitted, as the hedge was way above the ridge height of the house opposite. That bedroom window still isn't visible from the lane, only our front windows and drive. For now I've turned motion sensing off on that camera, so recordings are only triggered by the other cameras, which isn't ideal, but the best I can do. That camera does get recorded if one of the other cameras is triggered, but that's not something that happens very often, so the chance of something getting accidentally recorded is small. Talking to the neighbours won't be easy, as they are not at all communicative and very much keep themselves to themselves. I dropped a wrongly delivered parcel over to them a few months ago and didn't get a word out of them, not even a thank you, she just took the parcel and shut the door on me.
-
No problem, it would be worth doing. Our DPM is sandwiched between layers of EPS, the lowest two 100mm layers are direct on the blinding. There's no issue with putting EPS directly on the ground as it doesn't absorb water. One of the first applications of EPS as a load spreading foundation was supporting railway lines across boggy ground, I believe.
-
Luckily mine was a small one, 8 x 4, but I did buy the optional metal foundation frame as well. I can easily believe that it took a couple of days to build a 10 x 12!
-
I can second the hassle with screws, nuts and bolts with a metal shed. I recently built a Globel (Lotus) lean-to metal shed and there were around 1000 fasteners. It had to be metal, as it's less than a metre from the boundary, and it's pretty robust, but it did take a whole day to put together.
- 8 replies
-
- 1
-

-
- plastic shed
- keter factor
- (and 2 more)
-
Sadly it's not that easy, as the window in question takes up around 1/3 of the field of view of the camera. To blank it I'd need a large sheet of ply, or something similar, taped over the upper part of the front door.
-
It's the damage that is the real bugger, isn't it? I'd rather have stuff nicked than have the hassle of trying to get expensive doors replaced, especially with the knock on effect that has on buggering up the decoration, etc. Our CCTV system seems to have completely stopped the casual intruders we used to get, but has created a problem that I'm not sure how to broach with a neighbour. The external cameras are fine, they just look out on our drive and boundary, but one of the internal cameras looks at the front door. Now the neighbour has chopped down the 30ft high Leylandii hedge, that camera looks directly into his young teenage daughters bedroom window. Nothing I can do about it, except turn of the motion alerts from that camera, and make sure I delete the footage of her that is recorded every evening, but I wish I could find a tactful way to let him know that I don't particularly want to have that camera recording his daughter, it makes me feel very uncomfortable. I think part of the problem is that the external reflective film makes the front glazing appear as if it's opaque from outside, but the internal camera sees straight through it. The problem will go away in the late autumn when we plant some trees, but until then I'm not really happy with either turning that camera off or recording his daughters bedroom antics...............
-
That is indeed as expected, totally crap ducting - the cheapest, nastiest possible way of doing the job. That stuff is technically "insulated", but frankly the insulation is a bit of a joke, and the airflow resistance is high. However, I very much doubt if the MVHR has any bearing at all on the overheating problem. An MVHR system simply doesn't shift anywhere near enough heat to effect over heating, plus if the air outside is warmer than inside any ventilation, be it MVHR or just opening windows, will make the house hotter. The key to reducing internal temperature is to shade windows on the outside, keep windows and doors closed during the hottest part of the day (and turn off the MVHR) and then open windows and turn on the MVHR at night, when the outside temperature is cooler (the "night purge" system that's very common in Mediterranean countries). You could also have a look to see if the insulation level is both reasonably good and free from voids. Mass housebuilders are generally poor at fitting insulation properly, and good insulation will help to keep the house cool, by reducing the amount of heat that gets in from outside.
-
I agree, but the stuff I described, that uses a steel spring to try and keep it open, is bloody awful, and that is often used by mass builders because it's cheap and quick to install. The floppy stuff with the steel spring inside also collects duct and dirt, because the higher surface friction causes the air flow to slow right down and allow dirt to drop out of the air flow, I think. The semi-rigid ducting used for radial flow systems is fine, as it has a smooth liner, and the test data shows that it has a flow resistance that is near-identical to rigid ducting, with the exception of slight losses at bends (but then the losses on rigid bends are higher anyway). The other form of flexible ducting, the stiff aluminium stuff that has very shallow concertina grooves, has a far lower flow resistance to the floppy stuff with the spring steel spiral support. It's not as easy to use, but seems fine for the short isolating lengths at the MVHR unit itself.
-
Welcome. I'm afraid I'm not the slightest bit surprised to find a new house with problems, I get the very strong feeling that house build quality is getting poorer, especially with some of the big name builders. There are several issues that could be contributing to your problem, and it may well not be the MVHR that's the major issue, either, or at least not directly. In general, good insulation keep heat out as well as it keeps heat in, so it's not automatically a given that a well insulated house will get hot. Additionally, mass house builders don't build well-insulated houses anyway, so you may well find that the insulation level is such that it just barely meets the building regs requirement (and my experience is that often it may not even meet that standard). Flexible ducting means many things. Semi-rigid ducting is fine, and is not "flexible ducting" in the general sense of the term. The really poor flexible ducting is the stuff that has an alumised (shiny) or possibly flexible PVC, skin with a wire spring to try and maintain it's shape. Long lengths of this are bad news, as it does impede air flow a lot when compared with other types of ducting. Big builders love it, as it's cheap and quick to install. The only place it should ever be used (and then only as a last resort) is as a short length to act as a vibration and noise isolator at the duct junctions to the MVHR unit. Even then I'd not use it, as there is an alternative, in the form of the concertina aluminium ducting that isolates noise and vibration just as well but has much lower flow resistance. A bit more information on what you have would help. It's also important that the MVHR is sized correctly for the size of your house. It's quite possible that the builder has installed a system that's either too small, or right at the lower limit of what might be acceptable. If you can give the total internal floor area (all floors) of your house, plus the model of MVHR, then it's easy to do a quick check. When were the MVHR filters last changed/cleaned? Generally these need to be cleaned or replaced at around 6 month intervals, as they clog up with dust which then reduces the air flow rate. MVHR won't have much impact on house temperature in summer, and if the MVHR unit and ducting is located somewhere hot, like the loft, and not well insulated, then it may contribute to daytime heating a little bit, rather than decrease it, but again it won't be a massive effect, as MVHR just can't move large amounts of heat, even when all the air flow rates are set properly. Your overheating problem may well come from solar gain through the windows, and, perhaps, solar gain through the structure of the house, especially if the insulation level either isn't that great, or if the insulation and structure of the house combined has a low decrement delay. The latter gets a bit complex, but if your house has somethign like a brick or block outer skin then the decrement delay should be reasonably long, and the problem is more likely to be elsewhere. Reducing solar gain can be achieved in several ways, from adding external screening in some form (shades, slats, a brise soliel, solar blinds etc) to fitting external reflective window film (we have this, it's very effective, but not cheap).
-
Possible to cool with UFH and my setup?
Jeremy Harris replied to pudding's topic in Underfloor Heating
We had our system set up to do exactly this before we had the external heat reflective film applied. It was very effective at keeping the areas of floor that were being heated by the sun at a much lower temperature, just by distributing the heat around the slab. The main effect was to reduce room heating from what would have been hot areas of the floor; just reducing those small areas from around 30+ deg C down to around 20 deg C by recirculation significantly reduced the overall house air temperature. A large part of this was down to the much reduced temperature differential. As long as the whole slab stayed below room temperature there was no heating from it at all, and then at night the slab could cool down a bit, ready for the next day. Overall it worked well, but I never really got a chance to test it during prolonged hot spells, as the cooling system would kick in and actively cool the slab. In the description above, the only thing that has now changed is that I've wired the UFH pump to the UFH valve, so the pump does not run all the time that the programmer has the system turned on. The UFH pump used to be wired directly to the power feed to the system, switched by the programmer. -
Possible to cool with UFH and my setup?
Jeremy Harris replied to pudding's topic in Underfloor Heating
What I did was to make a UFH control box that has 12V four relays in it, plus some diode logic to switch the relays in set combinations. One relay controls the ASHP cooling/heating selection, one relay controls the ASHP on/off terminal, one relay controls the UFH valve and pump (this opens the valve in the UFH return line and turns on the pump) and one relay control the valve in the flow to the buffer tank (this is turned off when the system is in cooling more). There are two room stats, one configured as a heating stat, the other configured as a cooling stat. The heating stat is set to 20.5 deg C, the cooling stat is set to 22.5 deg C. If the heating stat calls for heat then the heating/cooling relay is set to heating mode, the UFH relay is set to open the UFH valve and turn the pump on, the buffer tank valve relay is set to open the buffer tank valve and the ASHP on/off relay is set to turn the ASHP on. The ASHP delivers water at 40 deg C, and the TMV on the UFH manifold mixes this down to about 24 deg C. The buffer tank heats to 40 deg C, or as close as it can get to the flow temperature.. If the cooling stat calls for cooling then the heating/cooling relay is set to cooling mode, the UFH relay is set to open the UFH valve and turn the pump on, the buffer tank valve relay is set to close the buffer tank valve and the ASHP on/off relay is set to turn the ASHP on. The ASHP delivers water at 12 deg C, and the TMV on the UFH manifold just opens fully, as it can't achieve the set temperature (not a problem). The buffer tank is isolated for as long as cooling mode is selected. There is an override for hot water, as we use the buffer tank to pre-heat DHW. When the buffer tank thermostat calls for heat (it's set to 35 deg C) then cooling mode is turned off, heating mode is selected, but the UFH valve and pump are turned off if the heating stat is not calling for heat. This allows the ASHP to just heat the buffer tank, not the floor. As soon as the buffer tank thermostat is satisfied, then is cooling more is selected the buffer tank valve closes and the system reverts to cooling the UFH again. -
Possible to cool with UFH and my setup?
Jeremy Harris replied to pudding's topic in Underfloor Heating
I've found that cooling the UFH works very well. I just added a cooling thermostat to activate the UFH and turn on the ASHP in cooling mode, with the ASHP set to deliver a 12 deg C flow temperature when in cooling mode. I find the floor surface nave goes lower than about 18 deg C, so there's no condensation risk. I also had to add a motorised valve to turn off the flow to the buffer tank when in cooling mode, so that tank stays warm. -
Low profile concealed shower valve
Jeremy Harris replied to Crofter's topic in Bathrooms, Ensuites & Wetrooms
Our tray runs the full width of the shower room and I just fitted the mixer on the wall opposite the shower head, with a bit of 15mm pipe running under the floor and up the wall to the shower connection point: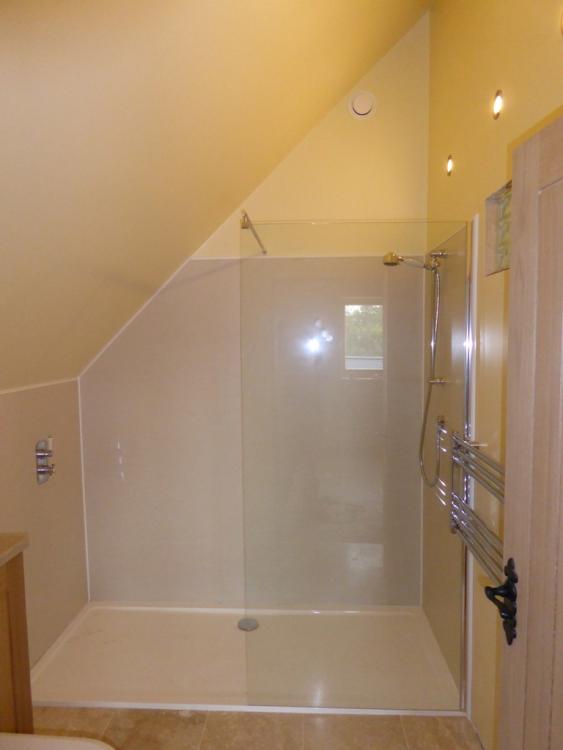
-
The way you have to pay twice to discharge conditions is damned annoying, especially as both times we had an email back from the planning officer within a very short time saying they had been discharged. I fail to believe that it cost £90 of a planning officers time to do this work each time, at best it may have been half an hours work, which according to the full employment cost data I got from the council (via an FoI request) equates to about £14 for each submission.
-
UFH pipe literally sandwiched between mesh...a problem?
Jeremy Harris replied to mvincentd's topic in Underfloor Heating
Worth bearing in mind that the UFH won't get the concrete hot - it will get far hotter just sat in the sun I expect. Before we fitted the external reflective film to our front glazing the floor would easily get to around 35 deg C on a sunny day, whereas the hottest it ever gets with the UFH running is maybe 23 deg C. I think there is probably a fair bit of unwarranted concern when it comes to the thermal effects that UFH may have, probably based on decades old problems from back when UFH systems needed to run at 30 deg C plus in order to keep a house warm. -
Need quick to learn CAD software recommendation
Jeremy Harris replied to Ferdinand's topic in New House & Self Build Design
The big problem with all CAD packages is the learning curve, I'm sure, and a large part of that problem probably stems from people not having been taught the basics of draughtmanship at school, I suspect. I did Technical Drawing as a subject at school for several years (including O level), then never used it at all until I needed to learn how to use AutoCad for a job at work that involved some aircraft modifications. This was pre-Windows, when we ran AutoCad on a "state of the art" 286 PC running DOS, complete with the AutoDesk dongle that was used to prevent software piracy.................. I went and did the AutoCad course, and found it tough, but not too bad. The hardest part was remembering all the stuff I'd done in Technical Drawing years earlier at school (like remembering which projection was which). I can now knock up drawings in AutoCad in a few minutes, having built up a big library of parts and part drawings over the years, so it might take me 10 minutes or so to produce a whole new set of elevation drawings for our house, with lots of changed details. Someone starting from scratch would spend many tens, perhaps hundreds, or hours just getting to grips with the software, before they ever managed to produce a useful drawing. For anyone that's only going to ever want to produce drawings very occasionally, then I would strongly suspect that just paying someone to do the job would be a lot quicker and easier. -
It's generally taken as being the total floor area (all floors) inside the external walls; the area taken up by internal walls isn't usually deducted, AFAIK, so this figure slightly over-estimates the usable area of the house.
-
The US system of building codes and inspections is pretty similar to that in the UK in general. There are big differences associated with the fact that timber has pretty much always been a very common building material in the US, with millions of homes being of all-timber construction. I believe they suffer from the same sort of problems as we do when fashions change and new methods of construction and finishing are used, though. The example here of stucco directly on to a timber frame is typical. Stucco was a finish applied to mud and concrete structures in the main, but fashion dictated that people in areas where timber structure was more usual wanted to use this as a finish, instead of the more normal weatherboarding/siding. There was a lack of knowledge about the impact of doing this, so problems have arisen. You could make exactly the same arguments about the first use of mass constructed timber frame houses in England. The first contractor to build these, because of the speed and cost advantage mainly, got caught out badly when the frames started rotting after 10 to 15 years. The cause was a failure to understand the way water vapour moves through materials and the large amount of energy needed to change condensed water back to water vapour. As a consequence we're now all more aware of the need to ensure that water vapour movement is properly controlled, and that the risk of interstitial condensation, particularly at critical points like a cold sole plate, is mitigated.
-
MDPE has a max temperature rating of around 40 deg C, above that it will start to deform, so running the risk that the fittings may not seal well. It's probably best to use a pipe that's rated for hot water use really, although you may possibly get away with it. The thing that would worry me is the joints, because there is a fairly high risk that the pipe will deform inwards when warm, from the compression forces from the clamp ring.
