Jeremy Harris
-
Posts
26430 -
Joined
-
Last visited
-
Days Won
360
Everything posted by Jeremy Harris
-

Obtaining restrictive covenant insurance
Jeremy Harris replied to Moonshine's topic in Party Wall & Property Legal Issues
Hopefully the OP won't mind me tagging on to this as it's the same topic. We're being asked to stump up for a single premium insurance (plus a hefty fee from our solicitor) to cover a covenant that can't ever be enforced, for two reasons. Firstly, it's a "right to light" covenant where the property that has the right to light is not identified (for whatever reason the deeds/land registry documents don't identify the property). Secondly, there are other covenant clauses that restrict the house to single storey, and as such it couldn't possibly block anyone's light, especially as it's got hedges on the two sides facing distant neighbours that are around 12 to 15ft tall. My inclination is to say no, we won't pay for insurance, as it's not something that can ever be enforced. I'm getting a bit fed up with our buyer trying to get us to jump through hoops, especially as we gave her the details of the covenant BEFORE she made an offer. I'm inclined to the view that these one-off indemnity insurances are a bit of a scam. Anyone got any views about them in a case like this? -
Yes, as far as I know. I've only seen one for real and that was a Willis made one, and it looked to me as if the element was a standard one with a 2 1/4" BSP thread.
-
A Winter of Peckering
Jeremy Harris commented on Triassic's blog entry in Mr and Mrs Triassics New Home
The initial clearing and levelling of our site took away around 900 tonnes, and then we had to take away about another 100 tonnes to get the garden, drive and patio to the right level. -
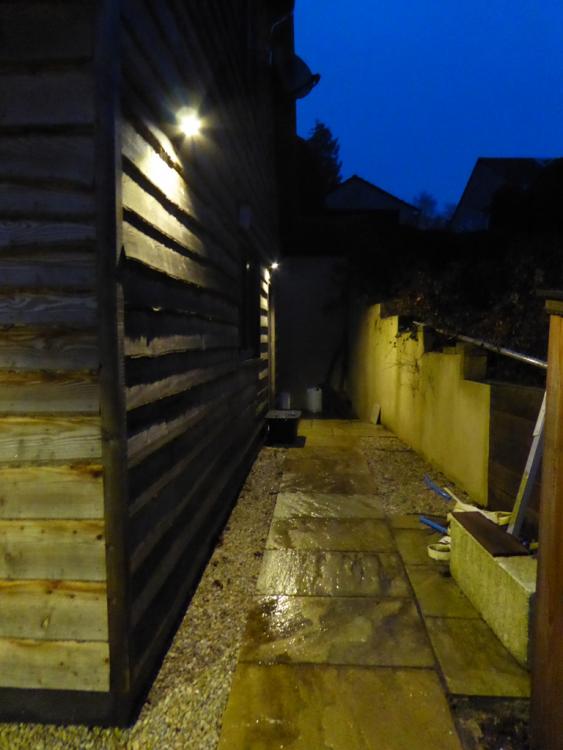
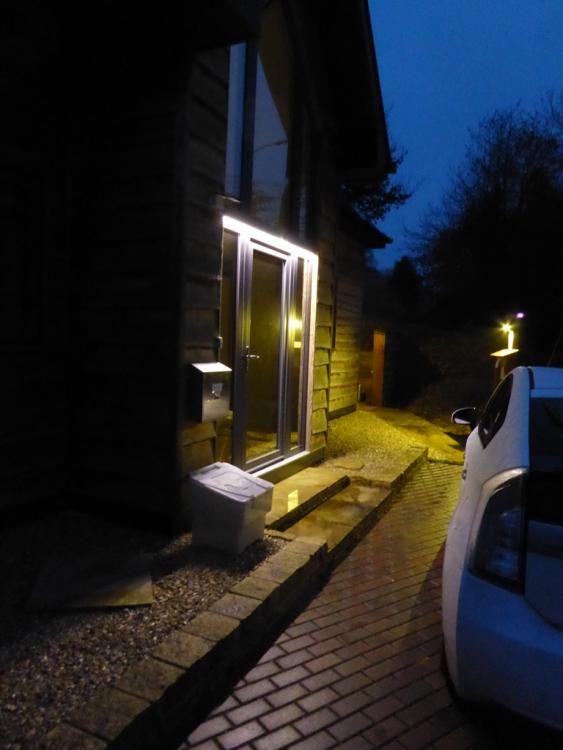
I found that an off-the-shelf solution didn't seem available. I built our solar powered outside lighting, using two different battery systems, and two different types of lights, but with the same eBay PIR switches. They are shown working in this post: I can't see a problem with scaling up the same concept with a larger solar panel and battery and some LED strip lights. I've been really impressed with the bright 12 V LED strips (they are the ones I fitted into the drip groove on the stacking cill over our front door), and reckon they would work well in a garage (they were what I was originally going to use before I discovered modular, plug together, LED tubular lights). 30 minutes of lighting isn't a problem for a modest sized battery and PV panel, it's just finding an off-the-shelf system that will be the challenge.
-
Off the shelf non vented roof windows
Jeremy Harris replied to vivienz's topic in Skylights & Roof Windows
The problem with that is that the closed vents aren't really airtight, plus they form a nasty thermal bridge through the frame, and on a roof light in a passive standard house they will almost certainly attract condensation. -
The solution I've ended up with is to use thin (6mm) microfibre mats. The smaller ones weren't great, so we've ended up with ones that are wider than the front and back doors by a fair bit, as these stay in place better on the travertine flooring. What I should have done is left mat wells by both doors, so that thicker doormats could have been dropped into them, but at the time we were having the floor tiled it hadn't occurred to me that mats would be a problem.
-
The only one I have of the ramp to our back door is this one that shows our solar powered outside lights. The furthest light is over the back door, so you can just make out the flat paved area there for turning a wheelchair more easily. The black recycling bin is sat off the ramp on the gravel that's all around the house. The wheelie bin flat area is where the lump of left over foundation EPS and other rubbish is sat, at the bottom right. This photo shows the front steps and in the background the start of the ramp from the end of the drive, again it was taken to show the solar outside lights at the front. My car is parked a lot closer to the front door is this photo that it normally is; where it's normally parked there is loads of space to get a wheelchair, wheelie bin or whatever past. You can just make out the wheelie bin storage area, behind the timber screen fence in the background, where the ramp turns around to run up to the back door:
-
My father was a wheelchair user for years, and modifying our old family home was a lot of work. We ended up building an extension at the back to house a downstairs bedroom, converting the old cloakroom into a wheelchair accessible shower and having three or four doors widened to allow wheelchair access. One of my best friends is also a wheelchair user, so we had him around to test some of the accessibility stuff, like getting in and out of the WC. That made me think carefully about details in our new build, so I fitted 33" wide doors everywhere, all with flush thresholds (which incidentally makes cleaning a lot easier). I didn't want a ramp at the front door, because it would have taken up a lot of space and would have spoiled the look, so instead I had the ramp lead up the side path to the back door, where it doesn't even look like an access ramp. I also made sure there was a big, flat, paved area at the top of the ramp, outside the back door, to allow a wheelchair to be easily turned through 90 deg. That ramp is also handy because part way down it there's another flat area off to one side where the wheelie bins sit, and the rest of the ramp down to the drive makes wheeling the bins easier. As @jack mentioned, a friend of mine built a really nice stone clad farm house style build in Yorkshire, and didn't want a ramp to spoil the look, so he covered his lovely York stone steps with polythene sheet and laid a weak concrete mix ramp over them to comply with the access requirements of Part M. Once he'd had the house signed off he just broke up the concrete and cleaned up the underlying stone. He also objected to having to have the switches and sockets half way up the wall, so had his electrician run two sets of boxes in for every switch and socket, one set where he wanted them, with cables looping in and out of them, and one set that was Part M compliant. He papered over the unused boxes, so when his house was inspected all the switches and outlets were compliant, then got his electrician back before he decorated the place to fit all the outlets and switches where he wanted them, filling in the other set of boxes to hide them. I can't say I agree with what he did, but he's as stubborn as a mule, hates rules and regulations with a passion, and wasn't going to have anyone tell him how he should have things in his own house. He's close to my age, and he built the house ten years or more ago, and I doubt it will be long before he starts to wonder about the wisdom of being so damned stubborn about Part M.
-
Music is an odd one, as it isn't in colour for me, although written and spoken words and numbers are. Not hearing music in colour is something I've always thought of as a bit of a disability, just because I like music and wish it was expressed as colours, as I think it would be even more enjoyable.
-
Pitched roof thickness and insulation
Jeremy Harris replied to Moonshine's topic in Roofing, Tiling & Slating
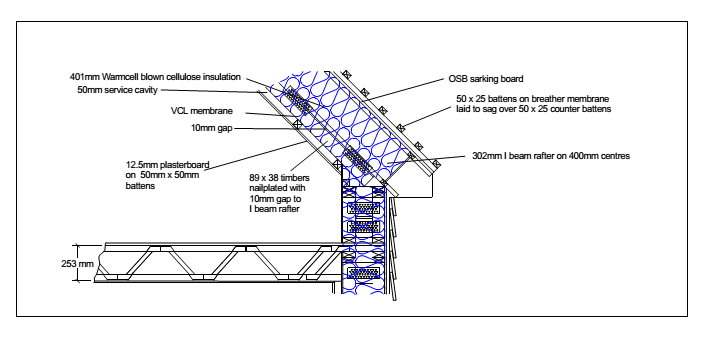
We have 302mm deep I beam rafters, with an added bit of stud timber nail plated spaced 10mm off the lower I beam edge, giving a total rafter depth of about 401mm, The outer face of the rafters is clad with OSB, to provide sarking and containment for the insulation, the inside has a layer of Isover VCL membrane, held in place by 50mm x 50mm battens across the underside of the rafters, which also provides a service void. The space between the rafters is filled with ~400mm of cellulose, which in reality is a bit thicker than this on average, as the pressure under which it's blown in has slightly quilted the membrane on the underside. The advantage of this method is that the ~400mm layer of cellulose provides a reasonable level of insulation, but more importantly, it has a reasonably long decrement delay. An unexpected advantage is that it also provides a very good degree of acoustic insulation, so the house is very quiet inside, and we can't hear rain on the roof, for example. -
Colour is a funny thing to me. I think in colour, and every word has a specific colour, or sequence of colours, which made memorising resistor colours codes easy. I don't consciously translate colour bands into numerical values, but just "see" the value from the colour. My late mother used to make me do party tricks by asking me the colours of words like the days of the week, or numbers. It does mean I remember phone numbers and credit card numbers/PINs easily, because they are just colours. For years it was just a bit of a curiosity, one of those odd things that didn't seem at all significant, but around 25 years or so ago there was an article in New Scientist, or maybe a paper in Nature, describing exactly the way I think in colour. Apparently it's not that unusual; it's even got a name and is in Wikipedia: https://en.wikipedia.org/wiki/Synesthesia In my case I lived for the best part of 40 years keeping quiet about it most of the time, although I invariably got quizzed by my mother, trying to catch me out, as I don't think she ever really understood that I think in colour and have to actively translate colours to words, with often subtle colour shade differences (for example Wednesday is a dark green, but Thursday is a sort of muddy green). I think the only advantage it's given me is being able to remember facts a bit better than most, which certainly helped when doing exams, otherwise it's just a bit of a curiosity.
-
Yes, it's SELV. These LED panels qualify as the driver is separate and mains powered, but connected by a low voltage cable to the light itself.
-
I've always just used the Brother stuff, and not had any issues with labels coming off. Perhaps some of the clones of the Brother label tape that are around may have adhesive that's not as good? Years ago I used to print paper labels and cut them up and poke them under clear heatshrink as cable markers, but it was a real faff and I needed power to run the small heat gun, so stopped doing this when I bought the labelling machine.
-
A cheap Brother label printer works fine. The labels can be either stuck to T&E, or wrapped around individual wires. I used to use different coloured electrical tape, but so much of the stuff has really nasty adhesive now that I stopped using it. A sharpie works OK too, at least on the outside of T&E, but I prefer using the Brother labelling machine, as it has the option to make wire wrap-around labels.
-
The regs are pretty clear with regard to what's required, and have been for decades. When I used to teach apprentices decades ago, switches and FCUs were often supplied with engraved labels on the front, describing the circuit that they controlled (something like "immersion" or "heater"). This is something that has "gone out of fashion", but the requirement to identify circuits and switches where it's not obvious (and light switches and switches in outlets are considered obvious) has existed for as long as I can remember. What's happened is that the economics of supplying so many variations of the same basic switch has meant that manufacturers have saved costs by removing the built-in labels, with the possible exception of cooker switches. This has switched responsibility to the installer, and there are far too many monkey's out there who have never bothered to read and understand the regs - read through any of the electricians forums and you'll find a LOT of electricians asking really basic questions where they should have already known the answers as a part of their training.
-
decrement delay - what is that?
Jeremy Harris replied to readiescards's topic in Building Materials
The easiest to understand description is on this website, I think: http://www.greenspec.co.uk/building-design/decrement-delay/ -
It's not just in the CU that labels are a requirement, they are required wherever there could be doubt as to what a switched circuit controls, or there needs to be a diagram/adequate description located close to the CU or distribution board such that anyone looking at the system can understand how it's wired. Apart from being something that saves time (and so should save cost) for any subsequent inspection and test, it also makes it a lot easier to resolve the sort of issues that @lizzie is now, unfortunately, experiencing.
-
It's slightly longer than EPS, and a fair bit shorter than blown cellulose. However, it depends very much on what the outer skin of the house is made from. If the outer skin is brick, block or stone, then that will substantially increase the overall decrement delay. It's also a bit site-specific. Our location is such that the house gets sun from sunrise to sunset, so decrement delay has a potentially big impact. It was one reason we opted to use pumped cellulose. If we'd had a stone outer skin than I'd not have been so concerned, and may well have opted for something like PIR insulation.
-
There's a requirement in the wiring regs to ensure circuits are adequately identified. It's an issue that should be flagged during an inspection and test, and has been for years (although it's something often ignored). If I was inspecting a system that didn't have labels or an adequate description of the installation that was clear enough to inform me of the details of each circuit I'd mark it down as a C3 (Improvement Required). Bearing in mind that every domestic electrical installation should be inspected and tested at least every ten years (another thing that's very widely ignored) and that an inspection and test is a hell of a lot easier if things are properly labelled and that either the original data from the installation tests, or the previous EICR (Electrical Installation Condition Report) is available (and it makes the EICR cheaper, as it takes less time), then there's every reason to make sure that documents are retained and everything is properly labelled. It's worth noting that the guidance for conducting an EICR is that there should be minimal exposure to live parts. This means that if there is an existing description of the installation, with the results of the tests that were conducted, then many of the EICR tests can be conducted with least disturbance to the installation, provided that an inspection of the installation doesn't give rise to concern. Mind you, I bet that 90%+ of domestic electrical installations rarely get any inspections at all. SWMBO has always been a bit annoyed with me for spending a couple of hours every few years checking our electrical installation. My obsession with inspection and testing comes from having seen some pretty grim installations in houses we've bought over the years. Arguably, this has made me go a bit OTT with our new build, with an all-RCBO CU, cables that are generally one size up from what's just about OK and labels everywhere. My workshop even has E stop buttons and contactors controlling the two 20 A radials that supply the main power circuits, so banging a button kills all the power (but not the lights) if something goes awry.
-
I've used non-slip epoxy floor paint from Reactive Resins and it was really good, but sadly I see they have now gone into liquidation. There are plenty of other suppliers of epoxy floor paints though, and generally they are all pretty similar, and if applied as at least two coats would probably meet any food safety issues OK. They are hard work to apply, in my experience, as to get the required build thickness they tend to be quite thick and need a lot of work to brush or roller out. Worth it though, as there's simply no comparison between ordinary floor paint and the epoxy stuff - it's far more hard wearing and gives a really nice looking finish.
-
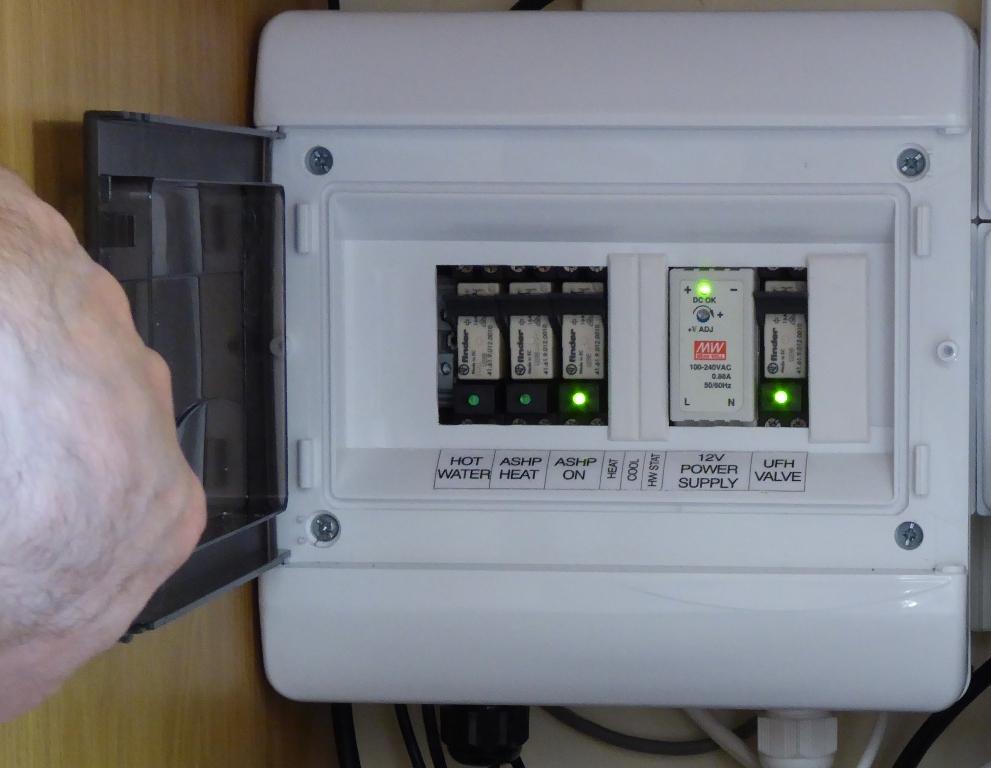
As an example, this is our heating and hot water control box, with labels on every relay and LEDs on them so anyone can see at a glance what's on and what's off. Under the centre blanking strip there are three connections from the thermostats, so when the lid's off anyone can see which connection goes where:
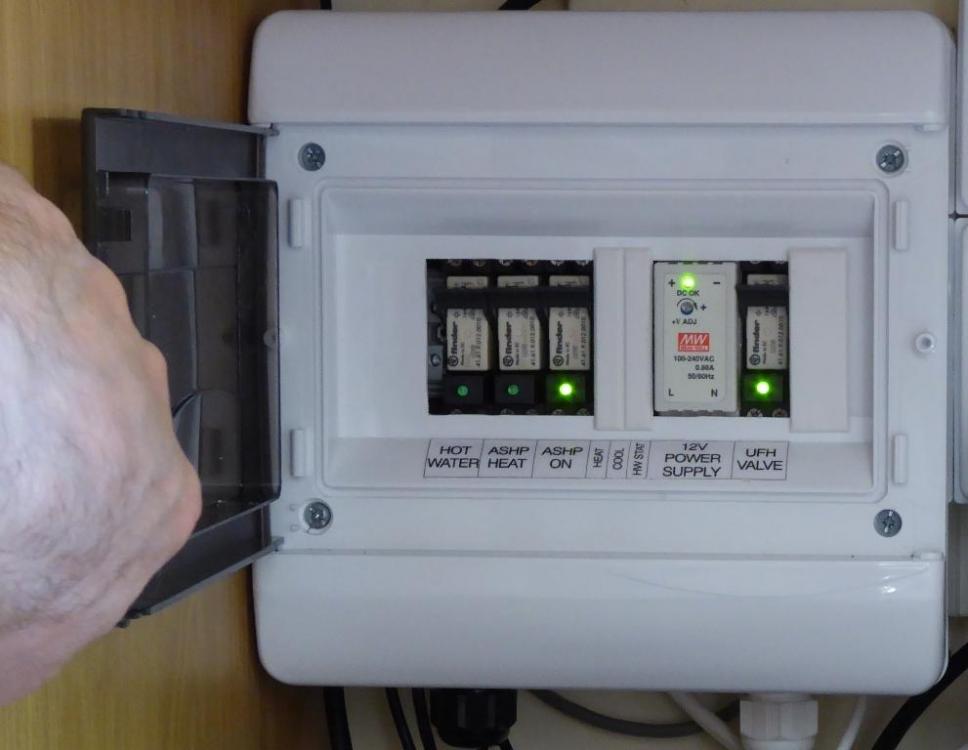
-
There are supposed to be labels on damned near everything now, so why the electrician who wired it didn't label it I don't know. There's also supposed to be a description or diagram of the whole installation somewhere by the consumer unit, although that's a rule that's more often than not ignored. I spent ages going around labeling stuff, so every switch and box has a label on letting anyone who looks at it know what it does. It should be standard practice, especially as labeling machines are pretty cheap and it's a lot easier to label stuff as you go, rather than do it all at the end when you may well have forgotten what some of the things do, or connect to.
-
3.3 kW at the UK nominal supply voltage of 230 VAC = 14.35 A, so it can't be connected to a FCU, as they only go up to 13 A. The maximum power that can be drawn from a 13 A supply is 13 A x 230 V = 2.99 kW. If it's a resistive load, like a heating element, then it will probably deliver more than this power, as in reality the UK mains supply voltage is still really 240 VAC. When we harmonised with the EU, it was agreed that our nominal supply would be stated as 230 VAC, but we were allowed to have a tolerance of +10%, -6%, which conveniently allowed us to keep our 240 VAC supplies without changing anything, because they are within the allowable tolerance (minimum supply voltage is 216.2 VAC, maximum is 253 VAC).
-
Here's a cross section through our house, showing the detail: The gap was created when the rafters were put together in the factory, by nailplating a bit of timber to the lower member of the I beam with a small gap.
-
Main issue with polythene is that it has an extremely low surface energy, which means that it's really difficult to get any adhesive to stick to it for very long. The membranes used for VCLs have a surface that has been made from a material (or specially treated) to increase the surface energy and allow much better long term adhesion. My worry would be that even the very best airtightness tapes may not stay adhered to non-surface treated polythene sheet for the decades that's expected for something embedded in the structure of the house. All the approved VCL materials have an inner surface that is either made of a material to which tapes will bond very well, or have a surface treatment that does the same thing. Ordinary polythene sheet won't have any form of surface treatment, so isn't likely to allow adhesive tapes to remain well-bonded for decades. You can get around this by choosing to use mechanical sealing, perhaps, like using some form of mastic on any joints and a batten to secure them and keep the two bits of polythene under pressure, but I'm not sure how you would deal with things like door and window openings.