


Temp
-
Posts
10690 -
Joined
-
Last visited
-
Days Won
43
Everything posted by Temp
-
There was a case of a widow who's husband had sadly died during construction. Couldn't face living in "their" house which she had finished - but council pointed out she had to for three years. I don't remember if they relented on that.
-
Ah. In that case would two separate planning applications work? Perhaps with a year or two between?
-
How not to remove a Chimney Breast.....
Temp replied to MAB's topic in General Self Build & DIY Discussion
Would be interesting to see inside. I wonder if the stack went through the floor as well. -
The guidance on the CIL here.. https://www.gov.uk/guidance/community-infrastructure-levy Has some on phasing.. https://www.gov.uk/guidance/community-infrastructure-levy#para129 Reasons for rejecting the resubmission will have to be valid planning reasons or they will loose at appeal. I very much doubt a possible loss of CIL due to a perfectly legal exemption (eg two self builds) would be considered a valid planning reason. Expect them to look for valid reasons such as prolonged impact on traffic or noise on neighbours or other nonsense. I would get a friend to check to see if they have met demand from the self build register. If not point out you will raise that at appeal as well.
-
I think that would be risky. From what I can see CIL phasing is only allowed if the PP specifically mentions a phased development... https://www.hewitsons.com/latest/news/community-infrastructure-levy-cil-is-your-development-phased-or-will-full-liability-arise-on-first-commencement "If it is intended at any time that a development will be phased then developers and landowners should ensure that such phasing is expressly required within the planning permission and its conditions and s106 obligations."
-
I did 60m of natural hedge using whips. You just use a spade to make an L shape cut and lift the corner. Stick the whip in, let the sod back down and press it down with foot. Think i did something like 300 whips over two days. Two rows staggered. Can still cut it by hand. I put mine in about 1m away from a post and rail fence so I can get between the fence and hedge to cut the back side.
-
Do you actually have a cavity tray in the wall as per the drawing? If not then given that this area is hidden I'd go up three courses of bricks instead of two. It doesnt have to be a uniform 150mm it can be greater at the low end of the gutter. I suspect the roof/lead man will make a hopper where the existing downpipe is and have the top part of the down pipe discharge into it. I would consider replacing the lower part of the downpipe with a 110mm pipe to reduce chances of blocking. Discuss with him first though.
-
Yes but for less time. Overall if the thermostat and time clocks aren't changed the bills shouldn't increase because the heat losses should stay the same. In practice if the floor is hotter there might be increased losses into the ground.
-
I hired an excavator, wacker plate and small dumper. The dumper was needed to move some of the soil i dug out and the concrete from the front of my house around to the back. Also used excavator to dig trench for power cable. Think excavator was about £160 for a weekend.
-
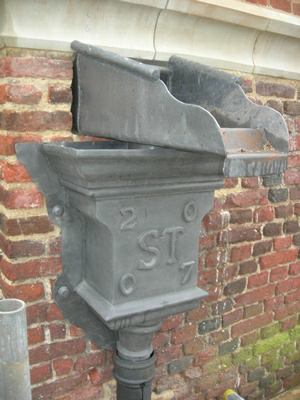
Its probably time to get a lead worker to visit and tell you what he needs. You need that triangular bit of wood to support the bottom of the gutter. Should slope towards the downpipe. Where is/are the down pipes going? Typically the lead gutter extends over or through the wall and into a hopper at the top of the down pipe. If there is a down pipe at one end only the other end needs a bit of wall to hide and form the end of the gutter. So your first picture appears to be right assuming there is no down pipe at the near end. A small capping stone could be added after the leadwork is done. If there IS going to be a down pipe this end then he may have gone a bit too high. I'd probably stop the wall at the bottom of the lead gutter level so the gutter goes out over it. This is a rather grand version showing gutter coming through hole in wall. Best one I could find in a hurry.
-
My outbuilding base was about 6mx5m. The shuttering was easy and I had ready mixed concrete delivered. The hard part was raking and levelling the concrete. Wife and I tried to slide boards back an forth across top of shuttering. That was much harder work physically than expected. We struggled. I had to frequently wade in and rake concrete to move it around otherwise we couldn't move the levelling board. Got it done but it took more than one beer to recover. The two courses of engineering bricks was the first bricklaying I had ever done. I set up strings on posts as guides for line and level. It was pretty easy. Put a bit too much mortar on then tap the brick down until level with the string and scrape off excess mortar. Easier than tiling a wall or floor.
-
Not sure if this has appeared here before but for some reason youtube recommended this vid showing a Belgian "lego" like SIP system. Looks interesting if you want to literally build your own house. Home page.. https://gablok.be/en/
-
A course or two of engineering bricks is easier than doing the concrete. I had to do mine twice - after laying a course of bricks i discoved the bag of "ready mixed mortar" i thought I was using actually had a bag of cement in the bottom. ?
-
You dont really want the timber sitting on a slab unless the slab is above ground level and the shed is larger so water doesn't sit on the top and wick under. What I would do is build a slab slightly oversize at ground level or slightly above. Then lay two courses of engineering bricks, a DPC and shed on top. Then inside put a sand blind and DPM, then however much insulation you want, and an osb floor or similar on top. Some sites recommend a VCL layer under the OSB. One course of engineering bricks is about 75mm tall allowing for say 55mm insulation and 18mm OSB or 50mm insulation and 21mm OSB. Two courses would be better at about 150mm high allowing 120mm insulation and 20mm OSB. The cost difference is really just the engineering bricks. I calculate one course is about 135 bricks and two about 270. So around £70/£140 at Wickes retail price.
-
That would be ok or @nod's suggestion. You can also cast your own padstone either in situ or make your own mould. https://www.bbc.co.uk/programmes/p03n6tt8 Edit: Sorry its telling me the clip isn't available.
-
+1 Not quite sure why they even ask this question.
-
How long to get Agreement in Principle...?
Temp replied to billy_bob_2020's topic in Self Build Mortgages
I'm hearing there are delays for regular mortgages. On the radio they warned some might not make the stamp duty deadline. -
Not all can be tiled on direct. Which are you looking at and what do the makers say?
-
A: Plywood is better than chipboard. Two layers of ply with staggered joints even better. Remember it must be rigid to tile onto. The wood should also be sealed. B: Presumably you mean.. Tiles Routed board with UFH Chipboard/Ply Insulation between Joists
-
The two most most important things are Depth of insulation under the UFH - How much can you fit? How deep are the joists? Enough coverage - If you have a room with a lot of glass (high heat loss) and kitchen units (reducing area with UFH) then the amount of power delivered from floor to room might be inadequate. Perhaps work out the power based on 65-85 W/m^2. PS Don't put UFH under the fridge/freezer
-
Strip foundations for Garden walls
Temp replied to brickierob1's topic in Bricklaying, Blockwork & Mortar
Paving Expert site is also good.. https://www.pavingexpert.com/featur03 Long walls should have piers at regular intervals, or zigzag them to make them more interesting and do away with piers. -
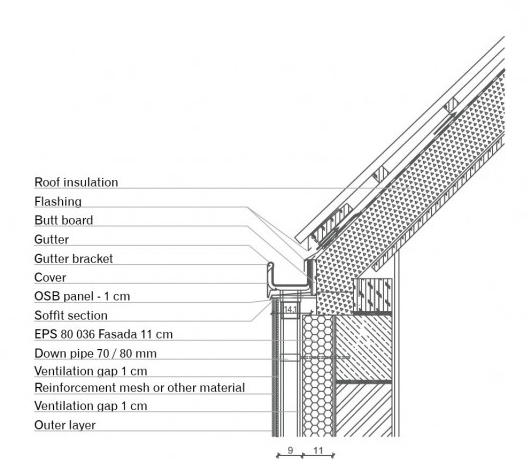
My first reaction to seeing this.. ...Is that heavy rain will overshoot the gutter. It will also be very important to get the details under the gutter right when its built. The facade tiles would need to be behind the drip bead shown. In case you are wondering.. you can't hide the gutter behind the tiles.
-
Main thing is not to make it too close. If its a bit further out you can always batten the wall before plaster boarding.
-
I'm not 100% sure but most timber used in construction is graded either C16 or C24 standards. Google found.. https://cdn.buildresources.co.uk/sites/582/docs/BM_Trada_fact_sheet.pdf "Building Regulations require structural timber used in buildings to be strength graded and marked dry graded". But lots of people, including us, use green oak in construction.
-
Outbuilding construction drawings quote
Temp replied to oldkettle's topic in General Self Build & DIY Discussion
There is a list of appeal decisions here.. http://www.permitteddevelopment.org/Incidental-Use-Appeal-Decisions.php Some large outbuildings were refused but some were approved at appeal.



