


MJNewton
-
Posts
1347 -
Joined
-
Last visited
-
Days Won
1
Everything posted by MJNewton
-

Air Quality Monitoring indoor
MJNewton replied to Dave Jones's topic in Mechanical Ventilation with Heat Recovery (MVHR)
I wrote a post that might be of interest: http://forum.buildhub.org.uk/topic/32067-mvhr-monitoring-and-control/ -
As others have said a long ceiling with a strong light source at one end will highlight even the slightest of issues, and many such 'issues' are perfectly normal given the construction method. In my experience the best paint to mitigate this is Tikkurila Anti Reflex 2, but you might never be able to make it perfect. It'd be worth a try though even if only for the extra coat(s) which will always help even things out.
-
Foam Gun Cleaner - am I doing something dumb??
MJNewton replied to jayc89's topic in General Self Build & DIY Discussion
Actually, that's a good point - prior to my inadvertent 'year-on-the-shelf test' I will almost certainly have sprayed the outside (tip especially) with gun cleaner as it is so easy to do and just dissolves away any uncured foam. -
Foam Gun Cleaner - am I doing something dumb??
MJNewton replied to jayc89's topic in General Self Build & DIY Discussion
You would think so - I did - but imagine my surprise when my gun continued to work perfectly fine having sat with a half-used foam canister on it for over a year! A little bit of coughing and spluttering for a couple of seconds but after that it was like I'd only put it away yesterday. -
MVHR is Largely Bogus
MJNewton replied to DavidHughes's topic in Mechanical Ventilation with Heat Recovery (MVHR)
According to this page it's not quite as simple as running costs being assumed to be greater than energy savings, but - if I've understood what they're saying correctly - that the SAP calculations assume different infiltration losses with and without MVHR. -
Do you need eARC to enjoy Dolby atmos?
MJNewton replied to Adsibob's topic in Networks, AV, Security & Automation
In all honesty I'm not well informed about them and haven't really been following their reception since being released so not well placed to comment. I don't know if I've already mentioned but I've got a pair of Ikea Symfonisk speakers for surrounds and they were only £79 each at the time so a relatively cheap way to get the rear channels which made all the difference for movies (I have them turned down relatively low for music sources as I still prefer stero for that). They're a bit on the bulky (ugly?) side compared to some of the Sonos offerings but for the price I couldn't really say no and we've got them tucked behind the sofa so they're not particularly visible. To fully realised the spatial sound offerings of the Era 300's you'd need the right source material, which we don't have (we are on the free-with-Prime Amazon music package but I think you need Unlimited). -
Will do. As mentioned I decided to keep the original air sensor for permanent use inside the house so I ordered another from a different seller on Aliexpress. Unfortunately they sent the wrong one and, eventually, ended up refunding me. So I had to order another - in fact bought a couple this time - and they arrived today so will try and fit one at the weekend. Of course, this will trigger an acceleration into spring and that'll be the end of the wood burner for another 8 months so I might have to wait a while to see how effective it is! I am fairly confident though now that I've seen how sensitive these things are, and whilst waiting for the sensor I've rigged up a relay to be able to trick the MVHR to go into frost mode (basically by swapping in a fixed-value resistor instead of the thermistor to make it think it is -10C outside) which will cut the supply but keep the extract going.
-
MVHR is Largely Bogus
MJNewton replied to DavidHughes's topic in Mechanical Ventilation with Heat Recovery (MVHR)
Our is a Titon and was from ebay too (£350). One of many fitted to a development that turned out to not match the spec so they were all replaced with the next model up having only been commissioned. Came in the box of the next model up with the latter's mounting hardware etc still all sealed so the story seemed to check out. I wouldnt normally factor such a bargain into discussions of value for money were it not fir the fact that it seems quite common to buy new/as-new units off eBay so it's a buying strategy I would recommend if you have the time to wait for one to turn up. -
MVHR is Largely Bogus
MJNewton replied to DavidHughes's topic in Mechanical Ventilation with Heat Recovery (MVHR)
Yeah ours was just shy of £1500 all-in. Took a fair bit of shopping around, bit of good fortune/timing for picking up the unit cheap and again all DIYed but I had the time (and inclination - tight Northener here!) to take such an approach. I can see costs being much higher for paid services, single sourcing and of course much bigger houses. -
MVHR is Largely Bogus
MJNewton replied to DavidHughes's topic in Mechanical Ventilation with Heat Recovery (MVHR)
Guys, interesting discussion but would you mind starting a different thread? It's drifted *way* off topic and is at risk of halting what was otherwise a really valuable subject to debate and one that we keep coming back to so is clearly of interest. -
MVHR is Largely Bogus
MJNewton replied to DavidHughes's topic in Mechanical Ventilation with Heat Recovery (MVHR)
I keep it running throughout as often in the summer - particular on warm sticky nights - there isn't much wind around and so the MVHR can really help keep the air moving. In some situations the heat exchanger will also reduce the temperature of the incoming air, but only by a couple of degrees or so and given the low volumes it's no air conditioner, but I think every little helps psychologically! -
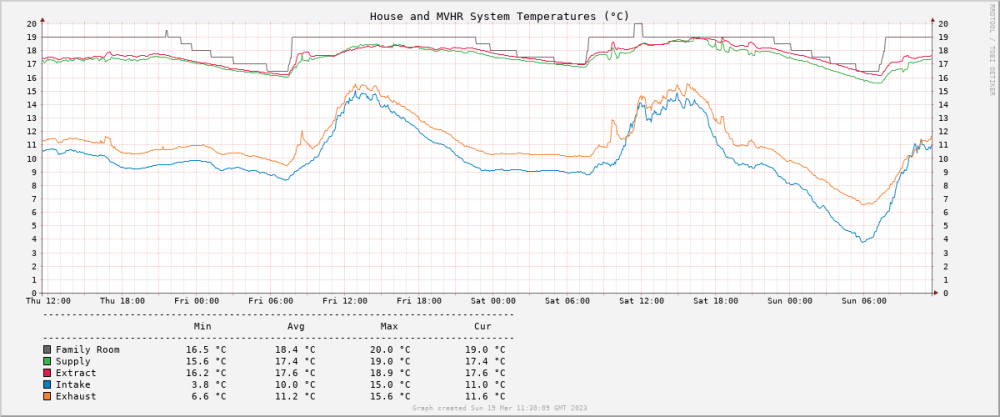
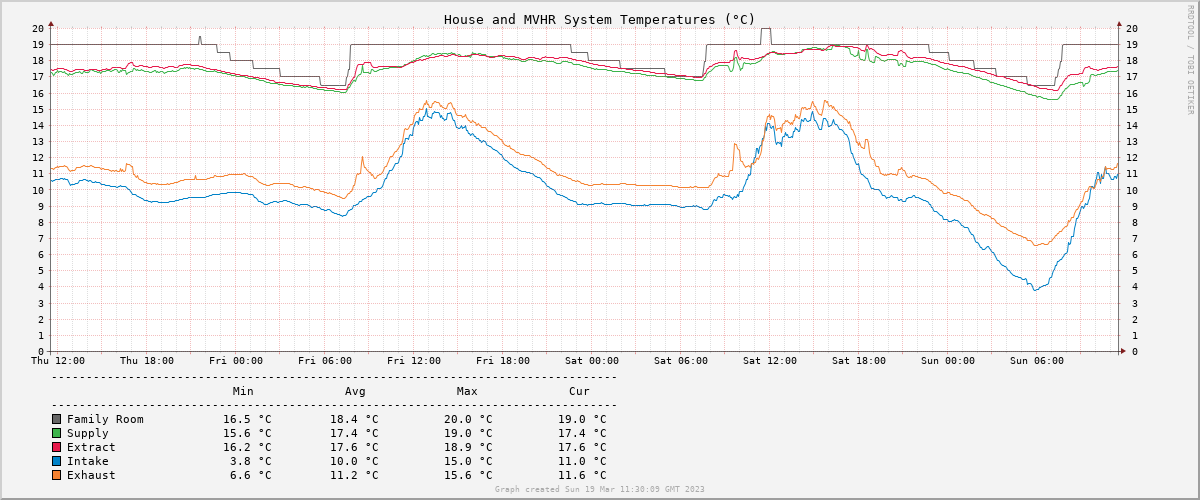
As evidenced above there's almost an infinite ways to achieve this sort of thing with pros and cons for each. I think familiarity plays a significant part in people's recommendations so there's a certain amount of bias in what people might say is the 'best' way to do it. Notwithstanding this I'll throw in my suggestion: RRDtool. It has been around a long time (since late 90s) and was based originally on MRTG - Multi Router Traffic Grapher - designed to monitor routers which is what I first used it for (measuring interface throughput and the like) however it can be used for pretty much any time-based logging (and graphing) and I've found it great for visually monitoring temperature, humidity, air quality, boiler state/flow/return etc around the house. The name RRD refers to Round Robin Database and it is this that sits at the heart of the approach. It is a database in the form of a text file that simply records specified values at specified intervals. This is an massive oversimplication though as it is enormously powerful. As such there's a bit of a learning curve but when you make a start you soon pick it up. To illustrate with an example of monitoring my MVHR unit I created an RRD database with the following command: rrdtool create temperaturedatabase.rrd \ --start N --step 5m --no-overwrite \ DS:supplytemp:GAUGE:10m:-20:50 \ DS:extracttemp:GAUGE:10m:-20:50 \ DS:intaketemp:GAUGE:10m:-20:50 \ DS:exhausttemp:GAUGE:10m:-20:50 \ DS:lofttemp:GAUGE:10m:-20:50 \ DS:efficiency:GAUGE:10m:0:200 \ DS:altefficiency:GAUGE:10m:0:200 \ DS:humidity:GAUGE:10m:0:100 \ DS:power:GAUGE:10m:0:1000 \ DS:supplyintakedelta:GAUGE:10m:-10:30 \ DS:familyroomtemp:GAUGE:10m:-20:50 \ RRA:AVERAGE:0.5:5m:3M \ RRA:AVERAGE:0.5:30m:6M \ RRA:AVERAGE:0.5:1h:5y \ RRA:MIN:0.5:1h:5y \ RRA:MAX:0.5:1h:5y Quickly running through this, it creates a database in the form of a structured text file that is ready to record and manage the following at 5 minute intervals: Supply, extract, intake, exhaust and loft temperatures (obtained from locally-connected DS18B20 1-wire temperature sensors) System efficiency (calculated two ways from the above readings) Humidity (obtained from a locally-connected AMS2302 humidity sensor) Power (obtained via an HTTP API over the network from a smart relay) Supply-intake delta (again just the result of a calculation of other values) Family room temperature (obtained via an HTTP API over the Internet to Honeywell's cloud service) The database automatically retains the readings at 5 minute intervals for 3 months, averages of the readings at 30m intervals for 6 months, averages at 1hr intervals for 5 years then finally min/max readings at hourly intervals for 5 years. The round robin aspect refers to the fact that new values eventually replace old ones thus the database will always stay the exact same size as it was built - 15MB in this instance. So that's the database built, but empty, and so now needs filling with data. I have various scripts capturing readings and they are fed into the database with the following command every 5 minutes: rrdtool update temperaturedatabase.rrd --template \ supplytemp:extracttemp:intaketemp:exhausttemp:lofttemp:efficiency:altefficiency:humidity:power:supplyintakedelta:familyroomtemp \ N:$supplytempcelcius:$extracttempcelcius:$intaketempcelcius:$exhausttempcelcius:$lofttempcelcius:$efficiency:$altefficiency:$humidity:$power:$supplyintakedelta:$familyroomtemp As the database fills up with data you can then interrogate it, and in particular build graphs from it. For example, a 'system temperatures' graph covering the last 3 days can be created with: rrdtool graph $graphlocation/systemtempsgraph.png \ --start -3d --end now \ --full-size-mode --width 1200 --height 500 \ --title "House and MVHR System Temperatures (°C)" \ --watermark "Graph created `date`" \ --lower-limit 0 \ --y-grid 1:1 \ --right-axis 1:0 \ --right-axis-format "%2.0lf" \ --slope-mode \ COMMENT:" ---------------------------------------------------------------------------------\n" \ COMMENT:" Min Avg Max Cur\n" \ COMMENT:" ---------------------------------------------------------------------------------\n" \ DEF:familyroomtemp=$rrdfile:familyroomtemp:AVERAGE \ COMMENT:" " \ LINE1:familyroomtemp#666666:"Family Room" \ GPRINT:familyroomtemp:MIN:" %4.1lf °C" \ GPRINT:familyroomtemp:AVERAGE:" %4.1lf °C" \ GPRINT:familyroomtemp:MAX:" %4.1lf °C" \ GPRINT:familyroomtemp:LAST:" %4.1lf °C\n" \ DEF:supply=$rrdfile:supplytemp:AVERAGE \ COMMENT:" " \ LINE1:supply#3cb44b:"Supply" \ GPRINT:supply:MIN:" %4.1lf °C" \ GPRINT:supply:AVERAGE:" %4.1lf °C" \ GPRINT:supply:MAX:" %4.1lf °C" \ GPRINT:supply:LAST:" %4.1lf °C\n" \ DEF:extract=$rrdfile:extracttemp:AVERAGE \ COMMENT:" " \ LINE1:extract#e6194b:"Extract" \ GPRINT:extract:MIN:" %4.1lf °C" \ GPRINT:extract:AVERAGE:" %4.1lf °C" \ GPRINT:extract:MAX:" %4.1lf °C" \ GPRINT:extract:LAST:" %4.1lf °C\n" \ DEF:intake=$rrdfile:intaketemp:AVERAGE \ COMMENT:" " \ LINE1:intake#0082c8:"Intake" \ GPRINT:intake:MIN:" %4.1lf °C" \ GPRINT:intake:AVERAGE:" %4.1lf °C" \ GPRINT:intake:MAX:" %4.1lf °C" \ GPRINT:intake:LAST:" %4.1lf °C\n" \ DEF:exhaust=$rrdfile:exhausttemp:AVERAGE \ COMMENT:" " \ LINE1:exhaust#f58231:"Exhaust" \ GPRINT:exhaust:MIN:" %4.1lf °C" \ GPRINT:exhaust:AVERAGE:" %4.1lf °C" \ GPRINT:exhaust:MAX:" %4.1lf °C" \ GPRINT:exhaust:LAST:" %4.1lf °C\n" And this gives a result like this: With a small tweak to the --start and --end options you can create a graph showing a different time interval from, say, a single week from last summer: The graph appearance (colours, legends, scale, background, titles etc) are fairly customisable too: I have this sitting on a Pi Zero and it (re)builds a bunch of graphs every 5 minutes which I can view via a web browser.
.thumb.png.01d67d0cfce6aa583b15ba27963852e7.png)
-
Thanks - just had a read - and yes, it has made me think about more about the whole air quality issue. I am also starting to think that so many articles seem to focus on what everyone else is doing that's causing you harm, and not perhaps what you might be doing yourself that might be just as bad if not worse. To be fair, that's exactly what I did - concerned almost entirely with what the neighbour's wood burner was doing to us, but now I am as much interested in what we're doing to ourselves! Just hope it doesn't become an obsession*! 😂 *Edit: Non-paywall version in case the link doesn't work for you
-
Are they not one and the same thing? It seems to be working fine. It wasn't originally part of the plan but I had an issue with my phone and when the supplier sorted it out they also sent me a powerbank as a goodwill gesture. It just happened to arrive on the day I was began playing with all this stuff and so immediately allowed me to move the sensor around more easily. The Pico does apparently cope with supply voltages down to 1.8v I believe which must surely help, but the sensor is a bit more sensitive and requires a minimum of 4.5v according to the datasheet.
-
They all happen to be wired, and with this being a retrofit all there was left for me to do was add a detector in the loft and the relay base. Re CO we've only got a gas boiler and that's room-sealed so I figured the risk was fairly low. Not zero of course though so we do have a battery CO alarm collocated with it. Truth be told if the Aico CO alarms were cheaper (they're around £50 or so) I'd probably add one in because, well, why not? As mentioned I ended up changing my stance on that one. Inspired, I think, by the fact that some other MVHR units have dedicated smoke/fire alarm inputs I originally figured it worthwhile emulating that function with my setup but recently I began to question exactly why. It's not like the MVHR will be pumping in loads of oxygen and fueling the fire in any meaningful way (or I assume it won't?) and so if anything I think I'd prefer the potential smoke clearing benefits from leaving the unit on throughout. Even if the fire goes out and we're in a state of panic outside there's surely some benefit in the MVHR continuing to clear the house. The alarm interface to the smart relay is what I really appreciate as it does give me some peace of mind when away that the house likely isn't burning down - that's the sort of thing that casually wanders through my mind whilst sipping magarita's by the pool! Of course, completely different story should I ever get that alert!!!
-
I actually bought the unit off eBay and picked it up locally - it had been fitted as part of a development of houses but the wrong units had been installed so they were all removed and replaced with the next size up. Whilst they'd been commissioned they'd never seen actual use. I suspect this opportunity meant a short cut for my usually rather protracted research, planning and selection process but I've no regrets - it seems a very capable unit. Sure, limited in terms of fancy controls but it seems to work well, is quiet, has good quality Papst fans and Titon's technical support line have been great when queried about nuances of operation (e.g. I wanted to know the exact points at which the summer bypass kicked in and they were happy to elaborate by email). It seems I'm not alone in going down the new/nearly-new route through the likes of eBay and I'd do that again too.
-
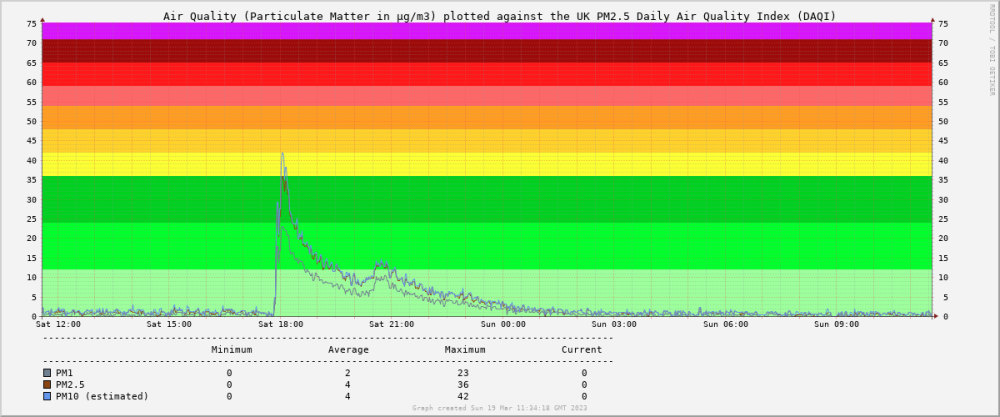
I did wonder if this should be in the MVHR section but actually it's more about the technology side of things so figured Boffin's Corner might be best place... The reason for posting is that I'm always really interested in reading about what other people have done with all things home automation, electronics, DIY etc and figured that the very people behind all that might well be interested in what I've been up to too. I've also got a bunch of graphs which for some reason have always appealed to me and I'm sure I can't be alone in that! So here goes! The follow graphic illustrates what it's all about, and that is essentially the 'command and control' of our Titon MVHR unit. Titon do sell an LCD touchscreen controller for it (although I'm not entirely sure if it is compatible with our particular unit) but it is pretty expensive and I figured I could do more for less, and have more fun in the process! It is based around the following components: Raspberry Pi Zero W - This is the 'heart' of the control system and monitors temperatures (using DS18B20 1-wire temperature sensors) in all the ducts (supply, extract, intake and exhaust) as well as humidity in the extract (using an AM2302 humidity sensor) and (soon) air quality in the supply (using a Plantower PMS5003 particulate sensor). As I will elaborate further below, with all this information it can automatically boost on humidity rises, cut back or turn off the ventilation entirely if outside air quality suffers, report heat exchanger efficiency etc and likely more things in the future too (I've been thinking about putting summer bypass under its control and perhaps complete fan control too). It also creates the graphs and serves them up for viewing in a web browser. Shelly Uni Smart Relay - Used as the interface between physical boost switches in the house and the MVHR unit so as to increases their utility in terms of allowing different actions for short vs long presses, but more importantly it also provides an easy way for boost and setback to be triggered from other triggers whether that be from the Pi, widget buttons on our smartphones and voice control via Alexa. Shelly 1PM Smart Relay - Used to monitor the power consumption of the MVHR as it was something I was interested in understanding even before fitting the system, and it used to also serve as a means by which to disable the ventilation in response to a fire but I have since decided I don't actually like that and would rather the ventilation kept working. It is still connected to the smoke alarm circuit though and will alert me via app/SMS if the alarms do trigger. Raspbery Pi Pico W - Acting as a 'mobile' means to interface with a PMS5003 air quality sensor whilst I am still playing around with it, but when the sensor goes in the ducting I'll read it directly from the Pi Zero from then on. So breaking down some of the functions further... Heat Exchanger Efficiency With knowledge of the supply, extract, intake and exhaust temperatures you can calculate heat exchanger efficiency in real time. The Paul Heat Recovery page on the subject describes two methods in more detail and the following graph illustrates what are fairly typical efficiencies figures (high-80/low-90%) I see from the unit: Automatic Humidity-Related Boost The Titon does have its own humidity sensor with an adjustable (but unmarked) threshold and whilst I've never actually tried it I've always assumed it would be susceptible to false positives (triggering when it shouldn't) or negatives (not triggering when it should) and perhaps more to the point was always going to be a bit of a pain to fine tune (and adjust seasonally) given that the unit is in the loft. So, given I am monitoring humidity (in the extract manifold) anyway if we look at a typical graph it is easy to see when boost needs to be triggered: Those peaks correspond to showering and cooking (e.g. mostly the hob) and as I said are really easy to spot with a rate-of-rise calculation. The Pi takes measurements every 5 minutes and as a starter-for-ten I set it to trigger the boost (via an API call to the Shelly Uni) if the humidity rose by more than 5% within the 5-minute window. This turns out to have been a perfect threshold as it has never knowingly missed a shower (or pan of boiling water) or triggered when it shouldn't have in the several years it's been running now so I've not cause to make any changes. Automatic Ventilation Setback This is the most recent addition to the control system, and is still work in progress but as it's been so interesting to me I thought I'd share the not-quite-finished product... Our neighbour (who thankfully we get in really well with, but even friends can be annoying!) bought a wood burner for their recently-built extension. We've been mindful of what we might be breathing in from it as it seems barely a day goes by when there isn't some article or other written on the subject. Indeed, on occasion over the winter we've seen smoke coming from it but more to the point we've been able to smell it through the MVHR too. Granted, this is mostly when I've seen the smoke and have jumped up on a chair to sniff the incoming air from one of the vents and it seems the planets have to be in alignment for this to occur e.g. a cold still day with no wind, the neighbours using damper-than-ideal logs etc but it's happened a two or three times now and whilst I've been convincing my wife how sensitive the human nose is and that we shouldn't assume we're being poisoned I did begin to really want to quantify how 'bad' the situation really was. Aside from anything else it was a good excuse to buy another sensor, produce more graphs and give another aspect of control. Like others whilst we normally run the MVHR 24/7 and enjoy the fresh air it provides but this of course is only effective if the outside air is indeed fresh so my goal is to detect when it isn't fresh and either turn the ventilation down (whether that be both supply and extract, or perhaps just supply I don't know yet) or perhaps even turn it off temporarily when such a situation arises. The PMS5003 particulate sensor is a delightful little thing - the size of a small box of matches and costs around £15. You wouldn't expect much for so little but I've read several accounts now of people having compared them with air quality sensors costing thousands and them being a reasonable enough match, certainly good enough for taking measurements that are meaningful, consistent and reliable enough to feed into a home ventilation control system. The sensor is based around a laser whose light is reflected by the presence of particulates in its path from which the sensor can determine particle quantities in the 0.3-10μm diameter range which is exactly the region of interest when determining common particulate matter based analysis and determination of air quality. The following graphics illustrate the what the sensor can detect: The sensor does everything for you in terms of detecting the particulates and then presenting summaries of particle count and mass of different particle sizes over a serial line that I am reading with a bit of Python code running on a Raspberry Pi Pico W (currently powered by a USB powerbank for mobility): The Pico is configured to continuously read from the sensor and gets an update roughly once per second and, via HTTP through its wifi interface, I can request and parse these readings from a script running on the Pi Zero: I capture the readings once per minute which are then stored and can be graphed to show particle count of any specific detectable size but I am finding the 'all detectable sizes' (>0.3μm) summary useful enough: The particle mass figures are even more useful as they can be compared against Air Quality Index charts such as the UK's Daily Air Quality Index (DAQI) 10-level bandings shown below: Now technically the DAQI levels, like most AQIs, apply to 24hr mean readings thus non-continuous spikes as seen above don't really up the level - it's the 24hr average (as shown in the table) that really counts if wanting to compare against the index. The neighbours haven't been using their woodburner over the past week or so as far as I can tell and so it would've been rather boring to put the sensor in the supply manifold as ultimately intended so instead it's been sitting in our open-plan lounge/kitchen/diner and it's been quite an eye opener! As the following graph illustrates, cooking really does produce a lot of particulate matter: I think the first spike was preparing some halloumi burgers on the hob, the second the bread machine in action and the third some sausage rolls in the oven. What was really quite alarming was when my wife burnt some sesame oil in a frying pan... I was out at the time so have only got her word but she insists it wasn't that smokey (and to be fair when I got in later I could smell cooking but didn't assume anything more than that) and yet the particle count graph looked more like a nuclear bomb had gone off: The spike doesn't look all that significant until you look at the y-axis scale - a peak of over 3000 particles/0.1L which is over ten times the peak we'd normally see when cooking! It was interesting to see the PM1, PM2.5 and PM10 counts against the DAQI for that episode too: Whilst as mentioned it doesn't mean all that much shown like that given the DAQI is meant to be used with a 24hr mean (thus 13μg/m3 of PM2.5 in this case, which is still only Level 2 'LOW' on the scale and not the 195μg/m3, or Level 10 'VERY HIGH' as it might otherwise appear presented like this!) but it does make for an interesting perspective nevertheless. Some might say it also serves as a quantifiable measure of my wife's cooking skills but obviously I wouldn't... So that's where I've got to really! Next steps are to buy another air quality sensor as it seems a shame to lock this one away in the MVHR ducting as there are too many experiments begging to be done - lighting matches, candles, perhaps the barbecue and maybe driving around with it too (the sensor, not the barbecue) to see what the air is like on a commute or in a city etc. Also with two sensors I can have one inside the house to automatically boost when required, and one in the supply duct to do the opposite and turn the ventilation down/off temporarily if the outside air quality is lower than desired. I've written more than I planned to so well done - and thanks - if you've got this far. Hope it was of some interest, and if there are any questions or any way I can help you do something similar I'd be happy to oblige.
-
We've got the same doors (CP130LS) and no issues with condensation. Quite a 'chunky' look compared to many though. We like this but I know others are really into to minimalist sightlines. Been in just over five years now and would recommend them.
-
Not modular ones like these, otherwise the 'outlet' of one section would be below the 'inlet' of the next... (Notwithstanding that though, a fall is not all that important as others have already mentioned)
-
Best way to cut semi-rigid ducting?
MJNewton replied to jayc89's topic in Mechanical Ventilation with Heat Recovery (MVHR)
Yeah I'd definitely recommend a Stanley knife - easy, neat and there's no swarf. -
There’s always someone who has done it worse
MJNewton replied to Pocster's topic in General Self Build & DIY Discussion
Unclipped cables. -
I’ve (re)painted many rooms whilst having to avoid existing papered walls etc. Never had any issue whatsoever, and in fact I think it’s easier to keep paint off adjacent wallpaper than it is to keep wallpaper paste off adjacent paint. i think I’d take their suggestions as simply their preference given the choice, but certainly not something that should pose them any issues at all. I suppose it does depend how good they are, and if I’ve learnt one thing about professionals over the years it’s that the title really does refer to getting paid for it and not necessarily being any good!
-
If you shop around might you be able to shop around for a same/similar-looking patio slab that could be cut and shaped to fit using an angle grinder?
-
Given the drop-down pipework to the UFH I could imagine water flow noise could arise from trapped air inside the lounge ceiling runs. It might be absorbed eventually over time, but someone might be able to suggest strategic ways to get the air pushed through and ejected. Does the lounge ceiling pipework serve upstairs too?
-
For belt and braces I put two seal img rings on any join (I only had the beginnings and ends). Almost certainly not necessary but for pennies per seal I figured why not.


.png.d22a6efec3ecd2fff18ef2578313c141.png)

