


CC45
-
Posts
1255 -
Joined
-
Last visited
Everything posted by CC45
-
Personally I would make it 6" deep (as long as you have already removed any topsoil) and twice the width of the proposed wall. No to cavity. I would fill the void with clean materials you have about - left over bricks, blocks etc - I would personally bed these in place (4:1 sand : cement mix) - straight onto a compacted base. I then put a concrete skin ~ 3" over the top of this rubble - to give a solid surface to walk on while you wait for slabs to be laid. If you haven't got rubble around then I'd do a weak (6:1) mix of ballast to cement. Just my opinion.
-
 get the original file off them and then you can get someone with CAD to take some accurate measurements if you need to.
 -
same around here .... there doesn't seem to be any stocks about so everyone is happy to pay whatever just to get hold of stuff. There seems to be lots of rumours around here suggesting a bit of a downturn is on the way in building - many seem to be making employed staff redundant and using self employed people (same blokes) - so the price increases may need to be reversed at some point....
-
Remember that land registry is not the source of definitive boundaries - it just shows that there is a boundary in that approx area. There are lots of mistakes on their database. We were told that whats on the ground is the actual boundary. Prob not what you wanted to hear. We got our plot surveyed and triangulated off neighbouring buildings (that had been up for Q a while) and this helped our case. Surveyer & good CAD person. Good luck.
-
I tile the lot 1st: 1. If you ever change the units / design there are no issues with the floor. 2. Fitting the plinth will require it to be cut because the unit legs will be below the finished floor height - you could jack these up further if you wanted to I guess. 3. Your carpenter is right.
-
South Wales = close to Gods country, which everyoen knows is South west Wales! Good luck with your build. 6th year approaching for us but won't be long now (done it all myself + a full time job). Enjoy it.
-
DIY-Kitchens - The Alternative View (And its FAR from positive)
CC45 replied to Barney12's topic in Kitchen Units & Worktops
Our DIY kitchen should be with us next week. Utility units have been in ~ 3mths now - happy with them. I think they are quality items. -
more thistle type of comment there than buttercup....
-
Integrated Fridge Freezer fitting
CC45 replied to MikeGrahamT21's topic in Kitchen & Household Appliances
cut some spare skirting to cover the bottom false shelt. Got one on its way - so good to know whats likely to face me.. -
I'd cut boards 7 & 8 in half lengthways and then move 19 & 20 up the room and put the 1st two offcuts back where 19 & 20 were = lights now in the middle of a board. Now their up, I'm not sure I could be bothered. Don't bother with the cardboard, a good skimmer will give them a rough clean out for you, wait for it to dry 24hrs and then use your PB knife / file to finish the job off properly. poke some wire into threats that are blocked. The bigger pain is polyfilling the boxes where the plasterer hasn't done close enough to the box...
-
Same here, seems fine. You could go a bit closer to the wall if no wall cupboards but def no further out. Depends a bit on th espread you LED's have I guess.
-
I'd adjust the position of the boards to avoid downlights on an edge. I took a lot of careful measurements and then cut them after skimming. Worked fine. You could use a plumb line and mark the position on the floor.
-
Evening, had it delivered this week - primed mdf. Would it benefit from another coat of primer (I've got some Zinsser to hand)? Would you prime the rear of it as well as the face? I was going to just glue this on using pinkgrip - is this sensible or would it benefit from a nail as well? Is it worth putting the top coat on before fixing (especially if glued on)? If I nail it - I assume oval head nails just below the surface & then filled - what would you use as filler? I was going to glue and nail the architrave. It would be great if you could all share your secrets! Cheers CC
-
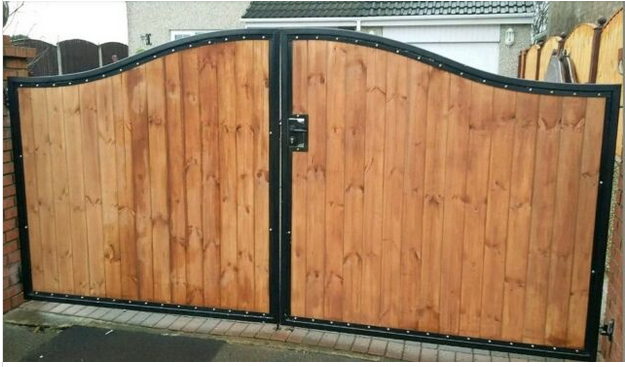
Hi all, just planning ahead for August / Sept - I'd like to get around to erecting some gates on what hopefully will be our new access. We are thinking of 6ft wooden gates within a metal frame, sort of like: We would like to use metal posts - with no brick surround. These black metal posts will match some railings that we will also put down. The gates will be between 5ft and 6 ft high and 6ft wide each. How big a post do we need? Does anyone have experience of this? 6" x 6" post? 8" x 8"? 5mm thick metal? Do we fill the post with something to help strenghten them? How far in the ground do they need to be? (6'6" out of the ground - 3' in it?) Would it benefit from a square foot welded to the bottom? Any advice gratefully received. CC
-
DIY-Kitchens - The Alternative View (And its FAR from positive)
CC45 replied to Barney12's topic in Kitchen Units & Worktops
not sure that delivery chap is correct - I've had discussions with them through lockdown and our units were delivered over a month ago. I've always found them helpful. Must be a challenging time for them at the minute so I'd expect a few hickups. our deligvery is coming soon - will see what happens then. -
DIY-Kitchens - The Alternative View (And its FAR from positive)
CC45 replied to Barney12's topic in Kitchen Units & Worktops
DIY delivered our utility units fine - one came 3 days later but all good. Added a few screws to the back panels - just my pet hate is to see the come loose and a screw beats a staple every time. Main kitchen on order now for delivery next month - they must be under some staffing challenges since communicating with them was more difficult (phone or online) but everything did get sorted. Delivery drivers were a pain - ended up carrying most of the units far too far - I will not be doing that again. Thats the only thing that annoyed me. Howdens are worth a shout as long as you get 70%+ off their list prices. -
I used 20mm on the perimeter. Thickness = u value you are aiming for. I was going to use 200mm but added 25mm to suit blocks. Law of diminishing returns applies so there must be a limit somewhere, you could calc it out if you wanted to I guess.
-
not sure I'd want to lift stuff up using this. don't the ones on ebay give you dimensions for when the steps are down?
-
'what I got' maybe more common?
-
how much PIR in the floor? We've got 225mm - bit ott but that was the phase I was going through then, also matched the depth of a block so easier for the brickies. Timber frame on top of these blocks.
-
I'd leave the will - it will be more fun for you to look down / up at all the fighting going on.
-
Best plasterboard lifter for damaged hands
CC45 replied to ToughButterCup's topic in Tools & Equipment
@joe90 has hit the nail on the head - I used the yellow jobby to carry them all around - 15mm sheets are easy with it + the lifter to fix boards. Did the whole house single handed. -
What I would do ... Put a piece of timber along the top / bottom of the existing joists to hold them temporarily while you cut the pieces out, cut and then add bracing. If you are really worried you could form the 'box' 1st and then cut to fit this - pop this in place and fix. If it all goes wrong no liability here + anything there of interest to the rest of us self builders?
-
not self build I mean PIR. With enough time to forget the pain I might use PIR again. It is good insulation with min space taken up. Ours is not a simple house shape and that didn't help the job. Have fun
-
Mixing slips : is it possible to copy this?
CC45 replied to ToughButterCup's topic in Building Materials
Have you finished the rest of the house? bored? if so I could find some jobs to keep you going....... What you could have done is get an amateur / blind bricky to build a 2nd skin from the old bricks alongside your new block wall - extend the width of the building slightly but you would prob get the same effect!


