Leaderboard


Popular Content
Showing content with the highest reputation on 08/28/16 in all areas
-
I can pretty much guarantee that Cat5E will be around in 10-15 years time, as we are still flood wiring buildings with it ...! If you plan to run HDMI 1080p over Cat5 then your issue will be the balun quality not the wiring - even 4K video is fine for Cat5 as long as you're not trying to send it 300m. What will become prevalent is power over Ethernet - PoE - and for this you really do need a copper conductor, not CCA. This is about the cheapest I've found pure copper Cat5 but I'm happy if someone can find cheaper ..!! http://www.cabling4less.co.uk/products/1941/utp_pvc_cat5.e_reel_-_0.5mm/2 points
-
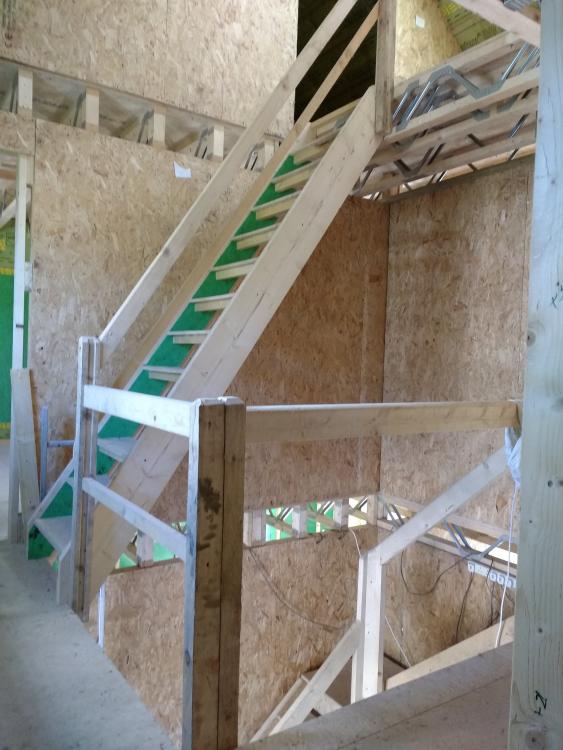
I used a couple of unused roof rafters as stringers and made up 13 stair cassettes in a jig again out of some left over floor board and OSB. Cutting the bits was trivial, given that I have a table-saw and chop-saw. The design, cutting and jigs were my work. Each cassette was made of two parallelograms of OSB, a floorboard tread with under brace. Jan assembled the cassettes (screw and glue), and then screwed them into the stringers one-by-one from the bottom working to the top. When she got to the top, all that remained was to add the rails. Here is the final result below. It's pretty steep because the final stair will include a ¼ turn, and this was a straight span. Still, a damn sight easier to go up and down than a ladder or the like. We added rails and the 1st staircase was going to be used a lot more so I did do this as a ¼ turn. OK, I am a pretty handy carpenter, but doing this is easy and the cost for me was a box of wood bolt fixings, so about £5 IIRC. The rest was leftovers from the frame erection. The stairs are designed to be taken apart for plastering and reinstalled until we fit our permanent stairs after we've painted the halls. I personally take a different view to Dave and Peter. If you are anything like us, then you'll be going up and down the stairs 100s off times carrying kit. You need proper stairs and banister rails, even if temporary. If you aren't confident making your own then do as Nick suggests as buy a cheap flight on eBay or whatever. My only regret is that if I'd realised that we were going to use the stairs for a year then I'd have built a ¼ turn upper stair as well (to bring the pitch under 45%).
 2 points
 -
It's going to sit on an old office chair base. The small 70mm holes are for the Lucozade bottles of water he takes to bed - two for symmetry. The grooves are so he can nominally line up his laptop square on top. The big 127mm hole will be directly under the laptop vents. He'll put his radio controlled, "atomic" alarm clock and phone etc underneath.1 point
-
Pop the manhole up,and try a bit of old fashioned echo-location. Turn a sledge hammer upside down and with someone ( unlucky ) dangling their head in the manhole someone else goes around and gives the ground a good thump. Audible feedback at the manhole gives you at least some indication and it's free.1 point
-
Zoom in there's a bolster there too!1 point
-
I paid £800 and it was so over specified it would hold up a block of flats and cost a fortune so scrapped the idea for standard founds .1 point
-
Nice bit of finishing work though, considering the only tool I can see is a lump hammer1 point
-
Cut and fit, neatly and go for it. It can be delaminated too and used as 140 + 40. Don't squash it or leave gaps,1 point
-
I paid £500 ! Four years ago1 point
-
HerbJ negotiated site stairs as part of his MBC package - I wrangled the same deal. They're a standard set of Jewsons MDF and softwood stairs. We've had to pop them out a few times to facilitate flooring and plastering /painting works and you really feel the difference having to use ladders instead. We will replace them with 'fancy' stairs in due course (just getting final quote now) but even though practically all decorating and other 'dirty' works are complete we wont have them installed until everyone is off site and we have fully moved in.1 point
-
Depends how much value you put on your own time. To drill & fix wall starters or individual ties versus too thing out & packing mortar in-I know which I'd go for!1 point
-
I have a "scaffold staircase" 6 "treads" each 2 scaffold boards wide, and 0.5m rise per "step" So it's big steps put perfectly do able to walk up them, and big items can be lifted up a "step" at a time. That's how all my windows got up to be fitted from inside. I'm out all day but I'll try and post a picture this evening.1 point
-
Cheapy one off eBay or gum tree. A ladder will not suffice. Health and safety would have a field day and you'd also have to get some form of mechanical handling sorted for carrying plasterboard a etc as a ladder won't have the weight capacity. I did the same on an extension so we didn't have to go through the existing house. I used 9x2" for the sides and treads with glue and chunky screws. Carried all the sheet material up it so two guys and gear at a time without a creak. Securing it well top and bottom is of equal importance as it doesn't matter how strong the stairs are if they aren't secured properly. Pay close attention and inspect it weekly, ( as if you provide it you'll be responsible for making sure it's safe and for keeping it that way ).1 point
-
I made a simple ladder stairway out of 4 x 2. It is about 700mm wide and fixed at the top. The BCO checked it was fixed and was happy for all to use it. It's been there for six years no problems and hopefully in the next couple of months will be replaced with the proper staircase!1 point
-
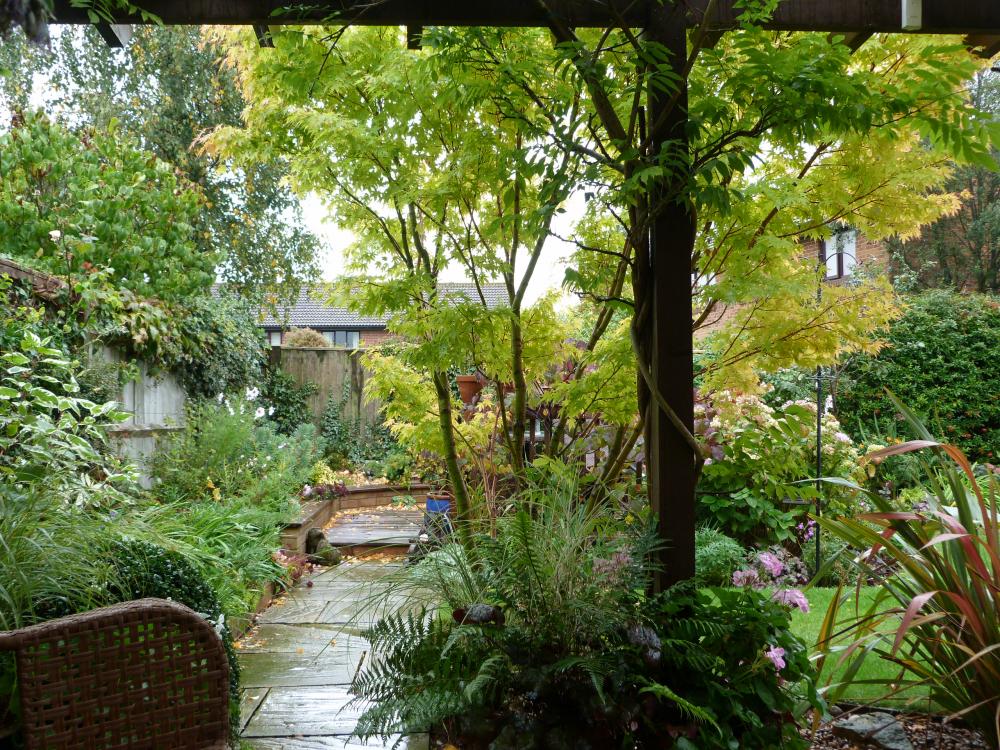
Definately mine and yes, I am 'queen' of the garden. he occasionally cuts the grass but thats about it. Here's the view from the patio - strategically placed trees hide all the neighbouring windows so its quite secluded.
 1 point
 -
It's more important to make sure it's even and no more than 1:40 - counterintuitive but if you make it steeper you lose the water and leave the solids behind ..! (Sorry to those eating their Sunday breakfast ...) building regs quote 18mm per metre for stubs, unless it is tight on space where 9mm is acceptable as long as there is more than one WC on the stub branch - guess what I was reading last night ..!! At 18mm, that's 1:55, 9mm is only 1:111 so you can see there is some discrepancy even in the regs themselves.1 point
-
a 1 in 40 drop is 25mm drop in a 1 metre run. To measure that, I have a standard 1 metre long level, and I tape a small bit of 2*1 timber to one end of the level, then set the pipe so the level reads level and you have a 1 in 40 fall. You won't get any droops or puddling at that fall. You can go to 1 in 80 if you are short on fall. Then you have to be more particular that you can't get droops in the pipe run.1 point
-
1 point
-
At least we got this advice now And for the benefit of others who might end up going down this shit hole, so correct method is: Or if your slow bend is lower add a short section of pipe which has a female socket at slab level or a straight pipe section with a double socket again aligned to slab level. Fill with a blanking cap whilst the slab-work is going on. And if I recall Dave actually had his cap about 1cm below the slab level so making power floating easier, and he then tapped this 1cm out after the slab had gone off. And now back to my cock-up and how we mitigate this. A few clarifications: When you say a double socket straight connector, are you meaning double push-fit (p/f) or would you use p/f+solder fit using PVC-U solder for the lower socket which is going to be resealed in the concrete? My inclination would be to use the latter rather than p/f upwards against the flow direction. That assumes that we've done the test on a piece fo soil pipe to make sure that the solder socket and the pipe are solder compatible. We have two soil pipes and only one has a ground floor toilet branch attached. The other has rodding access and a lower spigot to the utility sink waste. Surely if solder fit is compatible then can't I just position the double socket above the slab? Lastly if you are suggesting using a double p/f, then why not just use a triple socket branch direct onto the soil pipe and solder the bottom socket? We can use solder to expansion converter for the top socket to give the required expansion. It's just that doing the 6" core is going to be costly and risky -- if anything goes wrong then what is plan B? So if I can avoid this, I will.
 1 point
 -
I still like Hager, mainly because they keep the design of their stuff consistent, unlike some others. e.g fit a new MK mcb in an old MK board and it might as well be a comnpletely different make as they keep on changing the design. I have a Hager in my new house. I have fitted a couple of the BG new metal consumer units and I liked the ease of knocking out the knock outs, and the fact the top and bottom entry knockouts were mostly 20mm round, perfect for terminating SWA. My Hager CU is an "old" one that has a metal back but plastic front, I made sure it was fitted last year before the new regs came into force. I am flush mounting it, i.e the back of the CU is screwed to the OSB "back" of the service void, and when battened and plasterboarded, just the plastic front of the CU will show in front of the plasterboard.1 point