ruggers
-
Posts
335 -
Joined
-
Last visited
Everything posted by ruggers
-
I'm not a brickie so need some advice on the following. I've been looking to order some concrete or cast stone window sills for a self build with face brick exterior and come up against an issue due to it requiring exact sizes, +205mm if your selecting stooled sills. Theres a 3 week lead time plus delivery charge so I need to pre order them just before the build starts. All of the external walls are designed to metric sizes for full & half bricks using 215x102.5x65 bricks. I'd like to know whats the minimum sized brick cut you can have at the reveals if it doesn't match brick bond, or how else you go about it? For example, other windows are all metric distances apart from each other or from the corners. I have some openings 1800mm wide which are likely to be 1810mm when it comes to building to include the perps. Some of these can be tweaked a little to suit the bricks, but I have one 1st floor window that needs to be centred above an entrance below, and the size of the opening at 1200mm wide doesn't work for full/half brick cuts unless I start to reduce the window size by 100mm in width. It would be much nicer to get to this point, then measure and decide on site but as mentioned, these need to be ordered together or its expensive delivery. I was looking at stooled sills, but considering slip sills if it makes it easier so that I can measure up and install after the openings are built. I then have the option to have them between the reveals only, or order them a bit longer and manually cut out the horns to let them go past the reveals 50mm each side.
-
@nod @Jeremy22 Are these your own houses with the slate overhanging the upvc verge, dry? Any issues, wind catching under them and loosening them compared to wet verge?
-
UPVC Verge to underside of slate and facia area?
ruggers replied to ruggers's topic in Roofing, Tiling & Slating
@joe90 Sounds a good shout that with the metal trim. Just slid between the battens and undercloak then tacked to the ends of the rafters. -
UPVC Verge to underside of slate and facia area?
ruggers replied to ruggers's topic in Roofing, Tiling & Slating
I'm familiar with slating and done a bit myself but I'm not familiar with tiles. Even though I won't be installing the slate or tiles, I want to understand the options so that I can find an installer who will do it that way. I liked the idea of slates with no undercloak and the facia up to the underside because it effectively zero maintenance. Having to get repointing done, even in 20 years, is the expense of 3 gable scaffolds up to 9m high or paying someone however much that costs for the time if it can be done from a ladder. The only difference I can think of with the facia to slate, no mortar option, is the slate 40mm over hang gets caught by the wind and could eventually come loose? What do you mean by undercloak being bedded? Mine will be on a gable ladder which provides a 200mm soffit. If I'm correct, a 150mm wide undercloak would normally installed on top of the gable ladder and barge board, held tight under the tile batten and secured by clout nail into the rafter, and then 40-50mm of the undercloak projects past the bargeboard with the slate? The battens and breather membrane need to be set back enough so they don't wick moisture from the verge mortar. Then once the roof is completed all of the verge is pointed up in one run? The clay tiles I looked at (Sandtoft rivius), as you mention, theydo say they need to be clipped on every row at the verges. Are these clips visible from the outer edge, and can't be hidden if using a pointed wet tile verge to avoid using dry the systems? The tiles would have to be black so the verge caps would have to match. If using slate, It will be purple/black Welsh with anthracite UPVC. I was just told by a joiner when we done my current house facias and roof, that it's bad practise to have the weight of slates on the facia and makes it really hard to replace the facia again because your trying to lift 5m of eaves slates when nailing to the rafter ends. Where as if it's supported by other means on the rafters, like a tilt fillet, it's better. Ultimately I'll have to comply with building regs and require eaves ventilation anyways. -
UPVC Verge to underside of slate and facia area?
ruggers posted a topic in Roofing, Tiling & Slating
Is it good or bad practice to install UPVC gable end barge boards up flush with the top of the batten so it meets the underside of the slate, rather than have a cement board cloaking and mortar pointing? One roofer says the mortar method is best to add weight to the ends and helps when it's windy. I'd rather avoid mortar if possible, it's more future maintenance and cost with it being a 9m high ridge. I'll have a 200mm soffit and verge overhang all around and 40-50mm slate over hang. I planned to fit slates but have been looking to reduce costs so considering some rivias clay tiles for my self-build roof. I much prefer the look of slate because I don't like the look of individual dry verge caps and have been told the 3m long strips can warp. Both usually fade too. I want it to be as low maintenance as possible so I'm not having to pay for upkeep of mortar verges or replacing caps. Does anyone have any advice on dry verges that are good quality if I go with tiles? Is it ok to have UPVC to the slate underside and should it be CT1 sealed where the two meet? How can I avoid having the weight of slate or tiles on the facia boards, are tilt fillets still used or is there something better thats nailed to the rafters and offers better air circulation? -
Two questions here. I'm building a masonry build cavity wall, face brick exterior detached house, and I was going to be D&B boards to the external walls. Because I'm looking for a good level of airtightness, I was going to parge coat the internal block work by means of a wet slurry mix or getting a plasterer in to parge it. . I'll be using masonry hangers so I'll want to cover the joist area myself before they're installed. Instead of dot and dab, I've been considering pricing it up for wet plaster to save the hassle of having to parge it, then hoping the installer does a good perimeter seal around each board. 1. If I wet plaster all of the external walls, how do we skim the internal reveals and catnic where I'd have cavity closers, or my own PIR insulation that plaster won' stick to. Do we have to board this area? 2.How are cables and 15mm pipes hidden in wet plaster. I'll need to drop some pipes down to the kitchen.
-
I need a disclaimer because I've had to post this lots of times, but I can't have blown bead with facebrick in a higher wind driven area on the West coast, no one uses it and the local BC won't like change. The plans have been approved a long time ago now. Going to use T&G boards.
-
My cavity wall construction is 100 Face brick - 150 partial fill cavity with 100mm PIR - 100 inner block. I was looking at cast stone slip cills for the front of my build that provide a 50mm front over hang, but I want to sit the back of the 65/70mm deep window frame so that it's 25mm into the cavity to reduce thermal bridging and to give a deeper reveal on the outside of around 60mm. I'm not sure if I need a 150mm cill or a 175mm. The passive cill image attached has a 200 cavity and full fill blown bead, but it shows the cill set back into the cavity and the frame set back on top of that leaving a 100mm external reveal. Did you run DPC under the concrete cill only, or differently?

-
What option did you go for? Did you use a cavity closer under the ply internal cill and if you did, did the outer part of the closer, sandwich between the underside of the window frame and on top of your concrete outer cill?
-
Airtight walls & fixing stuff to them
ruggers replied to WWilts's topic in New House & Self Build Design
@OwenF Hi, just seen this. I haven't got that far, my project had to be put on hold for the time being. When I completed a full heat loss survey, I was surprised that the addition of internal insulated plasterboard over the whole house made minimal improvement to the total heat loss and it was going to add a lot of money onto the build cost. Every little helps, and I'd have to check again but it was something like 0.4Kw improvement for £2500 extra. I couldn't find anything solid on whether or not a masonry build with cavity insulation was better left without insulated plasterboards for thermal mass reasons, or to add it. In reference to what you've quoted from my older post of adding a vapour barrier behind the battens then adding insulation between them, I'd need to be sure it wasn't going to cause damp from warm and cold surfaces. I think I'd leave the vapour barrier out, apply battens to a parged wall and as long as it was only one room, blower paint could be applied to the sides of each batten if needed. -
How to determine finished floor height using beam and block?
ruggers replied to ruggers's topic in Foundations
@jon-lee Once i get them in I'll set the leser up and have a check across the rooms. Spans vary from 3.8, 4.25, 4.9, 2.5m. Thats including the 100mm end bearing. I'll be using dense solid blocks as the lighter more insulating ones don't offer any more to the U-Value. the reason I was going with 50mm liquid screed was initially because of the faster reaction times but thisn't so much of an issue with weather compensation. It's just the extra 25mm of cem floor adds quite a lot onto the price for every 5mm thicker but I do see what you mean if theres a lot of bow in them. -
I'm building a 2 storey house with an internal garage thats accessed internally from the utility room. the 2 external walls are 350mm insulated cavity (100/100/50/100), and the 2 internal walls to the house are 300mm full fill PIR (100/100/100) and will only go up to first floor joist level. The 300mm walls separate the garage to utility and the garage to hallway. Theres a room above the garage ceiling, I'm using posi joists on masonry hangers for air tightness, but, the ends of the joists above the garage and hallway/landing are to sit on the 300mm cavity divide wall. I'm now wanting to extend this hallway/landing garage divide wall up to the first floor ceiling level so I have a solid wall up the side of the stairs. I can either do this on the house side single wall only, or continue both sides of the 300mm wall up to the roof truss level, which loses 200mm of space from the room above the garage. If I continue the inner wall right up, but leave the garage side finishing at first floor height with the joists resting on the divide wall, what should I be closing off this cavity with to prevent cavity air working it's way up into my floor void? It will be 100mm PIR so shouldn't be much space for air movement, but unless closed off it's not airtight. It would need to be strong enough to allow the joist ends to sit on it.
-
This is exactly what i was going to do, i have the stone to the front for vehicles to drive in and park up to be loaded, i just wasnt sure if B.C ask for something under the beam and block, like stone or dry mix. It seems a waste to me if vegetations removed and its away from light, but i was unsure if there was another reason for it. Despite not wanting to due to cost, The only reason i was going to stone the footprint, was with it being a wet site and needing an 8t machine on to dig the mass fill founds, it could all get chewed up if it continues to rain on and off. I need the founds dug in the next few weeks to meet the pre 2022 regs cut off, currently its all graded nice and flat but its wet after just being completed and no land drains in yet.
-
@nod or anyone, I'm having my site cleared and the foot print of the house plus 360 perimeter path around it down to clay level ready for setting out and founds dug. I haven't spoken to B.C yet but had some saying to stone the whole foot print in 150mm compacted crush stone then set out and dig through, and using the stone removed back on the drive area. Or to leave it as clay, build up to DPC, and dont put anything under the beam and block floor just leaving the air 150mm gap. I think I'd be looking at 80t of stone so £1000.. Whats the drain you refer to underneath?
-
Thanks Nick, cost of the extra floor pipe was never the issue, I just thought that adding too much pipe might make it too warm. Its one thing I've never installed so I don't know how much adjustment there is on the balancing screws. The whole floor will be open loop so plenty of mass. the 24m2 kitchen will actually be 18 after cupboards. The company mentioned in this post said to run pipes under the cupboards too, to prevent the heated floor transferring to the unheated space. I've never used them JG collet fittings, only the push and twist ones. Tap water wont require oxygen barrier does it
-
Is it just standard 15 or 22mm Hep2o for potable water or does it have to be barrier pipe to keep oxygen out like the heating pipes? I'd rather keep it simple as you say, It's just the plastic fittings can be bulky, I need to drop some down a block wall to the kitchen. I've used the John Guest lay flat 15mm stuff before but some people said it's crap? The last thing I want is my house being too cold because I got the spacings wrong in the 50mm screed. I'm surprised that a lot of really good heat engineers who know their stuff & do detailed heat loss surveys, just go with 100mm c/c rather than custom to match the rooms loss. I have two 24m2 rooms, ones a living room the others a kitchen. Living room has 1 large window and is 21w/m2, then kitchen has 2 windows and french doors which doubles the heat loss and is 48.4 w/m2. (512w vs 1157w)
-
I agree with this, but most won't even do 100mm centres when I've asked it's 150mm min for a lot of them, some of them haven't heard of weather comp even in their technical department. None of them ask what floor finish I'd be having & I'm not 100% on floor finishes myself, too early at this stage, It will be a mixture of tiles with either vinyl click or kandean in some rooms. I need to understand how this affects the w/m2 output vs my room heat loss w/m2. I understand DT20 is probably not achievable at under 50°C flow on a gas boiler but at least if I size my radiators for 37.5 MWT, and it ends up a bit higher, I'm heat pump read if need be and at the cost of larger radiators, I'll be running more efficiently. Was this this using 16mm pipe for the radiators and then using the 15mm eurocone to adapt them to 15mm radiator valves?
-
Hi John, Sorry for the late reply, thanks for the info. I'm aware we're going off the topic from the original post here so I might be better if I start a new topic or drop you a pm if you don't mind. As mentioned my system (pipes & emitters) will be sized for max flow of 47.5C gas or 40C heat pump, both will give a similar MWT of 37.5C. Why is it that most heat engineers advise on going for 100mm centres if your going to run at low temperature, but the chart shows theres no need to? Some suppliers have said only Pex-al-pex is wras approved and pert is best for UFH, pex for radiators and potable water. I'm sure I've seen WRAS per-al-pert. What fittings did you use on the pert pipe, do they need to match the brand of the pipe for the transition to copper? I'm going to have a look at loop CAD, looked on youtube, is it an autodesk product or is there different version? Did you suss it out easy enough?
-
Thanks John, is loop cad easy to pick up? I can use 2d autocad to an ok level, I've completed a full heat loss survey so have room by room heat loss with w/m2 and know my flow and return temperatures etc for full weather comp. But everyone says to just go for 100mm centres when running a low temperature system. I was considering loop cad and getting bespoke spacing that suit the w/m2 for each room and the floor finishes. The cibse heating design guide covers this. What pipe did you use to your taps? I've also never installed any before and not sure what you can really tell by looking at them, some say a manifold is the same as the next in most situations, others claim some are really poor. Some pipe is wras approved to be used for drinking water. I'm not sure how to tell good pipe from bad or why people prefer top brands like uponor, it's certainly not something I want to skimp on if its going to be buried in screed.
-
@richo106 or have any other used this company? Seems pretty quiet here but their trust pilot has good reviews. The main things I'd be looking for are, quality of the pipe and manifolds and do their design service recognise low temperature weather compensation.
-
Are you meaning a timber external door frame? They don't really offer a very good air tight seal, all the ones I've seen with the cill on don't have the jam on the bottom to continue the seal round 360. I'd like to see a correctly fitted seal that works well, where its positioned on the casing, especially the hinge side, and if its routed in just stuck on.
-
Thats good to know with the small amount required and that it's not enough to affect any colour, I've only ever used cheap everbuild 3 in 1 5L plasticisers for block work in the past. Not buying all the sand at once because I think roughly I'll need 30 bulk bags for 250m2 face brick 245m2 blocks. I need to check that figure is correct. The supplier uses the same sand source from North Yorkshire as some developers who build high spec houses locally need consistency. Just looking at the optimix concentrate, it says 5-10ml per 50kg of cement, so you'd probably only need a few bottles for a full house? I think with Cumbrian wet weather that would go off in no time unless it was kept in a shelter. They do a pre mixed mortar in 0.33m3 tubs but its £40 a tub, lasts 1 day, £70 delivery and £60 deposit per tub.
-
@Canski Thank you. I'll have a look at the optimix. At least the buckets can be loaded by 1 person. It just needs to be the easiest method for the builder that is fail proof. If counting, everyone forget how many went in at some point or 10.
-
Hi, I have 240m2 of light grey facing brick to used for my self-build so have been playing around with different sands and ratios to achieve a mortar thats lighter than the brick. This is the shade used on a large development and looks good, so I want to copy it, only they've used a silo. Because it's a grey brick with grey mortar, the colour consistency is key, using other brick colours, you don't seem to need to be as fussy. I think I've got it to where I need to be now with a cheap & simple 5:1 mix of Hanson cement & a buff sand only. I know plasticiser will need added. So, have a few questions if anyone with experience can help? 1. Does adding hydrated lime add any value and does it affect the colour? 2.Does liquid plasticiser affect the colour, if so, in what way, and can you recommend any brands I should aim for or avoid? 3. Whats the simplest way of gauging the ratio without seeming like a pain in the backside for a bricky. Make a wooden gauging box for both the sand & the cement, or use other? 4. Should sand be alternated between bulk bags or is this a bit anal? There's only 2 bricky's and they are willing to work with me, but I want to keep it as easy as possible for them. Gauging boxes all look to be 2 man lift unless this is fine. It's too easy to forget how many buckets of sand have gone in the mixer without one. Any advice appreciated, thanks.
-
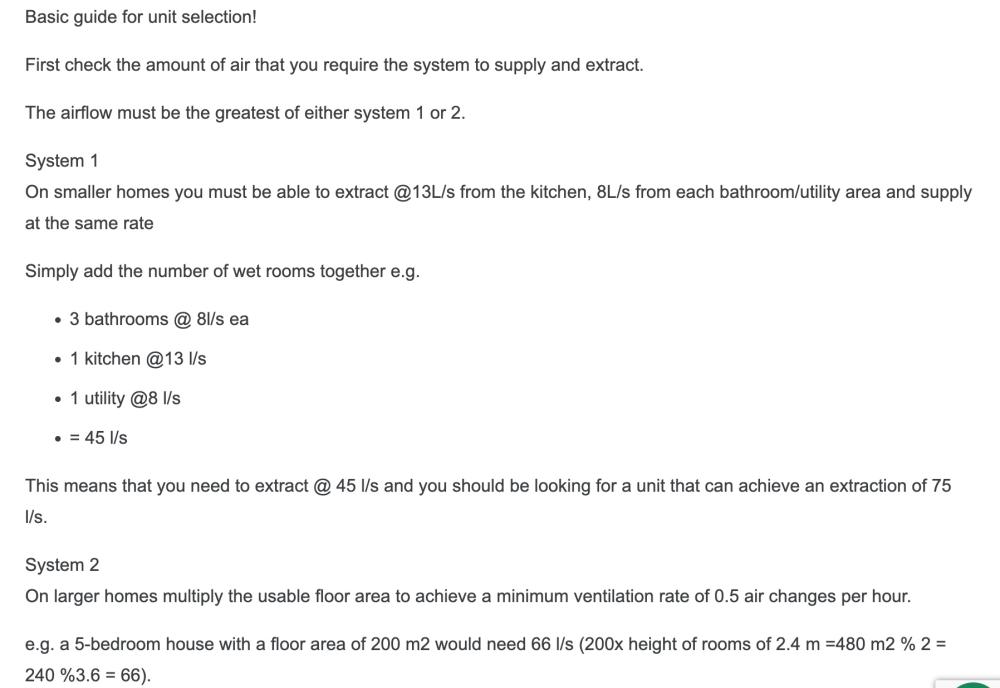
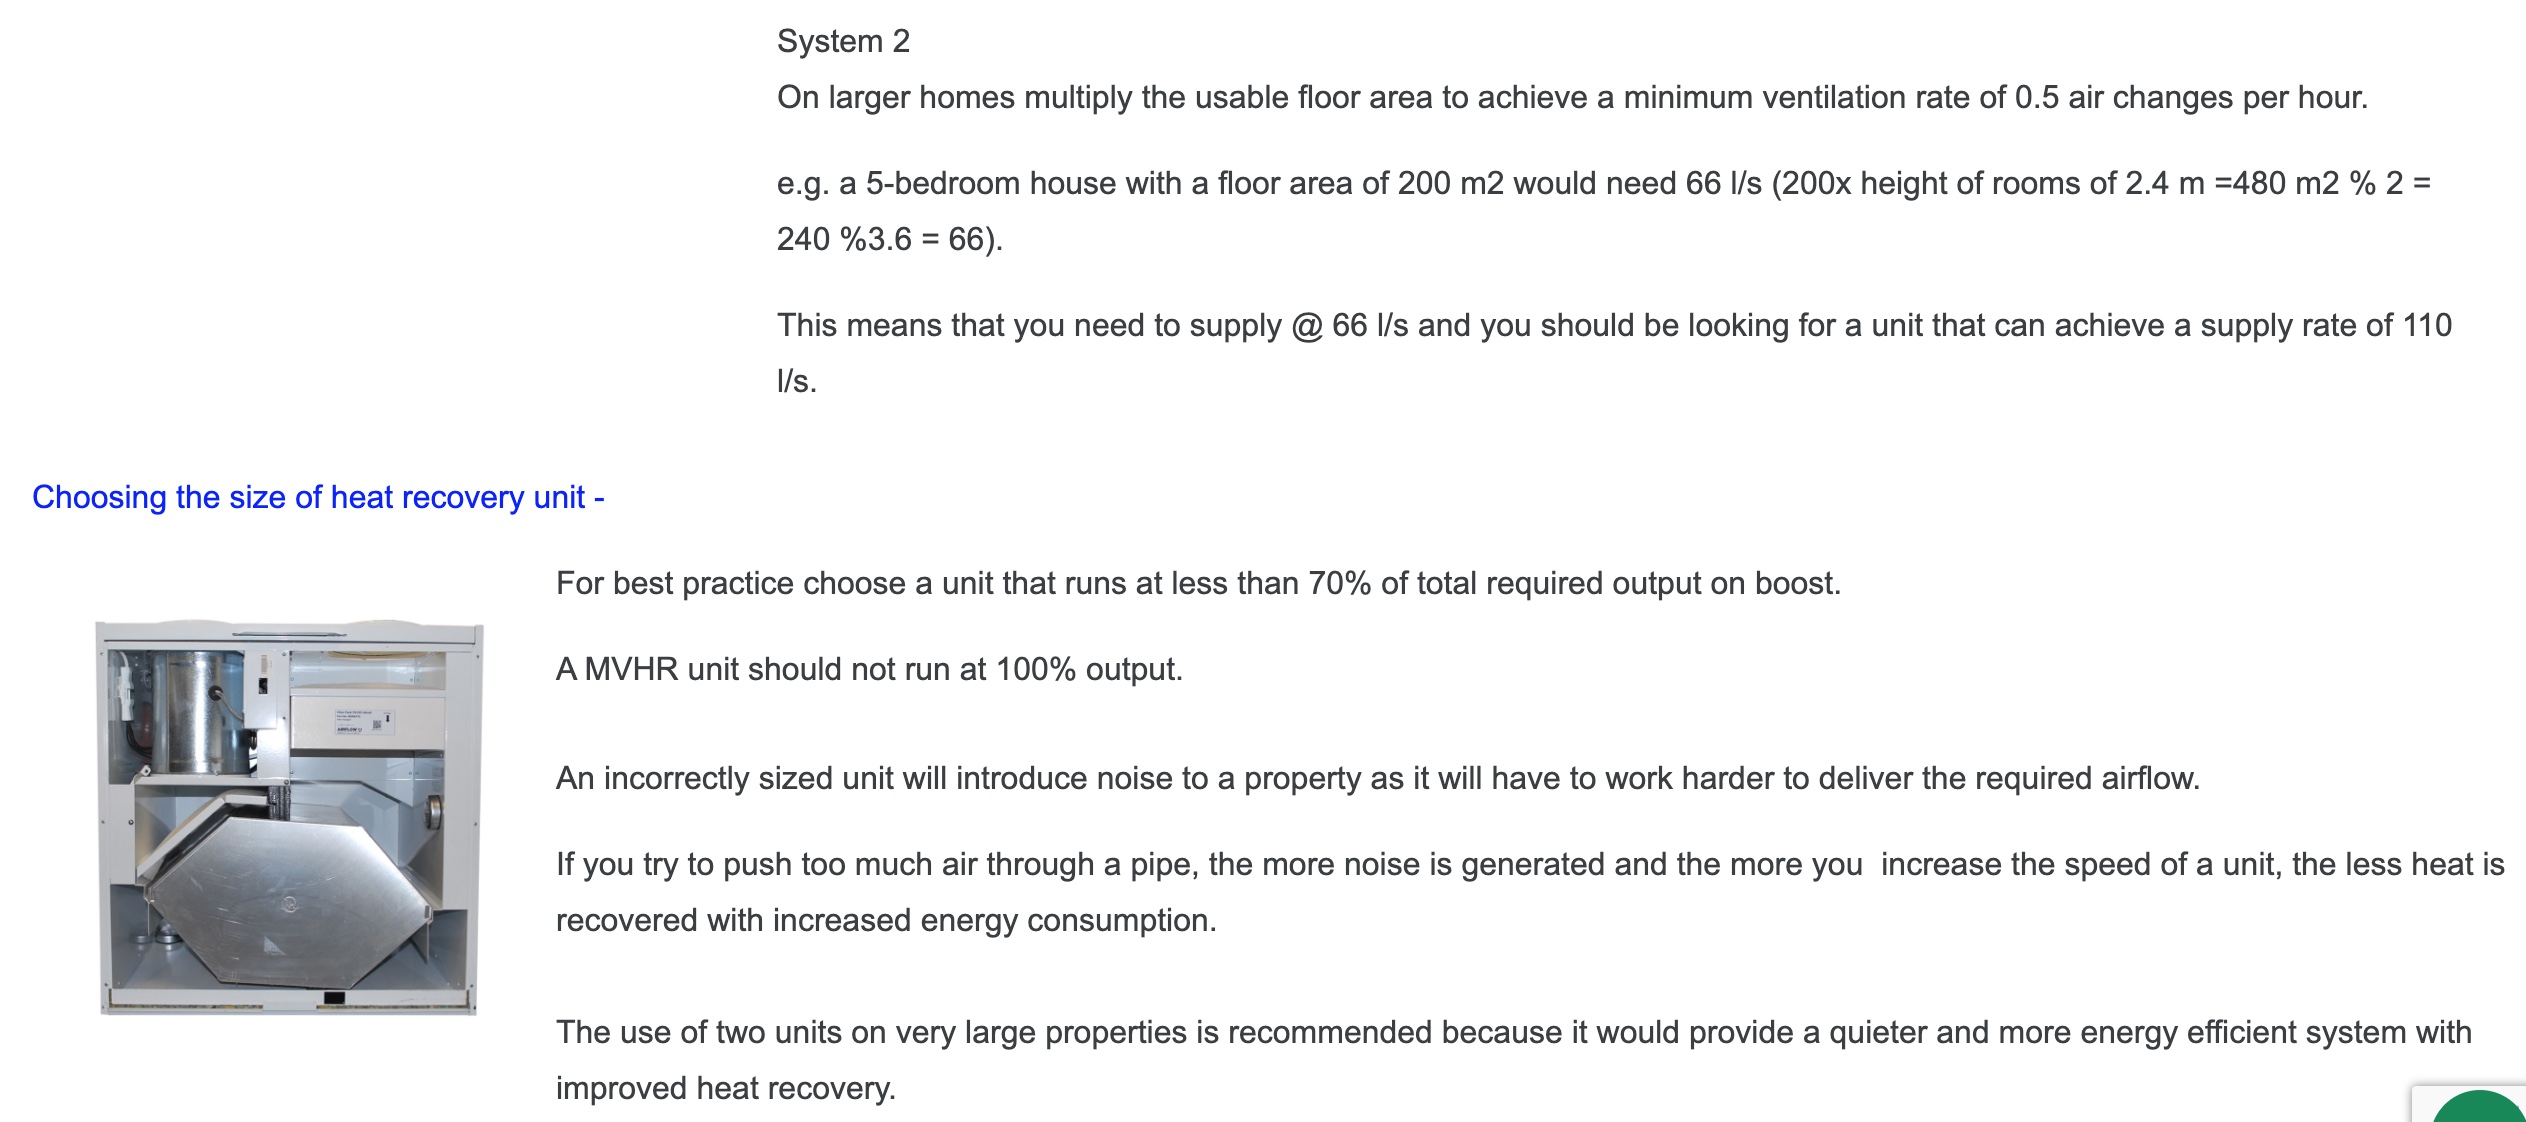
Hi @Johnny Jekyll I'll post my experience so far and see if you can take anything from it. My supply rooms are: 4 x Bedrooms, 1 x living room, 1 x dining room. Extracts are: 2 x bathrooms, 1 x ensuite - Toilet sink no shower, 1 x boiler room which houses the boiler & cylinder & will double up as a drying room with UFH passing through it, 1 x kitchen, 1 x utility room. So for my build I contacted 4 companies, BPC was one of them, the other two i met at the home show and both were very similar in their quotes for spec and price but I found one of them willing to discuss every option in detail much easier. BPC only offered design and supply, not commission being in Ireland. Their prices were good and they also mentioned something up that i need to look into in more detail which was how they recommend sizing the unit for my build. Something i will need to add a post for. The other two companies have told me that a Zehnder 350 is fine and BPC said that I'd need a 450Q or a Vent axia plus B. I need to know if the volume is calculated by ground floor and first floor total volume based on 2.4m ceilings, or by including the 250mm joist void into the calculation like my SAP did saying ground floor was 2.7m (250mm between intermediate floor). My floor space is 200m2. BPC didn't think a 350Q could run under 70% of full power on boost hence the need for a different or larger unit. Taking these comments back to the other designer, they provided an explanation are maintain that the 350Q is fine leaving me slightly confused. When i first made contact, I supplied my preferred locations for MVHR unit, the room plenum locations and my proposed duct runs. the companies seemed to be happy with my design & said it's pretty much where they'd put things too, but I may require an extra vent or two in some of my rooms and this would be calculated in a detailed design. It was due to me having more extracts than supplies. They discussed options of 125 or 160 vents, having 75mm or 90mm pipes. Because i want a very quiet running system I immediately opted for 90mm semi rigid ducting. BPC then said they'd always go with twin 75mm which was different again. A detailed design is going to cost around £700, i had 6 extracts and 5 supplies, I've now been told I will require 7 extracts and 7 supplies, for my large 24m2 living room they will look at the option of either 2 supplies or 2 ducts to one plenum. I'd like to use 90mm ducting. The kitchen diner requires a supply where as I'd only included the extract at the kitchen end, & my larger main bathroom might require further extraction. I think it's possible with good self research to get a 90% efficient design, but as everything's fully enclosed once complete, I only get one chance, So i'm going to pay for the design to ensure everything's been considered by professionals, I'll do the full install to which they've listened to my suggestions and also highlights any bad ideas, then I'll pay for the £450 commissioning service to balance everything & complete the final set up.