Gus Potter
-
Posts
2342 -
Joined
-
Last visited
-
Days Won
29
Everything posted by Gus Potter
-
Can you run rectangular ducting from the attic void under the ridge within the depth of the rafters insulate the duct then drop that down to the first floor ceiling?
-
More foundation fun - straw bale garden room on clay
Gus Potter replied to Nick Thomas's topic in Foundations
Hi @Nick Thomas Really like what you are doing and how you are thinking about making it safe and what not.. to last a long time. But your solum space is..a bit of a mess. I think need to get that ventilated big time or you could end up with serious issues. The bales seem to be touching the retaining wall or close to it. There is no ventilation at that interface.. I think you need at least 150 -200mm of a gap between the bales and the walls. Also you need to think seriously about the weathering details at the retaining wall. Can wind driven rain hit the retaining wall and flow down? The retaining wall will be damp anyway and if you close off the ventilation the surface of the retaining wall it will become more damp. The water gas inside will pass through the bales and if touching the cold retaining wall will condense and wet the bales.. you'll have compost really quickly! Have you thought about spiders / infestation etc ..bugs.. they will love that. Are you sure the straw can be left exposed for say 20 years in the gap at the rear? For me I think you have spent a lot of time thinking about this and then spent more time posting on BH which I really appreciate.. I have learnt a lot from you so it is not a one way street where you post and get slagged off. I hope that once you digest and take a step back you will see where I'm coming from. What about making the back wall a timber frame with wood fibre insulation? Make the panel and stand it up? or something like that? The really weak spot here is the rear / retaining wall interface. I think you need to review what you are doing here and how you are going to achieve the weathering details. Also you should get a good air flow under the floor. -
Yes you can in say a finite element analysis but in real life and on site it often does not work out that way, thus we need to apply some serious safety factors.. and then you find solution is often not cost effective and not easily buildable. I often embark on ideas like this.. and sometimes get things to work.. but then I come up against fire protection / buildability issues for example and I'm back to square one.. but it was fun looking at it..
-
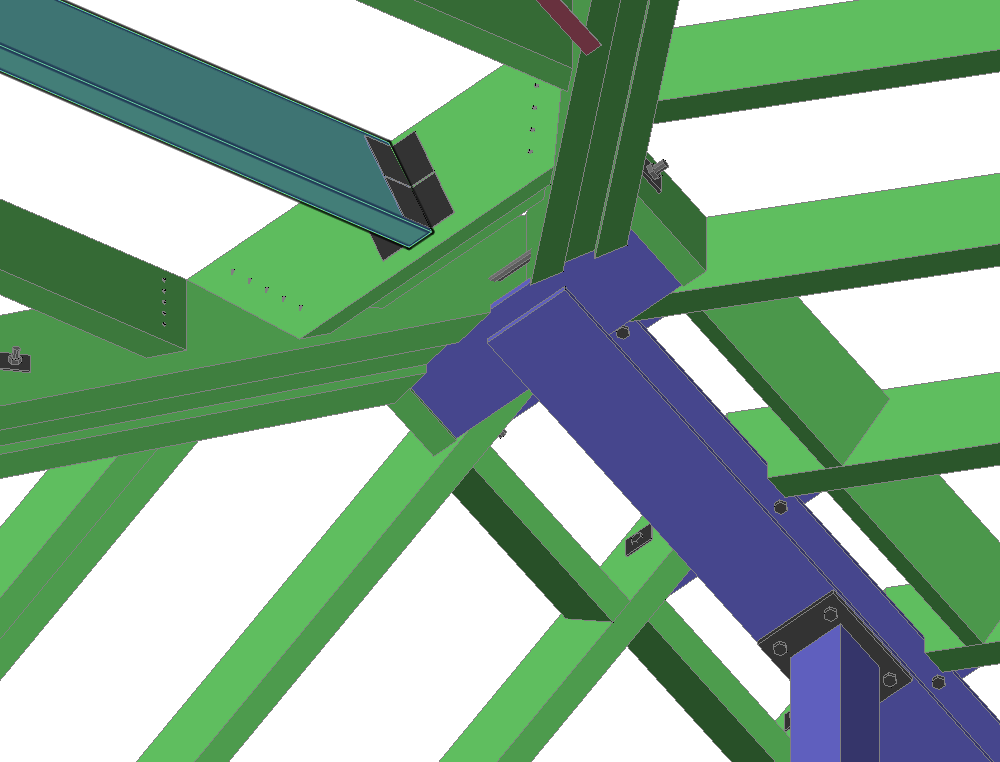
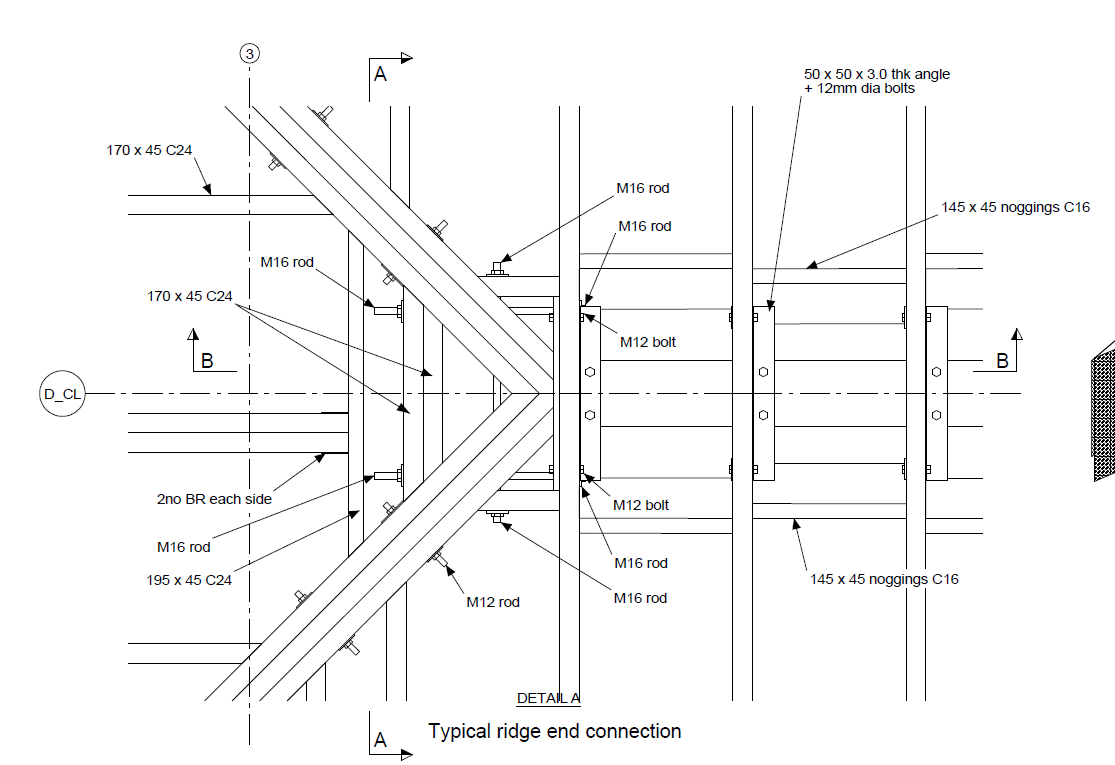
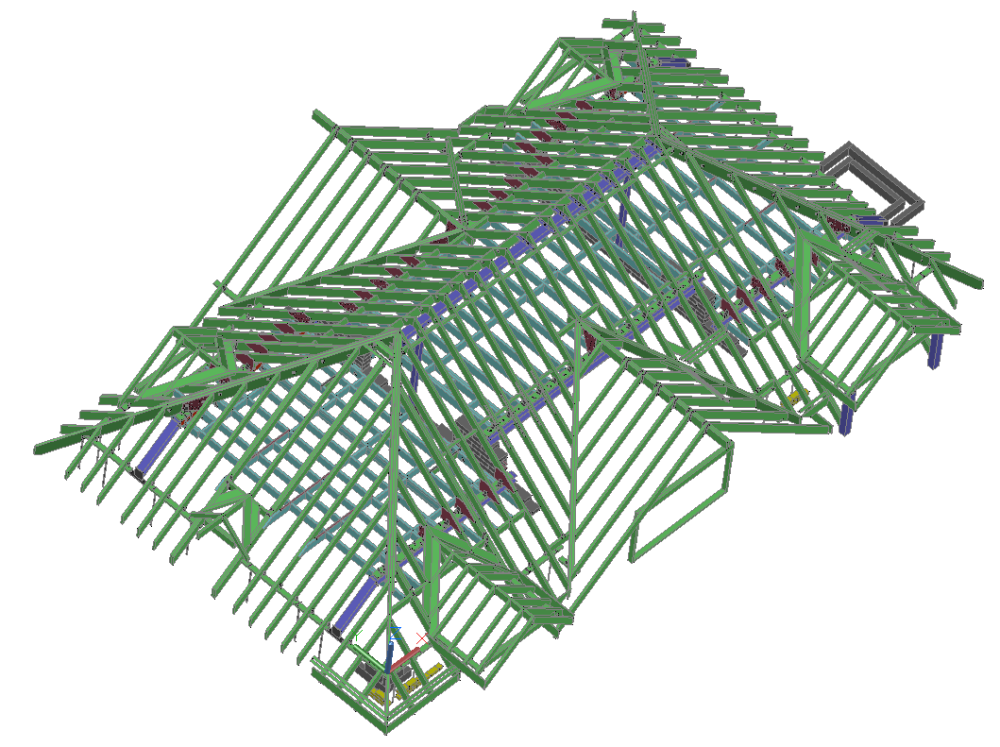
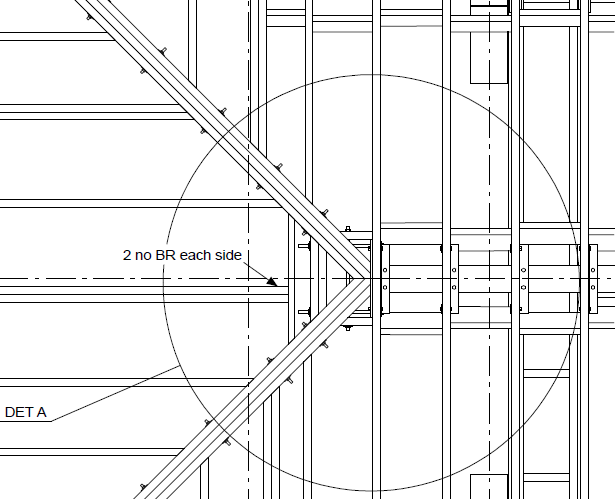
Can see the general thrust of the design, some steels etc. I have not studied in detail but pick out one element.. the roof. You have flitch beams at the roof hips. That is going to be more expensive once you detail that up and realise how difficult that is for a normal builder to put together and build properly. The following is pretty detailed but I hope it gives you food for though in the sense that you need to ask a lot of questions and try and look at the design holistically In other words if we buy a motor bike in parts the sum of the parts will cost more than just buying.. ready to ride away! Below is screen shot of my structural model of a roof I got involved in and improved / value engineered. It's possibly more complex than yours but there is a lot in it that may help you get your head round what is coming down the pipe. The first screen shot is of the overall roof structure. I can see that on your roof plan at the bottom you have some heavier, treble rafters.. I'm guessing this is for a big roof opening / dormer? At he bottom left of the model there is a dormer, a bit smaller than yours but the concept is the same. The main thing about this model is that all the parts are off the shelf, nothing hard to source and a decent builder will be familar with working with the different components and know how they are supposed to be installed. The aim is to go for the simple stupid. Lastly all roofs are different ( the layout and support positions below also drives the roof model) when we get into the fun part of self building so don't take my way as the best way for your project. Below is how I swapped out the originally hip flitch beams for solid timbers and the hips.. they are offset in the vertical direction but I gave the builder the info they need to offset, rather than just guessing. It's actually quite easy to do once you get your head round the roof angles and if you can do a compound cut (a competant joiner/ chippy should be able to do this easily). I know as I used to be on the tools before I was an SE) In the above there are short horizontal timbers with long threaded rods (from Jewson ect). These tie the hips together and back into the main roof. You can see there is no connection at the ends of the hips to the ridge area aNd may wonder how the vertical downwards loads are resisted.. The reason for this is that in practice with the steel between the timbers the connection is so complex it almost stops working. Ask you SE how the are going to detail the flitch beam to ridge connection. Would be interested to see how they do it. For me I'm sharing what I know and how I try and simplify so in the round we stand the best chance of getting it built the we want without costing a fortune. The above is a screen shot looking up from below. Here I cantilevered the ridge beam so we have a simple connection between the supporting post and the ridge beam. Let's break down big problems and make them into simple things that can be tackled one at a time on self builds. The ridge beam has an big steel angle shop welded onto the end.. now we have big ledge to support the hips.. the chippies / joiners can't miss that landing area, even if they cock it up a bit there is some slack in the design. In summary the two images above show how I tie the roof together and support the vertical loads by decoupling the hard things to do on site.. Below are some screenshots to show how the model gets translated into a "paper drawing" for the builder. Incedentally if I'm doing something like this I always give the builder the 3D view and say.. I want it to look just like that! It's also great for self builders (and me) as its helps you visualise what needs done.. and it is great fun! Below there are a few things / ways where you can save money and some food for thought. When we are working with steels supporting roofs the steels themselves are usually not that heavily loaded to the extent that the steel material wil start to fail. Normally as steel is "bendy" it's the deflection that govens the design. This often means that the connections can be made more cheaply in a domestic application. You may see some SE's asking for a "full strength connection. This can involve an expensive welding process and beam end preparation. If the connection forces are relatively low then we can often use what is called a division plate with a bog standard 6.0mm fillet weld. The plate is cut from a bog standard flat bar.. off the shelf. Below shows a cranked beam form the model with a division plate shown as the black bit between the beams. Here we just use standard 6.0mm fillet welds to join it all together. Cheep and chearfull. I did check the division plates would not stick out the roof by the way!. In the above you can see a timber wall plate bolted to the top of the steels. It can also often be shot fired.. ask your build what preferance they have. In this case all the steels came predrilled to make it idiot proof.. I said if there is a hole it needs a bolt. The red bits are plywood gusset plates nailed and glued to the sides of the rafters, there is a timber packer behind these gusset plates you can't see. The reason for this is partly geometric and partly govenernd buy the Architectural design. But in essence this worked on this job to transfer the roof loads down onto the steels while also tying everything together. The L shape brackets are just Simpson or similar stuff off the shelf. Hope this post helps inspire..


-
Hiya. The reinforcement options like the Simpson etc have their limitations and these are reduced further when tackling solid joists. One reason for this is that the engineered type joists are less variable in terms of the local strength.. which is where we want to put nails / screws etc. If you only want to hole one joist with a big hole then look at trimming the joists out.. like a stair well and double the joist up either side for example. If you can't do that then we may plate the joist with flat steels each side but these steels need a hole also and thus up to a point the larger the hole the thicker the plates. At some point the hole becomes too big and even the steel plates won't work. Now the plates will be long. A starting point would be a steel flats 1.0 m long each side and be about 10mm to 15mm less than the depth of the joist to account for timber shrinkage. Here the joists shrink in depth, the steel doesn't so it can pop you floor and or a ceiling. An important thing to remember it that timber is graded at the size it comes out the mill based on the complete section depth and width. Now timber has knots, shakes in the grain etc. It's sods law that where you want to cut the hole will be right where there is a big knot or defect in the remaining grain... and now all the theory can be invalid. Each case needs considered on it's merits. Can you tell us a bit more about what you want to do? This concept works for steel beams where we hole the webs reasonably close to the middle of the section and weld in a tube to transfer the stress around the hole. But I don't think it would work for timber as not least when the timber shrinks it would stress the glue... and then we would need a glue that can really bond timber to steel for structural applications.. and also be able to be used under site conditions?
-
More trenches, holes and crushing concrete
Gus Potter commented on LSB's blog entry in Little Stud Barn
For a self build string lines and a good steel tape are an essential requirement. Also consider a water level.. not technical but it's cheep to knock up and means you can check that either you or the builder are getting the basics right at little cost. Best to get the founds right as you sleep well at night.. you need to get the sleep in early as later you'll maybe be grateful for it! It happens in soils like sand when they are loose. Main thing is to clean out the bottom of the found so the concrete doesn't end up getting poured on loose soil. -
More trenches, holes and crushing concrete
Gus Potter commented on LSB's blog entry in Little Stud Barn
Great blog.. keep it coming! Things I like are how your pics convey thousands of words. I can see the use of your simple and effective string lines. How you break out old concrete. Simple stuff that shows a found excavated and the different layers of soil. For all on BH.. if the sides of your founds don't look so clean cut as @LSB it's ok. Often in poor ground we want the sides rough so the edge of the concrete found gets an extra key into the ground! -
Yes do as as there are loads of folk on here that can give you loads of advise, help and ideas not least.
-
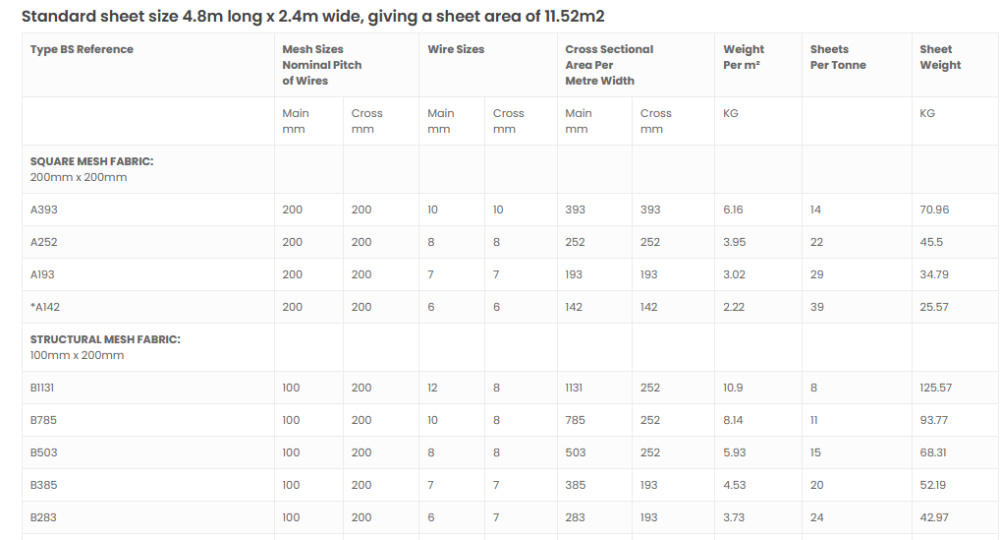
This is a clever solution from @George for common domestic applications, very practical (and once you see why so obvious) and cost effective. You'll be surprised how cheaply you can buy loose bars and how easy they are to cut them on site yourself to supplement an A type mesh. For all here is a bit of an explanation and a bit of "but here is the catch" at times! An A type mesh has a bar spacing of 200mm each way. The table below is a good start to look at. "A" type meshes are usually used to control cracking in slabs, particularly the A142 and A193. These are "non structural mesh applications" which means that if your floor tiles crack then the building / floor will not fall down.. that keeps SE's awake at night if things could fall.. loss of life. Often we use A142 and A193 for small ground bearing slabs and slabs on insulation, sometimes these ground bearing slabs that have less (further apart) movement joints in them... the concrete shrinkage stresses are higher so we use a heavier mesh to give us more space between the crack control joints. Now often we can use say A252 and A393 meshes for say ICF floor slabs, walls and suspended floors. Here the mesh suddenly becomes part of a reinforced concrete member... it no longer is there to just control cracking but forms an integral part of a main structural component.. which is a structurally reinforced concrete member.. like a reinforced concrete beam over a big bifold door opening. Now the design codes require a minimum percentage area of steel reinforcement based on the cross section area of the concrete as this is now critical to safety.. won't fall down as opposed to cracking your floor tiles. This minimum percentage requirement often results is a big jump in the amount of reinforcement you need to use. Often you'll see on BH folk (the ICF world is a case in point) wondering why they have lots of steel mesh and bars specified for what looks like an innocuous slab that others seem to get away with. I hope the above explains that the two different animals. The B meshes are intended for reinforced concrete (structural members) so have closer and heavier bars in the span direction if spanning in one direction, the cross and smaller diameter bars work as crack control and to tie it all together.. so they are thinner and at larger (200mm )spacing. In the right application they are cost effective.. they would not make them if they were not. For all and on BH we want to keep things simple stupid and get stuff off the shelf. Most SE's designing self builds will / should take into account that we don't want to complicate concrete design and rebar as the more complicated the more it will cost on site.. introduce risk that things may not get built quite the way we hope. We will often design the reinforced concrete members simply.. technically over design but in the round most economic for you folks on BH once you take into account labour and material availability. Now if we were designing say a car park or multi story building with multiple continuous spanning reinforced concrete beams we use a technique called "moment re distribution" which means we appreciate the steel will stretch and when it does it sheds load to other parts that have spare capacity so we get more bang for our buck. Now an intrinsic difference between an A and B mesh is that the steel has a different amount of "stretchyness" called ductility. The above may have the info you did not hear which is why they don't want to swap out the more ductile B mesh for an A mesh. I suspect they may not have gone into that much detail.. so keep pushing and posting if you want some feedback.
-
What about the old schooool way where we carefully chain drill the facing brick on the outside, angle the drill bit so the inner leaf hole is a bit large diameter and then tidy it all up with a long chisel. Takes longer but saves all the hiring hassle and that extra cost of the coring bits, the running about and pressure to return the hire. I would try one in a place where it can't be readily seen and see how you get on. Mind you if you have ten or so to do you may get fed up chain drilling. This has a spin off benefit as when you put to pipe in real life it may not work fall wise and line up with the hole!.. so all that effort getting the hole looking sweet will be a bit of a let down! Try a 120 mm dia hole to start, then line up the plumbing and enlarge if you need a flexible gap around the pipe. A scutch chisel should work here to get a start.
-
Good plan. In theory we can design a house with a trussed rafter roof with a big open plan empty space and then infill with non load bearing walls. But we need to balance that against the cost. However at times we may want to design a house where we can adapt it later easily. We pay a little more to create a big space that can be easily altered.. much like how we approach an office development. Would be interested to see what you SE says.. maybe they will give you two options.. a big box that you infill and a box with racking walls Then you can compare the cost difference? You mention a ridge beam.. are you doing something like a 1.5 storey and not a bungalow after all?
-
Appreciate your input, learnt more at my end, admire your skill and knowledge. A big thanks from me.
-
Compressive Strength - insulation behind ledger board
Gus Potter replied to jayc89's topic in General Structural Issues
Hi all. I don't think this is safe for the following reasons. Mind you you can ask ten SE's and you'll get ten different answers.. here are my thoughts. Agree that the ledger distributes the load over a number of the fixings. Mainly to account for a few badly installed ones. Also agree that if you use EPS or foam 200 you will get initially nominal tension in the anchors (as the say load increases due to snow) as the EPS will compress as the ledger rotates (and the fixings start to bend) due to the added eccentricity of the load. If the ledger was hard against the wall, it was 50 mm thick and with joist hangers then the eccentricity would be would be 50mm, maybe a bit less if the hangers are of wrap over type.. If you put a compressible insulation behind the ledger the eccentricity is now doubled to roughly 100mm and this completely changes the behavoir of the connection in a dramatic way. The insulation is not strong enough to deal with the forces until it compresses by a long way and by that time other things will fail.. probably suddenly which is dangerous. An EPS or Compacfoam 200 insulation means that it will often carry a load of 200 kN/m^2 at 10% compression.. thus before it can carry that much compressive load it needs to compress by 50 x 10% = 5.0mm and by that time your ledger will have rotated a lot and dropped a bit. All the bending forces will by that time get transferred to the fixing which is into brittle masonry. The fixing will now be subject to the same downwards loads (call these vertical shear forces) but also a significant bending force due to the compressible nature of the insulation. This causes the masonry to not least crush as the fixing enters the wall and that can reduce the capacity of the fixing by more than 50%. I have only touched here on some of the basics.. the behavoir of these types of stand off connections is much more complex and you enter into this world at your peril. I think your starting point here is to get a feel for the difference in load capacity of a fixing with a stand off (which is what you have) is to go to the Hilti website and see how much difference it makes when you have a a column base plate set above say a concrete pad stone. You can see this often on lighting standards next to motorways / railways where you can see the column base plates set above the bases with the bolts exposed.. you have something similar. Now even navigating the Hilti or similar site and interpreting the load data is going to take a lot of knowledge, but just have a look.. they have some pretty user friendly diagrams. I hope you'll then see the big load capacity reduction and realise that what you are proposing is not safe unless you design for the completely diiferent behavoir. However there is often more to this than meets the eye. When we design a building we want to tie different bits together for overall stability. In your case this could mean that we want to tie the rafters back to other parts of the house so the whole thing acts as a oner rather than individual elements.. we call this as SE's not least robustness (if one bit fails the rest hangs in there) and look at alternative load paths. We think.. just say the builder cocks that bit up.. is there another way the building can hang in there before it falls down? So rather than pushing the connections to the limit we need to introduce a bit of redundancy to account for human and material error. In principle you could make you thermal break using say something like this https://www.armatherm.co.uk/thermal-break-materials/armatherm-frr/.. I think it is a waste of money.. just accept you have a bit of a cold bridge and beef up insulation elsewhere to compensate. Also remember that you are fixing into old masonry, maybe bricks with holes in them, for the fixings to work well they need to be away from the mortar beds etc.. you are asking too much here.. in theory it may work but can you build it in real life and make it safe? So to conclude my thoughts are DON'T do this. Fit the ledger against the wall, maybe with a DPC behind. -
What about going for the simple stupid.. an insulated garage door and then you could treat the garage floor as a quasi party wall.. just horizontal? Next would be to look at how often would condensation really occur? In the coldest weather you may want to introduce a little background heating any way in the garage.. it would be a few quid over a week or so? During normal use a bit of PIR would help. So long as it's not a kitchen or bathroom your level of water gas generation will probably be less onerous. Ok so you shift the dew point down.. but the premise here is that the concrete is breathable.. which it is not really.. if the garage floor has a painted surface then shifting the dew point down ain't going to make much difference?
-
Indeed.. my mistake. that changes the game!
-
What a good question. My starting point here is to look at the direction of travel of the moist air (call this air that contains water gas) and where this gas will condense into a liquid (water which causes the problem) that is called the dew point. The garage is colder than the upper floor thus if water gas gets past the existing ceiling and migrates up it won't condense as the temperature above is higher as you move up the floor depth.. you move towards the habitable heated space... warm air can carry more water gas without it condensing out...hitting the dew point. Most intergral garage ceilings I have seen have two layers of plasterboard for fire protection. Before you do anything you need to make sure you don't compromise the fire protection. Now if you were to add an extra layer of insulated plasterboard (which is often has it's own vapour membrane) below the fire protected ceiling then as the garage is cold the water gas still won't encounter a lower temperature zone as it move upwards so you should not hit the dew point. In theory you could have a very moist bedroom and the water gas migrates downwards and condenses.. but that will happen anyway as it hits / nears the cold side of the existing garage ceiling. But in real life elevated levels of mositure will go up towards the bedroom ceiling. If the bedroom even approaches that level of moisture you must have another problem that would make it close to uninhabitable.
-
Hiya. Here is the link to a post I made a while ago about how I go about getting build over permissions and the different types of sewer.. I have tried to paste the link but if you click on the pic below it takes you to the thread where I posted info. Scroll down a bit and you'll get to my post. Big thing here is you need to know what the different types of sewers are. A private sewer is a drain that only serves your house.. you tend to own that. A public sewer is one that serves more than one house. You often see them up the back of a row of terraced houses. Often at the end of the terrace they turn towards the street and run into a main sewer.. which is a big (don't want to be rude) often deep large diameter pipe with potential very costly problems attached. Your 3.0 m rules are often out the window when you encounter a main sewer. To get best advice you need to give more info with a drawing and tell us what kind of drain it is. If you read my old post this should help you navigate this minefield. Have a read at that and then we can maybe help you a bit more?
-
I thought from reading the above you had a hybrid roof working from the top down. If you have tiles, membrane, a gap, insulation between rafters and insulated plasterboard below the rafters then that is a standard install... no drama. But if you had ended up with a hybrid roof then.. when you said part the insulation was over the rafter that is a big game changer.. I went to a job last week where the builder has changed one of my designs from a warm dormer roof to a hybrid roof and not asked me if it will work.. if they can't demonstrate to me that it will work by calculation .. it's going to have to come off and get built the way I designed it... and that is about 15 - 20 k plus down the pan. It's not just the roof it's all the plaster board inside as on a warm roof no need for MR plasterboard in bathrooms and vapour membranes etc.
-
Pity you wasted all that money then, why did you ask the question if you we just going to do your own thing anyway? Take it that the 50mm air gap is ventilated to keep BC happy? If so the insulation above that 50mm gap is doing nothing.. other than making you feel good. Or have you sealed off the 50mm gap.. seems odd how you can make that work.. If that is the case then you have dodge a bullet as what you have is a roof with less thermal perfomance (75mm PIR) but likely to last a lot longer as you won't be getting interstitial condensation.
-
Never mind about upsetting BC.. you should be more concerned about knackering your house and wasting your money. It seems you are suggesting a hybrid roof.. and these are fraught with condensation issues... like it will start raining inside! Can you tell us more about how are proposing to build up the layers of insulation, the membrane if any on the top side of the roof... and the type of plaster board etc you are going to use on the underside..do you have bituminous felt (not breathable) etc. There are a lot of things you need to get your head round before you take this route. Don't be put off as often the solution is simple.. you just need to know how these seemingly simple things work if put together in the right way.
-
No because they are wary. A 1500 tread width increases all the potential forces significantly.. you are in the region of a commercial stair. An SE will look at realistic and probable loading. If you look on the internet at family photos you often see groups of people gathering on the stair at xmas time say... that is a realistic and probable loading. That said the cost to design for this should not be an arm and a leg.. but BC will query if you try it on with the "stairbox" etc
-
More foundation fun - straw bale garden room on clay
Gus Potter replied to Nick Thomas's topic in Foundations
@Sparrowhawk Distaster strikes at my end. Thanks for pointing out my error and the heads up @Nick Thomas Can you all for give me please. I just use my own name.. not forgotton that yet.. but time may tell as I age .. further. -
Helo Glen. Well done you for getting to this stage.. as a past self builder it is a mile stone, technically and emotionally... bet you feel great! I'll comment first with my SE / past Contractor's hat on. Ok with the raft concept.. it has many advantages. So let's go with that for now. ICF is not suitable for what you propose in terms of cost and complexity in terms to reinforcement design and buildability = big cost. You have big open spaces and building stabilty issues. While I could maybe design this structurally on paper in ICF the detailing and the construction method is going to be so complex that costs will escalate exponentially.. and then you need to find a builder that can actually execute a complex design like that. To expand a bit you have some chimneys, exterior details.. to marry this with ICF is going to be very costly. To sum up if you came to me as a Client ICF would be the last thing on my mind. There are so many other better options worth having a look at. In terms of Architectural design. The example you posted is unbalance in that the garage dominates the main dwelling.. the massing and complexity of detailing is not pleasing... it looks like something from America.. we in the Uk have better taste. Your floor plans. This is something quite different. To simplify you have the main enterance, then you have to walk by the cloaks and the office.. before you get to your first feature which is the stair. When you get home or have visitors then there is nothing there that excites.. more like a 1970 sports pavilion enterance. I don't know what to say other than there is a huge amount of wasted space and the flow (how you move around the house) is bizzare. Why can't you access that boiler room from the ground floor.. I think you need to go back and reconfigure the ground floor and then the upper floor. Go back and look at other layouts.. have a major internal design review.. then rule out what you really don't like.. then you will know that what you have suits you. Looking at this I would say to you.. I think what you have is not good.. let's see if we can do better. Has anyone sat you down and explained your design and how it works on the different levels? if you can tell us more about that it would help to generate informative comments.
-
More foundation fun - straw bale garden room on clay
Gus Potter replied to Nick Thomas's topic in Foundations
Yes you were as it is your project and love what you are doing and your approach. I'm chipping in with partly my SE hat on in the hope you will make it safe but also to encourage you as best I can. On the other hand you have been on a course, know other stuff, taking an innovative design approach so we are all learning from each other. This works both ways.. I learn from you and visa versa. Where I think you are going off track I say so and try and justify why I think so. Think about this another way.. a garden room on average adds 20 -25k to the value of your house (think it was Which magazine that said something like that).. Imagine if you can do this for 4k, justify that it is safe and when you come to sell.. now you have pocketed 20k tax free, have enjoyed building it and using it.. -
More foundation fun - straw bale garden room on clay
Gus Potter replied to Nick Thomas's topic in Foundations
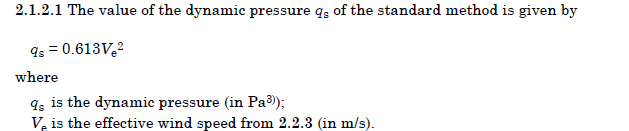
Hi @SteamyTea The general equation we use in the design codes is below. The extract is from the BS wind code. The factor of 0.613 is related to the air density but it boils down to Newton.. Force = mass x velocity squared. I know and agree that in most parts of the Uk 100 mph is not likely.. but we design on a 3 or 10 second wind gust speed depending on which commonly UK design code we use. It's these wind gusts that cause problems. Looking at @jayc89's design I think there will be issues at a much lower wind speed. I'm sure that can all be dealt with no drama.. main thing for me is to do it so you understand where you need to improve and where you don't.. thus not waste money and time. Well you have nailed that. As SE's we call this disproportionate collapse. In other words we design so a small local failure won't result in the whole building falling down. A good example of this is when we design steel reinforced concrete beams. We make sure that the beam will fail by the stretching of the steel (steel is streatchy stuff) reinforcement rather than a sudden explosive failure of the concrete as it is compression. Doing this way means that folk inside will hear noises, see big cracks and think.. I need to leave the building. The same applies to the straw bale construction. @jayc89 I think that you could build this and you could have big problems with the operation of the windows and doors. Now you can kill two birds with one stone. By making it safe you'll get the best service life out of it. I don't think you need to spend loads extra.. just understand what you need to do structurally and find off the shelf products that will do the job.