


PeterW
-
Posts
18480 -
Joined
-
Days Won
207
Everything posted by PeterW
-

IVT Ecolane ASHP - any owners out there?
PeterW replied to readiescards's topic in Air Source Heat Pumps (ASHP)
Can you take a photo of the box they sent you ..? It’s got a series of connections inside. That 2 zone valve is for the UFH calling for heat and allows the manifold to access either the buffer tank or the ASHP. You can can do multiple thermostats - you either need a relay to switch them over or use the micro switch on the diverter valve like I have. -
Whilst a number of people are trying to help here, when it comes to structural elements of a build you need to obtain sound professional advice that is backed up with Professional Indemnity Insurance just in case anything goes wrong. The advice given by the forum and its members is just that - it’s advice. It does not replace an architect or structural engineers calculations and knowledge which are based on plans and factors that members may not be aware of just from looking at photographs.
-
Blown bead is suitable for all exposure areas. It’s the only one I would go for these days tbh
-
You can’t use an RSJ there as it would show - it has to be a lintel but to get the strength it needs to have a minimum number of brick courses - usually 3 or 4 or 1 block - before you add anything else. Have you ordered windows as there is no way you can put a brick column in the middle of a 4m span. It has the ability to twist the lintel and that falling could kill someone. All of these lintels should have been engineer specified before the build was signed off as starting by BCO.
-
2 courses of brick on a 4m Lintel and then standing 2 windows on it is not going to work. It will bow. That needs proper structural design.
-
Help with kitchen renovation/ 1st house.
PeterW replied to zoothorn's topic in Bathrooms, Ensuites & Wetrooms
Less is more ....... leave it unless it’s hitting the window, if so spray it with foam cleaner now ..!! -
They look like RAL pre-finished windows, not ones you slap a coat of Wilko gloss on when you are done. What was the MI for the install ..? As per @Carrerahill I would stop them now and get them removed and replaced at either the installers or the PMs cost. Hope he has good PI....
-
We had this on a job with hidden steel gutters and 110mm downpipes. Quickly solved using lengths of gutter hedgehog fed down the drops and had the benefit of keeping leaves out of the drains too.
-
Catnic have been in business far longer than Potton. Take from that what you will. I would use the standard TF lintels from Catnic - Condells are the cheapest for these. That bifold is going to cause a headache though ..!! You will need to build the white render section with 75mm blockwork so the render can be applied inside the framing. Other (strongly recommended) option is make that whole apex rendered and framed with timber to match the rest of the render panels.
-
Need a decent flex adhesive. And that one is ok for big heavy stuff but not what you are laying.
-
You’re looking for a side tambour door.. Start with someone like This.
-
Help with kitchen renovation/ 1st house.
PeterW replied to zoothorn's topic in Bathrooms, Ensuites & Wetrooms
Ok @zoothorn You should be able to remove all the red arrowed bits, the glass will only fall out if you remove the blue arrowed one..!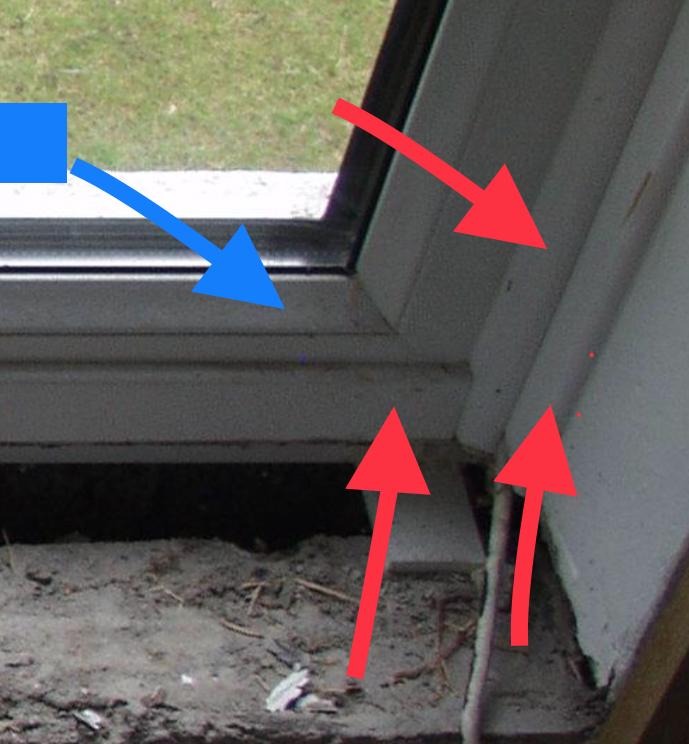
-
Not sure why he wants to insulate between a masonry chimney and the vapour layer of the frame ..?? If anything I would want a cavity here as it’s probably the most likely spot for water ingress (at the top) so I would want it open
-
If the majority of the house is 50mm you’re in for epic fuel bills and probably an automatic fail for building regs ..!! Aren’t the panels full fill..?? What steel has he suggested ..?? And there is a better way to do that fireplace so you get both insulation and structure...
-
Is it resin bonded or resin bound ..?? I didn’t know there was a difference til I checked ..!!
-
Quartz worktop joint, is this acceptable?
PeterW replied to Triple07's topic in Kitchen Units & Worktops
Ask the family member to pay the balance then ...... let’s see how long they moan for then ..! The bevel is there to take the epoxy joint compound - they should have epoxied them together then made it proud, polishing it back to a flat surface. -
Help with kitchen renovation/ 1st house.
PeterW replied to zoothorn's topic in Bathrooms, Ensuites & Wetrooms
It will snap along any line you cut tbh if you groove it enough. -
Help with kitchen renovation/ 1st house.
PeterW replied to zoothorn's topic in Bathrooms, Ensuites & Wetrooms
Sharp Stanley knife will cut it to score and snap or a padsaw with a coarse blade. -
Help with kitchen renovation/ 1st house.
PeterW replied to zoothorn's topic in Bathrooms, Ensuites & Wetrooms
Scribe it ..... move the board away by 25mm and then get a spare bit of batten and put a pencil tight to the side of the batten and run it down the wall. You’ve now scribed a copy of the line you need to cut. When you have cut along the line, push this tight against the wall and the mark the midpoint of a batten top and bottom on the board and cut a straight line. You end up with a section that now fits the wall profile. -
Help with kitchen renovation/ 1st house.
PeterW replied to zoothorn's topic in Bathrooms, Ensuites & Wetrooms
You don’t need noggins as they are only for structural studwork. -
Insulation needs to be a minimum of 100mm lose the second row of blocks ..... and can you send me the engineers calcs and drawing
-
Help with kitchen renovation/ 1st house.
PeterW replied to zoothorn's topic in Bathrooms, Ensuites & Wetrooms
Just be aware that when @Onoff does a job it’s usually belt and braces.... Well actually it’s 2 belts, 3 pairs of braces, a zip, buttons, Velcro and probably an overcoat and wellies for good measure ...!! You are in danger of actually finishing this in the time it’s taken him to cut some tiles .... -
Weird size .. let me check what I’ve got
-
There are a lot more reasons for using a collar tie than just aesthetics and a ridge beam is not the answer to all roof designs. Collar ties are required in some roof designs where the engineer is using them to stop splaying at the walls, and also where steels or dormers are introduced. I’d also suggest that in standard construction (ie masonry walls with cut or truss roof) that OSB as racking isn’t required and actually adds complexity.
-
Has to meet gas regs in terms of position but I would just build blank and then core drill the flue at a later date - neater and easier.


