Thorfun
-
Posts
4889 -
Joined
-
Last visited
-
Days Won
36
Everything posted by Thorfun
-
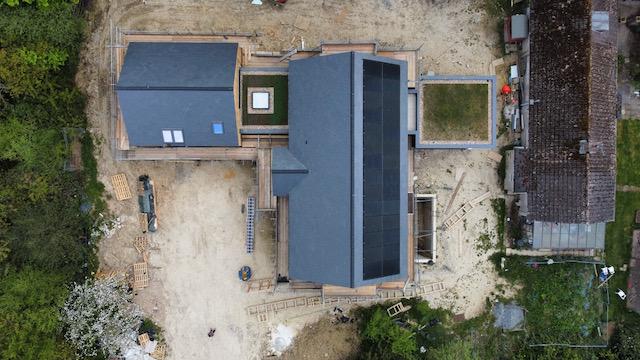
for us it was a decision on aesthetics. we have 2 flat roofs, one joining the main house with the garage and is our utility room which we have a sedum roof. the other is an 'umbilical' from the main house and is our garden room. this flat roof has the wildflower meadow on it as is overlooked by our bedroom and balcony. so we thought that it'd be lovely to look out from the windows in the house and from our balcony on to a lovely green grassed roof rather than the drab grey of a single-ply membrane. hopefully the bees will be attracted to the wildflower roof but as we live surrounded by woodland the choice was not based on any carbon or nature requirements or to tick 'green' boxes or anything like that. I'm afraid we are simply shallow and was going on looks. any other benefits are a bonus. 😉 we have a large main pitched roof that will be used for RWH but we also have a constant flow of water from the ground around the basement into our sump so we're planning on running that into the RWH tank as it means we will get water even in a period of no rain. the green roofs will run off to a soakaway so as to not contaminate the RWH. the below photo shows the green roofs and how they fit in to the design of the house. the pebble surround is actually a requirement for the green roof according to the roofers that fitted them. even if he's talking b*****ks we really like the edging. we have had to have the hose up there recently though as we hadn't had rain for many weeks and it was really drying out. but with the recent rain the wildflower roof has really started to flourish and it is a wonderful sight to see from our bedroom and the grasses and flowers are now high enough that we can see them from ground level as well.
-
Graf waste water treatment plant, any thoughts?
Thorfun replied to joe90's topic in General Self Build & DIY Discussion
my Graf got delivered the other day. will be fitted in a few weeks hopefully.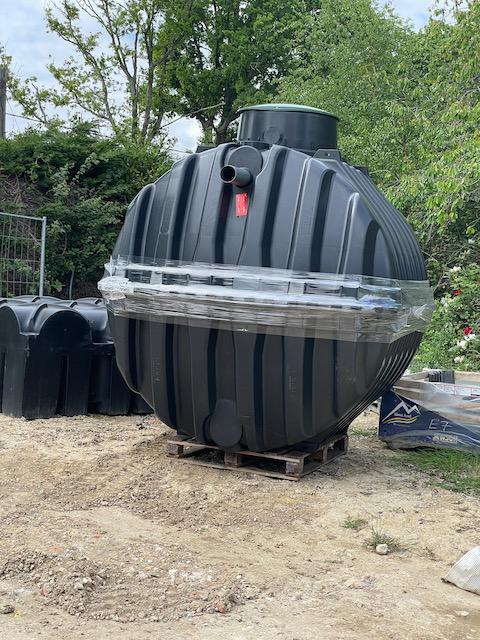
-
So 1st time self builder
Thorfun replied to CalvinHobbes's topic in General Self Build & DIY Discussion
ps. read through the many blogs on here and it will give you an indication as to what is involved if project managing the build yourself. -
So 1st time self builder
Thorfun replied to CalvinHobbes's topic in General Self Build & DIY Discussion
congratulations. now the fun begins. as @nod said, the builders proposed route seems to be quite common, especially amongst self-builders who wish to get more hands on. you'd basically be taking on the role of project manager which will definitely make it cheaper but will also take longer. This is the route we've taken with our timber frame. we organised the groundworker to get the basement dug and built, the TF company to build and erect the TF, the roofer to fit the slates, the window company to do the windows, the chippie to do the cladding etc. it is a lot of work and takes up a lot of your time so you need to be aware of that. you need to ensure that required materials are on site at the right time and need to co-ordinate trades etc. but it is doable and, although stressful, is very rewarding. best of luck and we look forward to seeing how it all progresses. -
Of course, I should’ve mentioned that our flat roofs were designed to take the green roof weight.
-
we were going to do this but as I've so far used nearly 3km of 2"x2" battens that would've been a s**t load of paint! in the end we decided to have a tongue and groove type profile for our charred cladding so that you can't see through it but also get a feeling of a shadow gap. although we also used a black membrane as we were originally going to have an open cladding. our build isn't ICF but as @Russell griffiths says you can put anything on top of ICF it shouldn't make a difference.
-
put the long wildflower grasses on the flat roof and also have a lovely manicured lawn (tbc) as well. 😉

-
TF House about to start, and last minute pondering... Insulation...
Thorfun replied to BartW's topic in Timber Frame
ahhh....I wish I shared your faith in the world and the building industry. I have hired good trades but have still had to keep an eye to ensure that things are done properly and as designed rather than just 'how they've always done it'. -
TF House about to start, and last minute pondering... Insulation...
Thorfun replied to BartW's topic in Timber Frame
call me cynical (and I am) once the PIR is factory fitted and covered by a VCL membrane, also factory fitted, how do you know that they've done a good job in the factory? you're just assuming that the factory workers give a **** and do a bang up job. but I wonder what the reality is? this is what we did. it wasn't hard work but it is time consuming and not completely pleasant! the roof was a real pain though. but I know that the mineral wool is well fitted and that every join of PIR is foamed. if I had the choice again I would seriously consider a twin stud/I-joist wall filled with blown cellulose for performance and speed of fit. -
TF House about to start, and last minute pondering... Insulation...
Thorfun replied to BartW's topic in Timber Frame
not sure I'm qualified to answer your questions about your thought process. EWI is possible but you need to be sure that you have a condensation analysis done (as you should for IWI though!). There are quite a few on here that have done it so maybe one of those will be along to assist. might be worth doing a search or trawling the insulation subforum -
TF House about to start, and last minute pondering... Insulation...
Thorfun replied to BartW's topic in Timber Frame
also, there's a lot of discussion about decrement delay of insulation and it's effect. PIR has poor decrement delay and also poor sound attenuation when compared to mineral wool. what size timbers is your TF being made of? I presume they're bigger than 120mm so you could fit mineral wool between the studs and then insulate internally/externally with extra PIR to get better U-values but also get the benefit of sound attenuation and decrement delay of the mineral wool. just a thought and sorry to throw the spanner in the works when you're so far down the line! -
TF House about to start, and last minute pondering... Insulation...
Thorfun replied to BartW's topic in Timber Frame
it makes the building bigger so planning might have an issue, assuming they ever come and check I guess. -
our plant room is in the basement but is pretty much central to the house so it wouldn't be a huge increase in pipe length to put it there rather than in the cupboard that is on the ground floor directly above the plant room. I might ask our plumber to cost up the manifold and extra pipe and see how much extra it would be.
-
I loved the idea of a manifold system even one where each room can be isolated from the plant room. but when our plumber came to price up the job and I mentioned it he said it'd cost a lot more and we'd need 24 pipes from the plant room instead of 3. we will have 4 bathrooms, 2 x WC, kitchen and utility room so with each having a cold, hot and HRC it just seemed excessive amount of pipework for a convenience that I don't know when/if we'd ever need (isolating a room that is).
-
speaking from experience...make sure you don't spend money on the self-build until you've exchanged contracts on whatever plot you find. we thought a property purchase was going through and so we paid an architect to design a new house, paid for topography reports etc only to be gazumped 2 weeks before exchange. so that was a substantial amount of money down the drain. we learnt that lesson the hard way. for this the day after we exchanged contracts I phoned up architects to get them round to view the plot safe in the knowledge that any money I spent I could sue the sellers for if they didn't complete after exchanging contracts.
-
Sewer connection quote. Reasonable?
Thorfun replied to Water's topic in General Self Build & DIY Discussion
it's either twice as much or takes twice as long. that should be 'rule 1' of self-building. -
+1. our 10.5kWp array cost us just over £10k installed with in-roof GSE trays.
-
Basement Concrete Pour - Thoughts on this...
Thorfun replied to Internet Know How's topic in Basements
Thanks. It’s a GoPro that I already owned. -
Basement Concrete Pour - Thoughts on this...
Thorfun replied to Internet Know How's topic in Basements
Ours was multiple pours with water bar strip. they basically built 2 corners diagonally opposite and then struck the formwork and rotated it to do the other 2 corners to make the rectangular box. details here. No leaks so far but it’s only been 6 months. -
if I had my time over again I would get an I-Joist/twin-stud (Larsen Truss) with blown in cellulose. I saved a small fortune getting open panel timber frame and fitting the insulation myself but I doubt I'd do it again.
-
I used a GoPro that I already had. in a waterproof case and powered via POE with a USB-C converter so it's permanently powered up on the roof of our existing property.
-
30s for me. for an example of what that looks like in a video look at my blog posts.
-
I had a few spare minutes on this lovely sunny Sunday evening and decided to spend it writing up a blog post for our basement UFH install and screed. We have a 250mm reinforced concrete slab sitting on top of 200mm EPS300 in the basement. The slab wasn’t very flat and so we decided to use a cement based liquid screed to give us a nice level base for our finished flooring. So we put down 25mm of PIR to level things out and also to allow the UFH pipes to be stapled to. I did some quick maths and I figured out that it was cheaper to use the 25mm PIR and UFH pipe staples than to use pipe clips fastened to the slab and a thicker layer of liquid screed and so an order was placed with our BM and it was delivered and fitted by my lovely wife and me. We found this is a pretty easy task to be honest and only found we had to put a small bit of sand blinding to level a couple of dips in one room. In the rest of the basement the PIR just took the bumps of the slab out. We taped the joints and foamed around the edges for a belt and braces approach even though there was a DPM going on top. Next came the DPM layer. We found this a bit of a pain to do! Not hard but trying to smooth it out and keep it square so that a constant amount was taken up the walls was just fiddly. In the end we got the laser level out and set it about 150mm above screed finished level and then used that to ensure we had enough DPM up the walls. Then we had to tape it to the walls but soon found that standard gaffa didn’t stick to the concrete walls nor the dense concrete blocks! We painted the concrete with a PVA mixture and that helped a lot for that but just didn’t work on the concrete blocks at all. Off to Google and this awesome forum and I eventually found Gorilla Tape which sticks well to concrete blocks and we were off and running! Following this we laid the UFH pipes. This was a job we actually really enjoyed. It was very satisfying creating those wonderful spiral shapes. We made some spacers and I was laying the pipe according to the layout designed by Wunda and my wife was walking behind with the stapler ‘kerchunking’ down the staples as we went. At the end it looked so good we were sad to think all our hard work would be covered up and never to be seen again. This was my first time running UFH pipes and also my first manifold fitting and I was very happy with how the manifold turned out. I filled the pipes with water and the pressure gauge showed that there were no leaks. That and the fact there water wasn’t pissing out anywhere! With the liquid screed booked in we needed to get a move on and get everything finished off and ready. The last stretch was to fit the temperature probes, perimeter expansion strip and create the expansion joints for crack mitigation at the doorways. Thanks to advice from this forum’s users I ran the temperature probes in UFH pipe with the end crimped down so as to not allow screed in just in case they need replacing in the future. I got the expansion strip from uHeat on eBay. It came with a plastic skirt and adhesive already attached so it was a real breeze to fit. Not much more to say about that The final thing was crack mitigation strips for between the doorways. After speaking to the screeder I decided to use 5.5mm plywood board. It was an inexpensive and simple solution. I was asked to cut them to size but leave them to the side of the doorways and the screeders would add them as they went around. Obviously I had to put them in place first to ensure I got the sizes right! So here are photos of our basement ready for the liquid screeders. On the day of the screed they turned up early before the screed lorry to setup their pump and check on my prep work. They said it was exemplary and that I wouldn’t believe the state of the prep work of some of the jobs they turned up to! They had absolutely nothing to do to the prep work which made them happy and made me happy that all our hard work was worth it. They put down their little tripod level thingies and waited for the screed to turn up. Once it did it was really quick work and very impressive. If it wasn’t for the fact that they ordered 6.4m3 of screed but the company only sent 6m3 they’d have been done in a few hours but, as it was, they ended up having to wait a good 2 or 3 hours for the last little bit of screed to turn up. They were not happy as, in the end, they had to spend the whole day here when they could’ve been on to the next job. But, at the end of the day we had a wonderfully flat looking basement floor. And 48hrs later we were walking on it. 🙂 All in all very happy with the whole process and I will be getting these guys back in to do our ground floor screed. thanks for reading.
- 20 comments
-
- 10
-

-
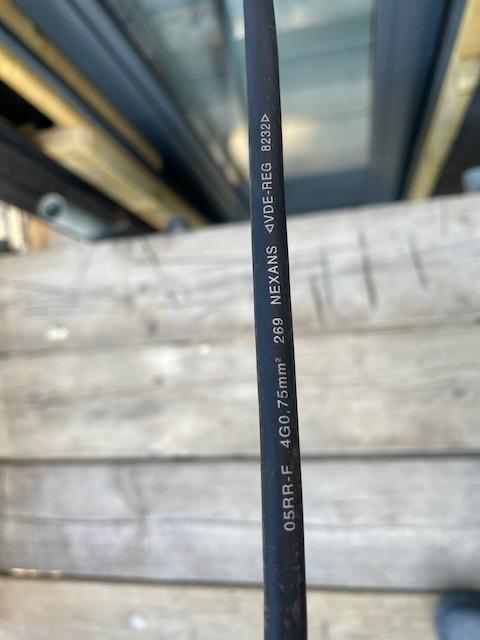
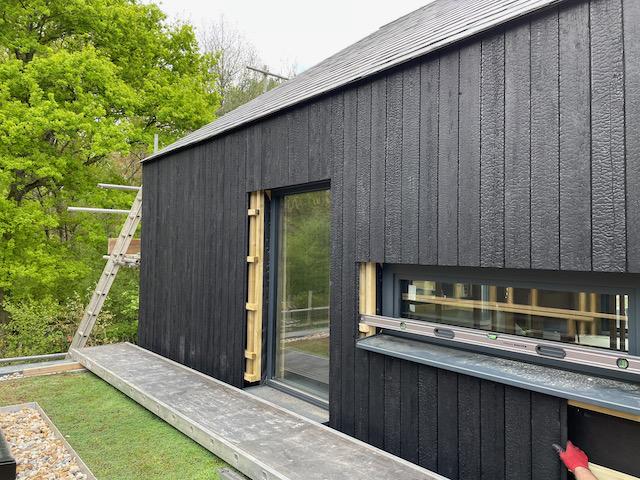
a quick Google tells me that the H05RR-F cables are rubber flexible cables. I see no reason why I need to use rubber cables for my run from the plant room to the external blind. so back to PVC cables then.
-
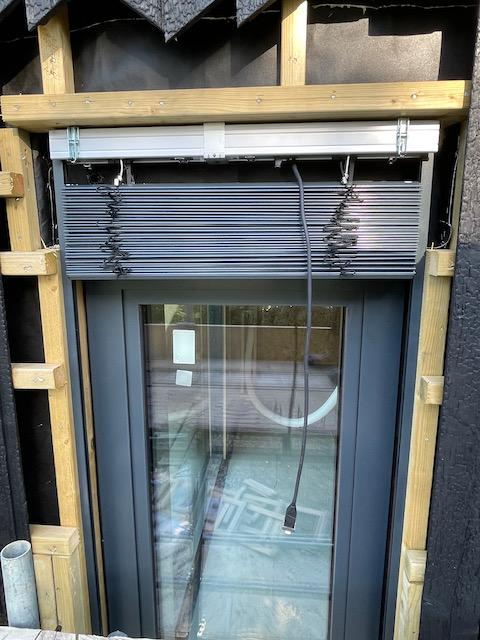
the cable hanging down is the one that comes with the blinds. I will run a cable from the plant room to each blind to connect to the blind motor's cable through a hole in the wall behind the silver head of the blind you can see below. the timber cladding (tongue and groove) will come down to cover the slat stack. the cable that comes with the blind motor (a Geiger GJ5606k) has the following written on it: