Thorfun
-
Posts
4889 -
Joined
-
Last visited
-
Days Won
36
Everything posted by Thorfun
-
we used virgin type 3 for our driveway sub-base to make it permeable. bloody expensive! if I knew then what I know now I would've used crushed concrete with reduced fines. still permeable (afaik and the groundworkers used it as backfill around our basement so I hope it is!) but a lot cheaper.
-
MVHR - Self install!?
Thorfun replied to richo106's topic in Mechanical Ventilation with Heat Recovery (MVHR)
we DIYd our basement UFH and will do the same with our GF UFH. it is definitely a good one to DIY as you'll save a small fortune. -
MVHR - Self install!?
Thorfun replied to richo106's topic in Mechanical Ventilation with Heat Recovery (MVHR)
I was going to DIY our MVHR install but then the supplying company offered me an install for £1200 and I thought it was too good to turn down as I already had plenty else to do. if the quote to install was £4-£5k that you're being quoted then I would've done it myself. -
The roofs, the windows and the solar PV array
Thorfun commented on Thorfun's blog entry in West Sussex Forever Home
yes we really do! it's like overlooking a wildflower meadow. I've been informed that over the years as more flowers take hold the number of grasses should reduce so it won't look so grass-heavy. -
The roofs, the windows and the solar PV array
Thorfun commented on Thorfun's blog entry in West Sussex Forever Home
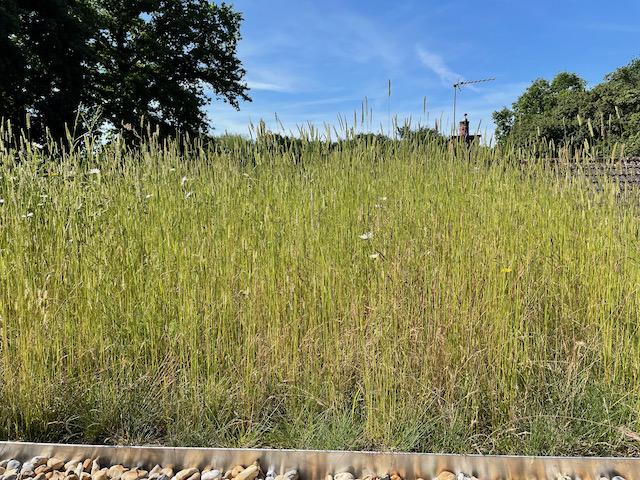
might be a bit itchy -
Cladding fixing - interlocking hardwood boards - face fix or secret fix?
Thorfun replied to MarkyP's topic in General Joinery
our Siberian Larch vertical cladding T&G style shadow gap cladding was tongue fixed using tongue-tite SS screws. the joiner said that with the interlocking T&G and a screw in the tongue they aren't going anywhere. our cladding is vertical though so I don't know if it's different for horizontal. I happen to have loads left over to sell if you do decide to go down that route as I originally bought enough to face fix but now don't need anywhere near as many as I bought!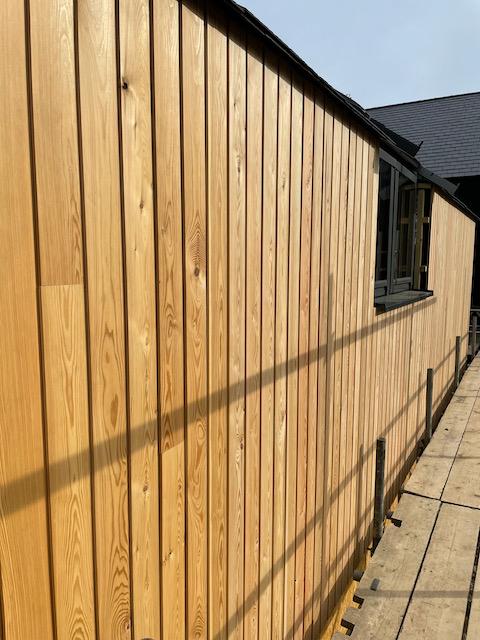
-
our roofer used Alwitra VSK single-ply. I was told by two different roofers that for our timber frame and due to the potential movement of it GRP was not a good solution.
-
The roofs, the windows and the solar PV array
Thorfun commented on Thorfun's blog entry in West Sussex Forever Home
the roof is full on now! bees are buzzing around and it gives great privacy in our bedroom from the neighbours house to the south as well.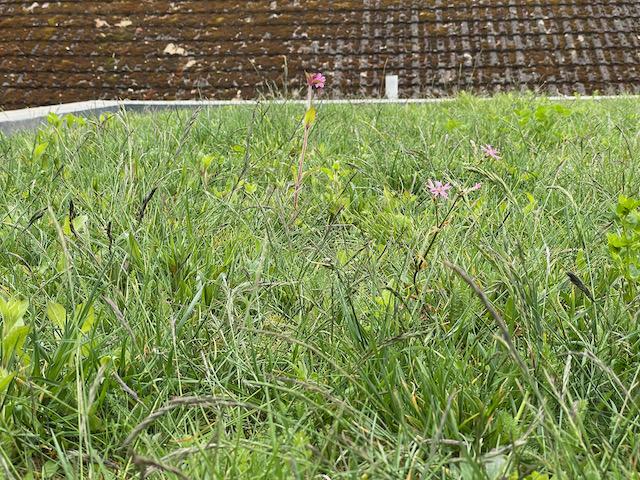
-
ours cost about £1200/£1300 per m2 but that is after deducting what it would've cost for the house foundations without a basement. it's a similar cost to @Bitpipe's basement as well. so, should be a good indicator. 🙂
-
have you considered going down to create a basement? can put the utility/plant/gym/cinema/offices/guest bedroom etc below ground with light from light wells? could give you the extra rooms you want without compromising the visual impact on the countryside. and you could also make it rectangular below ground and no one would know! 😉
-
Laser Level/Builders Level...
Thorfun replied to Mulberry View's topic in General Self Build & DIY Discussion
+1 to Huepar. it's been very useful and relatively inexpensive. the brickie and I used it to set out the coursing blocks in pulse mode for our timber frame and the TF company said it was bang on. and I used it at dusk for the guttering and downpipes and everything was level and fits! -
ok, so I understand the 2 x offices then. I was just thinking that people build 4/5/6 bed houses when, in reality, they only really need 3! and with your thoughts on number of en-suites etc I thought you could ditch one of the bedrooms and make more space for a family bathroom for what would be the other 2 bedrooms in the main house and still have the guest suite in the other building. we have 3 bedrooms in the main house as we have 2 kids. we have another room above the garage that could be a guest suite if required and so didn't see the reason of having a 4th bedroom in the main house that's rarely used when that space could be used to make the bedrooms that will be used a better and bigger space.
-
I assume you have 3 kids? if not, why the need for 4 bedrooms with a 5th (which I presume is a guest suite) elsewhere?
-
just paid Wunda around £1100 for the components for our GF UFH. this includes a Grundfos pump station, 11 port manifold, perimeter insulation strip, pipe staples, around 1200m of 16mm pipe and the required isolation valves. all in all I think pretty good value and quality stuff from Wunda. they also did the design for us (£50) which was taken off the order value. we will self-install as it's not that hard. we've already done it in the basement. if you're having an ASHP then you need to ensure that you've a well insulated and relatively airtight house. and if you are having an ASHP and want rads then you'll need to oversize them to compensate for the lower water temperature that the ASHP delivers when running efficiently.
-
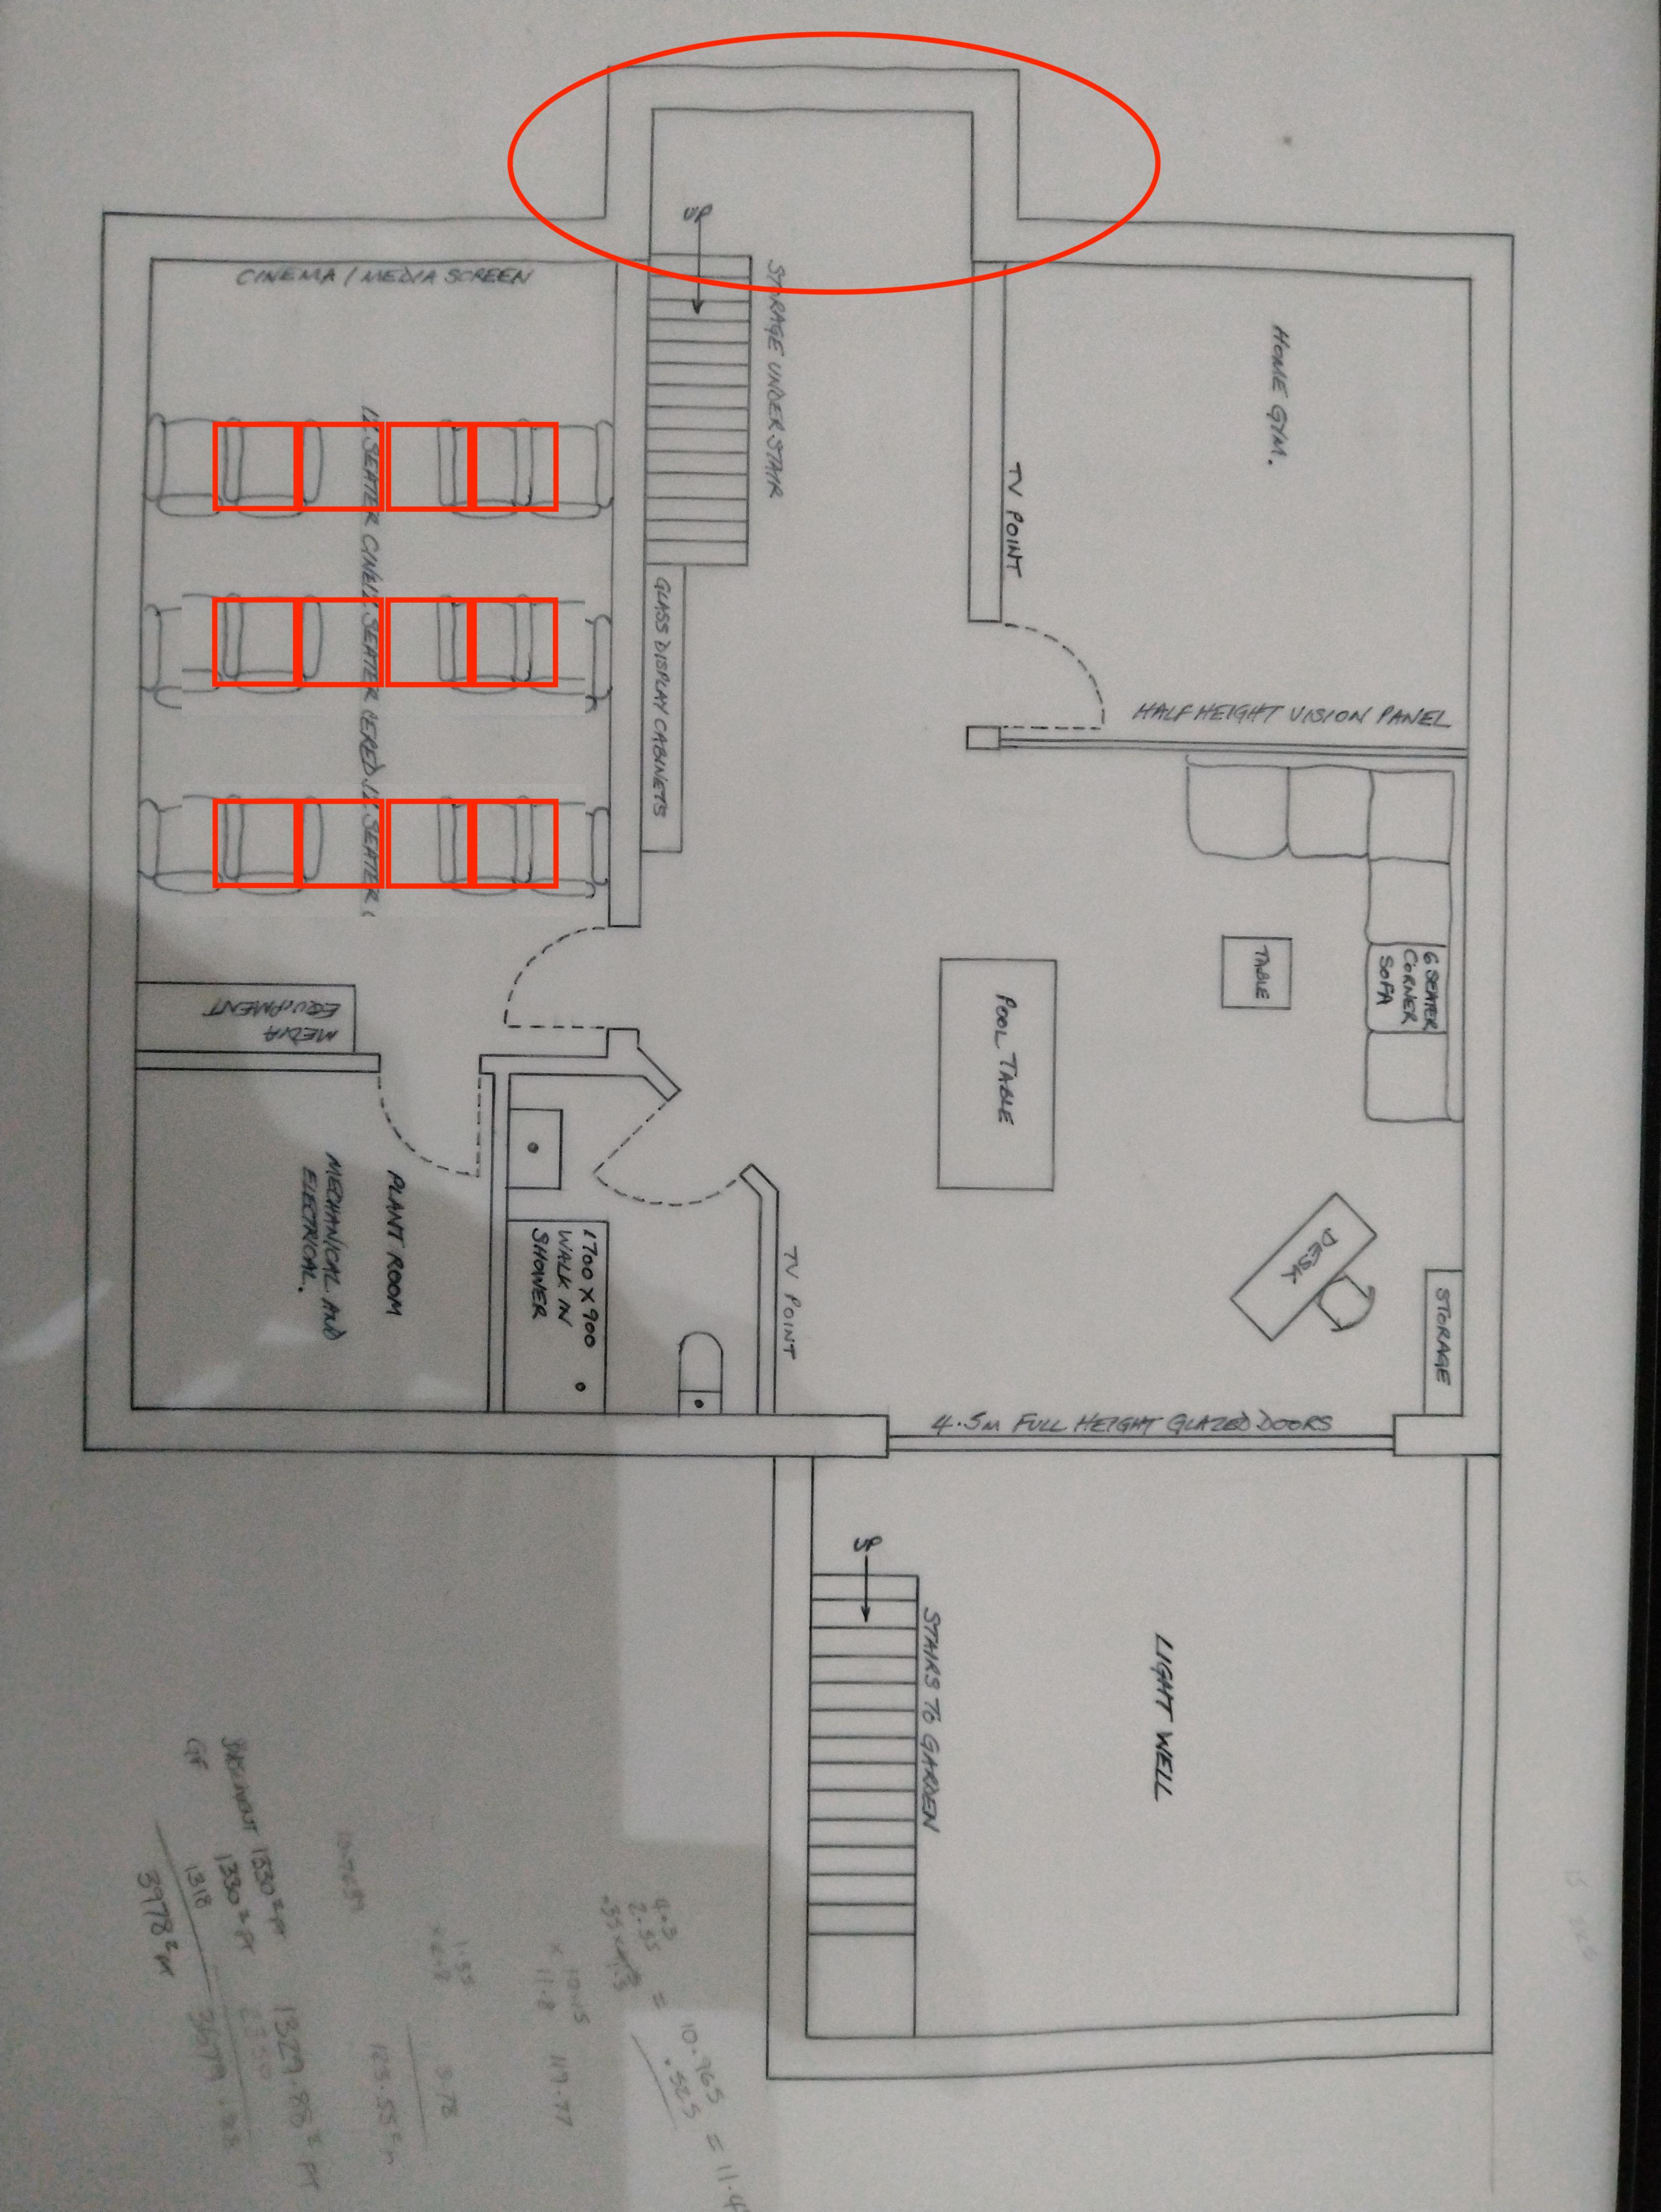
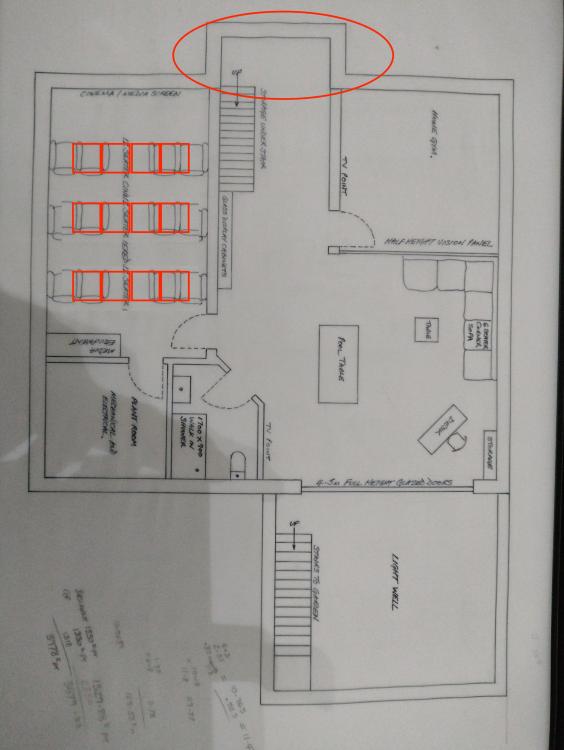
love it! and can't wait to see the progress once you get started. a few comments... 1. what is the area circled in red for? it's much more cost effective to build the square basement. adding that kink will add extra cost and I can't see a reason for it. 2. I would put the cinema seating in the middle and have the walkways at the sides. otherwise no one has the prime position of being central to the screen! Also, tiered seating would be amazing so consider your ceiling height when digging/building the basement and ensure you have room to allow it. it's exactly what I'm planning with our basement cinema if/when I ever get around to fitting it out. we have 3m high ceilings in the basement so plenty of room to allow tiered seating. now I've seen the plans, another few things to consider for your plant room. If you're having MVHR (and I presume you are) and it's going in the plant room then you'll need a condensate drain unless you're having an enthalpy exchanger. our RWH has a 'brain' to it that flushes out the header tank if no use is detected, i.e. holiday mode, so that rainwater isn't sat in it for a prolonged period. As such I need to 'drain' from the controller which will be in the basement but as it's drained by gravity the controller needs to be above the RWH tank or drains! this is a problem for me and if I knew then what I know now I would've run a drain from the plant room to the sump in our sunken courtyard (same as your light well) so that any water that needed draining from the plant room could easily use gravity out to the sump. maybe you won't need it but thought I'd mention it now so you can consider it if you might need it. what's more frustrating is I did put ducting under the slab for electric cables from the plant room to the courtyard for powering the pump and lights, just never thought I'd need to drain anything....how wrong I was. how big is your plant room and have you planned everything out? I thought ours was and it is just about ok but the MVHR ducting has taken up a lot more room than I anticipated. I have a separate plant room and comms/electric room to keep those items separated. I'm now a bit worried about the comms room as the Loxone cabinet for our HA system is quite big, and then when I try and fit a rack mount cabinet and the fuse box etc I think it might be a little tight. basically, don't underestimate how much room you'll need in the plant room. think that's it from me for now as dinner is nearly ready. if I think of something else I'll let you know. good luck! 🙂
-
yes, but you don't 'need' as much as at ground level. Have a read of this post for more details as to how depth underground effects U-values: also there are other threads in the basement forum on this subject. e g. 2 methods for a habitable space, yes. we used waterproof concrete AND waterproof membrane. details in our blog: we also have a land drain around the base of the basement going to a sump. very much belt and braces here. we used formwork and poured reinforce concrete but you can also use ICF and @pocster used another form of blockwork that he DIY'd but can't remember the name of it. yep, saniflo basically. or you could go to great expense and have a very deep waste pumping station externally. the basement sub-forum of this website! 😉 make provisions for utilities to come in to the basement if you're having a plant room down there.
-
wow! that's impressive. I really struggled with channelling but it was me on my lonesome. maybe with the wife's brains on board it might've gone better. I have the plumber starting in 5 weeks or so and have a lot of insulating, airtightness and service cavities to do to get ready for first fix so really can't spend the sort of time I'd need on it to do the channelling and so the 'slapping of the PIR over the top' will commence tomorrow morning. 😂
-
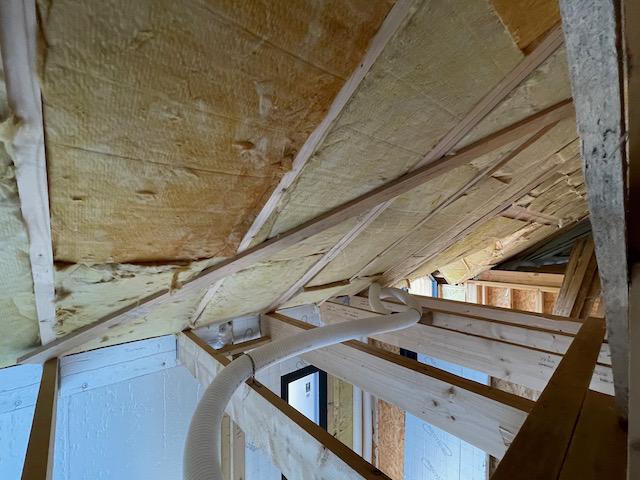
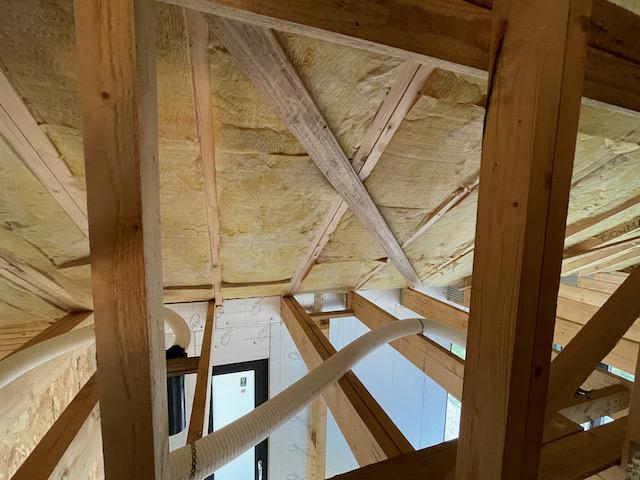
glad this post has been a benefit for you too! 🙂 I do have lots of leftover 4"x1" bracing that the TF company left here. so I could, in theory add more to make the PIR more level so that's also something I haven't thought of, thanks. but I thought the benefit of the emissivity of the reflective foil layer was on the inside of the PIR and not in the air gap to the outside?
-
thank you! sometimes you get so involved in something that it's hard to take a step back to see a better way. I'm glad I stopped for the day and had a beer and a think and then posted here rather than struggling on and spiralling further and further down the road to despair! 🙂 I like the idea of the expanding foam but I'd need to spray it on to the mineral wool either side of the bracing. but, then again, I may not bother! 😂
-
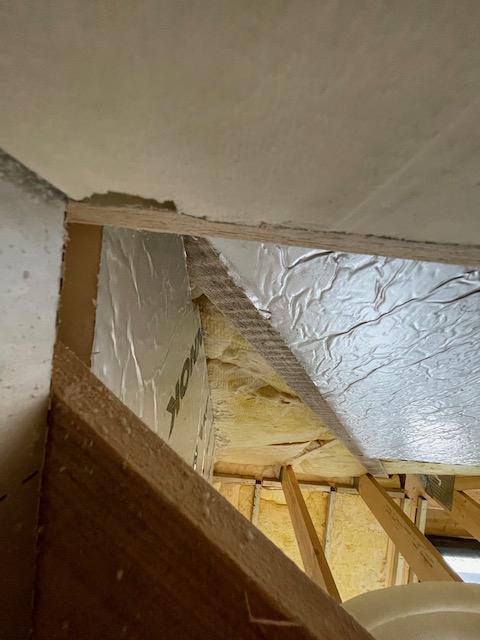
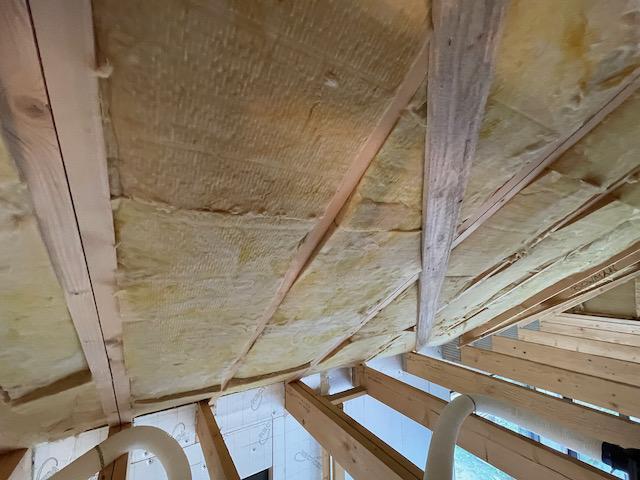
Hi all, the PIR insulation below the rafters in our loft is a real pain and I'm struggling and looking for some advice. the problem I have is that there are lots of 4"x1" bracing across the trusses. I'm struggling with how to cover those in PIR. I started by trying to 'channel' out of the PIR where the braces are and put the PIR on top but getting that in any way accurate to fit just wasn't working and I failed miserably. I then tried to cut pieces to fit around the bracing and then put thinner PIR on top of the bracing to bring it to the same level. i.e. we're using 100mm PIR so I was thinking of adding 80mm PIR to the bracing which will bring it to a couple of mm over the 100mm. But, the problem with this is it's very fiddly and hard to measure and also there are places where I don't have trusses to screw the PIR in to! and that's where I've left it for the day but I seriously don't have time to be mucking around with cutting all those angles and fiddling about trying to cut strips of 80mm PIR to fit on the braces. it'll take weeks and destroy my will to live. I can't believe that a builder would take the time to do it this way. am I being stupid here and precious about making it perfect? should I just slap a sheet of PIR on top of it all and screw it to the joists and not worry about the PIR 'bending' over the bracing nor the small areas of air gap that will be behind the PIR and the mineral wool as it 'bends' over the braces? that area is not going to be plasterboarded. I will simply cover the PIR in AVCL and continue that up into the attic space and will board down the attic trusses leaving the eaves unboarded. so, I guess the area in the eaves doesn't need to be level PIR? please can someone point me in the right direction as this is starting to get me down. I know that I sometimes get too hung up on trying to make it 'perfect' so please tell me if this is one of those situations where it doesn't need to be and bending it over the bracings is not an issue. if anything above doesn't make sense then please let me know and I'll clarify it with photos or diagrams etc if I can. many thanks in advance as always to the very helpful folk on this forum.
-
rather than individual pipes to each outlet could you not do a half-way solution with single pipes to a room and then branch from there? so rather than a bathroom having hot and cold to bath, shower, toilet, basin(s) (7 pipes minimum) you could run a hot/cold/hrc and then radial to the outlets from those pipes? reduced the 7 pipes to 3. caveat, I'm not a plumber and don't know if that's feasible but it seems logical.
-
we have about 120m2 of glazing. not something I wanted to do on my own so I paid the company to fit them. money well spent as far as I'm concerned as some of those windows are big and heavy! there's just some things I know others can do better and safer and quicker and it's worth spending the money on.
-
there are many discussions on this subject and they all, generally, come to the same conclusion that you want lots more than BR levels of insulation, especially on the ground. the thickness does depend on the insulation you choose but I would be aiming for 0.11W/m2K U-value. you can specify an insulated slab (EPS insulation under the slab (we have 300mm EPS under ours with 200mm under the basement)) which is a great solution for many reasons but it's something that your structural engineer needs to sign off as it depends on lots of factors.
-
welcome and congratulations. all the fun stuffs starts now. we look forward to seeing how your project develops.
-
Do you need a plasterer
Thorfun replied to Russell griffiths's topic in General Self Build & DIY Discussion
Great to know you found a good one! Think it’s a bit of a commute down to us though. 😢