mvincentd
-
Posts
495 -
Joined
-
Last visited
-
Days Won
1
Everything posted by mvincentd
-
http://2gomadindorset.blogspot.com/
-
Scroll to july 21 and 22 entries when floor is being poured. It worked, the pipes are ok, the system works well.........but make a point of being 'away' the day they pour yours if you go this route as the stress of watching them trample all over it is awful....they cannot with the best will in the world tread carefully while laying the slab. Despite success I would not reccomend this route unless like me circumstances forced it.
-
roofchart.pdf
-
Insulated Raft Slab Foundations - Finished Flooring
mvincentd replied to TBlew's topic in General Self Build & DIY Discussion
My power floated raft is my finished floor throughout my ground floor. The concerns being raised are all valid and it's good to be aware of them and know what you're getting into, but I believe they are all merely aesthetic. There's no reason why it won't work, but you need a shift in aesthetic sensibilities, and a pretty open mind to your precise outcome. The visual outcome of a powerfloat is a pretty individual thing dependent on numerous uncontrollable variables. Protecting that surface for the remainder of your build can have implications. Sealing powerfloat has problems associated with it, but (limited) solutions exist (look at Watco). I have one crack in 160sqm after 3.5 years, maybe 0.3mm at widest, I like it , whats the problem. I like the rust I sealed in from nails hanging around on the surface during the build, and the footprint. I'm ok with the steel baseplates and the protruding bolts on show, but it could have been avoided using the same principle as for a wetroom. I have 52 holes in the floor that have been grouted....from the bolts that supported soldiers holding wall shuttering up...there's no hiding them...so what. I appreciate 98% of people dont want a floor like this...but i didnt want to create a floor like 98% of peoples. -
Late reply, but for completeness of info....I sanded edges then overboarded with 9mm ply which then took a levelling compound, onto which Forbo Marmoleum (old fashioned lino) was glued. So, no comment re self levelling onto egger protect, sorry.
-
Brokers Adrian Flux found me some with Midas Crown.
-
I had a similar initial detail and thought it too complex along with being problematic to actually construct on site, so instead we ditched traditional footings and beam/block floor in favour of another structural slab tying into top of retaining wall.
-
I would choose to interpret that as meaning a road regardless of whether the road has a footpath alongside......so not pertaining to a path that hasn't got a road alongside....like yours. It's probably with drivers line of sight in mind. If you're lacking confidence to forge ahead then perhaps query it with your local highways officer rather than alert planning.
-
Manifold system versus hot return system
mvincentd replied to Russell griffiths's topic in General Plumbing
My supplier sold me this one, saying they'd had them apart and believed them to be rebadged but the same as the Grundfoss. https://www.bes.co.uk/dab-vs65-150b-bronze-hot-water-circulator-pump-21452/?ref=gs&gclid=Cj0KCQiAj9iBBhCJARIsAE9qRtD6d1psWN6bBJn8ra0KPJPrBvUf4JRHn2MjCK1I4kRZCa_UC_lYoEAaAjlnEALw_wcB -
Manifold system versus hot return system
mvincentd replied to Russell griffiths's topic in General Plumbing
I dont recall the rationale now but I was also lead to believe it needs to be a bronze and a rationale was given.... -
Phew, was hoping nod was taking the P... , didn't want to have to question his standards! I know nothing except what mine was like, I didnt have one square inch that rough.
-
The mortar between your blocks can suck water through like a sponge, as can the blocks to a lesser extent. This is the easy obvious explanation. For zero cosmetic change externally try a masonry cream, a step up in price from screw fix/everbuild/thompsons waterseal but you get what you pay for. http://www.stormdry.com If you can stand a cosmetic change externally http://www.renotex.co.uk/renotex_rollercoat.php I used this over failing render 4 years ago in economic preference at the time to replacing the render and it's still good.....quite a sticky mess to work with though.
-
What window style....velux and ideal combi for example which use compriband wouldn't want the compriband to bridge from frame to cavity closer, they'd want it to seal against outer leaf. Also what's your detail at the base....... I'd start by asking him to expand on this explanation, it might be that in your scenario he has a good point you should take on board. Do you currently understand the challenge of setting them back 100mm from the front leaf which is itself 100mm. I know in my scenario I definitely wouldn't want that....80mm fine. You've another window problem currently where you say "I can't work out if it is the architects plans which are wrong or it has been build incorrectly." I'd suggest adequate drawings would make this easy to establish....do bear in mind though the actual illustrated window section will likely be a generic representation so taking a ruler to your drawing to scale off it may be unsound.
-
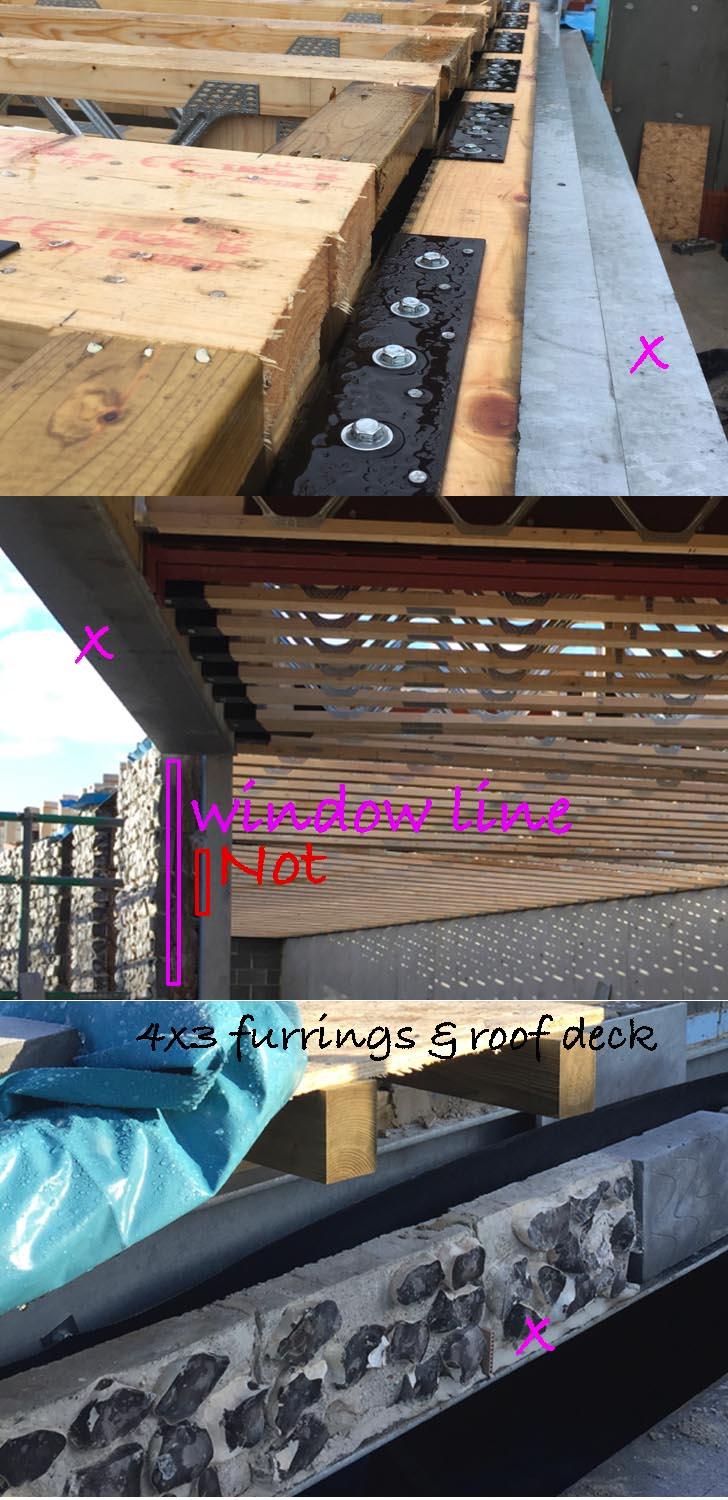
Supporting stone above opening (parapet)
mvincentd replied to SuperPav's topic in General Construction Issues
This might help you visualise maybe.
-
Supporting stone above opening (parapet)
mvincentd replied to SuperPav's topic in General Construction Issues
Whats your wall construction....is the line drawing right? I'm thinking you've drawn the steel in line with the cavity, but wouldn't it be in line with the inner leaf blockwork? Whats the cavity tray arrangement above the window? So your 7m span is the window width anyway...or is it coincidentally 7m the other way too. Wouldn't you fit the window into a steel goalpost arrangement and run the joists the other way. The top post would have an additional plate welded to underside supporting the 'outer leaf' which in fact is just circa 400mm as you say. I dont know anything about how stone like that pictured is laid but if it was brick/block you'd surely just look to how it was done lower down...ie tying the 2 leafs with wire ties....so i'd imagine Hilti fixing some steel strap into the I-beam. I have broadly this scenario over a 6m wide window but with flint blocks circa 400 high rather than your stone. I imagine (slightly simplified description) the top capping in the photo being a continuation of the box gutter and so acting a bit like a horizontal hook to hold the top of the stone too. On pozis' i have some 6895's that are 147 x 279 @ 400 ctr's but they're supporting a green roof so i'd think you'd be ok finding a 7m pozi. -
Defo delay install...i've damaged my own door being careful, it doesn't require a careless contractor. Also if its a metal skin as mine, i'm finding the finish very vulnerable, to the point i'm going to put helicopter tape around the key hole area to protect from inadvertent scrape by stuff dangling from keyring.
-
How to construct a shallow sloping roof with minimal thickness.
mvincentd replied to Andy H's topic in Flat Roofs
Have you accounted for 1:40 furrings adding 15cm (by my maths) at the high end. The Bauder guy hasn't suggested anything clever...that's pretty standard for single-ply systems. You could get away with less than 200mm insulation though, i've got 160mm under Bauder. I'm wary of your 'exposed leaving height' concept being potentially counter productive. The visual 'clutter' of the elements may impose on your eye bringing the ceiling down in your perception whereas a flat white ceiling is more unobtrusive. -
Basement waterproof concrete (Type B)
mvincentd replied to Moonshine's topic in Waterproofing & Sealants
I think you'll find Sika want their concrete thickness at 200mm minimum to guarantee its waterproofness (is that a word). If your blocks only have 150 cavity i'd think thats a problem even before addressing the fact the cavity can't really be continuous...can it? Personally i'd sleep easier with an external membrane on standard concrete (given it is somewhat water resistant!), versus just wp concrete. -
https://www.screwfix.com/p/soudal-soudafoam-expanding-foam-gun-grade-750ml/5026D?tc=QB7&ds_kid=92700058176434284&ds_rl=1249416&gclid=Cj0KCQiAmL-ABhDFARIsAKywVacK71IQn6iPOYVtNhzHe6Wdskv2v7pb0Z5RXE9kJt_DDYVrCBn6hpwaAnnREALw_wcB&gclsrc=aw.ds
-
Power floating even dead smooth won't entirely prevent dust coming off it...and dead smooth will make it harder to use a penetrating sealer (impossible if its also waterproof concrete), and a topical sealer will struggle to bond well....you'll need a specialist powerfloat sealer like Watco (https://www.watco.co.uk/products/watco-powerfloat-sealer). I'd think the advice with a dead smooth powerfloat would be to scarify it to get a bond to it so unless you want the powerfloat as your finished floor why aim for dead smooth. Regarding dead flat, I believe on-the-day conditions will always be a factor in what can be achieved powerfloating, particularly for large areas. One observation from mine; pump out any significant rainfall thats trapped in there....1cm deep water across the area will be much deeper when pushed by the concrete all up to the last corner where the last concrete gets dumped, so that concrete's consistency will be significantly affected and its readiness time for power floating. Powerfloating doesn't really redistribute significant amounts of concrete as it can only start once the concrete is hard enough, so if it hasnt already been tamped and levelled well powerfloating won't then solve levelling issues. I'm no expert, especially re' tiling but i'd think if anything it's better to put tiling adhesive onto a bull floated surface than a smooth powerfloat. (I repeat, i'm no expert)
-
Structural Engineer Not Providing Connection Detail
mvincentd replied to SteveMack's topic in General Structural Issues
I had the same problem....connection styles unspecified were decided upon by the fab, then the SE asked to see his drawings and upon seeing them said we couldn't use the chosen method. Fab was displeased at time spent wasted and suggested SE should have specced in 1st place if he wants to have approval over them, why should the Fab have to speculate. I totally sympathise with the Fab but SE insists it is the common practice. A similar issue occurred in the build regarding rebar and mesh in the raft which left the steel fixers swearing and getting very moody.....but also saying it happens ALL the time. If this is the case then why they persist in banging heads rather than communicating better I don't know. I think for me the core of the problem lie in having an SE firm more heavily involved in commercial projects with more complex SE issues than the average domestic house, they were used to the Fab work ending up in the hands of a more 'sophisticated' Fabricator than the small firm I used. Thats no excuse however. -
5 months to the day i started this thread and just seen the remaining 30% drop into my account...every penny claimed, nothing contested. Original claim submitted 1st June so a week short of 8 months in all!
-
You can but my point really is not to go to a 'staircase' company, talk to a local fabricator....most of them have at least done external fire escape stairs, it's not a great leap from there, unless you have a particularly unusual design in mind. PM me if you want my man's details, but to be honest I use him because he's now the devil I know and we have some understanding....I can't in all conscience recommend him and if starting from scratch i'd definitely look elsewhere.
-
My fabricator is quoting £2-2.5k for the steel, either a single central stringer holding trays, or 2 u-channel stringers with brackets, powdercoated black....for a 15 riser set. Planed all round oak, delivered works out around £900 for my size of tread (50x276x950)...but that leaves me to edge glue and finish and fit the treads(which will be 2 pieces of 138mm each).
-
Heatmiser Neostat v2 temperature sensor problem
mvincentd replied to Ultima357's topic in Underfloor Heating
I have 6 of these v2's 240v spread between 2 heatmiser wiring centres. They're set at the default 1 degree drop to trigger so right now i'm setting 23 degrees (uncalibrated). The only measurement of temperature aside from the v2's I have is from the mvhr....they generally only disagree by around 0.5 degree and like @AliG i'm not concerned with the figure itself just my warmth perception relative to it. I don't get the issues discussed here but agree the bloody things aren't fit for purpose; The V2 auto backlight comes on of its own accord randomly in the middle of the night. I've caught 4 out of 6 doing it so far. The light then stays on for an inconsistent period that doesn't accord with the auto-backlight function. There is no viable trigger in the house for this, i've consulted with Heatmiser technical, head scratched it with the sparky, and now removed the two which keep waking me up in the night. Heatmiser aren't very interested and being only 6 i've decided to get on with my life rather than have a fight. So i've been searching for V1's which only differ by the lack of auto backlight and the backlight's colour. They can snap onto the same backplate so a fuss free transition.......if I can find some....not yet! I will however be going to war with Heatmiser if I have to fit different backplates and stats from a different brand to the wiring centres. My other issue is that with a power cut they fail to retain programmed settings and time, which they should do.