

Crofter
-
Posts
3484 -
Joined
-
Last visited
-
Days Won
11
Everything posted by Crofter
-
SWMBO hates it when I do a dump run, because I usually come back with more than I had!
-
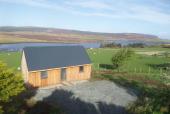
I'm going to jump right to the current status on site and at some point will go back and fill in the gaps. A summary of major jobs completed to date: - access created - water and electricity on site - septic tank and 'Puraflo' secondary treatment/filtration system installed and signed off by BCO - footprint of house laid with membrane and chips - concrete footings and piers poured - Douglas Fir ring beam installed - JJI joists installed on hangers - All four walls of the frame built and sheathed lying flat, and now lifted and fixed into place - Ridge beam built and installed - Windows delivered and now stored inside building - Rafters cut and installed When you list it like that, it's no wonder I feel like I deserve a cuppa now! So what's left to do? The pressing thing is to get wind and watertight whilst we continue to have good weather. This means installing the sarking, and breather membranes on wall and roof, and the first layer of battens to hold it in place. I will probably then board over the window openings temporarily and crack on with installing the floor. It's a bit lethal working stood on various temporary boards on top of the joists. Once we are wind and watertight, I can start working on the interior, and get on with the cladding on the good weather days. This is the site ready for installation of the ring beam. Ring beam and most of the joists installed Frame starts going up Ridge beam and rafters on- this is as far as I have got so far. It's been fun!
-
Still trying to work out the best way of doing this. I can think of three options: 1- A ceiling joist at each rafter pair, spanning the building. Nice and easy, simple, and supported by a partition wall part way. But lots of penetrations (16). 2- Run two joists as above, and then run the remaining ceiling joists at 90 degrees to these, i.e. lengthways along the building. Cuts number of penetrations to four. Loses benefit of support from the partition wall so probably need heftier timbers. 3- Fix a high level batten and put the ceiling joists on hangers fixed to that. No penetrations other than the screws, but now the joists are adding little or no strength to the building.
-
I'm about to start installing the breather membrane onto my timber frame. This will be hung vertically and then fixed via battens every 600. Question- do I fix a horizontal batten at the top and bottom of each window opening?
-
The ring beam was fun- manually moving and assembling over half a tonne of Douglas fir. Car jacks and ratchet straps were the answer. About 150 coach bolts holding it all together, my 12mm drill bit doesn't know what hit it. I'll do a blog entry showing current status, maybe tomorrow.
-
Seems a bit extreme. I would: - rod them to check that they are clear and accessible (if they are not roddable between each access point, then you will have trouble later) - check gradients by using a level or just pouring some water in - do a pressure test to check for leaks
-
I started the project with a pretty clear idea of what I wanted: the 'contemporary vernacular' style that Skye has embraced is a modern take on traditional proportions, using simple materials to create stunning properties with clean lines that sit well in the landscape. The best known examples are those drawn by Dualchas architects, with their designs featuring on Grand Designs and in various magazines. I seriously looked into a 'Heb Homes' kit but this would have been way out of my budget. Another contender was Loch Dhu. However whilst these provided inspiration, ultimately I decided to go it alone, both for budget reasons and because by now I had the bit between my teethe and wanted to give it a go. What all of these designs had in common were: simple, vernacular shapes with pitched roofs; vertical board on board timber cladding; roofing in corrugated or box profile steel; and simple, clean interiors. I felt that building in these materials could yield a comfortable, efficient, and value for money house which would be low maintenance and ideally suited to my requirements as a holiday let. The initial sketches I drew up were for a one bedroom build with an open plan kitchen/diner/lounge. Most of the glazing would be on the West side to make the most of the views out to the sea. The building would be a simple rectangle in plan, with a traditional 45 degree pitched roof. It would be about the least amount of house that the two of us felt we could be happy living in- so that if circumstances changed, we could sell our existing house and move in, without it feeling like too much of a compromise. The next big decision came about entirely thanks to the eBuild (now BuildHub) community: following a tipoff by the user 'ProDave', I discovered that an exemption from building regulations exists for houses that fit within certain criteria. The exemption is designed for mobile homes, caravans, and other portable buildings, and states that the building must be less than 6x18m, have an internal ceiling height of 3.048m or less, and be capable of being lifted or towed away in no more than two sections. Whilst it is probable that the writers of this exemption had in mind prefabricated buildings, this is not actually specified. Building without the need to adhere to building regulations would be a huge boost for me as a DIY builder. I would be able to put something up that I was happy with, without having to demonstrate to third parties that I was meeting various requirements. I would avoid the costs of a building warrant, the need for inspections, and the need to use certified equipment or installers. There is a significant downside to this build route. As I would not receive a completion certificate, it may not be possible to mortgage the building. However, for me this was not an issue, as I do not intend to sell, but rather keep the building as a means of supplementing our income. In addition, the building will sit on croft land and as such could not be mortgaged anyway, without applying for de-crofting first. One further benefit is that the building could be deemed as movable rather than heritable property, and therefore not accede to the croft as a permanent improvement. If the crofters' commission were ever to assign our croft to another person (a right that they can exercise if they feel that land is being neglected) we would at least be able to remove the building and look for an alternative site for it- although I expect that transportation costs would be considerable. Having made this decision, it was now time to finalise the design and prepare the planning application.
-
This is a retrospective look at how the site was when we first started the project. Our croft is a typical long, narrow strip of land. Crofts were traditionally carved up in such a way that everybody got a share of the different bits of land- a bit of shoreline, a bit of lower good ground, and a bit of rough hill ground. In our case, the croft is 27m wide and nearly 500m in length! If nothing else it ensures plenty of work for fencing contractors. Our strip has two public roads running through it- at the bottom, a relatively busy trunk road, and about half way up a quiet single track township road. Our current house sits on one side of this road, but on the opposite side was just a field. Some of our neighbours had built houses or sheds on their equivalent patch of land, and some have also built at the lower end of their croft, with accesses onto the trunk road. We therefore had two options for the site. The lower site was fairly flat and in some ways may have been easier to develop, but the proximity to the busier road was a downside, as was the view, being less expansive (although still a nice enough view, over open agricultural and hill land). The upper site had some challenges with steep gradients, but a much better sea view, a quieter location, and was a handy 30s walk from our own house. We decided to put our effort into the upper site, with the knowledge that if our planning application failed we might have a second bite at the cherry on the lower site. A bit of rough surveying followed- it's handy when your Dad is a civil engineer- and this showed that there was a good spot to sit the house that should be more or less on the building line (i.e. in approximate line with other houses on that side of the road), whilst not blocking any neighbours' views, and having the best possible view out to Loch Snizort and the hills of Harris in the distance. Originally, there was a very rough a steep grassy track into the field. I knew that this would never satisfy the council as a vehicular access due to the poor visibility. It ran parallel to an earthen bank which we had been told concealed our own house's septic tank. The land fell away at an average 1:7 gradient over the first 50m or so, steeper in some patches. The positions of water stopcocks in the public road suggested that the water main lay on the upper side of the road, so we would need a road crossing to get the connection across. Similarly, low voltage power lines ran along the upper side of the road. Our neighbours had recently built a house on the lower side so we did hope that there might be space in their duct to avoid the need for our own road crossing, but this turned out not to be the case. I had a site visit from Sykes holiday cottages, who were very enthusiastic about my proposed build. They encouraged me to keep it small, and aim for the couples market rather than families, or big groups of hillwalkers etc. This confirmed what I had been assuming up to this point. It was time to roll up my sleeves, download a copy of Sketchup, and start throwing around design idea. More about that in part 3.
-
This blog was originally begun over the now closed eBuild forum. I will be transferring most of the my blog posts over here in due course and taking the opportunity to tidy the blog up a little and fill in some of the gaps along the way. In 2013 I became the owner of a house and croft on the Isle of Skye, and set about looking for ways to make the most of this opportunity. In particular I was keen to set up some form of income generation to supplement my earnings. The first idea was to erect a wind turbine- we went a little way down the road of costing out the installation of an Evance 5kW unit. This would have cost about £32,000 and generated a predicted £2000 a year in FiT plus whatever savings we could accrue on our own electricity bills. However with the FiT rate about to take another cut we would have had to move quickly, and decided that we had simply not had enough time to fully evaluate the idea. In addition, as newcomers to the area we felt it might be a bit un-neighbourly to immediately stick up a wind turbine within a few weeks of moving in! The second, and far more exciting, idea was to build some form of holiday let. I was reasonably confident that we would be able to secure planning permission for a house on the croft over the road from us, as neighbouring crofts had done so, with one house in the process of completion as we were moving in. This would be a more risky project and almost certainly a more expensive one, but I was confident that the returns would be considerably higher than the wind turbine could produce. Quick costing up led me to realise that we were not going to be able to afford to get a builder in to put up a house for us, even a very small one. However I had accrued some building experience before, having fully renovated our previous house and converted the loft. I was confident that with enough research and patience, building a small and simple house should be within my capabilities. But this meant going truly DIY- I would be doing everything from designing and drawing, submitting the various permits, through to actually pouring concrete and building the timber frame, all by myself. At around this early stage in the project, I stumbled upon eBuild (the forerunner to BuildHub)- and ever since I have felt that I have been in good hands, with a wealth of advice and guidance available to keep me on track. From a slow early start, the build has progressed well and at the time of writing I have four walls and the structure of the roof all erected. Stay tuned for more updates, and feel free to comment or ask questions. I have learned so much in this project and would be glad to be able to pass advice on to others.
-

Best place for plasterboard and sound insulation?
Crofter replied to worldwidewebs's topic in Building Materials
I've been quite surprised to find that Wickes would do plasterboard and insulation cheaper than I could get it from a BM. -
I'm building a warm roof timber frame house with the airtightness layer at the VCL. In one part of the building the ceiling will be vaulted, and there will be three beams at c.3m above FFL, acting as structural ties between the rafters as well as serving as somewhere to position the lighting. That's six penetrations. In the rest of the house, the ceiling will be normal height so I will need joists to carry it. The easy and obvious way is to fly these across between the rafters at eaves level, adding a fair bit of strength to the building. However that would be an additional 16 penetrations in the airtightness layer, which is more than I would like. Any suggestions for a better way of doing this?
-
Nailed, as the fixings are in shear rather than tension. If it was a house you would be using c. 50x2.5mm nails at c.150mm centres or thereabouts, on a shed you could probably relax that a little bit.
-
I would do the OSB first to get the walls nice and square, unless there's any reason to clad first?
-
It's just occurred to me that I will have to stick to the airtight layer being on the inside of all the insulation, because that's the only way that I can make the layer continuous with the flooring.
-
Yes that's what I thought. But presumably means you have to tape or otherwise secure the membrane, as the battens are not directly onto it?
-
So, membrane before PIR stops the membrane being exposed to damage. But PIR before membrane allows you to fix the membrane down with battens, which also form your service void. Does that sound about right? If so I think I will stick with PIR before membrane.
-
Douglas fir is highly thought of for structural work and can be quite sensibly priced. It should be 'moderately durable'. Why not have a play around on www.iwood.co.uk to compare the different species available (NB I haven't actually bought anything from them but found their online pricing was a useful benchmark).
-
Yup, the garden area is really quite small, but with very large changes of level. The house was built into a deep cut into the hillside so there are large areas that are too steep to walk up. These get a token tickle with the strimmer. The 'flat' areas are still too steep to push a mower around. I found the mower worked much better if I strapped down the brake, and towed it around behind me- I could then lift it to meet all the lumps and bumps. Maybe not the safest but I loathe picking up the cuttings and the strimmer leaves it looking so uneven it reminds of that time I tried shearing a sheep by hand...
-
Can't say it's something I have ever heard of, but a quick google suggests that at least some paints are able to be applied this way, e.g. http://www.duluxtradepaintexpert.co.uk/web/pdf/datasheets/411.pdf If you intend to use the same type and colour of paint on all surfaces, it might be worth a go. Just remember to ventilate well, and let us know how you get on
-
Dave: would your system take brick slips?
-
Sounds like you have the same wall buildup as me (although my PIR layer is 50mm) so I'll be interested to hear people's views on this one. Is your airtightness layer also your vapour barrier? You might have the option of taping the joints in foil faced PIR and use that as the barrier, instead of a membrane.
-
It's never a waste of time to look up recent planning applications in your area. Get a feel for what the planners are going to want to see. Might save you a chunk of time later!
-
Hi John, glad you found us!
-
Nice to see you on here, David. Maybe if I pop down to Elgol you could give me a wee demo of the scythe? I am hoping to go to the gala day actually so perhaps I'll bump into you.
-
I'm also in the DIY camp, and yes it is frustratingly slow at times. I'm fitting rafters just now and must have been up and down that bloomin' ladder several hundred times. One extra pair of hands would make a big difference!

