

Crofter
-
Posts
3484 -
Joined
-
Last visited
-
Days Won
11
Everything posted by Crofter
-
The 25x50 battens are fixed with 50mm nails, put in by gun. Screwfix have some 1000 packs of 100mm screws on special at the moment.. very tempting but that leaves only about an inch going into the studs...
-
Danker... no spraken ze Deutsche... time to phone a friend I think
-
Next stage in the exterior of my house is to fix the 50x50 battens horizontally over the top of the 25x50 vertical counter battens. This will create a ventilated drainage space and provide the structure that the vertical board-on-board larch cladding will be nailed to. Before I go and splurge out on a few boxes of these (150x6mm screws) is there any sort of rough rule of thumb etc I should be considering for choosing what length of screws to use? My gut feeling is that, with 75mm thickness of battens to pass through, I should have the same again going into the studs. There are going to quite a lot (over a thousand, from my BOTE calculation) of these screws going in so I could easily end up spending a fair bit on this if I over-spec, but on the other hand I don't really want my walls to fall apart either
-

Choosing a external wall covering (medium exposure)
Crofter replied to gravelld's topic in Building Materials
Sometimes render fails because the underlying brickwork is poor quality- is yours leaving a mortar skin behind, or revealing fresh brick where it has come away? The latter would obviously suggest the bricks themselves are the problem. -
So long as you have rodding access at frequent intervals, and maintain an appropriate gradient, I'm not aware of any limitations on distance.
-
Choosing a external wall covering (medium exposure)
Crofter replied to gravelld's topic in Building Materials
ProDave of this parish has done his house in a EWI woodfibre board with an acrylic render on top- details in his blog Rather conventional in appearance but could satisfy your requirements! -
Use of a textile is not always necessary. As a rough rule of thumb, you want your largest particle size to be about half the depth to be laid. There's some excellent advice on all matters hardcore on Paving Expert
-
Short self-build series on Radio 4
Crofter replied to DavidFrancis's topic in Property TV Programmes
Good analysis, but the point I was making is that it's hard to fiddle with the housing market without upsetting somebody. As you say, some people are over-exposed to risk. -
Short self-build series on Radio 4
Crofter replied to DavidFrancis's topic in Property TV Programmes
Thanks, there was also an interesting piece on today about housing- figures showing a big drop in first time buyers. It's an interesting area as those in power try to juggle the various demands and needs of tenants, landlords, developers, existing home owners, etc. Very easy to make it unfair on some people no matter what you do, because the sums of money involved are so large, for most people. -
Thanks, I'm using board on board vertical (100x20mm square edge sawn)- so hopefully not the same issues as with waney edge. I could be sold on the Sioo is it's really as good as advertised, but it's a hefty up front cost that I hadn't budgeted for, and I can't help wondering if it's really *that* much better than something more ordinary.
-
Yes I've used the 10% rule before on tiling and laminate flooring. The cladding is a bit different, though- I'm working it out to avoid any joints whatsoever (longest run is 16ft) so I've worked out a cutting list based on the actual lengths, not the areas. I hope to only need extras in case of mistakes or particularly bad bits of wood.
-
Yup I've read that it's best to treat the boards before installation, otherwise any shrinkage leads to exposed untreated wood. I wonder if I should treat all sides though? Or maybe just three sides of the front boards, and one face of the back boards, as that is all that is conceivably going to see any UV exposure. I was hoping not to have to buy so much larch that there would be much left over for the fire!
-
That's the plan... just need to get the last few floorboards down first. I've had a lot of help from neighbours when it came to lifting the frame panels etc, so a wee get together is on the cards to say thanks to them
-
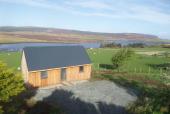
I may well take you up on that. With the OSB coming off the front openings the building should be a lot harder to spot from the road.
-
After a few weeks away from the build, I've been back at work and in the last few days everything is seeming much closer to completion. All three windows and the back door are all in place now (not yet foamed up etc)- just the big beast patio door still to go, which weighs about a quarter of a tonne, so that one will need a bit of a squad. Fitting the back door has made a huge difference to how the house feels- I can keep the sheep out now The other jobs I've been doing are laying the flooring and installing the first insulation. The floor buildup uses JJI engineered joists, with a 9mm OSB 'sub floor' resting on the lower flange, supporting 250mm of glasswool insulation, with 22mm tongue and groove chipboard flooring on top. Around the perimeter 50mm PIR prevents thermal bridging between the chipboard and the timber frame, so this has to be installed first. Laying the sub-floor stopped when I ran out of OSB- I had used some of the sheets as temporary boards over the window openings- so next up is finishing the floor, and then installing that big patio door. If anybody happens to be on holiday in Skye just now, and fancies a bit of manual work, look me up
-
Hi, I went through the same thought process on my new build- initially seemed a bit odd to omit the barrier layer on the floor when I will have one on every other surface. I have decided to rely on the integrity of the T&G chipboard with glued joints. There will be a further layer of solid flooring glued down on top of that. Like you, I was unhappy with the idea of a layer of plastic under the floor, with no possibility of any drainage.
-
Hello..your help will be needed.
Crofter replied to mvincentd's topic in Party Wall & Property Legal Issues
I've taken this topic across to property legal issues for further discussion -
About 60% of the cost of the timber itself, and that's me not accounting for any wastage and only treating the exposed face of the timber, not the back. It's supposed to have a 15yr service life so it would work out at about £30/yr which makes it a bit easier to swallow! If it really is as good as they say I could probably find the money, but it's not in the budget and I am wondering what alternatives there are.
-
Unlike seemingly every architect, TV presenter, etc, I'm not much of a fan of the 'leave it to weather' school of timber cladding. I think you can get away with it in certain circumstances- very uniform wood which weathers evenly, no overhangs on the eaves, nothing that will allow different parts of the same wall to see different levels of exposure. There are many examples of timber cladding up here on Skye where the weathering is very uneven and frankly I think it looks awful, like an old pallet left out to rot. Probably a case of architects designing for high quality Siberian larch and then the builder sticking cheaper native stuff up, or something like that. Anyway- I'm wanting to treat my larch, it will be Scottish so not as dense as Siberian, and in a high exposure coastal site on a building with quite deep eaves overhangs, I don't think I would get away with leaving it unreated. Fortunately the building is small and all of the cladding will remain accessible by ladder after installation. I've come across stuff called 'Sioo' which, according to the blurb, is very good stuff but it's incredibly expensive. Any other suggestions out there?
-
Welcome to BuildHub- yay, I'm no longer the baby of the group! What are you thinking about build method? I presume you will be somewhat constrained by the existing footings.
-
Just to update, first two windows went in today. First one I installed as per the instructions, removing the sash first. It was actually very akward getting the sash back in and I needed to call in some helpers. For the second window, which was much larger, I decided to leave the sash in place and fix angle brackets to it before installation. This worked out much easier, as even though the window was very heavy to handle, there was no need to hold a heavy sash up in the air and carefully fix it back to the mechanism. With that big window installed, I could remove the temporary boards and use them to finish building the floor. I'll update the blog at some point as there's been a reasonable amount of progress now.
-
It's alu-clad timber with an aluminium threshold built in. Never going to be level but obviously I don't want it any higher than it has to be. 'Worst case' height is definitely what I was thinking of planning for, just wondering what this actually means? The planned flooring is bamboo, which could be as little as 10mm, but if say I got a great deal on some solid timber etc, what is a reasonable maximum thickness to plan for?
-
What's best practice when setting the height of an external door in a new build, where the finished floor level may still have some uncertainties? I have my joists and 22mm chipboard down, but the final flooring may be 10mm or up to 16mm, depending on what I end up buying... then there is the idea of 'future-proofing' in case I was ever to replace the flooring material. What would be a good height to set the threshold above the chipboard? Thanks
-
Thanks, Nick. I was expecting to bond it down. I'm currently looking into how the FFL and door thresholds etc will work out. My big tilt/slide patio door is really just a giant window and not designed to sit right down at floor level, so I am going to look into using various bamboo accessories to make up a suitable transition. Is this stuff something that can be worked like solid wood, i.e. sanded, reshaped? Talking about strand woven and obviously not the engineered ply-backed type.
-
Just a wee followup on this- Would there be any point in me using an underlay? I have 300mm deep joists fully filled with glasswool, then 22mm chipboard glued/screwed on top. No UFH.