

Crofter
-
Posts
3484 -
Joined
-
Last visited
-
Days Won
11
Everything posted by Crofter
-
Not exactly what you are describing, but I got my insulation from 'seconds and co' who claim to be the only seller of kingspan seconds. Basically if a batch has too many flaws, Kingpan have to landfill the whole lot and these people take it off their hands for free, then bundle it up into pallets and sell it on at about a third of the normal cost. i got eighty boards this way. Two of them are closer to 40mm rather than the 50mm I require; about half a dozen more are a bit skinny but close enough that I will just use them anyway. Two have big voids within the foam, one was right at the edge and the other in the middle- you can tap the skin and play it like a drum. I will fix these using expanding foam. Many of the others have creases or slight hollows running in lines down the length of the board, where the foam filling has not fully risen (I guess they inject it from a row of nozzles about six inches apart?). Perfectly usable. And then there are the lengths of the boards, almost all are a little under 2.4m; sizes vary a lot but the majority are about 2.27m.
-

Stainless steel screws 70% off
Crofter replied to DavidFrancis's topic in General Self Build & DIY Discussion
It wasn't actually the SS ones that I got, but 'TurboSilver' whatever that means. Won't be directly exposed to the elements, but will be behind the cladding. -
Stainless steel screws 70% off
Crofter replied to DavidFrancis's topic in General Self Build & DIY Discussion
Thanks for the heads up- I was in need of some long screws for doing my cladding battens as well as the final bits of insulation board inside. Have cleaned out my local branch, at £1.50 per 50 screws it's not a bad deal. -
Yes I spotted that your frame was up, hope it's holding up OK in this weather. My membane has suffered some damage where I hadn't battened over it yet, but otherwise fine, and I have enough leftover to patch that bit.
-
Due to the way the rolls worked out I have a decent bit of breather membrane leftover. Is there anything to stop me from doubling up in the more exposed areas? The SW corner has suffered some damage in recent high winds and it would be much simpler to just overlay a big patch rather than remove the damaged bit, I'm also thinking I could use the much tougher roof membrane for the patch, it's breathable of course, but has much higher nail tear resistance.
-
Slowly slowly catchy monkey. Didn't take the sash out as I had tried that method with the two little windows and getting the sash lined up again was a real PITA needing three people. So I used brackets on the bigger units, firing in some screws as well where I had access. Started insulating the walls today. Pleased to report it is far, far easier than the ceiling was!
-
I kept meaning to take some pics and eventually thought "balls, better just post a blog anyway". I will see how even the lengths of the boards are- hopefully the 2.4m ones for the long walls will all be bang on and need no trimming at all.
-
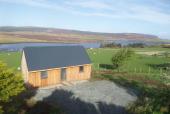
Time seems to be flying past with not enough progress to show for it. Anyway, a brief update. I got my 8ft wide triple glazed door (all 240kg of it) installed singlehandedly, showing just what you can do with a bit of patience and some levers, packers, and a bottle jack. Perhaps the reason progress is slowing down is that I find myself standing admiring the view out to the loch too often. Nearing the end of the chipboard flooring installation, I discovered maybe the first properly silly mistake I have made so far- the long edge of the boards are not supported and this is giving a slight creak, all along the front of the house. Of course they are glued and screwed down so they are nto coming up again. I will have to go in from underneath and fit battens to stiffen everything up. What a pain. At least on the back wall of the house I was aware of the problem and have added battens *before* laying the chipboard. The drainage run is now done, This involves five different penetrations through the floor buildup: kitchen, utility, basin, WC, shower. The kitchen can get away with a single drain point because the different appliances will connect up somewhere behind, within, or below the kitchen units. As luck would have it, the main hookup point where everything comes together is just underneath the eventual position of the WC, and this is where the ground level is highest, leaving me with some very unergonomic working conditions. Fortunately I was able to do the bulk of the work from above, before laying the final pieces of flooring. The other progress has been on insulation. A few weeks back, a lorry from 'Seconds and Co' turned up, with my £1000 of insulation aboard. I couldn't believe they had sent their own lorry all the way here- how on earth do they stay in business? The driver told me they get the boards for free as the 'first couple of miles' of the production run has too many flaws for Kingspan to bother selling it. Sure enough a small number of the boards have flaws- one has a big void in the middle (you can tap the paper like a drum skin) and a couple of others are distinctly too thin, but otherwise it is just superficial damage, and nothing that cannot be cured with a little expanding foam post installation. My insulation involves rockwool between rafters and studs, and PIR boards on the inside. This helps prevent cold bridging and also works well for vapour control purposes. Today I installed the final piece of overhead rockwool, hurrah. Very glad to see the back of that particular job. The boards are awkward to work with, especially alone, but not as unpleasant as the rockwool. Finally, this Friday I am taking delivery of my larch cladding- a thousand metres of 100x20mm locally grown larch. I designed the building on the premise that I would need to buy standard lengths of 2.4 or 4.8m, and this is what set the ridge height: 4.8m from the lowest point of the building to the barge board. Whilst this worked on paper, I did always think it looked just a bit 'top heavy' and a few extra inches of cladding would have let me slim down the barge boards and give a neater appearance, whilst still avoiding any joins. So imagine my delight when the sawmill phoned and said "Those 16ft boards you ordered, well the planks have actually come in at 4.95m, do you want us to trim them down for you." My answer, of course, was an emphatic No!
-
Toilets- S traps, P traps, holes in the floor...
Crofter replied to Crofter's topic in Waste & Sewerage
Right... bear in mind my house is a 'portable building' sitting up on piers and open underneath. The sewer pipe runs horizontal underground, under the building, to a rest bend, and then vertical straight up out of the ground and up to where the WC will be. Just under the floor there is a branch fitting where everything connects- the SVP stack, the kitchen run, the basin, and the shower- this is part of the vertical rise. This fitting fits just, and only just, under the 'subfloor' of the house (a layer of OSB boxing in the bottom of the joists and supporting/protecting the insulation). Ideally I want the soil pipe to come up through the chipboard floor via a nice neat hole that will be easily sealed (the chipboard will be the airtightness layer). So solutions that involve diving down into the structure of the floor are less appealing, but I suppose I could go that way if necessary. I think all I will need is a fairly short 90 degree connector and a compatible WC design. -
Toilets- S traps, P traps, holes in the floor...
Crofter replied to Crofter's topic in Waste & Sewerage
So I'd be looking at using something more like this: http://www.screwfix.com/p/mcalpine-wc-con8f-90-flexible-pan-connector-white-110mm/28262 To make the turn down through the floor. It looks like it's a question of choosing a WC that has enough space at the back to allow this- e.g. the one you linke to upthread gives 140mm but my interpretation of the specs on the connector above is that it needs 153mm... but this ought to be a solvable problem. Was just wondering if it's better to find an actual S-trap type toilet instead. -
Toilets- S traps, P traps, holes in the floor...
Crofter replied to Crofter's topic in Waste & Sewerage
Thanks, that looks neat. I presume I could just stick a 90 adapter onto the back of the outlet of that WC and then it would be able to go down through the floor? And of course all hidden from view! Edit to add: I'm leaning towards this approach as it presumably allows a little flexibility in the precise positioning of the WC and soil pipe, whereas an S-trap will have to be bang on the right spot, no? -
Toilets- S traps, P traps, holes in the floor...
Crofter replied to Crofter's topic in Waste & Sewerage
Do these always entail a hidden cistern? Would rather avoid that as the room is quite small and it would presumably need a lot of boxing out. -
Toilets- S traps, P traps, holes in the floor...
Crofter replied to Crofter's topic in Waste & Sewerage
Pretty far- through the 300mm suspended floor, then another 200mm or so where there is a fitting to take all the side branches (basin, shower, etc), then it meets the rest bend and transitions to horizontal underground... -
My soil pipe is coming up through the floor, and I want the WC to sit right over it. Do I need to find a specific S-trap type toilet, or can I use a (apparently easier to find) P-trap one, with a bend immediately after? I still have a little leeway in the exact position of the soil pipe, but not for much longer...
-
Is any form of "rent to buy" legally possible?
Crofter replied to ProDave's topic in Party Wall & Property Legal Issues
Another complication is if you make this arrangement and then another potential buyer comes along who is willing to buy the house outright. I take it you are planning to run B&B from the new house as well? Otherwise there is presumably a drop in your income which would more than compensate for the rental, no? -
This appears to be easier in England than Scotland. Prodave and I had similar repsonses from SEPA when asking about discharge to a burn. You will still need to keep clear of water sources, for obvious reasons.
-
Yes, that's why I said water source, not course
-
I would also add that private drainage and a water borehole on the same site sounds lilke a pretty nasty combination- almost certainly would be refused approval as you cannot discharge sewage effluent within a certian distance (in Scotland, 50m) of a water source.
-
Sewage treatment 101: - mains drainage. A pipe connects you to the public sewer. - cess pit. Your pipe goes into a big tank that fills up and gets emptied by a tanker. Big running costs, may not get approval (banned in Scotland). - septic tank + soakaway. The tank does a basic 'primary' breakdown and the watery outflow is discharged to ground where it should be broken down by bacteria in the soil. Standard option for off-mains drainage for many years but these days significasntly better performance achieved by... - treatment plant + soakaway. This is still a tank and a discharge field, but the tank has some active systems to introduce oxygen into the contents, achieving a much higher degree of breakdown. The soakaway field is allowed to be only 75% of the size of a septic tank one. A useful reduction, but probably not enough to make the difference to whether or not you can fit a soakaway on your plot. Oh and also: - a filter mound soakaway can replace a conventional one, in areas of high water table - a Puraflo peat-fibre system can also do the job of a soakaway in a much smaller area, again suitable for high water table areas - reed beds can also be incorporated but I can't claim any knowledge of these systems myself.
-
3 years, 2 months, 164 hours, and now it's over.
Crofter replied to ProDave's topic in Tools & Equipment
Well done on shifting it, nice wee pot of money towards your build. I might well have been better off buying a machine myself, and if I build more of these little houses I will probably go down the route of a 2.5t machine on a trailer. However with this site I had a lot of rock to break, and watching the guys grading and levelling the access left me realising just how much skill is involved- it would have taken me far, far longer and the £2-£3k that I spent on plant hire was probably money well spent. -
Scottish parliament Committee 'expert' opinion
Crofter replied to jamiehamy's topic in Environmental Building Politics
On the topic of user-friendliness, I remember years ago when my granny had storage heaters installed, my parents were unable to persuade her that turning them on and off at the wall would not affect the temperature of the room immediately. But she was used to plug in 2-bar fires and could not understand how these newfangled things could be any different. My current day version of this is our slightly more sophisticated storage heaters, which have baffles to keep the heat in. I have tried to explain to SWMBO that if we default to keeping the baffles closed, then it will not make the room any colder because the heat will still escape, just a bit slower, plus you will be able to open them for a boost when you need it. However she insists on running them with the baffles open so when we have a cold snap all we can do is turn up the input and wait 24hrs to enjoy the benefit. On MVHR, I am specifying it partly because I want improved air quality. My previous house (standard construction 80s bungalow) had some big problems with mould and damp behind the furniture in the spare bedroom etc. I am assuming that an active ventilation system is going to help me avoid these problems. However I don't plan on letting the occupants even know that the system is there, let alone having control over it (this being for weekly lets rather than long term letting). -
Scottish parliament Committee 'expert' opinion
Crofter replied to jamiehamy's topic in Environmental Building Politics
@jamiehamy Good points but might I suggest you consider making it primarily focused on the issues rather than the person? Just might find a better reception that way, IMHO. Oh also wee typo there- "quiet literally". (Right I'll switch off my school teacher mode again now!) -
I should have said, my experience of Sika is in boating applications, where everything carries a 'marine' pricetag...possibly not exactly the same formulation as builders' Sika?
-
From my limited experience, CT1 lasts a lot longer in the tube once opened- certalinly longer than Sika does. I haven't noticed any diffence in price between them so tend to use CT1 for doing little jobs as it saves me throwing away half tubes of Sika.
-
Watched this last night. Did I hear them correctly saying that the house was not actually fixed to the float in any way? I know that 26t of house is not going to just move by itself, but the consequences if it *did* move are pretty bad... Can't say I would want to live in it- seems a bit odd to have big opening doors out onto... nothing. Structurally, their floor buildup was essentially identical to mine, although I used heavier timbers for the box beam surrounding the JJI joists. One quesiton that bugged me- what the heck do they do about sewerage?
