Sparrowhawk
-
Posts
559 -
Joined
-
Last visited
Everything posted by Sparrowhawk
-
 Just send them to be tested. I have PPE here already but honestly the amount of disturbance taking a sample was less than the disturbance I'd made to discover something that needs to be sampled.
 -
I was looking at the providers over Christmas as I need to test what could-be-artex-but-is-probably-textured-plaster. https://www.bradley-enviro.co.uk/services/asbestos-consultants/asbestos-sample-testing is the cheapest I found, and I checked out their lab accreditations to make sure they can do what they said.
-
Drying and re-insulating a 2.5 year old damp cavity wall
Sparrowhawk replied to Adsibob's topic in Heat Insulation
That's the way to do it. Dry it and then put new insulation in. But put mesh over the holes while it's drying, or insert air bricks. You don't want to add an animal problem to your list. -
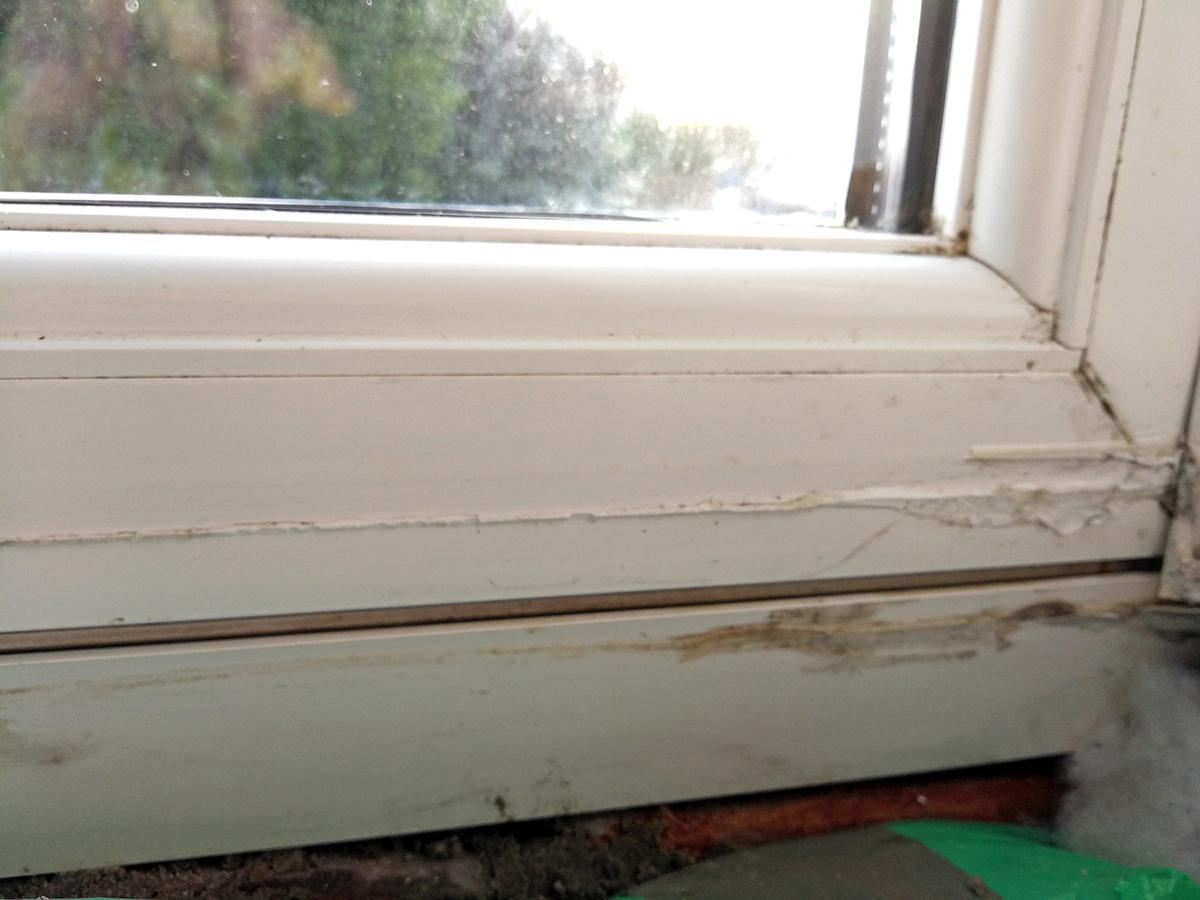
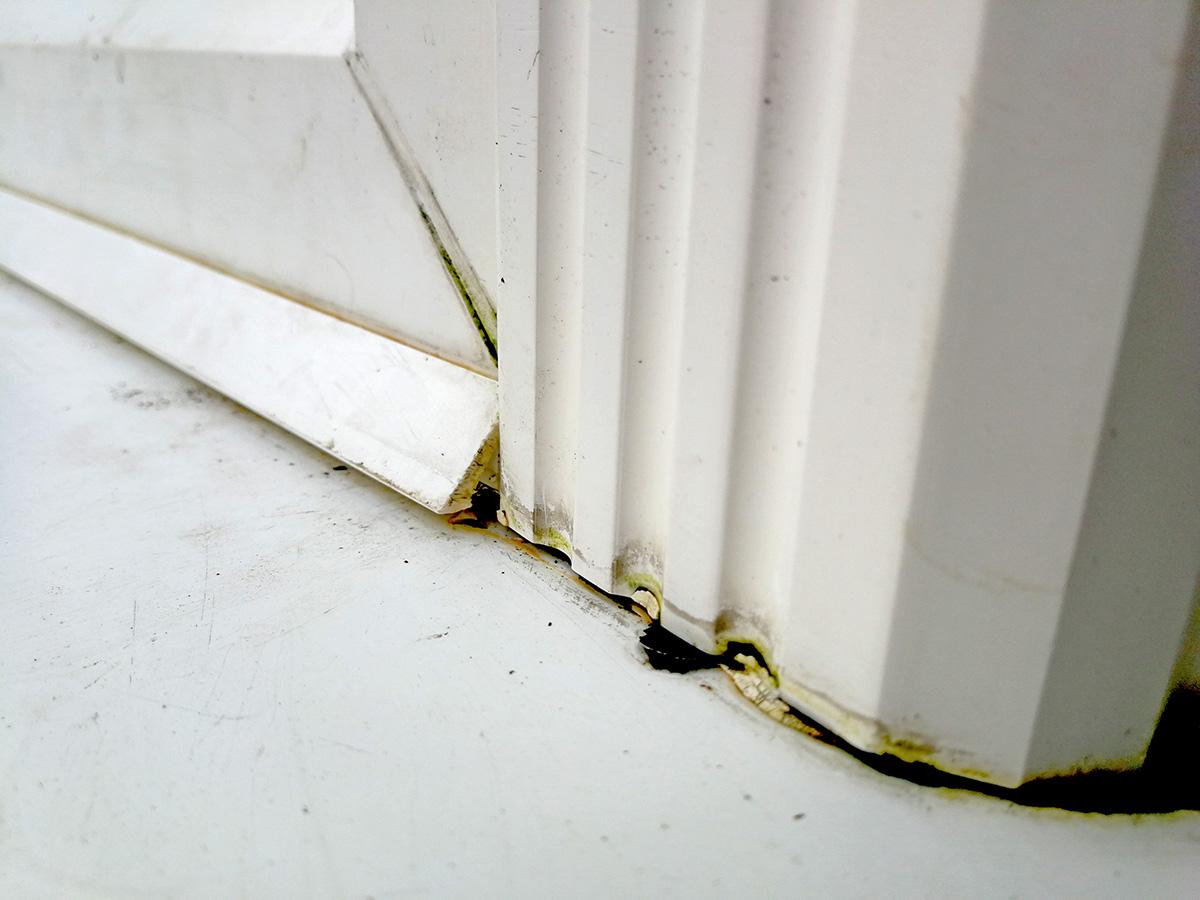
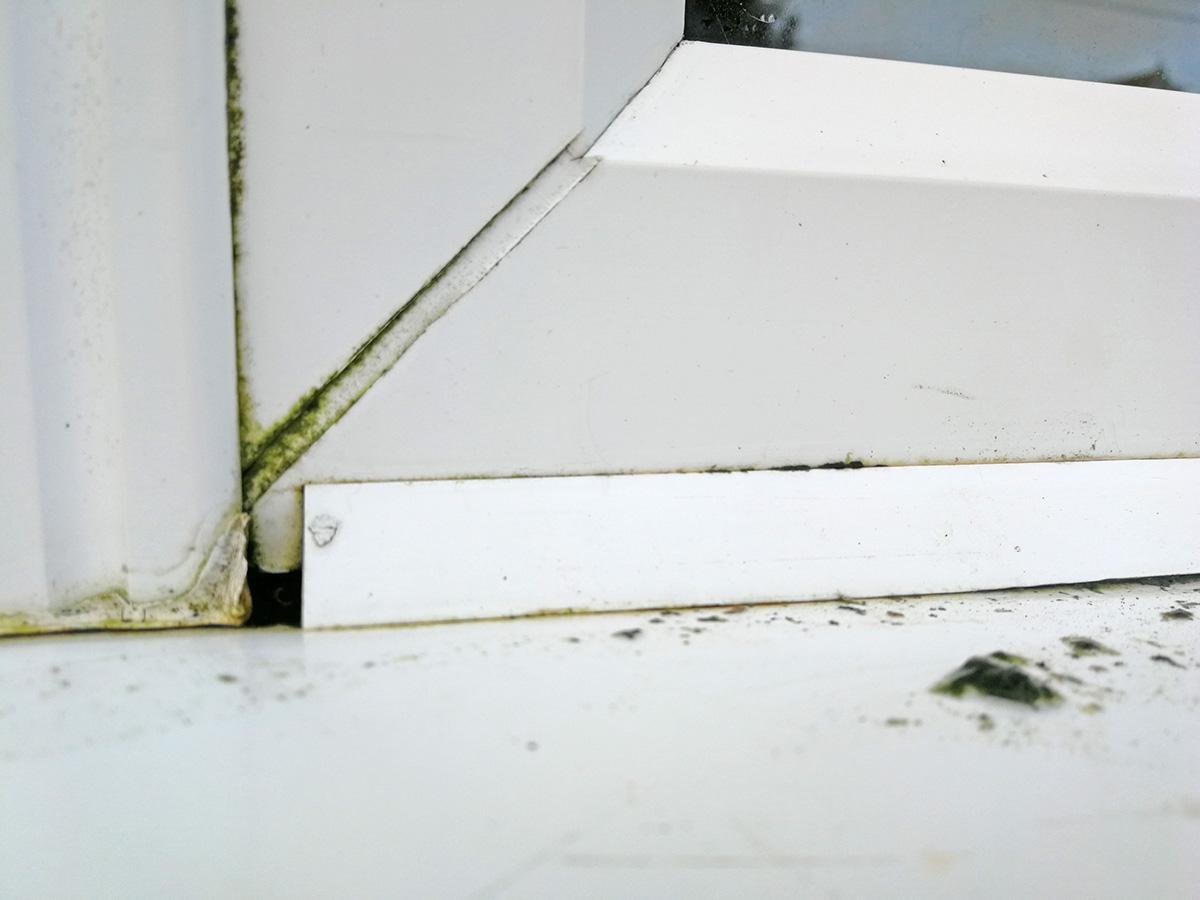
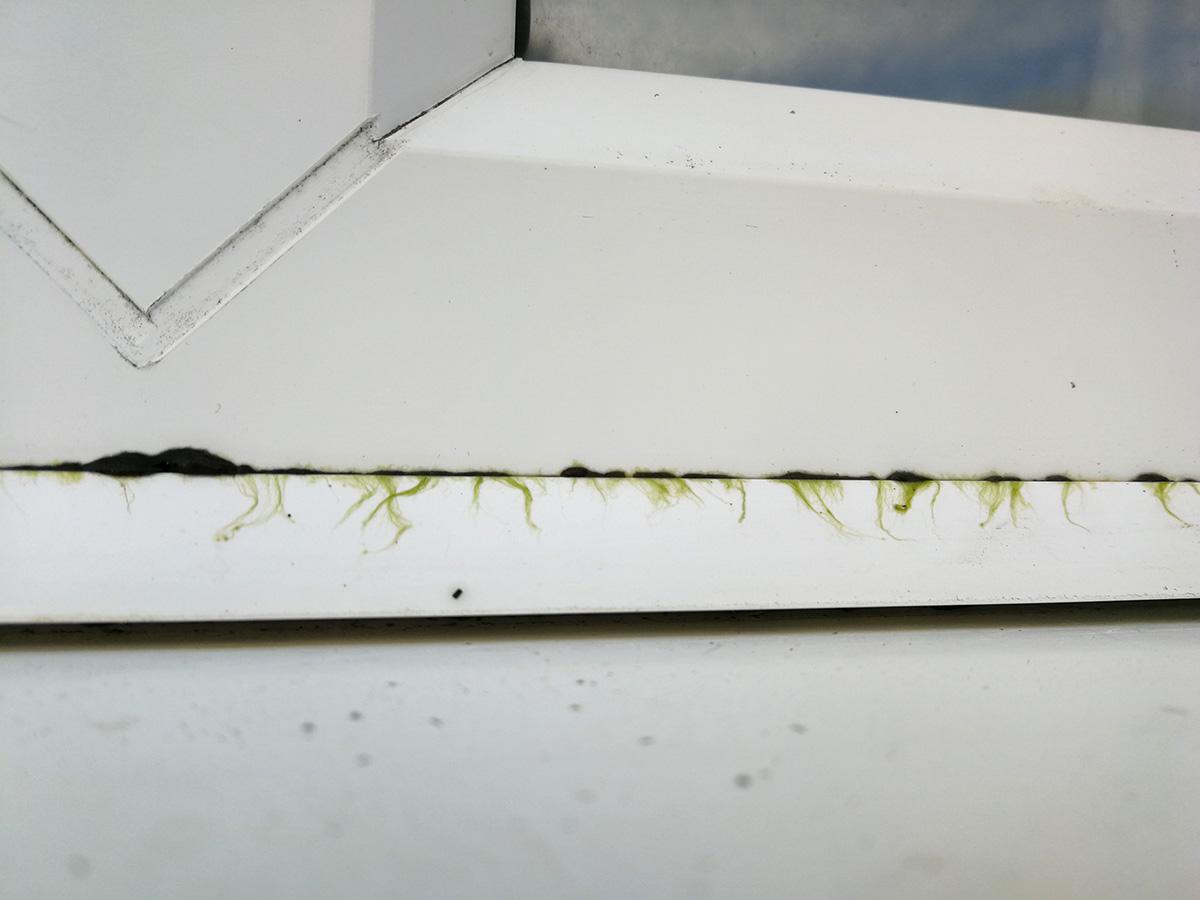
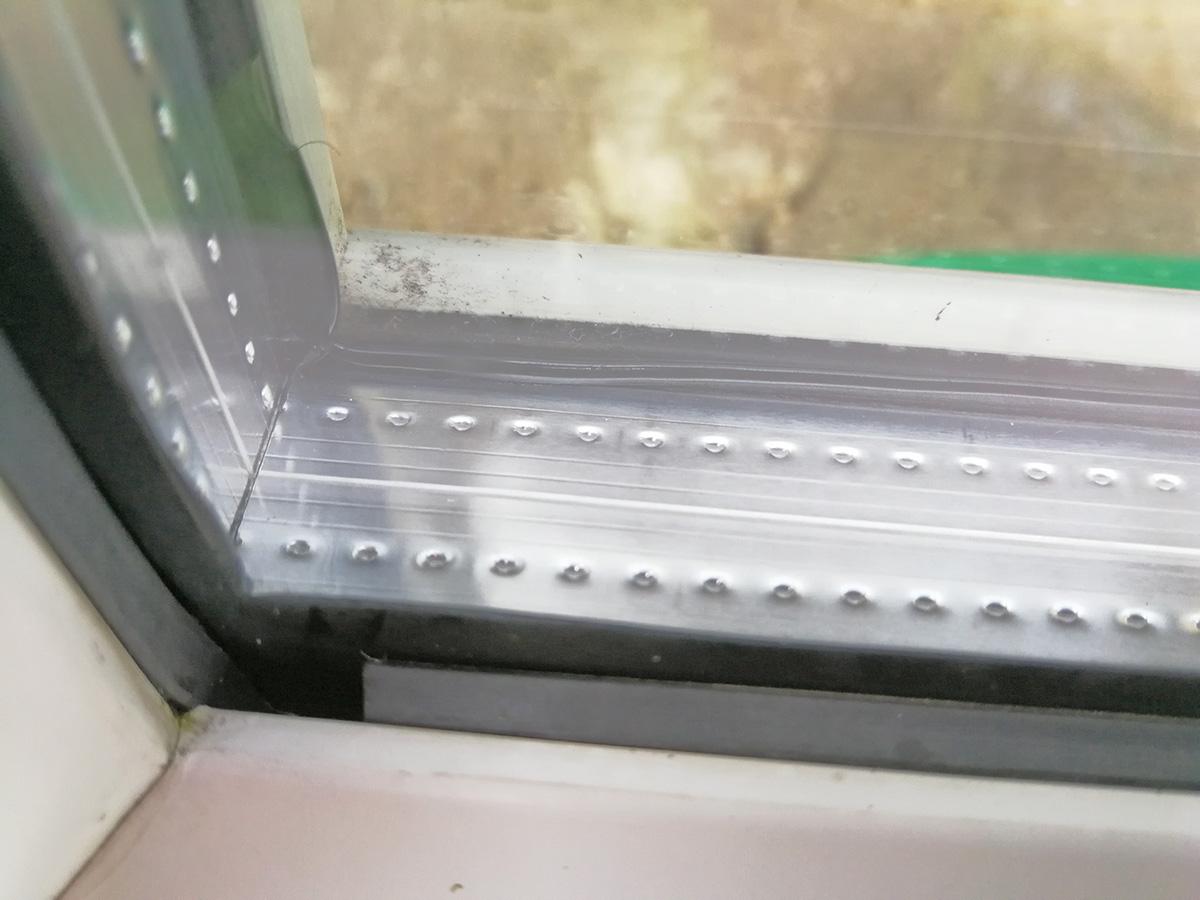
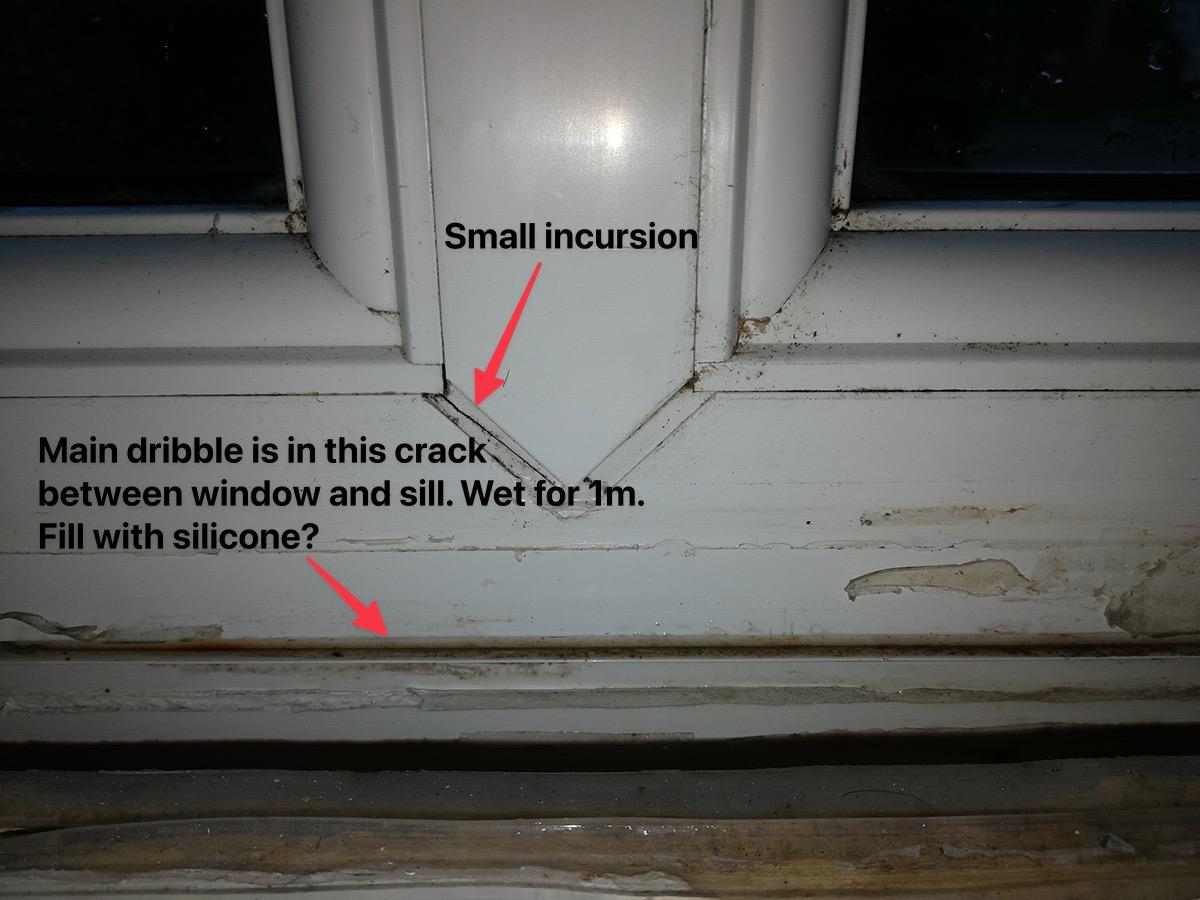
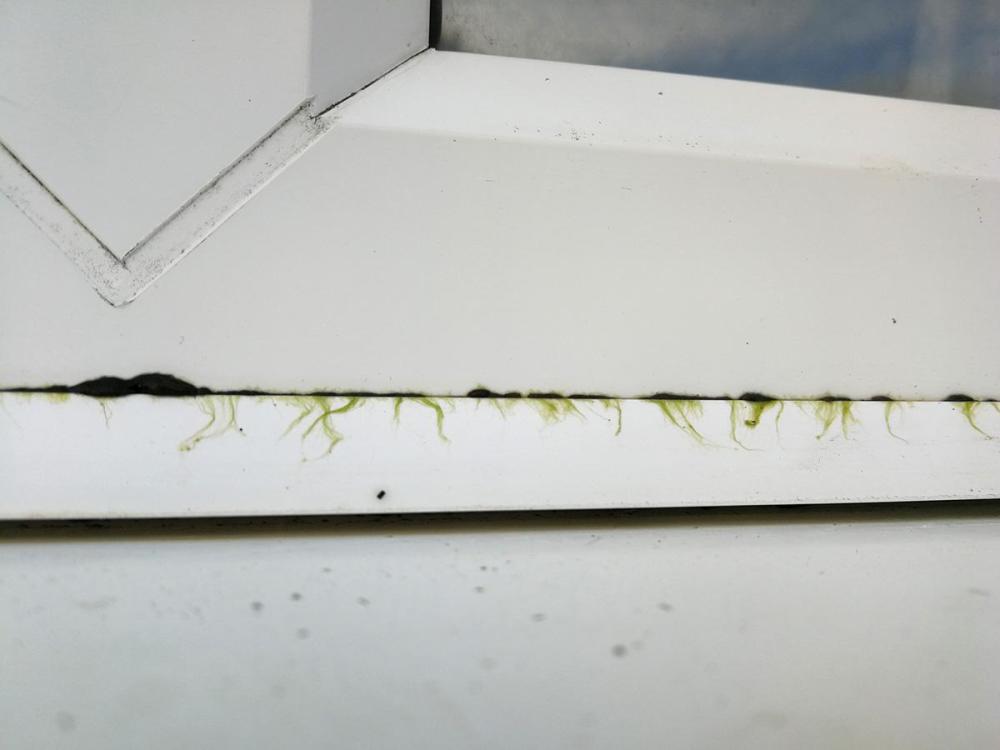
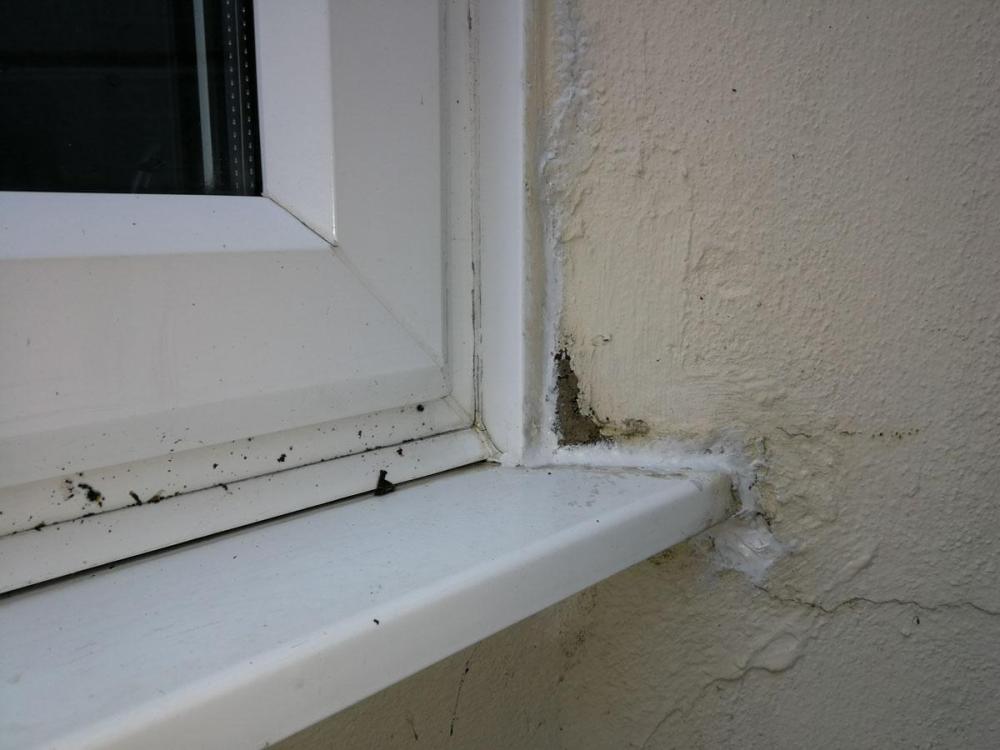
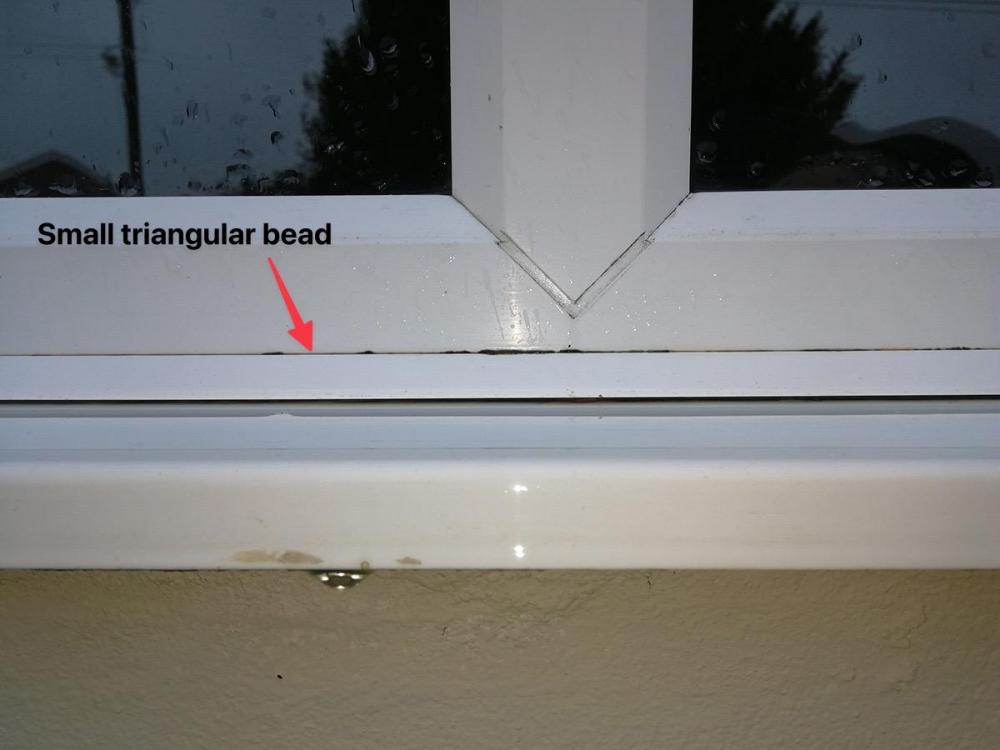
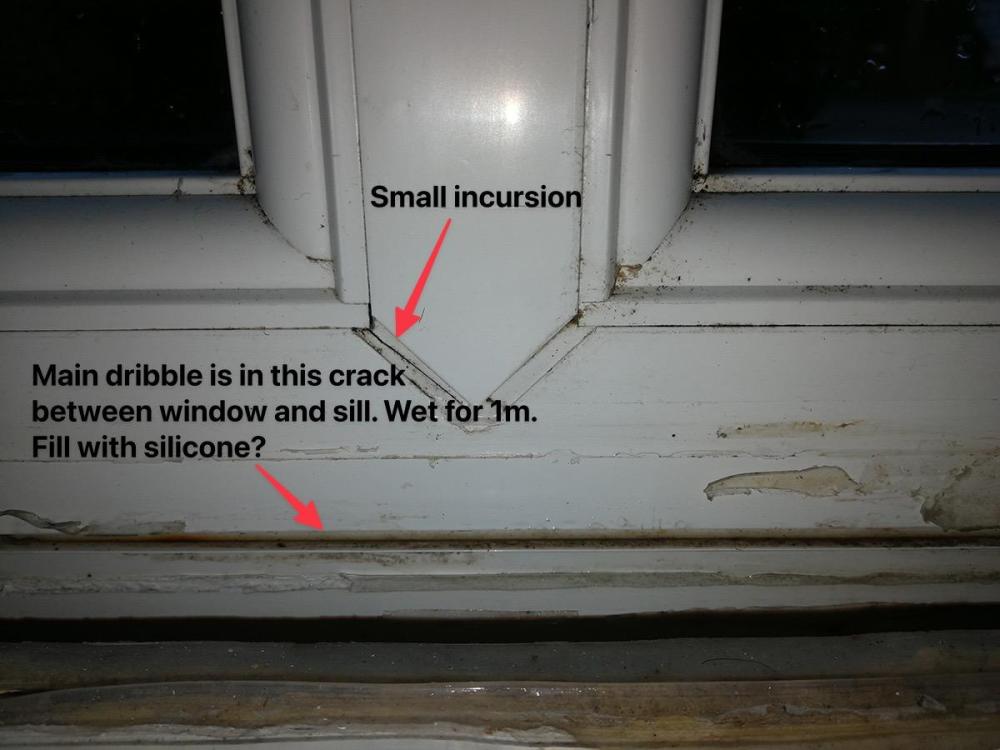
I've now discovered that water is coming in via the gap between the bottom of the window and the sill. I think over the years the sill has dropped and now slopes inwards, but I can't lift it. Looking at the damage uncovered they've been leaking for a long time, possibly since installation. I'm looking for a temporary fix, maybe 6-12 months until we get these replaced as I think they're not worth repairing now. Outside the've put some kind of triangular wedge in this gap. At the corners of the bay this trangular wedge is tight to the sill; in the middle there's a gap. As you can see slime and water weed is growing in it, showing how water sits here and doesn't drain. I've put sealant in the internal gap and the water is finding any pin-holes I missed to come through. My guess is the sealant will also be pushing the water leak to somewhere I can't see - like where the sill meets the cavity on the return (shown by "some water" in the photo below) Outside I'm guessing this gap has to be retained to drain the window frames, especially as the rubber has gaps like the one shown below. WTF is the triangle insert for? To direct water away? I prised a bit of the triangle out and can't get it to go back in, so have been wondering if frame sealant all along here would help prevent the driving rain be driven in.


-
'Twas the week before Christmas and the cozy fireplace video was on loop on the TV - and psychologically standing in pretty well. Except. Puny mid-temperature radiators are no match for the feel-good factor of a stove's heat on my face, transporting me to summer sunshine. Which got me thinking. Can the radiative aspect of a stove be faked to give the full experience? Domestic IR panels are at a too low output to notice so that's a non starter. What about a bar heater like this? At this point I have to acknowledge I'm not exactly practical, so over to you boffins. Can it be done and how would you do it?
-
I asked and they didn't get airtightness done at the same time as thermal survey, as they thought Taylor Wimpey would ignore it (too true). They shared the build airtightness certificate. Amazing coincidence to be designed for 5.00 and get 4.98...
-
Unsurprisingly the promise and the build quality don't match up. Thermal bridging, plasterboard tent. If you can't view/access X (formerly Twitter) here's a readable link to the thread: https://nitter.net/jimmybb/status/1733051913027949027 The image below is from a neighbour's survey. I have never seen dot and dab (with blower door running) highlighted so well. Source: https://twitter.com/sav_ann/status/1733118128199020803 / https://nitter.net/sav_ann/status/1733118128199020803 The thermal imagery is excellent and I am coveting these £18k/£30k thermal cameras.
-
Get yourself something like this and HomeAssistant - and anything else you want to run - will run faster than on a Pi. https://www.ebay.co.uk/itm/386317625023 I installed Proxmox first, then HomeAssistant inside that. It's been great. Edit: £69 is about right to pay. Prices are higher pre-Christmas on many listings Edit 2: This is the one I have for £10 less https://www.ebay.co.uk/itm/176078465130
-
That's doable. I went with zigbee2mqtt instead of nodered but I'm not doing any automation.
-
Lifting first floorboard without damaging others
Sparrowhawk replied to Sparrowhawk's topic in Wood & Laminate Flooring
Thanks, the joint's open a few mm in places; and there's no tongue to cause issues. Punching sounds a good approach. This kind of punch? https://www.screwfix.com/p/parallel-pin-punch-set-5-pieces/7549v -
I've watched a bunch of YouTube videos but reality is proving different to what they show so... I want to lift an 8ft floorboard next to the wall, that hasn't been lifted since the house was built 100yrs ago and is held down with those old rectangular nails. I've removed the skirting boards and there's 0.5-1cm between board and wall. On the other side the floorboard is close to the next in the middle, and at the ends I can just fit a pry bar down. There's no tongue and groove. I tried to get leverage on the side against the wall and couldn't. So I shoved the pry bar in between the floor boards, levered against the next floor board, and damaged the edge of that board. Obvious in hindsight. Is there a way to get this board out without damaging the next one? If not, a better way to get it out full stop?
-
First, my house isn't airtight so I check airtightness room by room, but you could do the same putting the fan in an external doorway or window and doing the whole house at once. What I do first bring a bowl of cold water, sharpie (marker pen), dust mask and eye protection into the room (I'm sensitive to dust). Then I put my "blower door" into the room's doorway and seal the gaps at the side with masking tape. I put on the PPE, turn the fan on and go round the room feeling for big draughts. If it's a room I'm going to redecorate I mark where the draughts are on the wall/floor. Otherwise I use post-it notes or similar. I seal these up. With mortar if they're big, or expanding foam if no alternative, or sealant if they're small. Or I stuff insulation material in if they're tricky to get to any other way. Then I wet my hand and go round using the front/back of the hand to trace where the smaller air leaks are. They can be a pain to track down because of the way air flows - where you feel a draught may be caused by a leak half a metre away, instead of where you're feeling it. And then I seal them. It's a slow job but satisfying. The biggest pain point is forgetting to bring something into the room before I tape the door in the door frame. E.g. the sealant gun. That's why in my video it isn't sealed - the room is airtight enough now that the gap round the blower door doesn't matter, and that lets me get in and out of the room easily. I have also used https://www.soudal.co.uk/pro/products/coatings/air-and-vapourtight-coatings/soudatight-lq, a cheaper alternative to Blowerproof or PassivePurple to seal around my joist ends under the floor. I applied it half the thickness it said so we'll see how long it lasts.
-
Indeed I did. blower_door.mp4
-
I second making a DIY pressure testing fan. I made one with a Screwfix office fan and it helps work out where the problem really is and isn't. Like water leaks, air leaks don't always show up where the leak is (the Coanda effect in action?) so being able to make the leak easy to feel and having time to explore where it's coming from is helpful.
-
What's the void depth?
-
Thanks @markc. When you say "the fill appears to slope backwards towards the window" which bit are you looking at? Edit: sill I think? That is an optical illusion, it slopes outwards
-
How thin can you get away with? 15mm batten + 12.5mm plasterboard (+ 3mm top coat if not tape & jointing)? We need to rewire external walls prior to CWI and I am not looking forward to having runs chased out in a lived-in house.
-
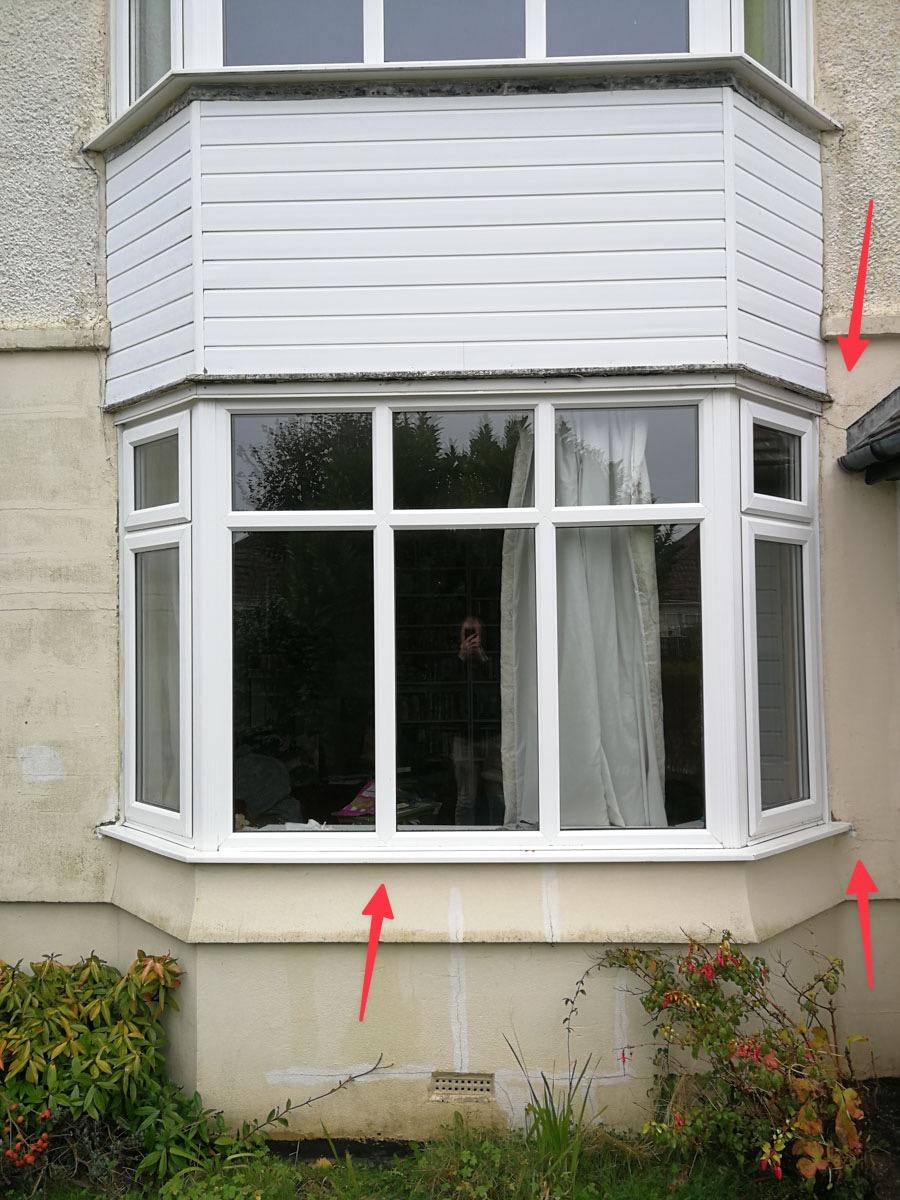
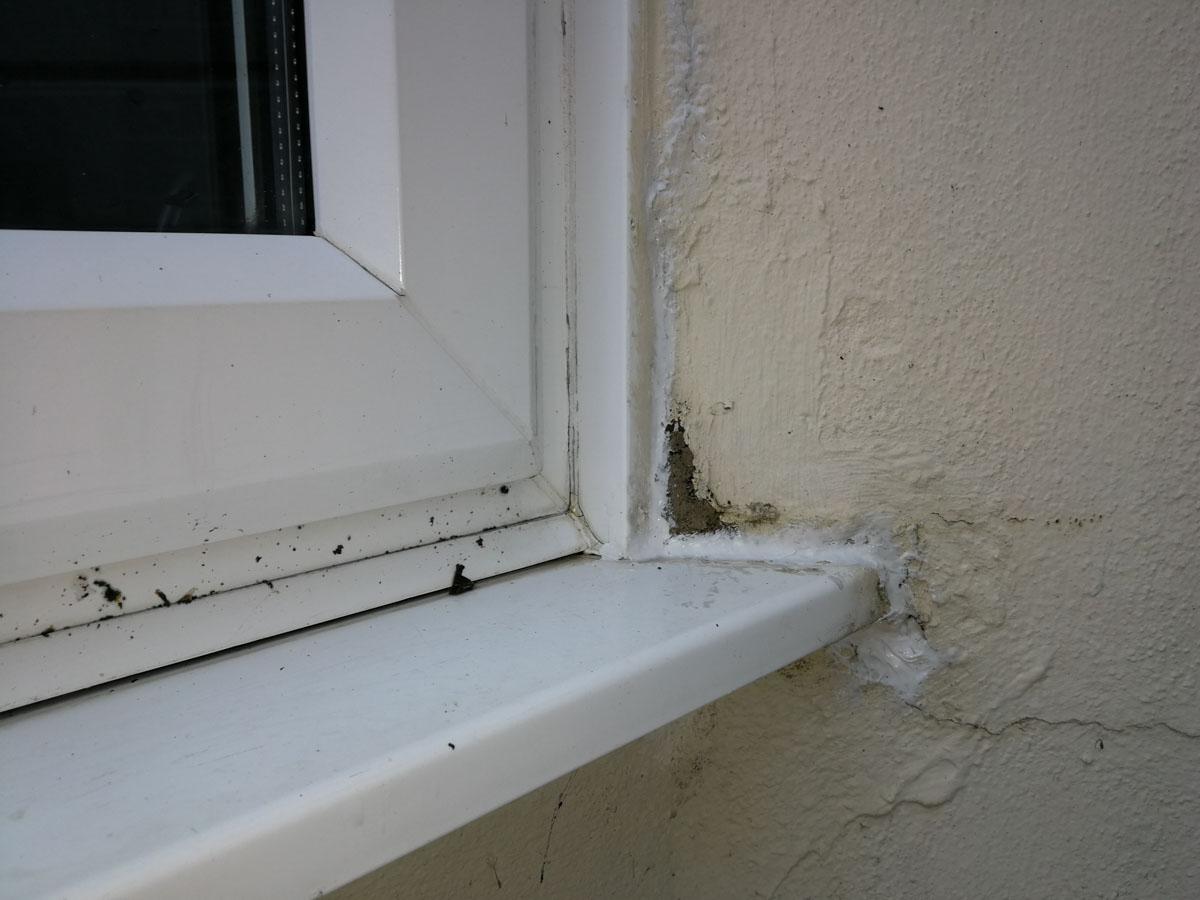
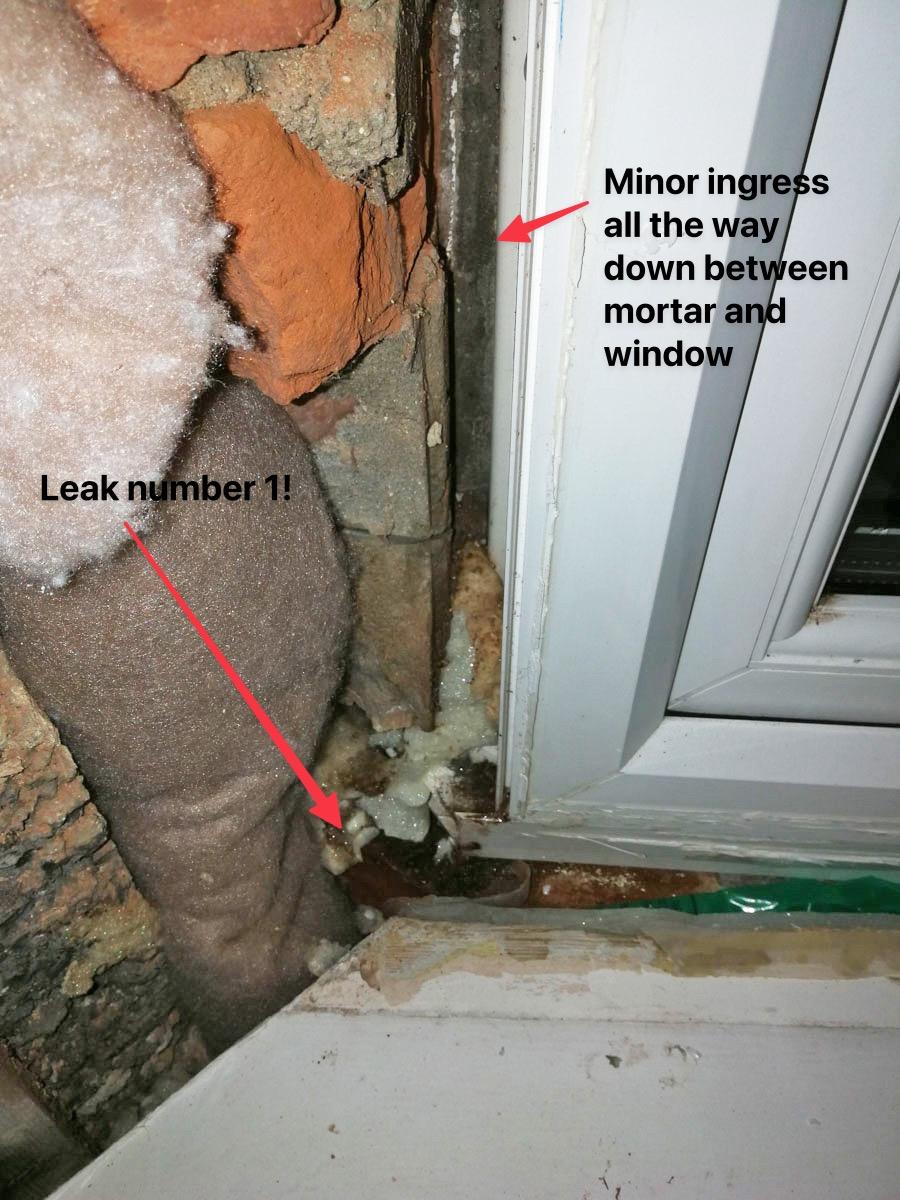
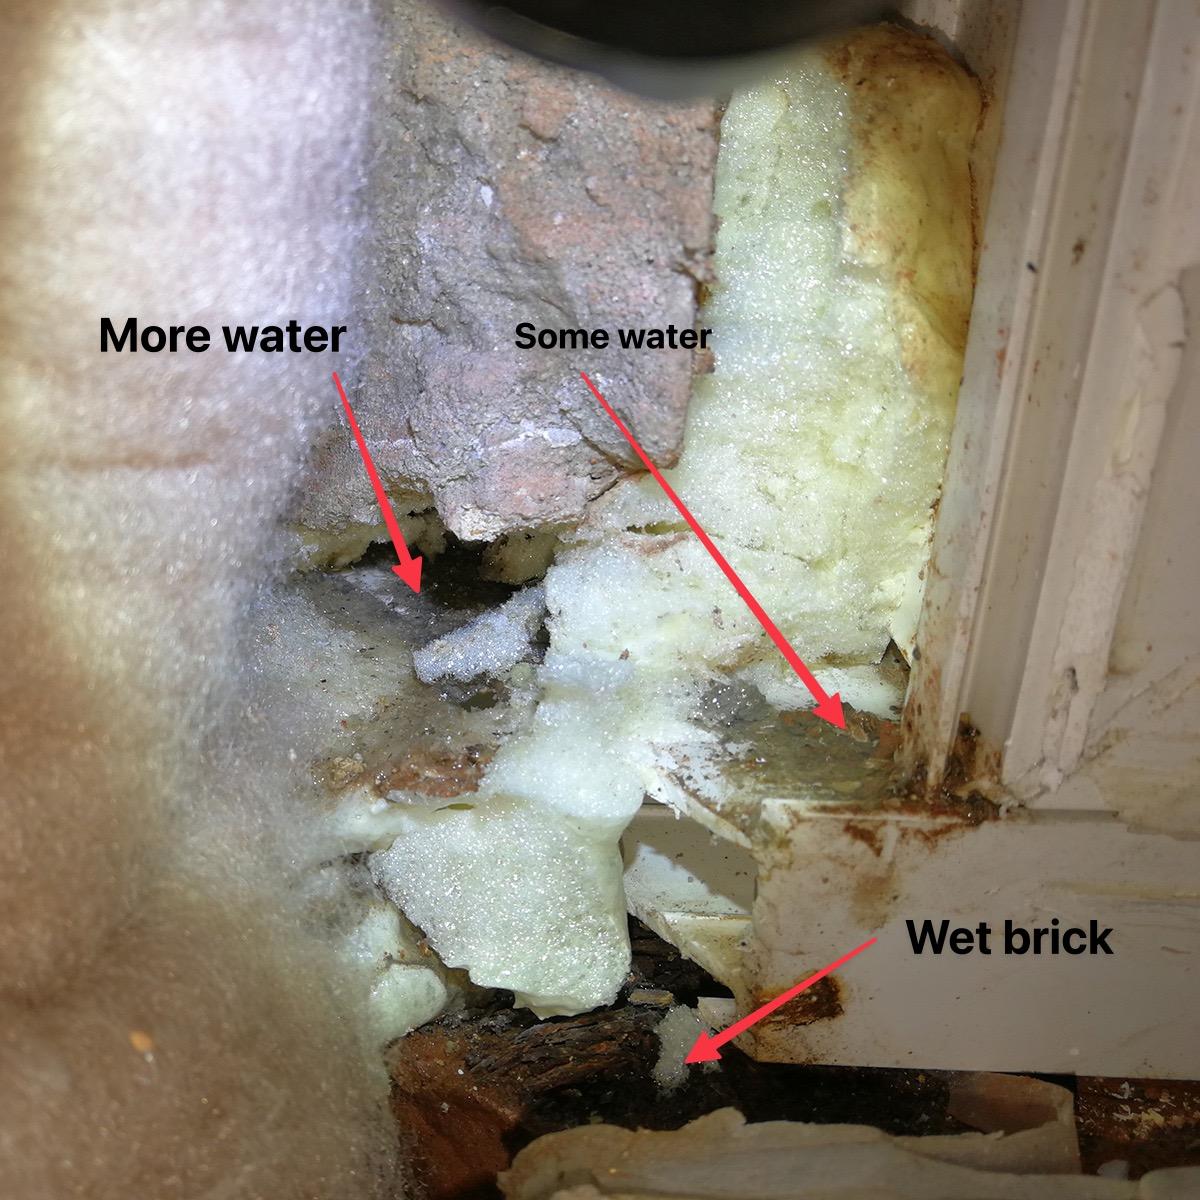
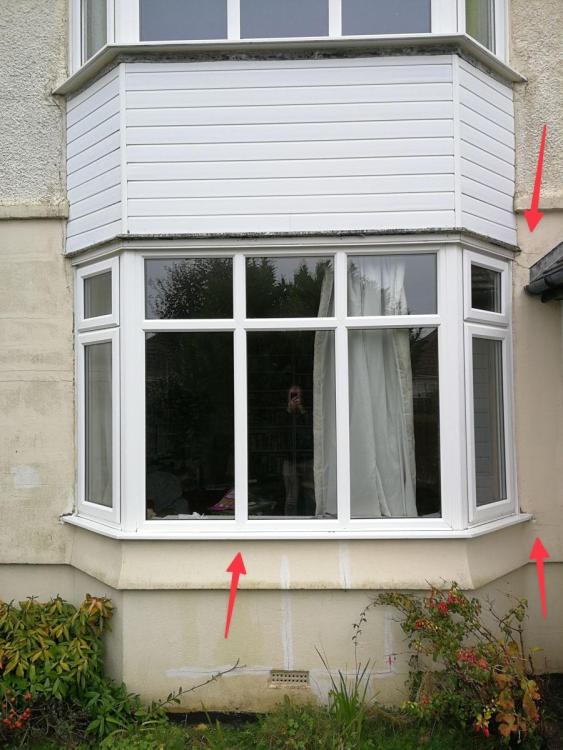
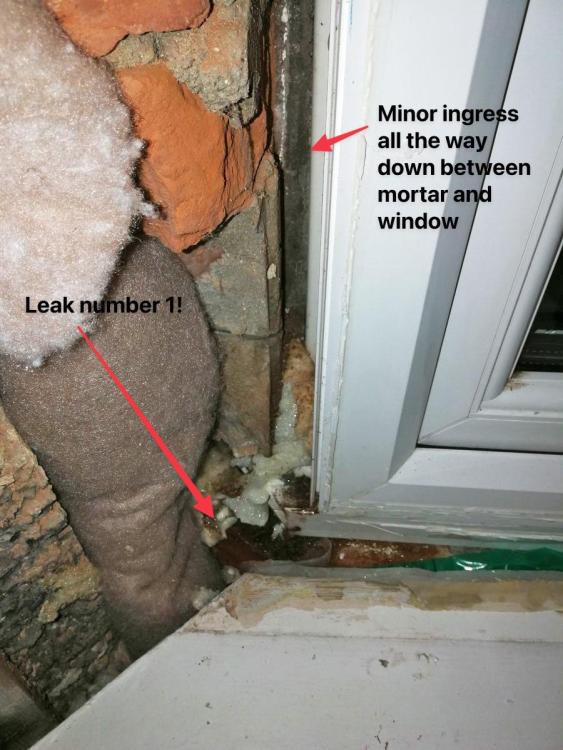
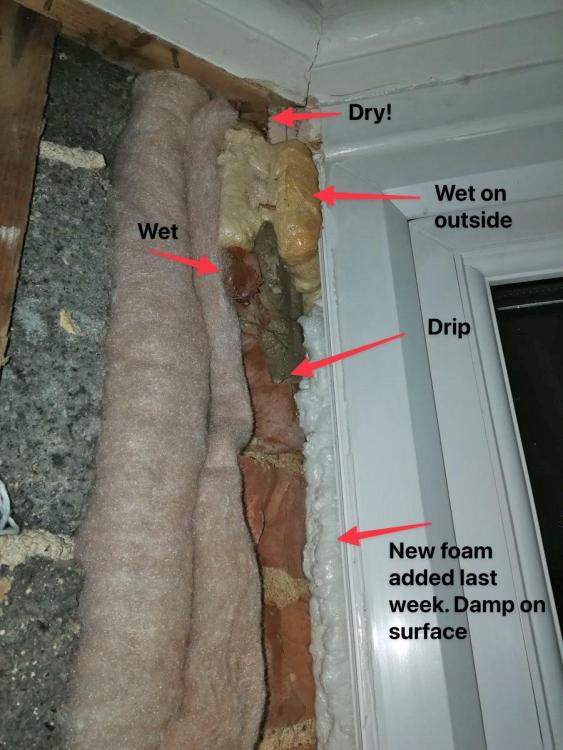
After stripping the (dry, wooden) surround off I've found two leaks on the right side of the downstairs bay window, and I suspect it's the same the other side. Where the window sill has been cut into the brickwork it has been leaking for a while - the render is soft, the wooden packer has rotted and the brick under the window is soaked. The open cell foam filling this area is sodden. Before storm Ciarán hit I filled the cracks and places where the mortar fell out with CT1 as it was soaking wet, which didn't stop the water coming in. During last night's storm I found a leak at the top right. And now a third leak between the bottom of the window and the sill. 2 questions: How can I patch this up for now, and what is the long term fix? We're planning to have this wall re-rendered due to cracked and crumbling (sodden) render, but this looks like a weak spot. With the gap between window and wall, and the way the window sill disappears into the wall and the open angle where the render touches the UPVC is going to be tricky to make waterproof? Overview Bottom right With my new CT1 trying to fill gaps. Foam is supporting external render. Some of the render fell off and I could feel sodden foam. Top right Again the old foam added to try and stop/hide the leak? Foam is probably supporting the render. And the bottom:


-
Foam gun lost propellant?
Sparrowhawk replied to Sparrowhawk's topic in General Self Build & DIY Discussion
Having bought a new can - it wasn't the propellant. The first can was fine. The needle moves with no issue in the gun. Somewhere between where the can screws on and the foam reaches the needle it has gone solid. -
Let me introduce you to... Gapotape! In all seriousness I'm making the same decision for our suspended floors. Probably going Rockwool but whatever's cheapest (so long as it's not glass fibre) as the airtightness will have a bigger impact on our comfort than more insulation. Loose wood fibre is appealing because it can fill all gaps and is easier to push into hard to reach areas.
-
Welcome! I've two friends in Malvern/Great Malvern and it's a beautiful area. There are loads of threads and discussions here on ICF and the different systems so do have a search of the forum. Some cover the "greenness" of it and the hemp versions too. I'm renovating a poorly laid out and twice-extended house so my first question to you is: do you have the money to knock it down and rebuild? 🙂 If anything's load bearing inside (all our ground floor walls are) or you've got internal cavity walls from before the extensions, it's hard to sort the layout. We've given up and are making the best of it. Plus you can get airtightness, insulation and comfort right from the start. Good luck and do share your progress!
-
Efficient slimline aluminium window suppliers?
Sparrowhawk replied to GaryChaplin's topic in Windows & Glazing
I'll push back and say that it does matter if your windows are smaller, as you end up with less light. Both a small window and a set of UPVC french doors have 40% of the opening as UPVC and 60% glass. It's most noticeable with windows on the north side of the house. -
I've enjoyed dipping into this Norwegian build: https://www.youtube.com/@mindsparx1/videos to see the way a carpenter orders the tasks.
-
Facebook marketplace. If you have a vehicle you can pick doors up in, you can get a set for under £50. Or free because people can't get rid of them. Depending on your house size you might need 2 sets which won't match, but they'll tide you over. I got a still-shrinkwrapped Wickes £30 door for free that way.
-
Am I correct that when working out the floor area for Part F F1(1) 1.24 it requires the following? You must include the whole area of a room in the eaves (even if the headroom is under 1m) You must include the area taken up by walls You should include anything inside the thermal envelope e.g. eaves storage cupboards And because of the emphasis of supply of air to habitable rooms, which Part F defines as "A room used for dwelling purposes but which is not solely a kitchen, utility room, bathroom, cellar or sanitary accommodation." I exclude the floor area of our kitchen, utility room and bathrooms?