Iceverge
-
Posts
4462 -
Joined
-
Last visited
-
Days Won
32
Everything posted by Iceverge
-
I was of the notion that differential temps created drafts too. Mind you, I've not ever noticed any in our house, even when some rooms are warmer. Is there any handy way of comparing rads output to UFH, I haven't done any of the sums but would like to get stuck in. I'm also thinking that standard radiator TMV's wouldn't be appropriate for very low flow temps? I like the idea of very oversized rads, intelligently placed, running on a single circuit at very low flow temps. Balanced to achieve the stated above temps in each room for an ASHP, or even retrofit compatible for ASHP. No zoning to worry about, no pipes to lay during the initial stages of the build, similar cost to UFH. It would be good for suspended floors and floating OSB over insulation floors. Situations which avoiding screed, avoiding very hard floors and minimising height buildup was an issue. Also because you wouldn't be directly heating up the ground perhaps losses would lightly be lower than UFH?
-
Sorry that was a bit of an over statement! I might try it myself on some stone buildings I want to refurbish. If I ever get around to it....
-
They often do this in the states. Closed cell outboard against the timber frame for airtightness mainly then something cheaper inboard like mineral wool to finish off. In 2016 when I priced (walltite, closed cell)!it was €50+vat per M2 for 150mm. K value about 0.026 W/mK Open cell icynene was €30+vat per m2 for 250mm. K value 0.039 W/mK. I liked the idea of polyurethane foam in our cavities for a total full fill and airtightness but the shrinkage at 250mm depth put me off. EPS beads were also about 1/4 of the price. For your project I would proceed with caution. Completely sealing one side of an old (stone?) wall with a total vapour barrier feels risky. I've suggested this before, I think to @saveasteading, and was shot down for some reason I can't remember. Plasterboard 50mm service cavities with batt insulation. Variable membrane like intello plus. Studwork stood back from the wall. EPS beads pumped behind the membrane.
-
Vindication from on high😁. What would be wrong with leaving the T+PRV on the tank as normal and running say 22mm copper vertically upwards to the loft (with insulation when it's outside the thermal envelope) and then back down to a safe discharge location? Realistically I reckon you could change to barrier pipe once a suitable distance from the T+P valve as the water would surely have cooled.
-
Get digging I say, only one chance to get this right. 300mm of EPS or 200mm of PIR is a good starting figure.
- 9 replies
-
- 1
-

-
- insulation
- floor slabs
- (and 1 more)
-

ASHP size (don’t sigh I’ve done the calcs)
Iceverge replied to Kelvin's topic in Air Source Heat Pumps (ASHP)
Will the larger unit have an easier life because rarely outputting it's max power or a harder life because it's cycling more? My guess is that a well sorted larger unit with a good ability to modulate will defrost less in winter and last longer too. -
I can't see any logical reason for a vented cylinder being a problem. Maybe there will be more costly antifreeze/inhibitor used as it'll need to fill the attic tank too. I'm aware the regs/manafactuers instructions specify that an unvented cylinder needs to have a tundish visible and waiting a specified distance of the cylinder, so you can see if the T+P valve is discharging warning of an issue. Why can you not run large diameter copper piping from the UVC T+P valve vertically upwards (AKA a solid fuel vented cylinder) and from there to a discharge a safe location. I can't see why this wouldn't work or be dangerous? It might solve @Thorfuns basement pump issue .
-
Brick cladding when the glazing is already installed ?
Iceverge replied to Post and beam's topic in Brick & Block
Like potty training, you have to make it easy for people to understand and to do the right thing. You're going to get a poop on the carpet either way. If you've warned of harsh retributions someone will first try to wipe it up with the curtain and then cover it up with the sofa cushions making the whole situation much worse. -
That Swedish guy Mindsparx?
-
Is this sub-standard. Sanity check needed!
Iceverge replied to devondumpling's topic in Heat Insulation
Unfortunately rigid insulation isn't rodent proof either. Best to keep them out altogether, or install a cat. That's good, it'll soon be a long forgotten memory. A diligent amateur would surely take up the task if offered a few ££. Just retain the cost from the builder and document all the poor workmanship to ensure they have no comeback. Don't cheap out on the foam either. Something that remains flexible and doesn't shrink. -
Is this sub-standard. Sanity check needed!
Iceverge replied to devondumpling's topic in Heat Insulation
If 99% of the time 99% of people cannot get it right the system is wrong. Rigid insulation between timbers is a bad idea. Every bloody time. In fact between anything, cavity walls etc. That's why we used blown bead in the walls and cellulose in the roof. @devondumpling, sorry to hear about this. What stage of the build are you at? Is it plasterboarded? maybe we can collectively come up with a good solution. -
@jonM Back on topic, you mentioned having different rooms at different temps which I can see some benefit in. Maybe bathrooms at 23, living room at 22, kitchen at 21, circulation spaces at 20 and bedrooms at 19. Have you actually done something like this in practice, does it create drafts?
-
It's a conspiracy by "big concrete"

-
It's amazing isn't it. I lived most of my life without even considering it. Something so simple as form factor never occurred to me which is amazing since I was always good at maths and physics and the sums are very basic. I think it has to do with decades of houses been sold as "homes, assets, fashion statements, investments, tax vehicles, inheritance, status pieces, heritage" etc etc. Anything other than machines to keep us safe from the elements. Nobody can make any ongoing cash from building a house that has very low running costs, is low maintenance and durable. People, even smart people, are just a product of their environment.
-
I've been considering this issue with some time. I've come to the conclusion that combining stuff is a bad job. From backhoe loaders to sporks they all end up like Frankenstein's monster. We built a 185m2 passive house and use about 15-25kWh daily (3200kWh in winter 2021/2022) during the heating season, all on a single electric rad so very in much the same ball park as you. We have an immersion driven 300l DHW cylinder that provides fine for our family of 4 on cheap (14c/kWh) overnight electricity. This is about 9kWh per day (330kWh annually) If we were to install an ESHP it would "steal" 9kWh of heat from the house per day and return a COP of about 3.5 at 50deg water temp. Good for @Thedreamer who can easily replace the heat with a woodburner and is using heat that would otherwise be lost through extract only ventilation. Not so good for us with MVHR and tiny ventilation losses. Any energy taken by the ESHP would be just added to the space heating electricity bill. If the ESHP was vented to the outside only it would lower the COP to about 2.5 (maybe?). At 50 deg it would need to run outside of peak hours too (49c/kWh) as it couldn't bank the same energy as the immersion tank at 300l at 70deg. Doing the sums, the saving was small, 40c per day. At at least €2500 to get one installed it was a 17 year payback. I bet the ESHP would break before then. A better plan I think is to install PV, at 4kW the payback is 7 years on DHW alone, shorter realistically considering that is will mostly displace super expensive daytime electricity. With a 25 year guarantee on the panels and zero moving parts it has a fighting chance of actually saving us some money before it goes kaput. Space heating is a different story. Had we had the wisdom to install UFH we could have banked our cheap night electricity rate in the floor slab with a wills heater like @TerryE As is we do about 1/3 space heating at day rate. Given the bananas price of electricity at the moment that now means €800 per year vs the €250 i planned on when electricity was 8c/kWh and I thought the house would not need evening heating. A good A2A at about €1500 installed will hopefully drop this to €200 per year for space heating, payback in about 2.5 years. Again a chance it'll save cash long term. Maybe a couple of elec heaters in the bathrooms for comfort just when occupied. As for MVHR, get a reliable unit with ready supply of spares and reasonably priced filters. Ours are €48 a pair, luckily the €7 pollen filter of a Citrôen Berlingo fit with a little prodding lol. TLDR. Immersion and PV divert for DHW. A2A for space heating. Stand alone MVHR.
-
@jonM Have you investigated cooling with the rads? I'm aware condensation be more of an issue than with UFH. Obviously the greater the surface emitter area to the lower the flow temps and the better COP. Fan assisted rads may be an option but the complexity increases there again. Are yours truly massive?
-
I would certainly hold off on the ASHP if you don't know how much energy you are using. Could you requisition the oil bills from the previous owner?
-
I think they already are. And not before time.
-
Passivhaus certification will come with a reem of documentation and photos as long as your arm. Importantly detailing the actual build, not the on paper design. More than happy to live in our passivish/passive house as I could see it being built and was able to verify it myself. I wouldn't trust a non certified "passive" house as far as I could throw it. Most I've encountered have double glazing, solar stapled to the roof, an "eco" stove, and airtightness levels so good that it didn't need to be tested.
-
It can be done, I did 8m3 in my tractor mixer for the floor of the garage as I was on my own and had time to burn during covid. Price the cement carefully however, for a strong structural mix it'll shock you how much goes in compared to commoner garden "patch a hole" concrete. It cost more in cement alone than ready-mix did for me. C35 concrete needs 410kg/M3. This translates to about 30% by volume. The smaller the mix the harder it seems to be to get a consistent mixture. If you have a good car trailer and van and a large container you could collect 1/2 a cube at a time from the batching plant with plenty of retarder in it to save on lorry charges. Having done it both ways though, I'd get a truck for your 1.5m³.
-
New member - stuck for what to do next to warm the house
Iceverge replied to Sparrowhawk's topic in Introduce Yourself
Closed cell foam in the cavity. 300mm of blown cellulose in the attic. -
It sounds like you have it pretty well sussed out. I wonder if your gables could be framed in timber or metal and then clad in cement board. It might save you some ICF blocks. It might not be worth the hassle.
-
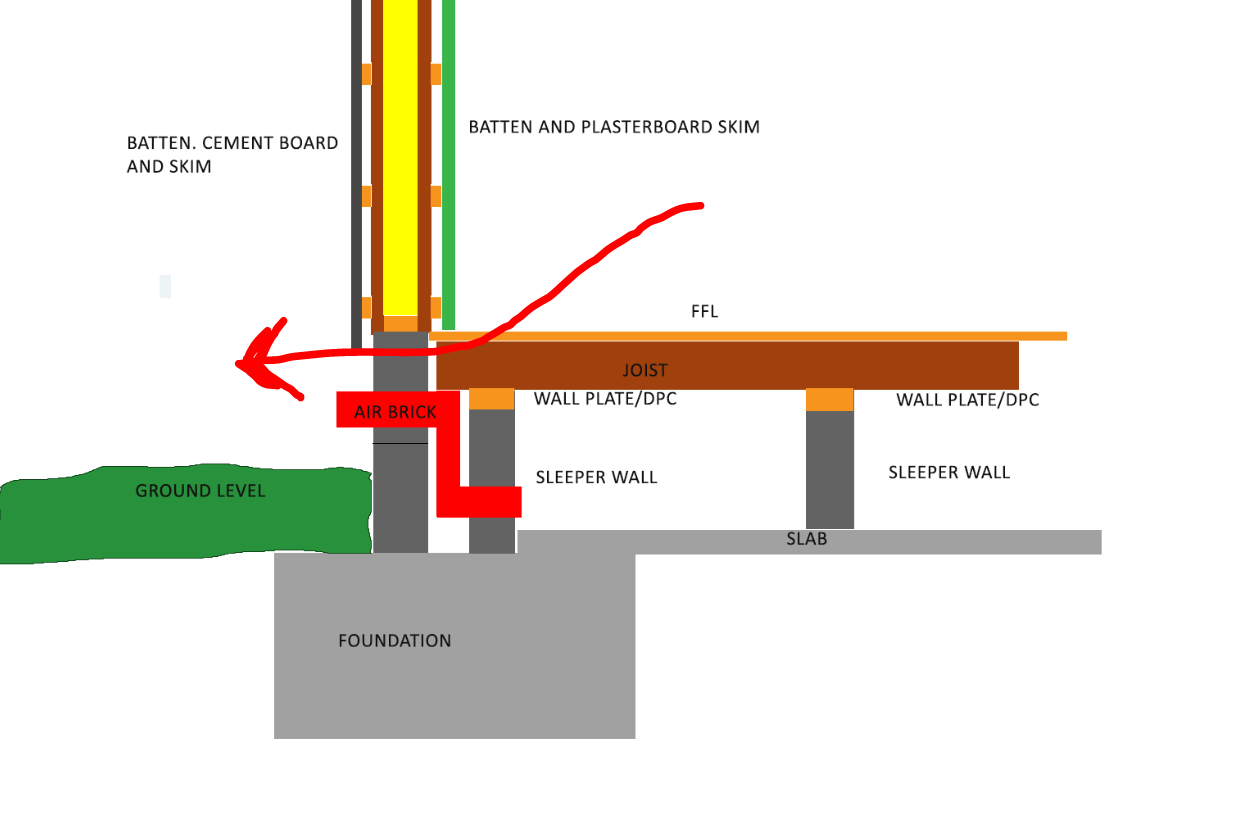
You'll loose lots of heat through this junction. I'm not quite sure I follow you here. Have you discounted masonry and/or stick build? It's tremendously advantageous to be able to pop down to the local merchants for a couple of timbers and/or blocks., especially on a smaller project. What kind of U value are you targeting?

-
Uneven old render - how best to proceed?
Iceverge replied to spleenharvester's topic in Plastering & Rendering
That sounds like a good option. -
There's your two options. I made a 5mm mistake with one side of the ICF but it won't make much difference. My guess is that extra external insulation will be better for thermal bridging of internal walls and windows etc as with the extra internal insulation the concrete will be below 5 deg on cold days. Given ICF isn't the cheapest have you considered masonry build as you're going to use extra insulation anyway? You'll use more concrete if you opt for the internal option of extra ICF insulation.