Iceverge
-
Posts
4462 -
Joined
-
Last visited
-
Days Won
32
Everything posted by Iceverge
-

Insulated Concrete Slab Garden Office - Questions
Iceverge replied to Ticky's topic in Garages & Workshops
Floor level 150mm above ground. Otherwise you're into a basement type detail really. -
Insulated Concrete Slab Garden Office - Questions
Iceverge replied to Ticky's topic in Garages & Workshops
@Ticky You must decide if you are willing to accept a 150mm floor level or build as you would for a basement with all the associated detailing and drainage works. Trying to get away with detailing a ground level floor the same as a raised one won't end well I'm afraid. -
Why not a hall feed system?
Iceverge replied to Petrochemicals's topic in Mechanical Ventilation with Heat Recovery (MVHR)
There's no saving in materials as you'd need to extract from every room so no reduction in ductwork. Good systems are inaudible. Extracts can make plenty noise too if done wrong. With all your ducting running off one of the MVHR fans you'd need an MVHR unit roughly twice the size as the job of shifting air is normally split 50/50 amountg the 2 fans, not 90/10 or 95/5. -
Much stronger. Blockwork and brickwork isn't that strong on its own and benefits from being tied into itself (cavity wall) or floors and roofs. The wall plate is a structural element. 75mm gives lots of hold for nails and screed etc from the roofing timbers. At 47mm they would pull out much easier.
-
Assuming a cavity wall with strip foundations that perimeter strip has a noticeable effect on the thermal performance of the wall floor junction. Thermally I'd put as wide a strip of PIR in there as I could fit with the caveat that too wide and fitting carpets will be a pain.
-
No, cavity wall with strip foundations.
-
Insulated Concrete Slab Garden Office - Questions
Iceverge replied to Ticky's topic in Garages & Workshops
Have you investigated the water table? Dig some holes in the ground in the area of the garden room and see after a period of heavy rain what depth the water settles to. This will inform a sensible level to put your floor at. If it low enough, a good french drain and well detailed DPM should allow you to drop the floor as low as you like assuming water cannot flow in the door of the room. Maybe incorporate a small sump and space for a plug in pump if you go down this route. -
Insulated Concrete Slab Garden Office - Questions
Iceverge replied to Ticky's topic in Garages & Workshops
this will be a big thermal bridge. You might get mold + condensation on the inside.
-
She'll have to wait a few years, I see her regularly crossing off the days mind you. ..... Yes and No. YES: I'm completely on board with the airtightness, 3g, MVHR, attention to thermal bridging. The house "coasts" so well through outside temperature variations. The bitter and extra windy weather last night was imperceptible inside. We are living more comfortably than any other house I've lived in and despite being direct electric is still much cheaper than most ASHP new builds I know to heat. In terms of KISS our CH works and a plug in rad or two doesn't get much simpler. NO: The 10w/m² peak heating load target is based on space heating of the house with supply air from the MVHR and hence is a bit arbitrary. Similarly the 15kWh/m²/annum heating demand. Doing PH can be quite an evangelical process as you have to do so much conversion of the doubters. In so it's easy to become swallowed by the doctrine. In reality 16kWh/m2/annum or 14kWh is neither here nor there and probably far outweighed by how much your kids let the door open. I would have gone for 300mm EPS floor insulation rather than 200mm and 300mm rather than 250mm EPS beads in the walls if I was to go again. The cost is marginal and would have taken us to about 8w/m² and 12kWh/m². No reason to stop at PH targets either. PH assumes 20⁰ is fine for every room. It is, but really 18/19⁰ in the bedrooms and 24/25⁰ in the bathrooms would be better. PH can put the kibosh many lovely design elements like roof lights at the cost of some minimal active heating/cooling. When we were building however almost everyone who didn't sing from the PH hymnsheet with regard to targets, airtight, heating load/demand etc was a bluffer and would have I'm sure landed us with a house that fell far short of design levels. TLDR. PH and PHPP absolutely work, use them but don't treat them as targets/limits and don't let the methodology limit you from making an excellent house an exceptional house.
-
No new build passive house 2021 finish. No CH installed. Just a plug in heater or two. I think my wife will agree to it only if she can bury me under the new slab. 150mm 35N concrete slab with a batch of A393 for good measure so I don't think I'll be undergoing that idiocy. Just an high COP A2A at some stage.
-
Had a quick scan of https://www.theunderfloorheatingstore.com/electric-underfloor-heating/inscreed-heating. Thought 3* 2600w kits would do 250m²? TBH I'm almost convinced to get the consaw out to our 150mm slab and put in pipes myself.
-
Have you scoped this out much? It may be possible to do some of the work yourself and save a few £. During our build I destroyed 2 X cheapo generators with a 9" grinder. Frustrated I bought a long length of 4mm² cable and dragged it 120m from the farmyard to our house. That was in addition to another 100m of wiring from the farmyard to the meter. The voltage drop was enough to upset some battery chargers but it worked. Surely 500m isn't insurmountable.
-
How about 30w/m² of resistive wire UFH buried deep in the slab to allow for time of use load shifting. Then a high output 500w/m² UFH just below the tiles in the bathrooms on a timer/timer switch just to kick the local temps up briefly when in use. I'm not sure if this would destroy the flooring.
-
I raised the idea of electric UFH in slab before and someone suggested localised hotspots may be an issue. Maybe @SteamyTea I do like the idea however, supposing your total area is 250m2 peak load is 2.5kW @10W/m². Assuming you want to bank the heat on a time of use tariff then 3* 2600w kits should work fine for a cost of about £350 plus install. Wet UFH will be about £1200 plus install. Spending weeks taking care of tiny details like airtightness and thermal bridging made me really resistant to installing any expensive heating system in our passive house despite the small cost of it in the overall scheme of things. It's 2⁰ and "feels like" -6⁰ outside. The house is pleasant all over, with one 400w rad in the sitting room downstairs. I've been running a 1400w heater from midnight to 8am too while the weather is cold. I put a cheap fan heater in the downstairs shower room last week to see what it's like and it is nice to step out to 25⁰ while toweling off. Noisy though.
-
Laminate here too. Happy so far.
-
Welcome and congrats. Surely electricity is available in Buckinghamshire? You'll be running a Genny otherwise mid winter or hand washing your clothes.
-
Any more info on the edge leakage for further reading?
-
Technically he may be right. One of the reasons I prefer EPS. I'm not sure if the products have improved since this test but it shows with no facer the insulation degrades faster. https://www.researchgate.net/publication/44073583_Long-term_thermal_resistance_of_Polyisocyanurate_foam_insulation_with_impermeable_facers

-
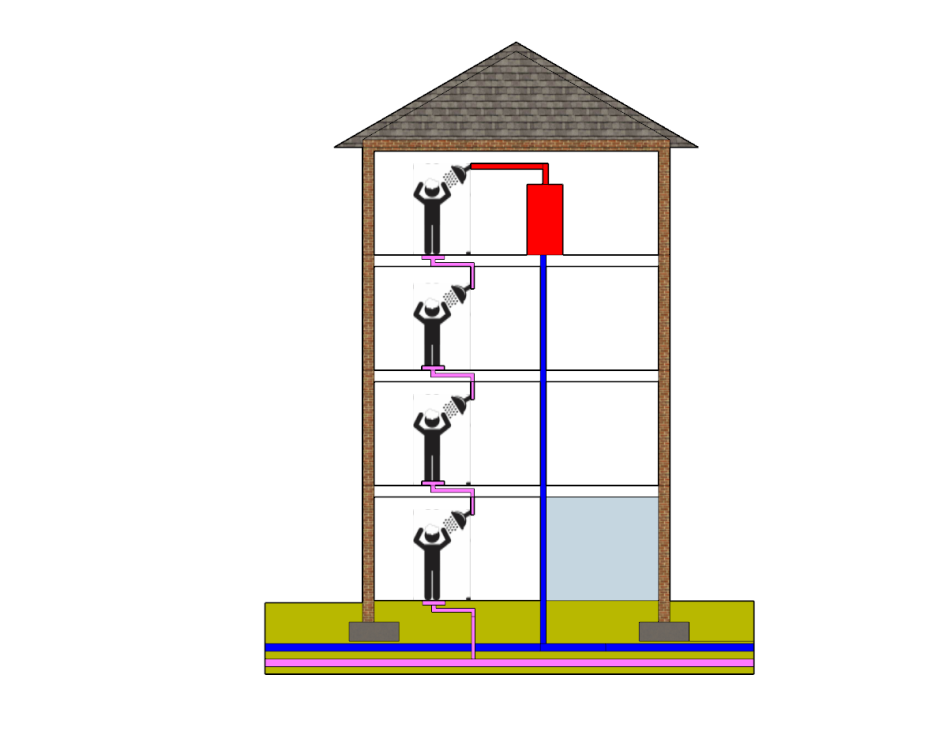
I just had a genius idea so did a quick sketch. 300l Cylinder. No problems
-
In fact scrap that, have a dedicated UVC for the showers for the "cold feed" that is full of water preheated to ~ 30deg by the drain water. Your normal UVC @50deg+ will last for ages when blended with almost warm enough water then.
-
This is an unusual requirement indeed You're limited by how much electricity you can suck from the wires. This can be multiplied say X3 by the ASHP and also buffered by extra storage but still you arrive at almost certainly unpractical figures for both. A third way that came to mind. Run the shower water through a heat exchanger preheating the UVC. They can run at 90% + efficiency but even if you were to achieve 50% overall you'd be 25kW better off re your total power requirement.
-
We have a 300l Joule direct UVC with 2 X 3kW immersions on a simple time clock that runs for 2.5hrs per night. The immersions are set to the max of 70⁰. The TMV blends everything down to about 50⁰ for the hot water manifold. From experimentation I reckon that the cylinders average temperatures is about 30⁰ when useable hot water stops coming out of the tap. From this storage capacity is.... 300kg of water X ΔT (70⁰-30⁰) X 4.2Kj/kg/K = 50.4Mj or 14kWh. This covers our daily usage of 10kWh just fine however if there are guests over we need to run the immersions for a few hours in the afternoon. If we were to store at 50⁰ we would only have 7kWh and need twice the storage volume.
-
Assuming you are really sorting the fabric of the house out first and foremost my advice is much the same as above. Wet UFH on ground floor only in a concrete slab in one zone. Depending on layout it might be easier just to chuck a few resistive UFH mats in the upstairs bathrooms. For DHW minimum 300l UVC. A plain-jane Telford or similar will be grand. Start by running a Willis heater if you like and see the running costs/useage. You may be satisfied as is. If you can get a good installer a good price go for an ASHP with weather compensation on a single zone. Like @TerryE said I hadn't expected to need heating in the late evening 6pm onwards in the sitting room so the rad does a few hours there. In fact I half expected/hoped not to need any heating at all like a neighbours passivhaus. They have superior thermal bridging characteristics though with an insulated slab and well detailed EWI. I don't know what temp they run the house at.
-
Your thoughts on this design?
Iceverge replied to Alan Ambrose's topic in New House & Self Build Design
Make it totally airtight! I being Scrooge came in today for lunch and was about to grumble to myself that my wife had been using the heating (a single resistive rad). I know, how dare she have the audacity to be comfortable in her own house that she's paying for! However turned out it had been off and the fact we had a couple of hours of sunshine earlier made the house warm up and being super insulated and airtight the heat just stayed put. I went and ate my brown bread sandwiches feeling a mix of idiotic and smug. Wife none the wiser. -
Your thoughts on this design?
Iceverge replied to Alan Ambrose's topic in New House & Self Build Design
Beware ply. It can be very variable and expensive l. Nothing against EPS or OSB for me in there place. Maybe specifically it's the oil based insulation plus the oak. Either way it's rubbish for decrement delay and in a lightweight structure can contribute significantly to summer overheating. PIR I'm not a fan of really. How about. Oak frame erected on site on insulated raft foundation. 15mm X 100mm strapping on the outside of the 250mm posts to allow 15mm plasterboard to be slipped behind them later simplifying that joint and reducing cracking. Then 22* 70 mm strapping to create a service cavity. The an airtight membrane applied from the outside and sealed. The a lightweight I joist or Larsen truss wrap around frame. Doesn't need to be structural, just strong enough to take the windows, insulation (blown cellulose preferably) and cladding/roofing. Then a taped OSB layer or woodfiber for Sarking/racking and windtightness. Then breather membrane Battens Counter battens Cladding. 300mm of insulation should give a genuine U value of about 0.13 excellent decrement delay, top airtightness, no waste or mess of insulation.