Leaderboard
Popular Content
Showing content with the highest reputation on 06/04/22 in all areas
-
Here's a pic of ours, been heating our house 'since Dec last year. Diy....maybe you can tell that from the piccy! It uses ~200g of R290, not an F-gas, but lots of care is needed. It lives outside, but inside the ongoing garage EWI to keep it a happy temperature all year. We still have the gas boiler plumbed in - Mrs RobL needs a year of heatpump use to be convinced we can disconnect. I say she needs more faith. It's 600W in, ~2400W out. Ish, as it's very hard to measure accurately the heat out. Standby loss is 2W from a micro logging stuff, there's no heaters, no immersion nonsense, no fancy clever stuff, just on or off and a few safety checks (flows, temperatures). I reckon it cost: £500 for the bits you can see and £1500 for the stuff under the ground you can't. And "some" time, which is of course, free:-)4 points
-
Attached is a rather long description of the ground source heatpump that I built at the end of 2021. It's completely diy - two 2nd hand fridge compressors(one for vacuuming down, one for the HP itself), bits of bent copper pipe, etc. I've encapsulated it as a pdf so that it hangs together in one thread, and should be an easier read. Thanks buildhub for a big filesize limit! I started out knowing vaguely what I wanted to do, then watching every youtube on R290 compressor systems several times, googling it, reading stuff on "Ecorenovator" etc. The youtubes are especially useful, watching people do things right - or wrong! I've been quite nervous about the safety aspect of R290 (propane) as the working fluid, and anybody who tries anything like this should be too. Propane is a great working fluid - it's not an F-gas, it has a GBW of 3, while most F-gasses are 1000+. But it burns well, so must be treated with great respect - used outside and kept away from flames and electrics. It was quite a steep learning curve - I'm ok at soldering copper pipes for plumbing, and regular electrics, but there was a lot to learn to make it work. Which it does, and we are happy with it - Mrs RobL doesn't accept any low temperatures in this house! There have been minor niggles (a fuse blew, lots of weeping compression joints in the water circuit before I watched a youtube on how to do them right). All the issues have been easy to fix, and I'm comfortable with the idea that I can fix them rather than wait for somebody else. DIY-GSHP-RobL-June2022.pdf1 point
-
If go with a slightly bigger ( 80-100L ) buffer tank, and a single stat. That’ll be simple and effective. The waste heat will be advantageous, so not a worry. Possibly install this in the airing cupboard?1 point
-
1 point
-
1 point
-
Reading this thread has got me thinking. Has anyone built a heat pump actually designed for the needs of a hot country? It seems the standard design either heats or cools water, by switching over some valves to swap over which is the condensor and which is the evaporator. But for a hot country where heating is never needed, then surely what is needed is a water to water heat pump that cools the house and the "waste" heat removed, instead of just being blown outside, is used to heat the hot water. Both functions all in one go. and if the hot water tank gets too hot, only then dump surplus heat outside. Does such a thing exist? (if not I better delete this post and start writing my patent application)1 point
-
Morning squire, not sure if it’s the right way but i would/do keep the plasterboard about 1/2 inch above the screed and use the wide joining tape to bridge the gap and maintain waterproof “tank” between wall and floor. A compressible foam could be used to fill the gap.1 point
-
https://www.sunamp.com/wp-content/uploads/2020/09/D0001-1.2-UniQ-eHW-Heat-Batteries-Installation-and-User-Manual.pdf Page 26 and 32. I found this whilst waiting for my coffee. Took around 45 seconds. Was very laborious and difficult, and involved typing 3 whole words on my phone keypad……..1 point
-
A few random thoughts. I'll start with what may be going through you SE's mind and their thought process. The 100 x 100 lintels tend more often to be what we call non composite lintels. In other words they act like steel beams say that "stand alone" and don't rely on having masonry above that interacts with the lintel / beam to create an arching / deeper beam effect. The 65mm deep lintels work in a different way, often compositely and they need to interact with the masonry above. In other words they are two different animals... but look very much the same. Now if you don't have say 4 -5 courses of brick above the lintel then you often need a non composite lintel. Also, on alteration work no matter how well you repoint the gap over the lintel you'll never get the same "bedding effect" that you get when you are laying the wall for the first time. You new mortar will shrink away so the brick above won't interact with the lintel to develop the composite action. In other words you can rule out a composite lintel on most alteration work. The difference in load bearing capacity is a lot so don't get caught out. You SE has probably also thought about how you prop the wall when you are doing the work and how much space you have to do this. They have probably also thought about what is above.. are there point loads from floor joists, maybe other stuff above, a door over lapping the opening, all sorts of permutations.. and that again rules out a composite lintel.. hence the 100 x 100 that is a non composite lintel. The 100 depth is say enough to carry the final loads but shallow enough for you to prop it? Before you go ahead mull this over. Be very careful about putting in any lintel orientated in a different direction from the manufacture's intention.. trouble ahead! Your weird 20mm cavity! What you probably have there is what we call a collar jointed wall. The two leaves are tied together with brick ties at much closer spacing than you have in a normal cavity wall and the gap between the leaves is filled with mortar... the gap is usually 10 - 20mm to allow for variations in the brick widths.. hence the 20mm you are observing. This allows you to design the wall using it's full thickness so you get more bang for your buck. In summary it looks like your SE has put a bit of thought into this. I would lift the phone to your SE before you start deviating from the design.1 point
-
1 point
-
1 point
-
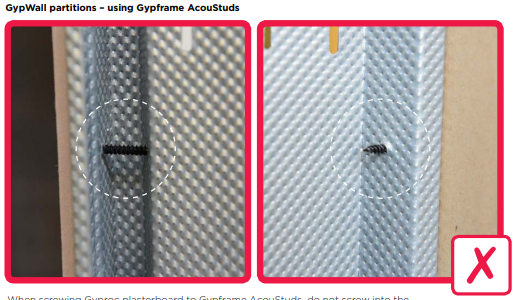
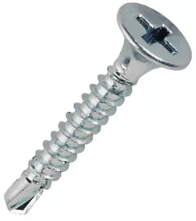
Top tip for Acoustic studs, use a different brand of screw. When inspecting a wall after the fact, if you've used a different branded screw with a logo on its head (e.g. Dewalt has DF on) or a BZP screw like the Screwfix ones it is then easy to inspect. The screws mustn't be too long (e.g. you want 25mm with a 15mm plasterboard) so if you only have 25mm screws of that type it's easy to check the correct screw has been used. https://www.screwfix.com/p/easydrive-bzp-bugle-head-fine-thread-uncollated-drywall-screws-3-5-x-25mm-1000-pack/258991 point
-
Thank you sir! Aye we worked our socks off, and through lockdown and lots of deaths in our family, plus pregnancy losses. Traumatic! But totally worth it 🙏🏽🙏🏽🙏🏽1 point
-
The programme of course make drama of everything! We have lots of friends in the tower blocks - it’s a great area near lots of new flats and beautiful houses along the river. The caravan was sadly burned…but we had abandoned it and the site for months as my husbands father passed away. We didn’t have site security at that point and kids must have thought it was abandoned as it was pushed to the back… Still horrific! 3 other houses are now well underway!1 point
-
And do what ..?? Are you an expert ..?? What if the bottom 2 courses of an 8 course block wall aren’t to your liking ..? Are you wanting the whole lot taken down and redone and at who's cost ..?? Build a relationship and trust. Talk to them, explain they are building your dream and not just throwing up just another box. Buy the bacon cobs on a Friday morning, make a brew occasionally… pick up a brush and do some tidying … but above all, treat them like decent humans who are earning a living doing something you either can’t or don’t want to do … Finally … don’t assume they are all the same please, it will get you nowhere… trades talk, and if the builder thinks you’re an arsehole, then the local trades will all soon know too …1 point
-
Our SE told us that fibres were not considered as too expensive. I think he may have been thinking of steel fibres as used for airport runways and for military tank strength. The plastic fibres are made by SIKA who were very helpful in persuading the SE that this was not something new. Local concrete suppliers both quoted an additional £9/m3 for fibres, so you can work out how much cheaper this is. The only trouble is that it is sticky to handle (no slump). I first used fibres about 35 years ago. There are issues, but as a sub-layer I have no problem in specifying it. We will use 150m2, so it saves us a lot. Steel mesh provides a little comfort if the ground is iffy. But with rock underneath nothing is about to move.1 point
-
1 point


