saveasteading
-
Posts
10644 -
Joined
-
Last visited
-
Days Won
90
Everything posted by saveasteading
-

Stud wall sound insulation question
saveasteading replied to jfb's topic in General Self Build & DIY Discussion
I don't agree. Sound insulation isn't dense enough to transfer sound by impact/reverberation through to the next room. In any case the stud is probably doing that. For higher frequencies and especially airborne sound, keep the full thickness. Especially make sure the full area us filled to the edges as sound leaks through gaps. -
Screws for Oven Handles
saveasteading replied to Ferdinand's topic in Kitchen & Household Appliances
You must join the club of salvagers of handy screws. These things tend to be fairly universal so you need a tin of screws. Seriously, I find 9/10 that I have just the thing. -
Once had to put in 4 rods, spaced 5m apart and 3m deep to get enough earth conductivity. Prior to that project it had always been more casual. It was as big supply, but I assume the principles apply, of getting an acceptable reading. The holes were bored oversize, then filled with bentonite slurry, which was easy enough to get, as it increases conductivity quite a lot.
-
Shorter drainage run - to save me some digging!
saveasteading replied to lstevensuk's topic in Waste & Sewerage
I would position the new chamber further from the house. Doesn't clash with the house construction, plus the flow is a more direct route. It would be essential first to prove the depth of the existing drain at a proposed connection point. Bear in mind that rodding chambers generally lose height at branches but maintain it at 'straight through' connections. Look at one on line or at a merchant to make sure. -
Shorter drainage run - to save me some digging!
saveasteading replied to lstevensuk's topic in Waste & Sewerage
How deep is it? Adding a rodding point C, nearer to the house may be easier than revising the B connection, especially if light duty (no cars). -
You can also link more than one using tank connectors, so that one dp feeds them all. In the winter you can even leave the tap slightly on, to dribble away and attenuate the flow. Did that on a big workshop once, as an official solution, accepted by the Environment Agency.
-
I like gyproc easy fill. As a non expert I find it flexible and forgiving, I think due to latex in the mix.. Also as it powder you can make it to suit. It is a big bag though. But a premixed filler should work fine.
-
If the gap is very small then you can patch in the sides of the hole by say 2mm, using filler or plaster. That might just work with your non-circular holes. How the unit clips in may, or may not, work with that. Or As above find repair rings. Or there are optional bezels, for appearance but would also perform this repair function. The trouble with the last 2 is whether your light would fit through the bezel. Or buy a new light that fits the hole. the hole not being round isn't helping choose a size.
-
Because they nearly always are. It is understandable for services, as uk wages and cost of living are higher than many. But for materials there has always been an uplift in crossing the channel. Because they can. Electricity crosses the channel too, this way only.
-
A shadow gap might help too. Lining the render straight over the join is bound to crack, so prodaves bead, and perhaps recess or express it.
-
Screed thickness with UFH, over PIR. How thick?
saveasteading replied to saveasteading's topic in General Flooring
Useful info thanks. I won't publish our quotes as it is a live discussion still. In principle though we have a bigger area and higher price. If we could do it in one pour then getting closer. -
How does your garden grow?
saveasteading replied to recoveringbuilder's topic in Landscaping, Decking & Patios
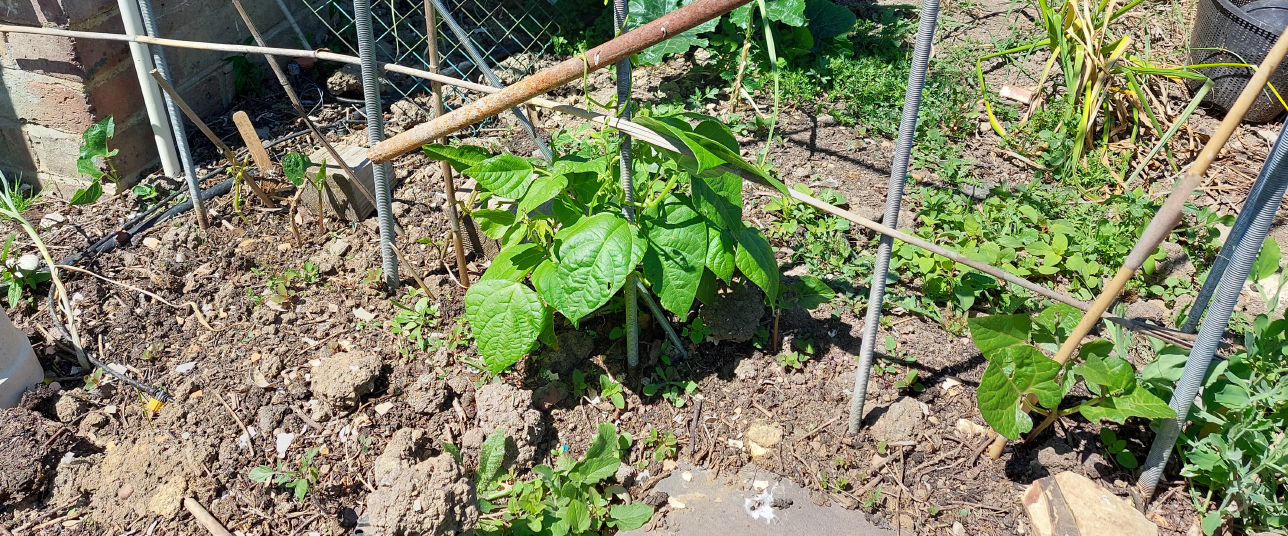
Only fair I should show my poor display of beans. And I had the cheek to give advice. In fairness to self, I have been away a lot at the project. from the left: 2 inch high from bean pushed into the ground 3 weeks ago. 3 inch high stem, denuded of all leaves and just sprouting some more: planted in pots 2 months ago ditto but kept some leaves so is growing A proper bean, a foot high and multi stemmed. it might be enough on its own. Planted in pot 2 months ago and escaped the snails somehow. as '1', but growing ok sweet peas to encourage insects if ever there is a bean flower. Far left sacrificial salad plant to delay the snails . Behind a couple of garlic plants to confuse the snails. and a courgette growing nicely at last. All other green is weeds....carrying no-mow May into not much weeding June. You may notice irrigation pipes. That will work when we are at 'the project' until the batteries or machine fail. Garlic water also applied....so easy I just broke cloves and chucked them in a bucket of water and they keep emanating into the water.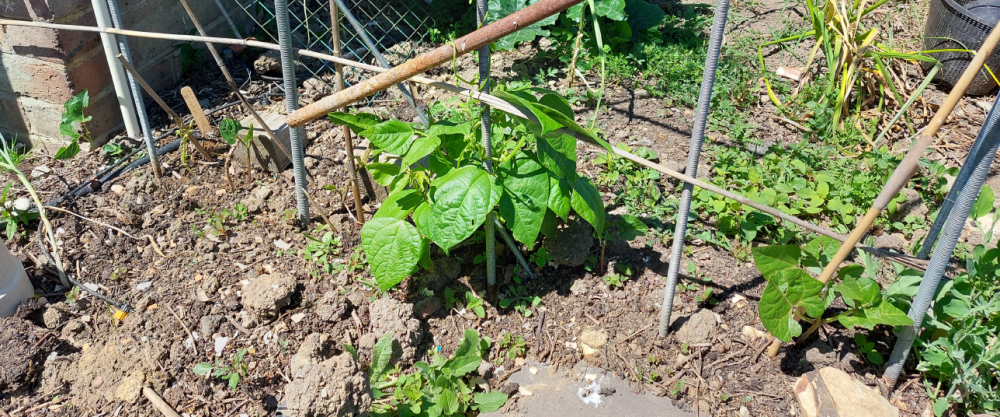
-
Praise where due. Having advised our family on site that scaffolders are a different breed, and to prepare for some chaos: this message today from site. You would be pleasantly surprised by the scaffolders: very nice guys, proud of their work and company, and did a full tidy up before they left.
-
Screed thickness with UFH, over PIR. How thick?
saveasteading replied to saveasteading's topic in General Flooring
Have had quotes from local specialists. The surprising thing to me is the sheer cost of the Cemfloor material, at about 3 x the cost of concrete. That helps in the sums Nobody has come back on saying 75 screed has advantages. So we will now get PIR prices and see what thickness is likeliest so that we have 140/150 of PIR then 60/50 of Cemfloor. We haven't even prepared the ground on half the building, so could go a little deeper, but I'm happy with that PIR thickness. -
You can do it yourself and get the same or better results without solicitors. You know what to do, and people here have confirmed it and made suggestions. The personal approach with some confirmation in writing/emails. I reckon it will go away. What i don't think has come up is the nagging of family and friends...maybe he has been spurred into this action., and a reasonable approach by you is all that is needed.
-
Screed thickness with UFH, over PIR. How thick?
saveasteading replied to saveasteading's topic in General Flooring
No insulation ordered yet. 125 theoretical thickness which may turn out to be 120. Also wouldn't want to find a wobble in the existing concrete base that made the screed less than 50. My main argument for thicker screed is that I think i recall someone on BH recommending a thicker screed to make better use of offpeak electricity. But it would then take longer to react in the case of a cold turn, and waste heat if the temperature improved suddenly. With the diminishing returns proportional to depth, it could be reasonable to lay eps 25mm ish on the bottom, if that makes the thicknesses add up. -
Opinions please Cemfloor 50mm or 75mm? We have designed the floor as 75mm Cemfloor over 125mm PIR. Two contractors have suggested reducing to 50mm to save cost, implying that this is the normal thickness. We can do this simply by increasing the insulation thickness. The 75mm was not chosen randomly but from research on BH and elsewhere. Very roughly the extra cost of insulation would be £10/m2 in PIR (or £5/m2 in EPS), and the saving on screed about £5/m2, so the premise of saving construction cost is wrong. However, the question is interesting...A thicker more robust screed with greater heat absorption property, but slower to react? Or more insulation?
-
wanted - Simpson ICF hangers ICFVL-CW
saveasteading replied to IanMcP's topic in Insulated Concrete Formwork (ICF)
We have found that the Engineer tends to select a Simpson product as a habit. One costed £42 each so we suggested an alternative at £4. "Fine". A rafter hanger at £19. Replaced by a standard one at 62p. x 30 and x 80 that saved us a lot of£. However nicely designed, it is a bracket, so check for alternative manufacturers. -
How many showers have you had , and thrown the clothes in the bin?
-
I think I see their logic. Without detailed analysis of the aquifer, the certainty of supply and quality might be in some doubt. Proving it would cost more than a tank. Plus, if there was any problem with supply, a tank allows for filling from a visiting bowser, giving you a few day's supply. Having looked into this recently (tank needed for feeding from a spring), the tank isn't too expensive, but it all ads up.
-
That has always intrigued me. How can it have no factor of safety as an agricultural building , but suddenly be ok for domestic use. I asked a respected BCO and he said that this is not overlooked, hence most such need additional foundations. Perhaps yours has additional support.
-
Whatever the 'out' level is controls the level of the standing 'liquid'. Also we want the 'in' pipe to decant all its contents and not have anything left in it. So out should be 100mm or more lower than in. Whenever some liquid enters the tank, the same amount must leave, preferably cleaner, hence it needs some barrier to the stuff going straight through.
-
Widening chimney fireplace opening
saveasteading replied to JamesF_80's topic in General Structural Issues
The chimney breast will contain another chimney from downstairs. Upstairs fireplaces in Victorian house were often very small, for a tiny coal grate. I would expect that all you can cut out is any bricks that narrow the opening but you can get your hand behind. Even then , this is dabbling with a standard construction so the condition of the building is important. At least you have the chimney. Many houses have them cut out to increase the room space, and very often without proper support in the loft. You will have responsibilities and conditions attached to your ownership/lease which must also be followed. SE required, and the answer may be no, you cannot do it. Alternatively apply for building regs and they may say yes or no from their experience, or require an SE. A picture would help. -
How does your garden grow?
saveasteading replied to recoveringbuilder's topic in Landscaping, Decking & Patios
If that was the only worry we would all be much happier. -
Undevelopable building plot ???
saveasteading replied to Christian123's topic in Building Regulations
I haven't re-read the regulations. However it is important to note that the great big document is of guidelines and suggested solutions. Only the little green section is 'the regulations'. Your challenge then is to propose a solution that deals with the supposed issue. As all sites are different the risks and solutions are also different. The reason for the distance is to allow the water to disappear and not to upset the foundations. The facts that the soakaway was a surprise, and that yours is far away will help the discussion too. Therefore a barrier between the two might work, or the foundations just a little deeper. If it has building regs approval, I assume this was before discovery of the existing soakaway. There is no guarantee of this being approved, and we would need to know much more before giving you more certainty.