markocosic
-
Posts
979 -
Joined
-
Last visited
-
Days Won
1
Everything posted by markocosic
-
MVHR unit sourcing
markocosic replied to KM A4's topic in Mechanical Ventilation with Heat Recovery (MVHR)
5 below is cold enough to freeze units with decent heat recovery unless they revert to extract only mode. (most do - check manual) Not a big deal in UK. G4 filters don't do enough to prevent diseasel PM2.5 fouling the core IME. I'd like to do better on the next install with some big pleated panel filters. -
MVHR unit sourcing
markocosic replied to KM A4's topic in Mechanical Ventilation with Heat Recovery (MVHR)
Meh...everybody is getting covid...the only question is when. Disabling rotaries in a commercial setting helps but frankly in a pandemic you probably shouldn't be in a commercial setting in the first place. In a single home resi setting it matters not a jot. Their advantages being that rotaries don't freeze in cold weather; and can be cleaned; whereas enthalpy exchangers need preheaters in order to not freeze in cold weather and can't realistically be cleaned with dissolving to mush. In the UK climate you're probably fine with freezable and drying but cheap and cleanable PVC only. Doesn't get too cold often enough to care about low humidity or needing a preheater to avoid the mvhr turning into an extract fan in cold weather. -
Ecodan standby power consumption
markocosic replied to LA3222's topic in Air Source Heat Pumps (ASHP)
Scrolls aren't damaged by liquid slugging the same way that reciprocating compressors are. They also are less bothered about the refrigerant being mixed with the oil at initial cold start. Buildings that need cooling in a cool climate might still need heaters though. CTC, Nibe, Thermia/Danfoss etc all use scrolls. It's the eastern AC manufacturers who use recip units. Compressors won't be cold during the heating season if they're running 24/7. Intermittent use is another matter. You could get clever and only preheat when required. But if it isn't captured by official tests you can be they'll err on the side of maximum electricity use / minimum warranty claims unless making an explicit thing about performance of that element. -
Ecodan standby power consumption
markocosic replied to LA3222's topic in Air Source Heat Pumps (ASHP)
If I remember rightly the Ecodan units don't have a dedicated crankcase heater - they energise the (stationary) compressor windings to heat it up internally. It shouldn't be necessary at all when the unit is actually running (e.g. 24/7 in a cold climate) and shouldn't be necessary when it's warm out but I wager the UK climate will fit neither of those requirements for much of the year. Stupid design in my view but that's what you get by bodging warm-climate rotary compressors meant for air conditioning into heat pumps. The better units will use scroll compressors purpose designed for heating that don't need crankcase heaters. Do verify the draw using a real meter though (do you have a smart electricity meter that does instantaneous load?) as it could be an artefact of a noisy power supply etc. -
That's pretty much my setup (used panels, used 3.6 kW Aurora with £30 of new relays fitted) In hindsight I'd flog the repaired inverter (has value as a convenient like for like swap for somebody with a failed one) and buy a smaller new one with the proceeds. 1) The low load efficiency isn't going to be ideal 2) It whines audibly when running at above 1kW (caps probably dying; old slow silicon inverting at a low switching frequency) Can't be bothered now that it's up though. 🙂
-
MVHR unit sourcing
markocosic replied to KM A4's topic in Mechanical Ventilation with Heat Recovery (MVHR)
No import duties on EU goods. VAT and an admin fee by the courier. Currently CE marked goods are still acceptable. This may change on 31/12/22 but I expect they'll just extend CE / UKCA recognition again. If going fancy a rotary unit might be of interest - these recover humidity in winter that can be helpful: https://www.komfovent.com/en/c/products/air-handling-units?taxons[0]=ahurhp Importing would be about £4800 vs £6800 from BPC; plus shipping. https://www.gedarta.lt/rekuperatorius--silumos-siurblys-„oras-oras“/rekuperatorius--silumos-siurblys-domekt-rhp-400--2824-kw If they price matched to £5k it wouldn't be worth the effort. Probably won't though as I don't think they stock these so would themselves be hot be the same one off shipping costs. -
Flue options - vitreous>twinwall or 100% twinwall?
markocosic replied to markocosic's topic in Stoves, Fires & Fireplaces
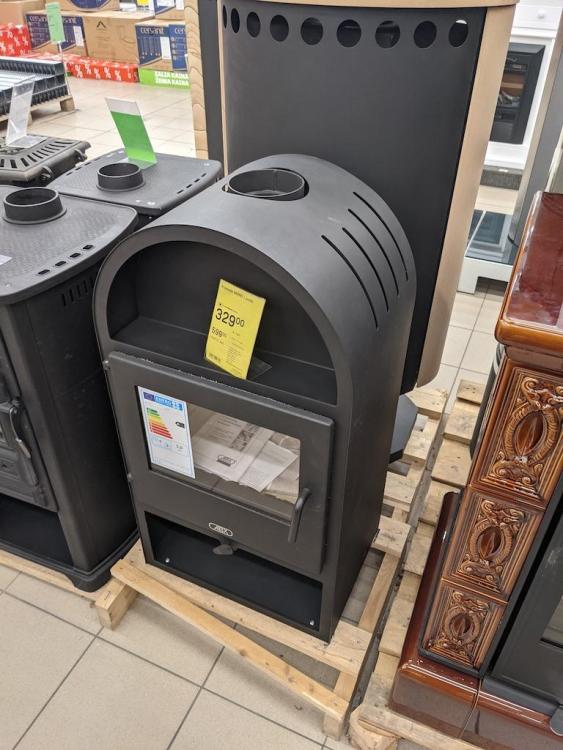
Thanks folks; more food for thought there. Heat loss: 1) From the *OUTER* wall. A 230 mm OD flue will lose more than a 180 mm OD flue. There's more cold wall punched through the house. This is where I don't see the benefit from more insulation on the flue. 2) From the *INNER* wall. That's 130 mm no matter what. Having it exposes loses more directly to the air when not in use (if it's warm that means you're losing heat through it through convection currents within that pipe?) There probably won't be losses from the outer wall through the insulation to the inner wall. As in you lose enough through the outer wall conducting directly to the outside that you don't see any benefit from 25 vs 50 mm insulation between this and the inner wall. Are there any passive house types who have analysed this 25 vs 50? Is there a historic reason that 50 exists and 25 never used to be an option? 3) From the length of the flue when not in use. Short flue out the back always loses less than the large flue out the top. As such option 2 should be out and so should option 4. Option 3 should win over option 1 and it looks a lot ore reasonable "in person" than "in the trolley" at the DIY shed. Actually no, 13 cm is tiny, 18 cm isn't that big after all, though 23 cm is starting to push it. (roll of roofing membrane is 18 cm) Short and out the back with an external flue still wins though. The big going through the wall it hotter now but the only bit likely to ever get a soot fire is outside so meh. Again smaller in real life than it looks in the shop. She says it's ok after all. Winner due to no roof penetrations in an important space. Material - decide to go with 316L (the better one) for robustness against low-output potentially condensing operation. Stove - it's rated for 2.5 to 7 kW operation; which I think is fine on this basis: Gypsum is 1000 J/kgK which means each m2 of double layer plasterboard needs 24 kJ to raise it by 1 degC. 325 m2 of wall/ceiling plus 170 m2 of floor (which for arguments sake lets say has the same heat capacity) gives 500 m2 and 12,000 kJ to raise it by 1C. 6 kW. does that in 30 minutes. 3 kW in 60 minutes. If you're down at 5C (because it's been left at setback - this is a cabin - then you're talking a 7.5 hour burn at 6 kW to before the walls/floors/ceilings stop sucking out heat...so I think it'll be fine for reheat from cold or for an evening burn in a cool building. Winters are not tropical here and even with 30+ cm of mineral wool everywhere and MVHR you're still averaging >1 kW from Nov>Feb if wanting to keep the place at comfort temperature. https://weatherspark.com/h/y/148554/2021/Historical-Weather-during-2021-at-Vilnius-International-Airport-Lithuania It isn't the best. It's ok - external air feed, well built but no other frills, 80% efficiency rating. Nothing else on offer was materially better in terms of 'useful' features. Prettier yes. Functionally no; so I picked it up whilst there was still one on the shelf at that price! I'll give it an additional flue damper to reduce the draw once lit. Beyond this I think you're looking at adding a catalyst to do materially better. (on the bucket list) https://www.youtube.com/watch?v=96kA_Cwye04 https://www.youtube.com/watch?v=JHIJ9vbfF_0 https://www.youtube.com/watch?v=LjQemZThSv4 etc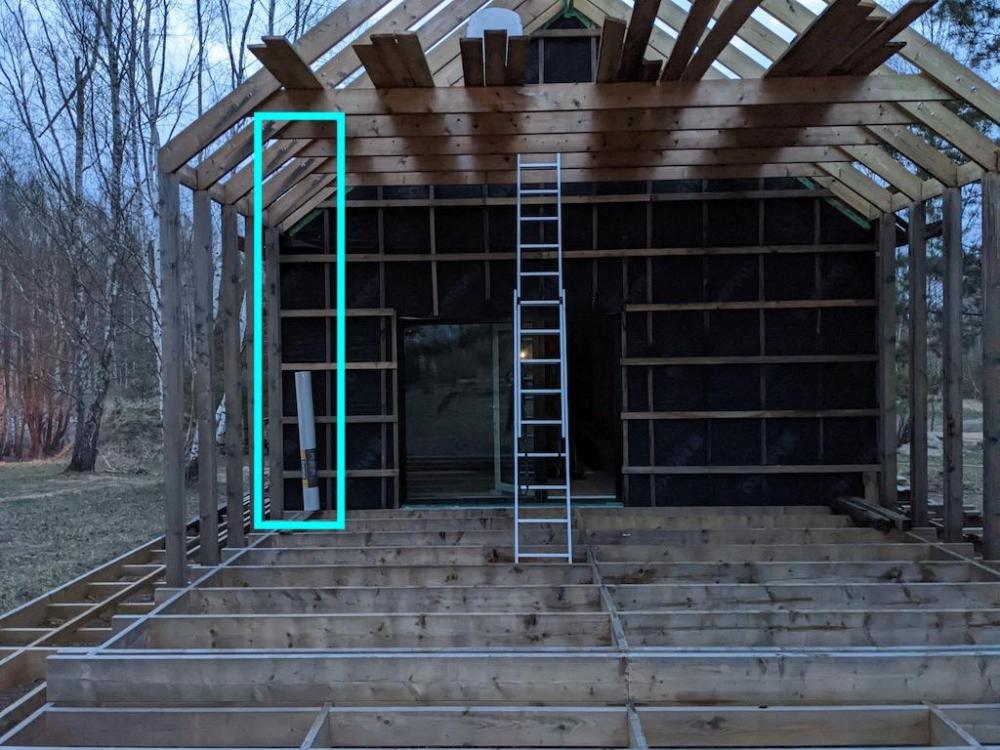
-
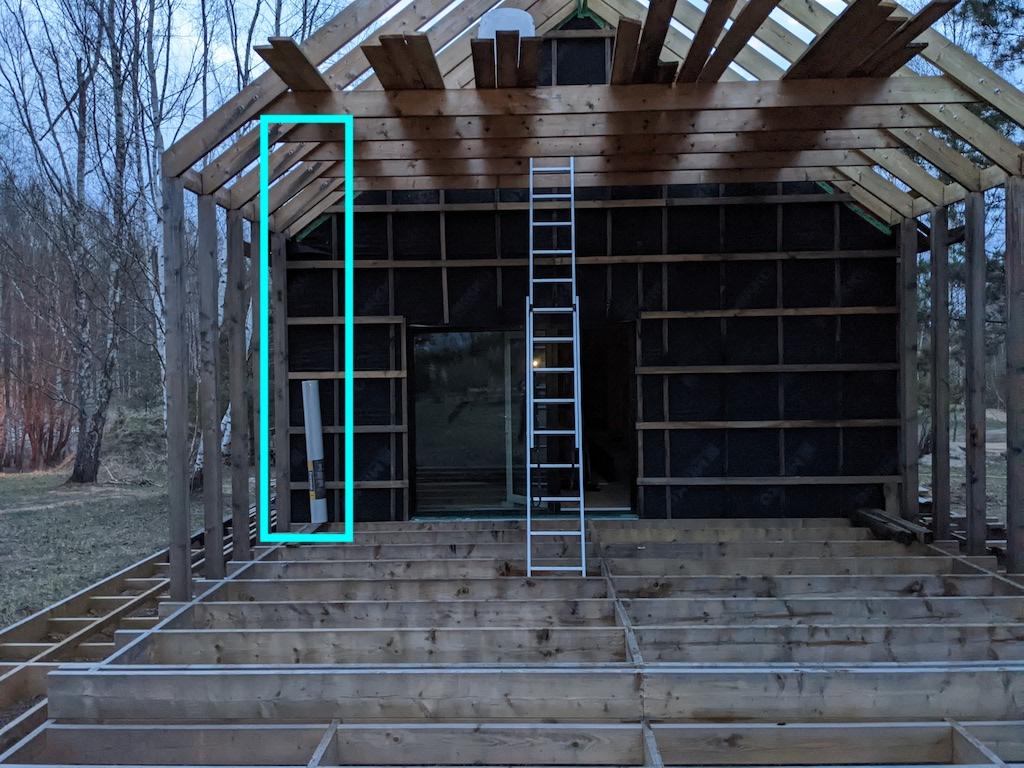
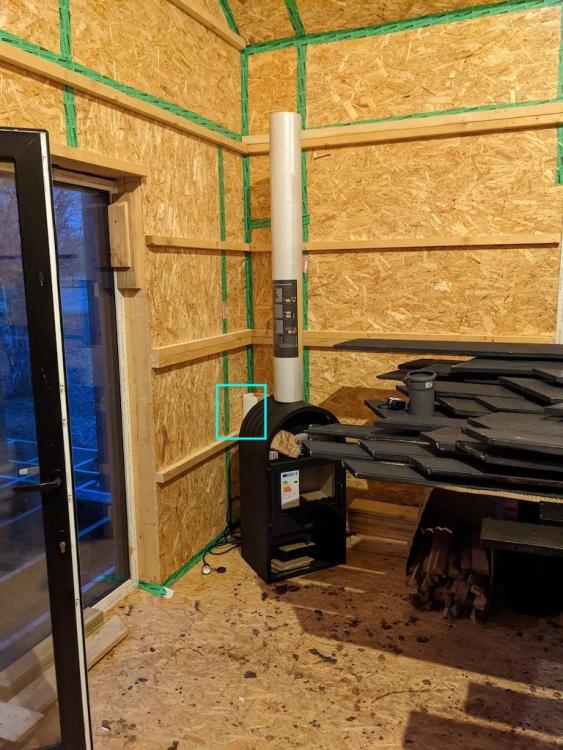
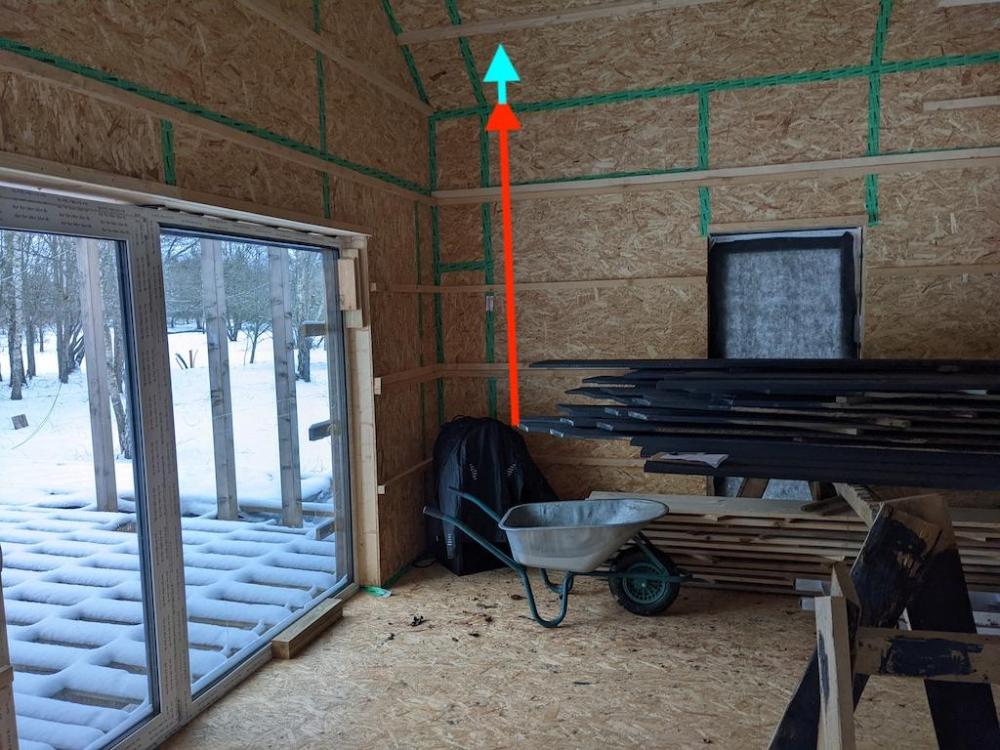
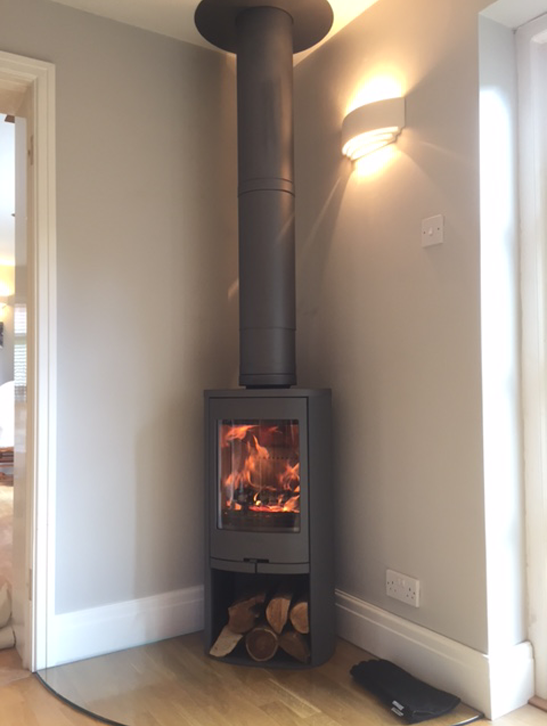
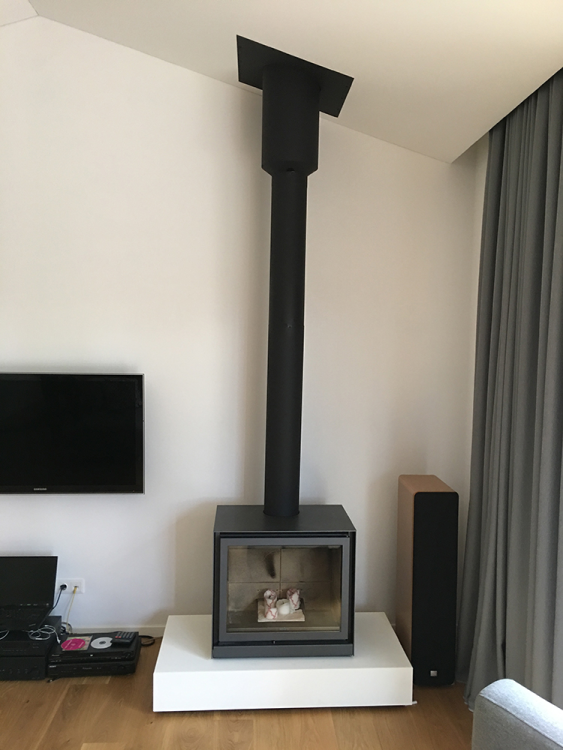
Could I pick some brains on flue selection please? The previous plan to go out through the wall and run the flue up the gable has been rejected by she who must be obeyed on visual grounds. "OMG that's enormous and fugly" Stove 5 kW 500 mm wide / 950 mm tall 130 mm flue outlet on the top (or out the back) 100 mm external air feed from the back Flue gas temperature at nominal rating 230C Flue I'm probably going to buy from these folks - locally made and can be bought in custom lengths and custom colours etc if desired - but would like to sanity check 25 vs 50 mm insulation. https://www.sauresta.com/en/products https://www.sauresta.com/static/files/3/54/354/Dumtraukiu_instrukcija_EN_Rasu_2018-10-26_No7.pdf Systems: - 130 mm single wall stainless (can get black iron to match the stove elsewhere; vitreous enamel isn't really a think here) - 130 mm twinwall with 25 mm insulation (180 mm total; Wet operation rated; L50 / 316L liner; sootfire rated and 70 mm to combustibles) T450-N1-W-Vm-L50(050-100) - G70 - 130 mm twinwall with 50 mm insulation (230 mm total; Wet operation rated; L50 / 316L liner; sootfire rated and 50 mm to combustibles) T450-N1-D-Vm-L20(050-100) - G50 Install location It's going in the corner at a 45 degree angle. It's a convector type so it only needs 200 mm clearance to combustibles. This puts the flue centreline - if mounted directly on top of the stove that's hiding under a jacket in the corner - about 600 mm from the wall (marked with red/blue arrow) and far enough clear of the rafter that is behind the green taped joint for either the 180 mm with 7 cm clearance or the 230 mm with 5 cm clearance to miss the house structure. There would be a hole in the OSB (airtight layer) that is the flue diameter plus 5cm or 7 cm as appropriate. Options 1) Run 50 mm insulated (230 mm outer diameter) twinwall the whole way. Stove = 975 mm (once it is on some flooring Adapter = 100 mm (1075) Damper = 200 mm (1275) 4x 1000 mm sections = 950 x 4 (5075) 1x trim detail on the vaulted ceiling 1x airtightness seal at OSB level 1x restraint at rafter level 1x airtightness seal (watertightness seal) at roof membrane level 1x cowl at roof level 1x top closer = 115 mm (5190) 1x diffuser = 200 mm (5390) The ridge is about 5850 mm so we're almost at ridge height here. The roof is between about 3400 and 3900 so there are no joints inside it. Every piece of twinwall is clamped tight. The restraint at rafter level holds the flue near the middle, the stove holes the flue at the bottom, and gravity does the rest. There's a cowl/clamp on the OUTSIDE of the roof to hold the flue "part way" Benefit - simple Benefit - mechanically robust Benefit - marginally better insulation when not in use (less area exposed directly to outisde in that you have the thermal bridge from the outer wall of the flue but none of the inner wall is visible Downside - dear lord is 230 mm large compared with the stove and with the curved top rather than a flat top to the stove it will probably look silly and be my fault. e.g. 2) Run the first 2 metres in single wall then 50 mm insulated twinwall the rest of the way Swap the damper and the first two sections of flue for single wall black iron and convert near ceiling level Downside - this is probably wobblier mechanically and might need external supports? Downside - I can't imagine having much success colour matching black iron, vitreous enamel, and painting twinwall flue ending up the same colour after 5 minutes Downside - two metres of single wall flue that's as cold as it is outside when the stove isn't in use (heat pump is probably main source of heat - stove is there for the love of burning things / clearing up windfall from the land / fast reheat from cold) Benefit - we think prettier though you still end up with a +100 mm diameter "blob" at ceiling level: 3) Run the lot in 25 mm insulated twinwall At 180 mm overall this seems to be a good compromise between the visual bleurgh of the 230 mm twinwall and the faff / cold of running single wall then converting to twinwall. Aside from the 50 vs 70 mm clearance to combustibles - which is neither here nor there - what is the benefit to running with 50 mm insulation vs 25 mm insulation on twinwall? Part of me thinks salesman wants to sell 50 mm twinwall because slightly spendier than 25 mm. Part of me thinks that this is just what people use around these parts when the similar diameter flues are in use on larger appliances and larger buildings. (150 and 200 mm internal diameter are standard in the DIY sheds) Part of me thinks I'm missing something obvious but can't for the life of me work out what! 4) Hide it in the corner and DIY shed the lot? 150 mm ID / 250 mm OD twinwall is stupid cheap if you're ok with galv mild steel outside (fine if being primed and painted to match the roof) and 304 stainless inside (fine if only ever burning dry) - €42 per metre https://online.depo-diy.lt/products/6252 We could...run a 150/250 twinwall flue right in the corner of the room. (to the left of the green tape showing where the rafter is) Rest the flue stack on the floor. Use a tee to take either the rear-exit outlet from the stove. False wall to hide the flue entirely. Pain the bit you see on the roof to match the roof. Condensate drain and fresh air inlet could be done the same way (150 mm plastic duct feeding 150/250 twinwall flue that joins the outer wall of the main flue but has a condensate drain pain to separate the two sections). I've not found a good picture of this to show she who must be obeyed though! Thoughts? I'm leaning towards 3 or 4 unless a daft idea.
-
I stand by my statement that Brookvent are a bunch of grade one c*nts not to be trusted with a 40' bargepole. Why? The earlier unit is very easily repairable - knife the seam, swap the fan, reglue the seam - but the company (a) REFUSE to sell the spare part and (b) prohibit the original equipment manufacturer from selling the spare part to anybody else in order to force you to purchase an entire new MVHR unit. They don't repair them themselves; they supply new assemblies only. From what you're saying evidently the NHBC got fed up with claims (which says something about the failure rate) and forced them to produce a slightly more modular unit. So I'd still eliminate them as a supplier on the basis of their being harks. Dubious commercial operating model / moral integrity. Taking a look at companies house from brookvent is also enlightening. The name might be but the business that sold these units won't be around for future warranty claims.
-
Getting these up to the low level roof (roof 3) looks easy. - Put them on the floor under the high roof - Straps on the ends of the roll (good bit of wood through it; straps secured to the wood) - Straps over the joists - Pull 50 kg each end of the strap (one end at a time and secure it if billy no mates) - Swing it through the gap under the RSJ onto roof 3 when it's high enough Do that for both rolls. - Fashion ramp from roof 3 to roof 1 - Drag it up the ramp from roof 3 to roof 1 using straps What am I missing here?
-
Hybrid inverter for small in roof 2kw array - help please!
markocosic replied to Timmyk's topic in Photovoltaics (PV)
No internal DC isolator. So you need more gubbins to fit them which will look ugly take longer and end up costing more. No monitoring via WiFi. Unless you buy more widgets. Mppt range and startup range ok. If you're sorting by price then do remember to include all the extra bits. You might want to ask your installer what they're prepared to fit too. -
Hybrid inverter for small in roof 2kw array - help please!
markocosic replied to Timmyk's topic in Photovoltaics (PV)
East West need 1 mppt each. Optimisers not useful if not shaded. Two small £250 inverters require you to mount with 8 screws and connect 2 AC cables. One big inverter with dual input requires 4 screws and 1 AC cable. They can share the cable running back to the consumer unit. The DC side is identical. These even have the isolation switches and WiFi built in. It's all of 30 minutes work to screw both units on the wall and wire them. Most of the work is getting the DC cables to them and the AC cables to them. I don't know of a low power dual input inverter with dual DC isolation switches built in that's compatible with your current ratings and costs £500. Search by all means but this is what I decided was best for a small south + west arrays on my own house. When my hideously oversized and inefficient but £50 3.6 kw dual input Aurora inverter goes pop that is. Can't justify £450 to replace what already works given that I'm spilling much of the generation as is. (1x "1.6 kW" array, 1x "1.2 kW" array, but built from £140 worth of secondhand 20yr old panels with bad orientation, because they were there on eBay and nicely offset the daytime hotel load) -
Hybrid inverter for small in roof 2kw array - help please!
markocosic replied to Timmyk's topic in Photovoltaics (PV)
Depends on shading - two inverters is simple (and they're cheap / not mounted on the effing roof under the effing panels, for when they fail before the panels do) - but optimisers will make better use of the PV in shading conditions -
Hybrid inverter for small in roof 2kw array - help please!
markocosic replied to Timmyk's topic in Photovoltaics (PV)
Good thinking - it's great seeing "will do what I can do" 🙂 You need to consider: - Max current - Max open circuit voltage of the string (not going to be a problem for a small string) - Minimum startup voltage and MPPT tracking range for the string (can be tricky with small strings) - Shading (with conventional inverters you'll want one MPPT input for east and one for west) - Maximum DC power / AC power (it's usually ok to attach more panels to the inverter than it is able to convert to DC; output will only be clipped occasionally) Don't go too big. The efficiency of inverters is poor at low load. If the shading isn't horrible I'd stick in a pair of these:in the appropriate (overall power) rating. One east. One west. Does 15A. Has WiFi. Stick them somewhere that you can access them to replace them later when the fail. https://midsummerwholesale.co.uk/buy/sofar-inverters/sofar-1100-tl-g3 Else keep it stupid simple. Panels that work with any old inverter. Put the inverter somewhere easily accessible. They're the only bits that really fail. No solaredge stuff. They company appear to be grade one a-holes and it's pushed hard by sales because once it's on the roof you're stuck with it due to the cost of getting up there to rip it out. https://www.mcelectrical.com.au/solaredge-inverter-optimiser-review/ Batteries probably don't pay for themselves over their lifetime. They don't last forever. Do the math on the how much each charge/discharge effectively costs you and you'll probably decide that the batteries aren't worth it. PV on the other hand 30+ years. Inverters 15+ years. I think you push panels down the front roof to avoid the chimney shading. Push the panels on the extension as far away from the house as you can to minimise shading. The panels are made in strings. If you shade the bottom of a portrait panel then you shade all three strings and you knock out the panel. If you shade the bottom of a landscape panel then 2 of the three strings still work, the bypass diode will bypass the third, and the panel will produce. Depending on your shading landscape may (often will) perform better. On-roof fit installers hate landscape because it needs more rails and you're faffing more finding rafters etc. With GSE trays it matters not one jot. https://www.sciencedirect.com/science/article/pii/S0038092X21003868 If you do need optimisers go with Tigo. They'll work with any inverter.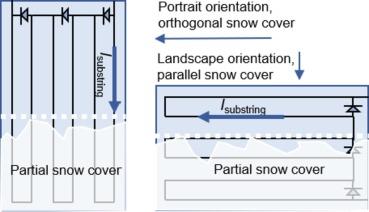
-
Concrete is reasonably idiot proof is why not; in the main part. And clay; clay is rubbish for bearing strength. And banks; banks want properties that remain saleable at any point during the loan period. Even if it's theoretically ok if they were worth zero once the loan was repaid... http://www.geotechdata.info/parameter/bearing-capacity 100 kPa means 10 tonnes per square metre. Or a 3.5 tonne transit van on a 60x60 cm paving slab. A few 60*60 holes rammed full of rocks happily carry 30m2. Spacing limit is probably how bendy your floor beams are.
-
I don't think you need strip foundations. Dig hole. Ram with rocks. Move over. 6-10 feet probably works best. Dig hole. Ram with rocks. Big rock or a block on top to finish. Build your frame up off of these piers. For single storey 30m2 it's very unlikely to blow away unless in an exposed area and made of nothing. Sand between joists for ufh would help see to that too. One could probably also use mud even. Nice clay bake! I don't think it needs ufh in a UK climate if the insulation is good though. Is it internal for area that counts for the 30m2 rule? So no incentive for thin walls where space allows?
-
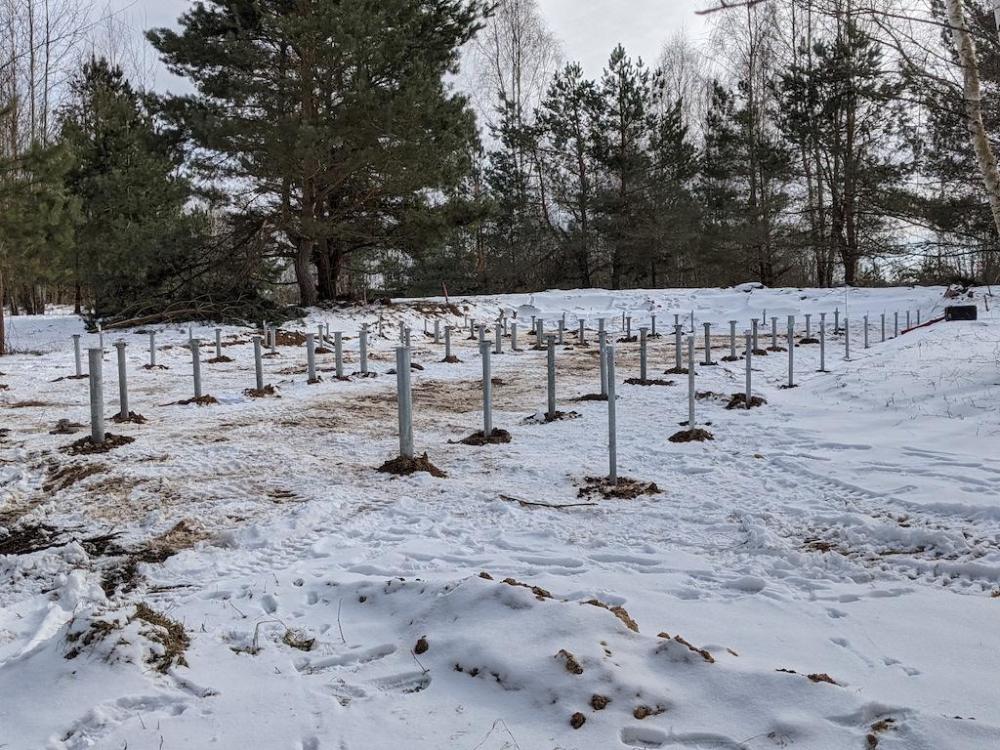
Some thoughts...not tried either as yet but wish I'd thought about it / she'd asked for it before we laid the floor! https://www.youtube.com/watch?v=Z4jShqK6qNQ https://www.youtube.com/watch?v=1-TrFIcxPjU Though to be honest for 30 m2 and insulated well might you just... https://www.saturnsales.co.uk/Panasonic-Etherea-CS-Z20XKEW-Inverter-Air-Conditioning.html More than 1 metre from the boundary and less than 29.9 m2 largely solves building control I think. Dig down (scrape off topsoil) then pop your screws in and suspended floor above if you're trying to keep overall height down? This is chuffing heavy and hasn't sunk yet FWIW. I think (I hope!) they're fine for houses not just Screw piles and ratings from here: http://pamataisraigtiniai.lt/en/ 0.75 tonne each for sand; 1.5 tonne in better soil; for the larger screws In a UK context I'd look at how you make block paved driveways. Scrape off mud. Geotextile. Wackerplate crushed rubbish / hardcore. That in itself isn't moving. Some blocks on top to lift the wood off the ground. DPC. Then wooden building on top?
- 16 replies
-
- 1
-

-
- ground screws
- timberframe
- (and 1 more)
-
In the UK, in an urban environment, in a house that's regularly occupied, I wouldn't bother with either antifreeze or antifreeze valves. Just some manual valves to drain the outdoor unit down in the event that it fails / electricity fails when it's cold out. Graham's notes are worth a read: https://www.linkedin.com/pulse/why-do-we-put-glycol-air-source-heat-pumps-graham-hendra If the house will be left empty and unattended for extended periods often enough to worry about the header tank and fill valve in the vented attic space freezing; the electricity is prone to failing in winter; or you're somewhere that actually gets cold then probably antifreeze it. Around these parts there are three options: - City district heating = water (and don't for gawd's sake allow it to freeze) - House in the countryside = -20C antifreeze so that if the heating is out of action for a few days you don't burst all the pipes - Holiday house in the countryside = -40C antifreeze so that you can leave the heating off without bursting all the pipes The pipes they're worried about...are the pipes INSIDE the house not the pipes in the monobloc. You antifreeze these...even when the heat pump is a split rather than a monobloc. 😄
-
It's Ethylene Glycol; treated to make it less toxic to those drinking it. https://www.hydratech.co.uk/Technical/Ethylene-Glycol/0/34# Toxicity isn't otherwise a big deal. (it breaks down fairly readily) https://www.atsdr.cdc.gov/toxprofiles/tp96-c1.pdf https://pubmed.ncbi.nlm.nih.gov/11302583/ As such corrosion inhibitors in the "heat transfer fluid" are more of a big deal than the anti toxicity elements. Not uncommon to buy the glycol+additive; then topup additives; rather than dumping the coolant when the corrosion inhibiting additives are consumed: https://www.stafor.lv/gb/heat-transfer-fluids/staterm-concentrate-heat-carrier-coolant#Package:20l https://www.stafor.lv/gb/heat-transfer-fluids/staterm-long-life-additive-package-for-heat-carriers---coolants-concentrate-1100#Package:1l
-
They're cheap in standard sizes compared with mvhr unit filters too
-
Running around and sliding across the floor in socks? Who me? 😄 Very restrained at half an hour! 😉
-
Controlling MVHR preheater
markocosic replied to markocosic's topic in Mechanical Ventilation with Heat Recovery (MVHR)
Nothing at all stops you using the brine pump Mike - hence the interest. Cooling power is higher than you imagine if you assume that incoming air would otherwise be 30C. You're not delivering 100m3/hr at 17C to cool a room at 23C. You're preventing the addition of 100 M3/HR at 30C. Delta 13 not 6. Worth having if it's cooling of air that's needed not removal of solar gain in a property that is otherwise already cool so to speak. -
Controlling MVHR preheater
markocosic replied to markocosic's topic in Mechanical Ventilation with Heat Recovery (MVHR)
FYI: Doing little more digging it appears that shared brine loops is "a thing" and the duct heaters/coolers referenced weren't far off the mark on sizing. Here's one with decent documentation in English including guidance on temperatures, soil types, loop sizes, flow rates etc: http://www.ght.lv/home/ https://site-51152.mozfiles.com/files/51152/__Technical_data_GHT_2020.pdf (that largely answers the question on control - do it with the pump for the brine loop and you can't really over-do it) The other thing I tripped over on this research fest was Card Case Pleated Panel Filters - these are (a) dirt cheap compared with poxy MVHR filters and (b) materially lower cost https://www.energyvanguard.com/blog/path-low-pressure-drop-across-high-merv-filter/ As are...pizza boxes if you want a nice insulating EPP box that you can DIY duct entries, condensate drains, and indeed pleated panel filters etc into. For those not troubled by building regs at least. https://www.thermocateringbox.com/171-thermobox-epp For everybody else there's an off the shelf heating/cooling battery and pleated filter inside a pizza box for a couple of €k. 🙂 -
PEX Radiator pipes - in screed or insulation
markocosic replied to Brian in Dorset's topic in Central Heating (Radiators)
If doing that for downstairs make sure that you don't create an "n" shape with your PEX... ...because that will be a swine to get the air out of. Ideally your "horizontal" runs to/from the "drops to downstairs radiators" will have a constant slope "upwards" to somewhere that the air can escape, such as the "rise" to an upstairs radiator. -
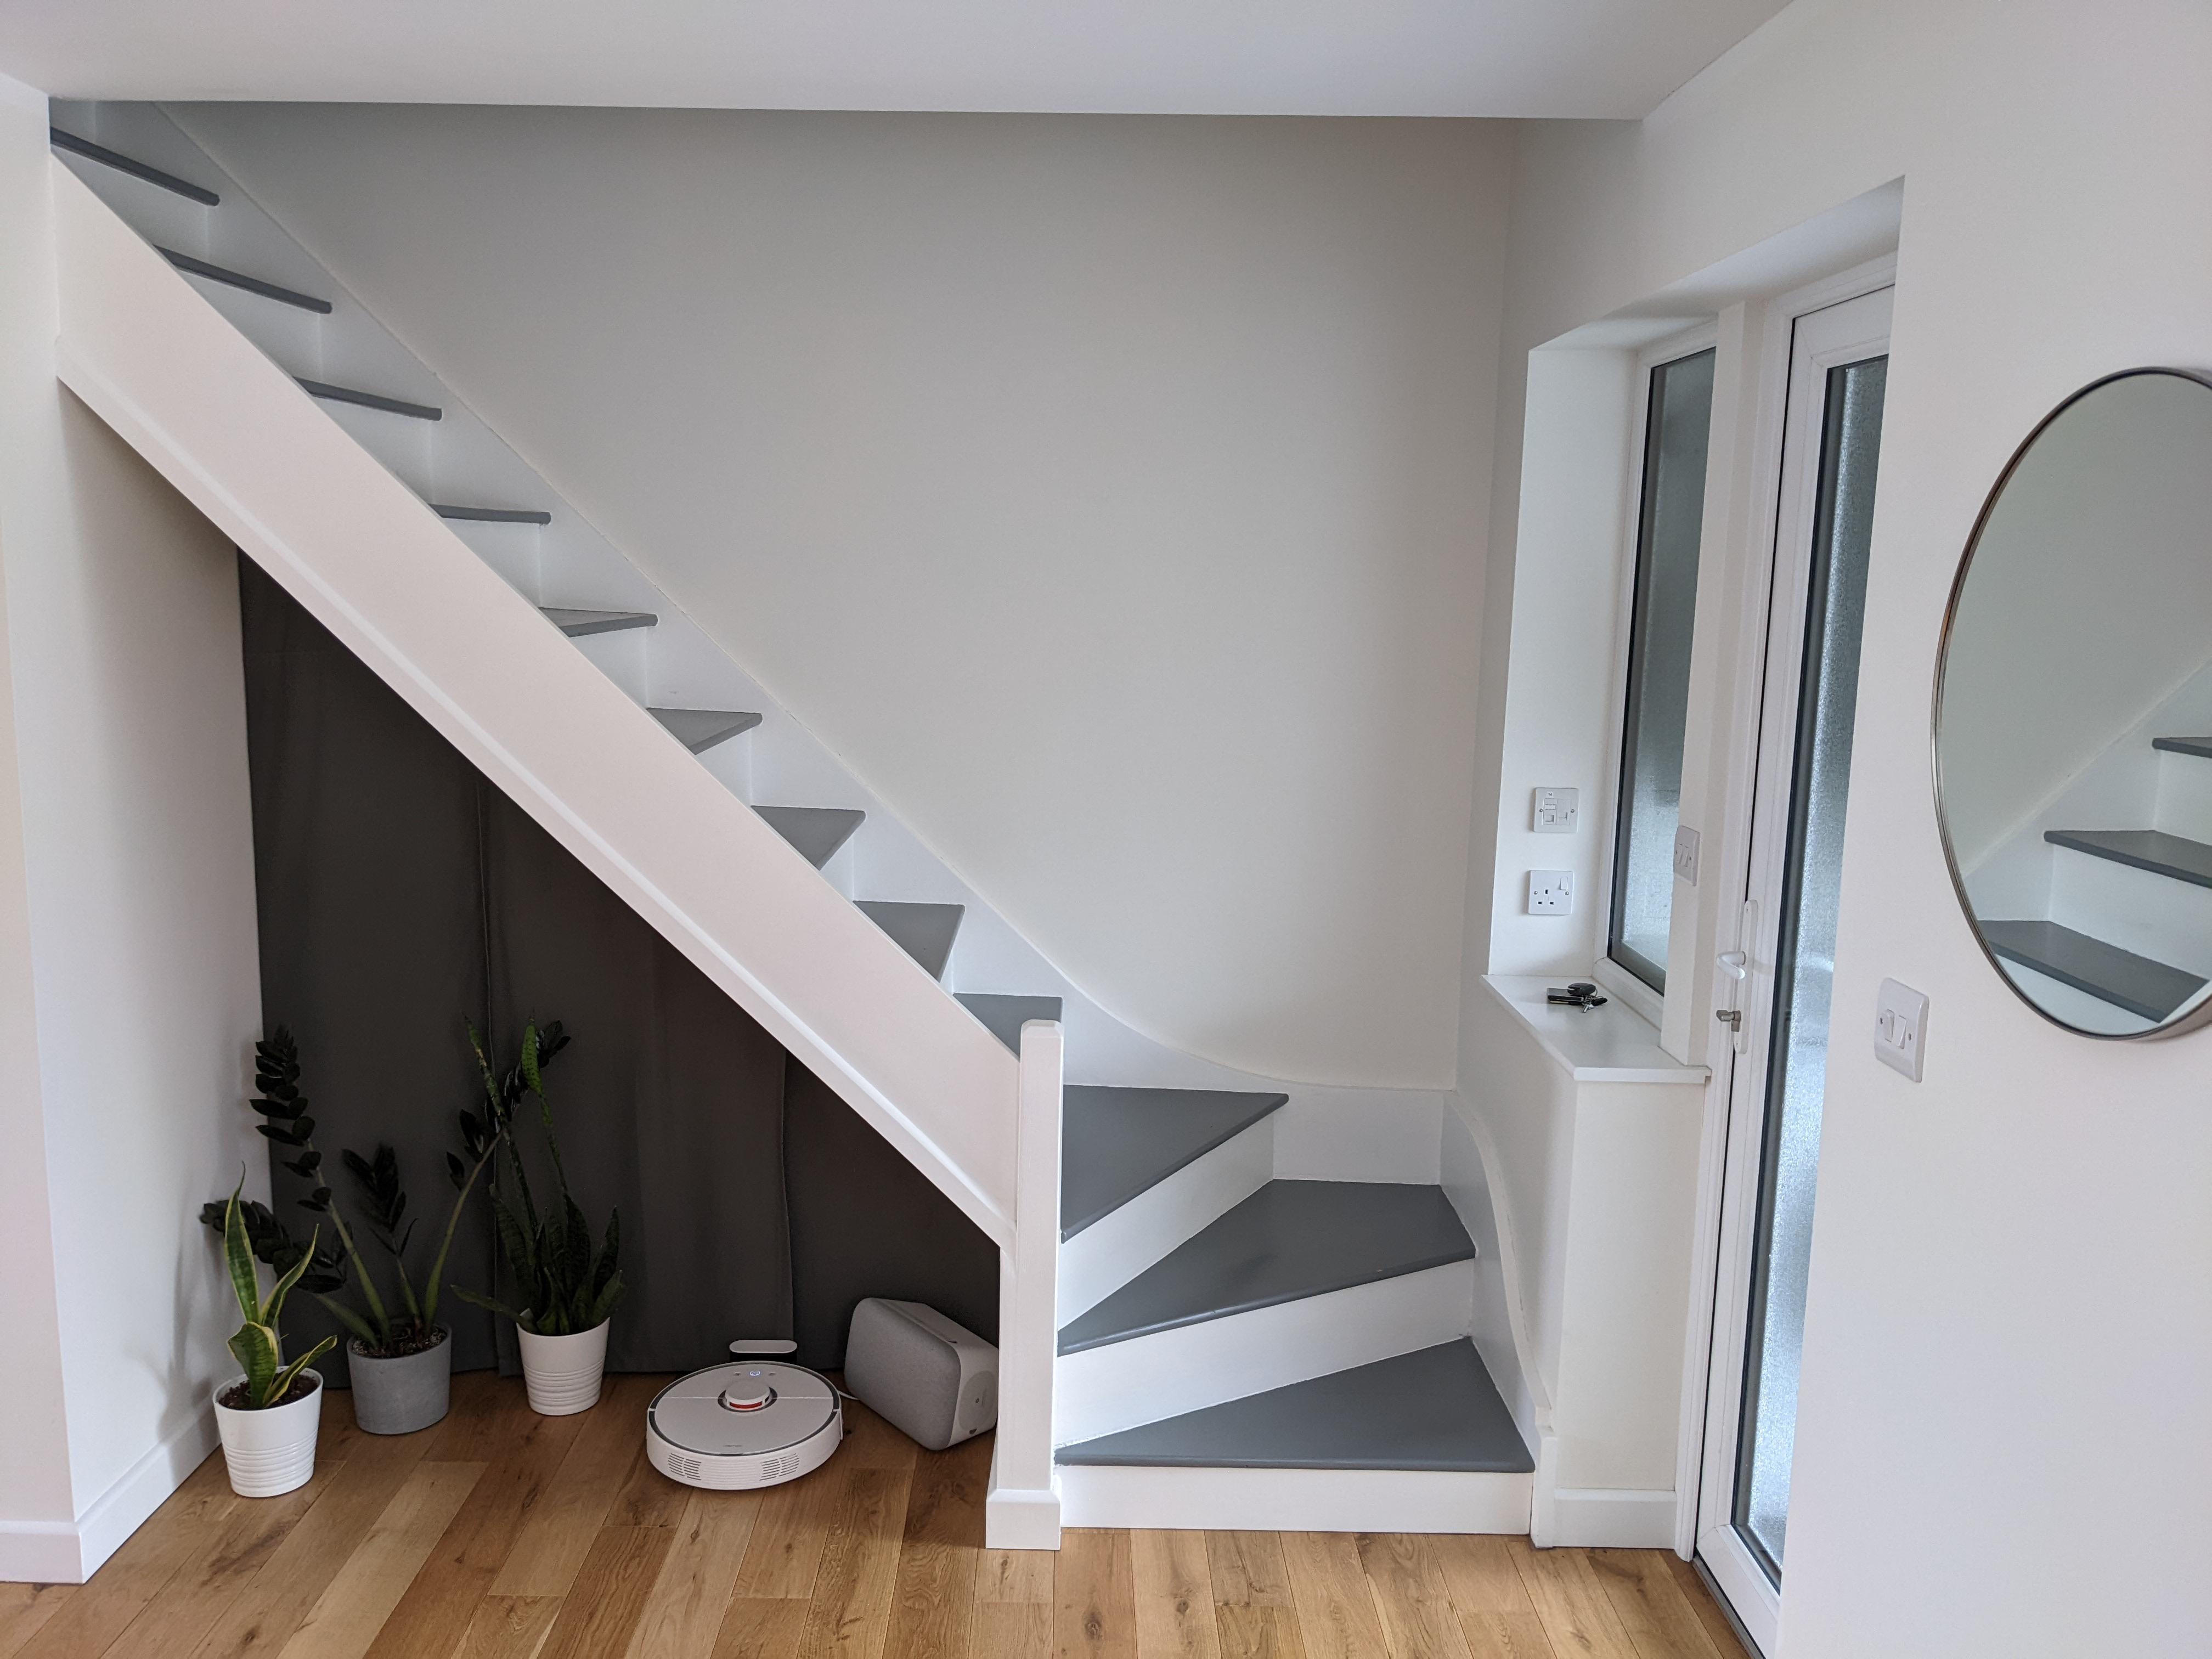
Kids bounce 🙂 It's the guests that you need to worry about. Those who live in a house with wood floors and smooth wood stairs with no banisters learn how to walk "assuming no friction" so to speak. Like walking on ice. You can stand on the flat even in shoes. Those who live with carpeted stairs or shoes in the house tend to walk in a way that assumes their feet don't slide. Like warm country people walking on ice. Or enthusiastic labradors on tiles. Here's our outrageously slippery and unhandrailed staircase. Guests walk up it at 0.1 mph. We scamper up and down it with coffee in one hand and book in the other without issue. I'd definitely leave it alone for a while until you get used to it; but warn the guests!