Cambs
-
Posts
111 -
Joined
-
Last visited
-
Days Won
2
Everything posted by Cambs
-
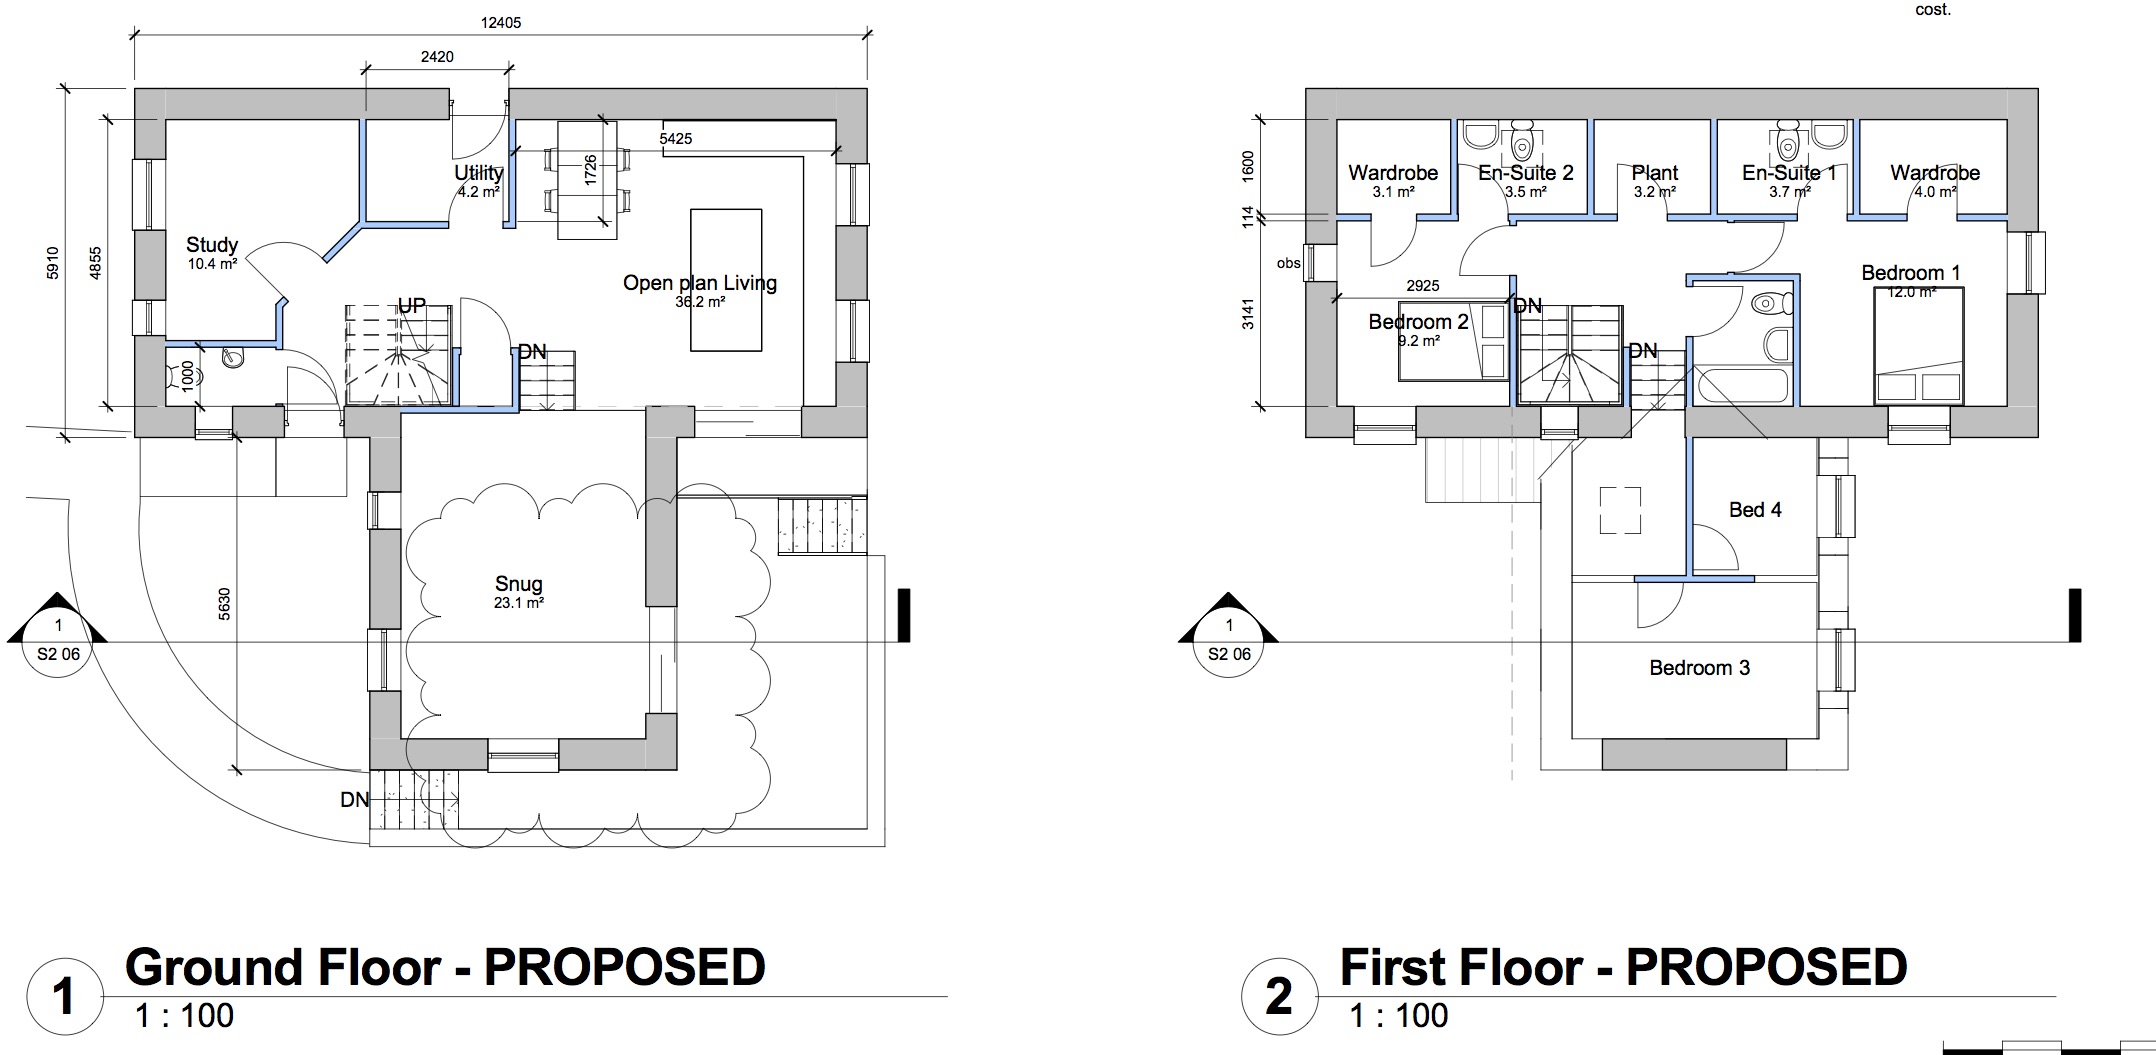
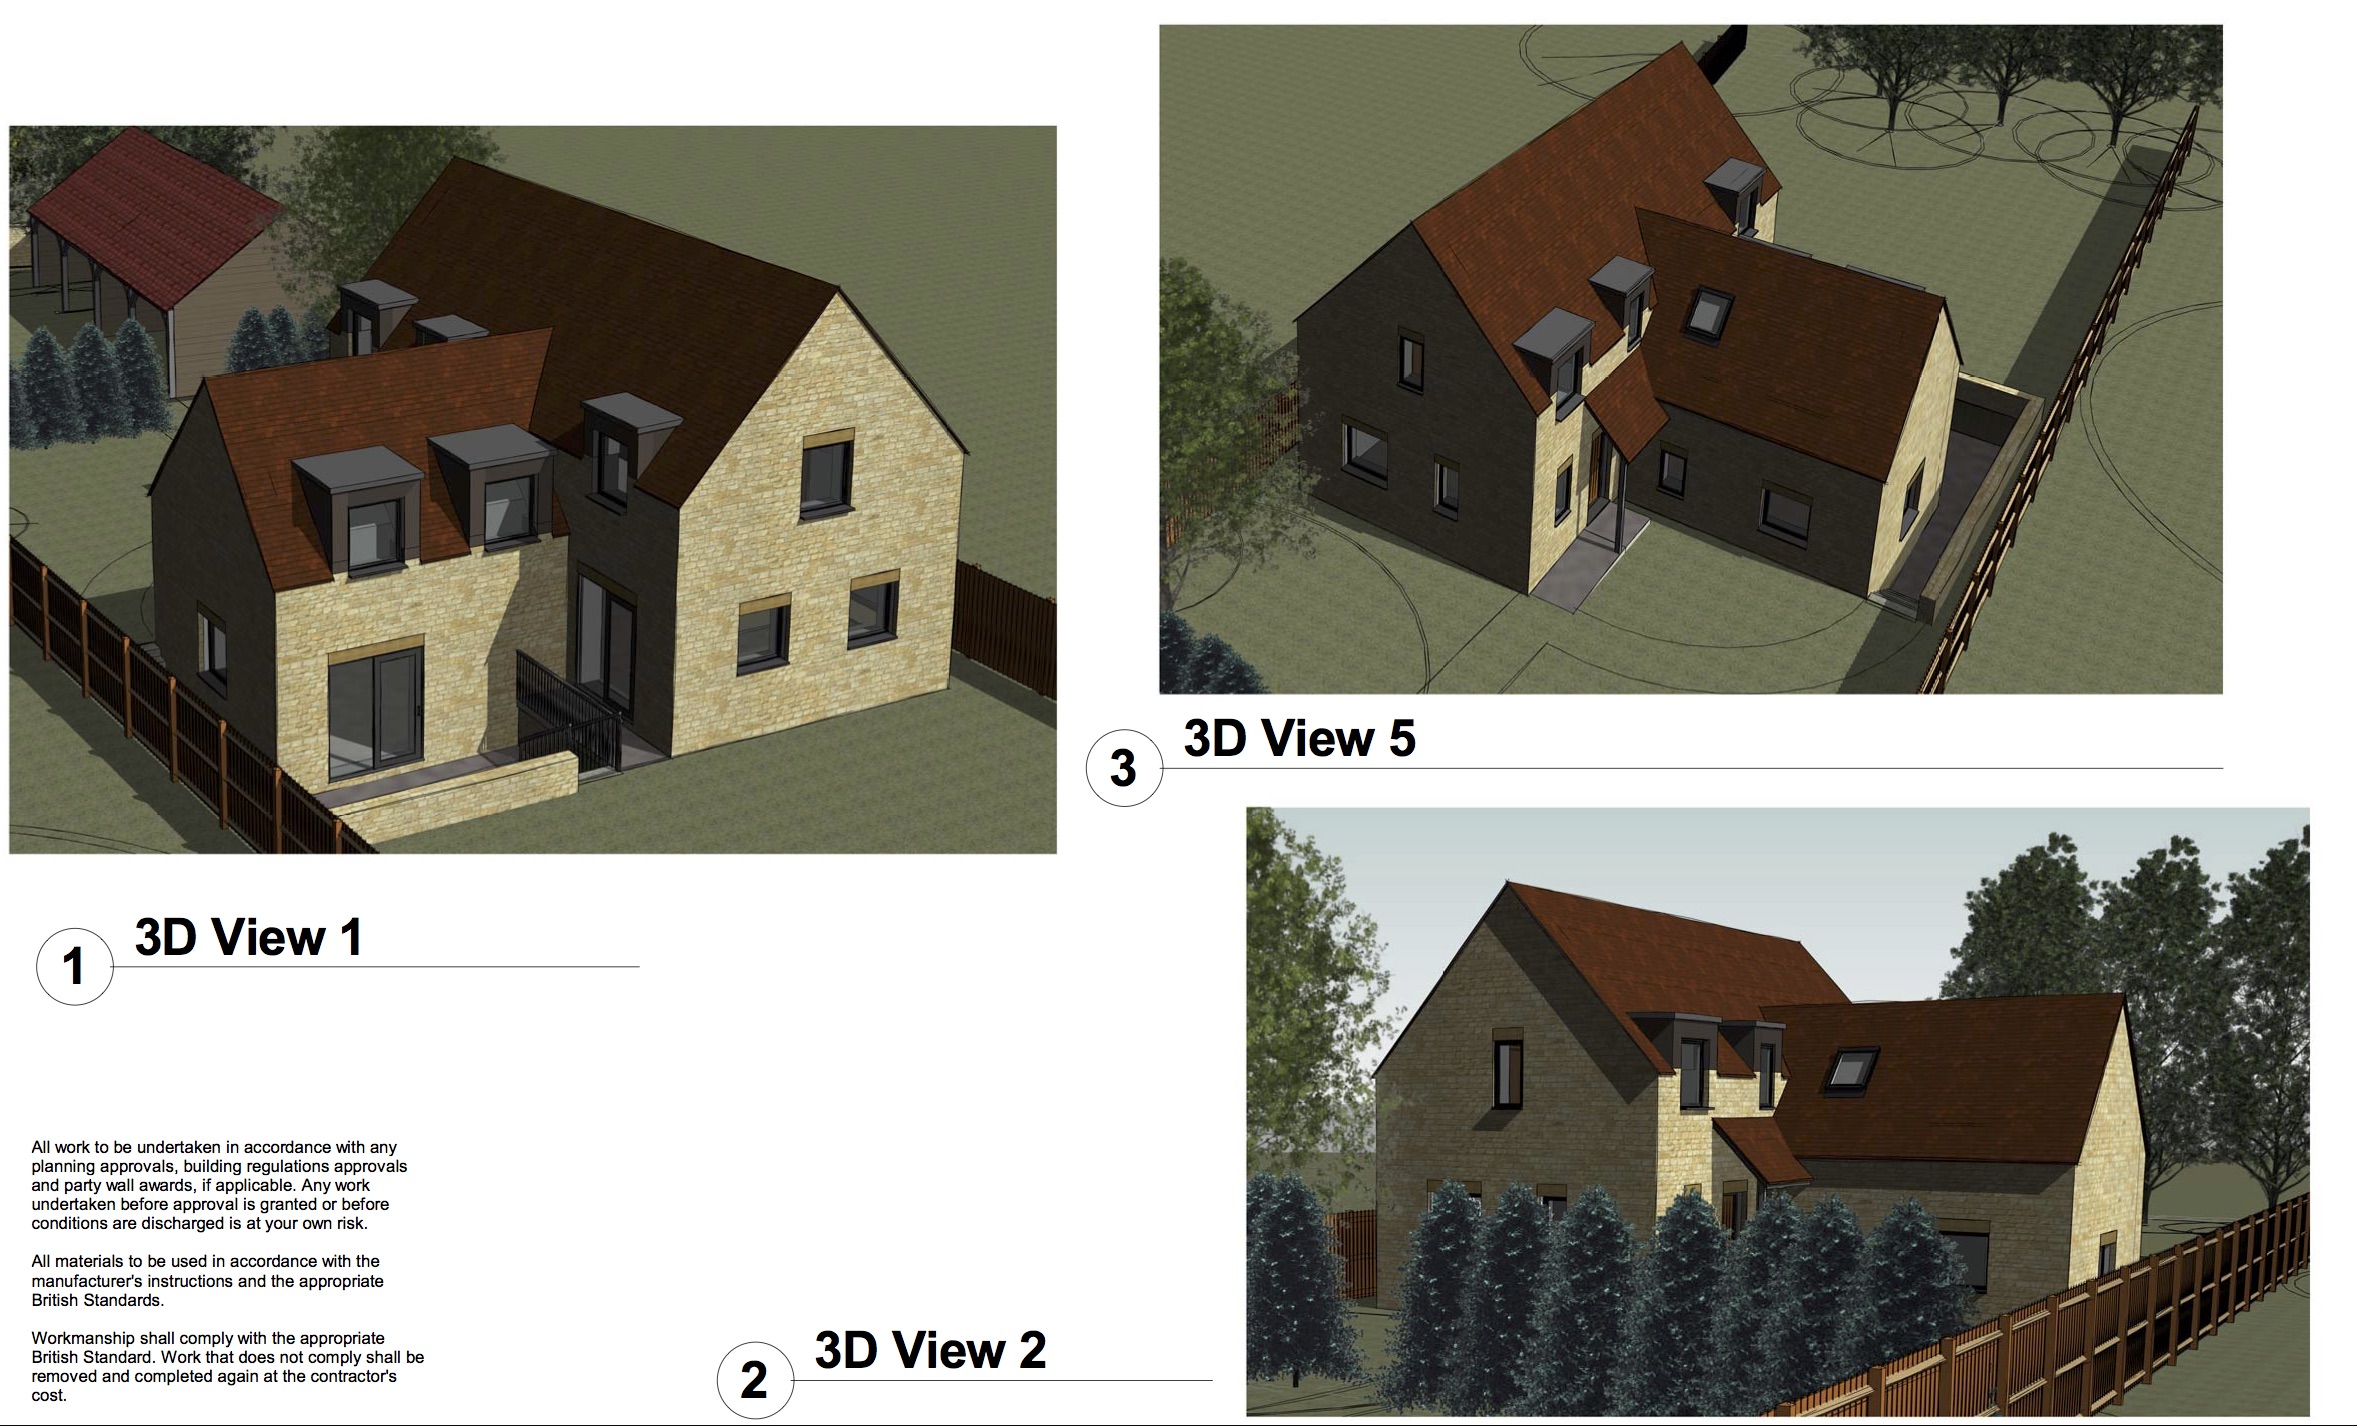
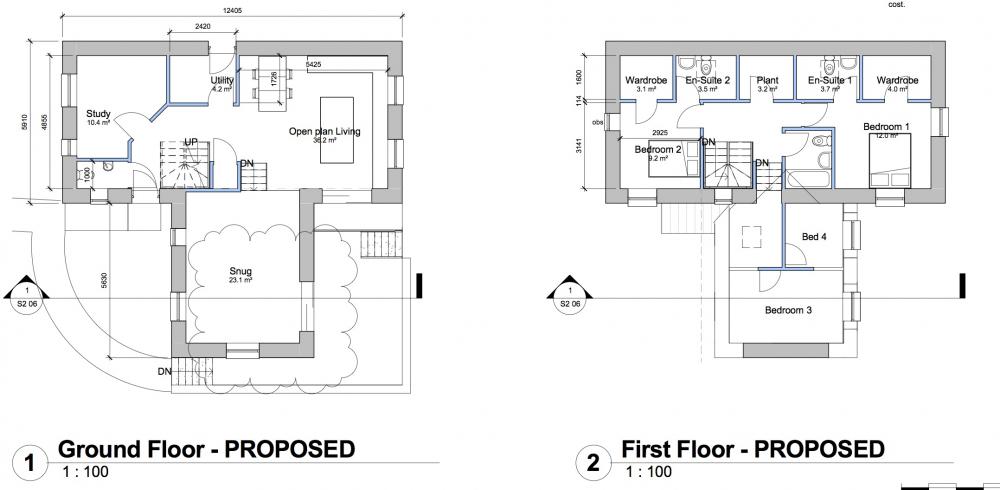
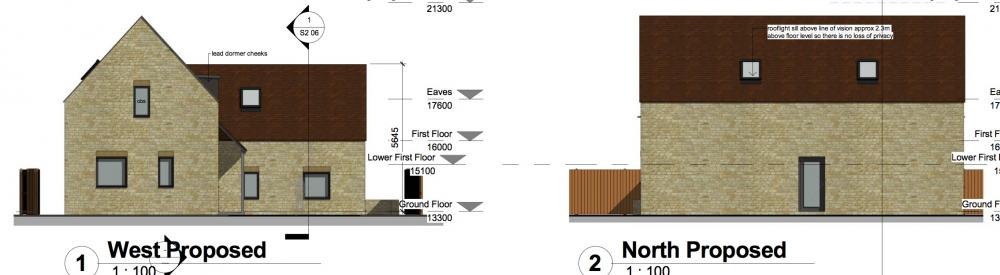
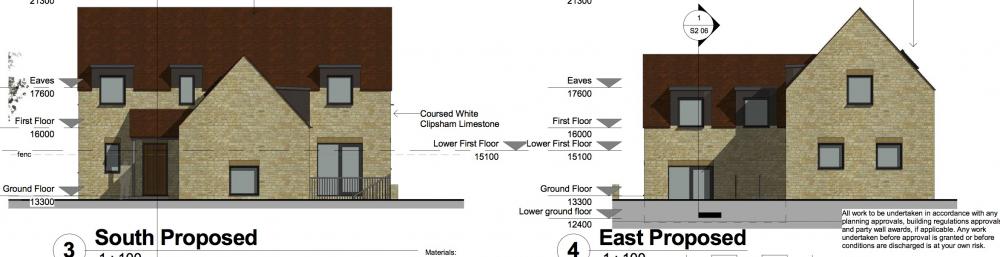
Not sure about a blog yet but may do. Here’s a link to the original post showing what we are doing. Been a few tweaks since then e.g dropped down to 3 bedrooms. The sunken part is turning out to be an expensive option but the council wouldn’t let us raise the ridge height so we decided to dig down instead. Timber frame from PYC, in production now, and windows from Green Building Store. PYC are agents for GBS so they are doing the install for the windows.

-
I must admit, I wondered where it was too...unusual place name. Architects in Bodmin, so looks like you’re right.
-
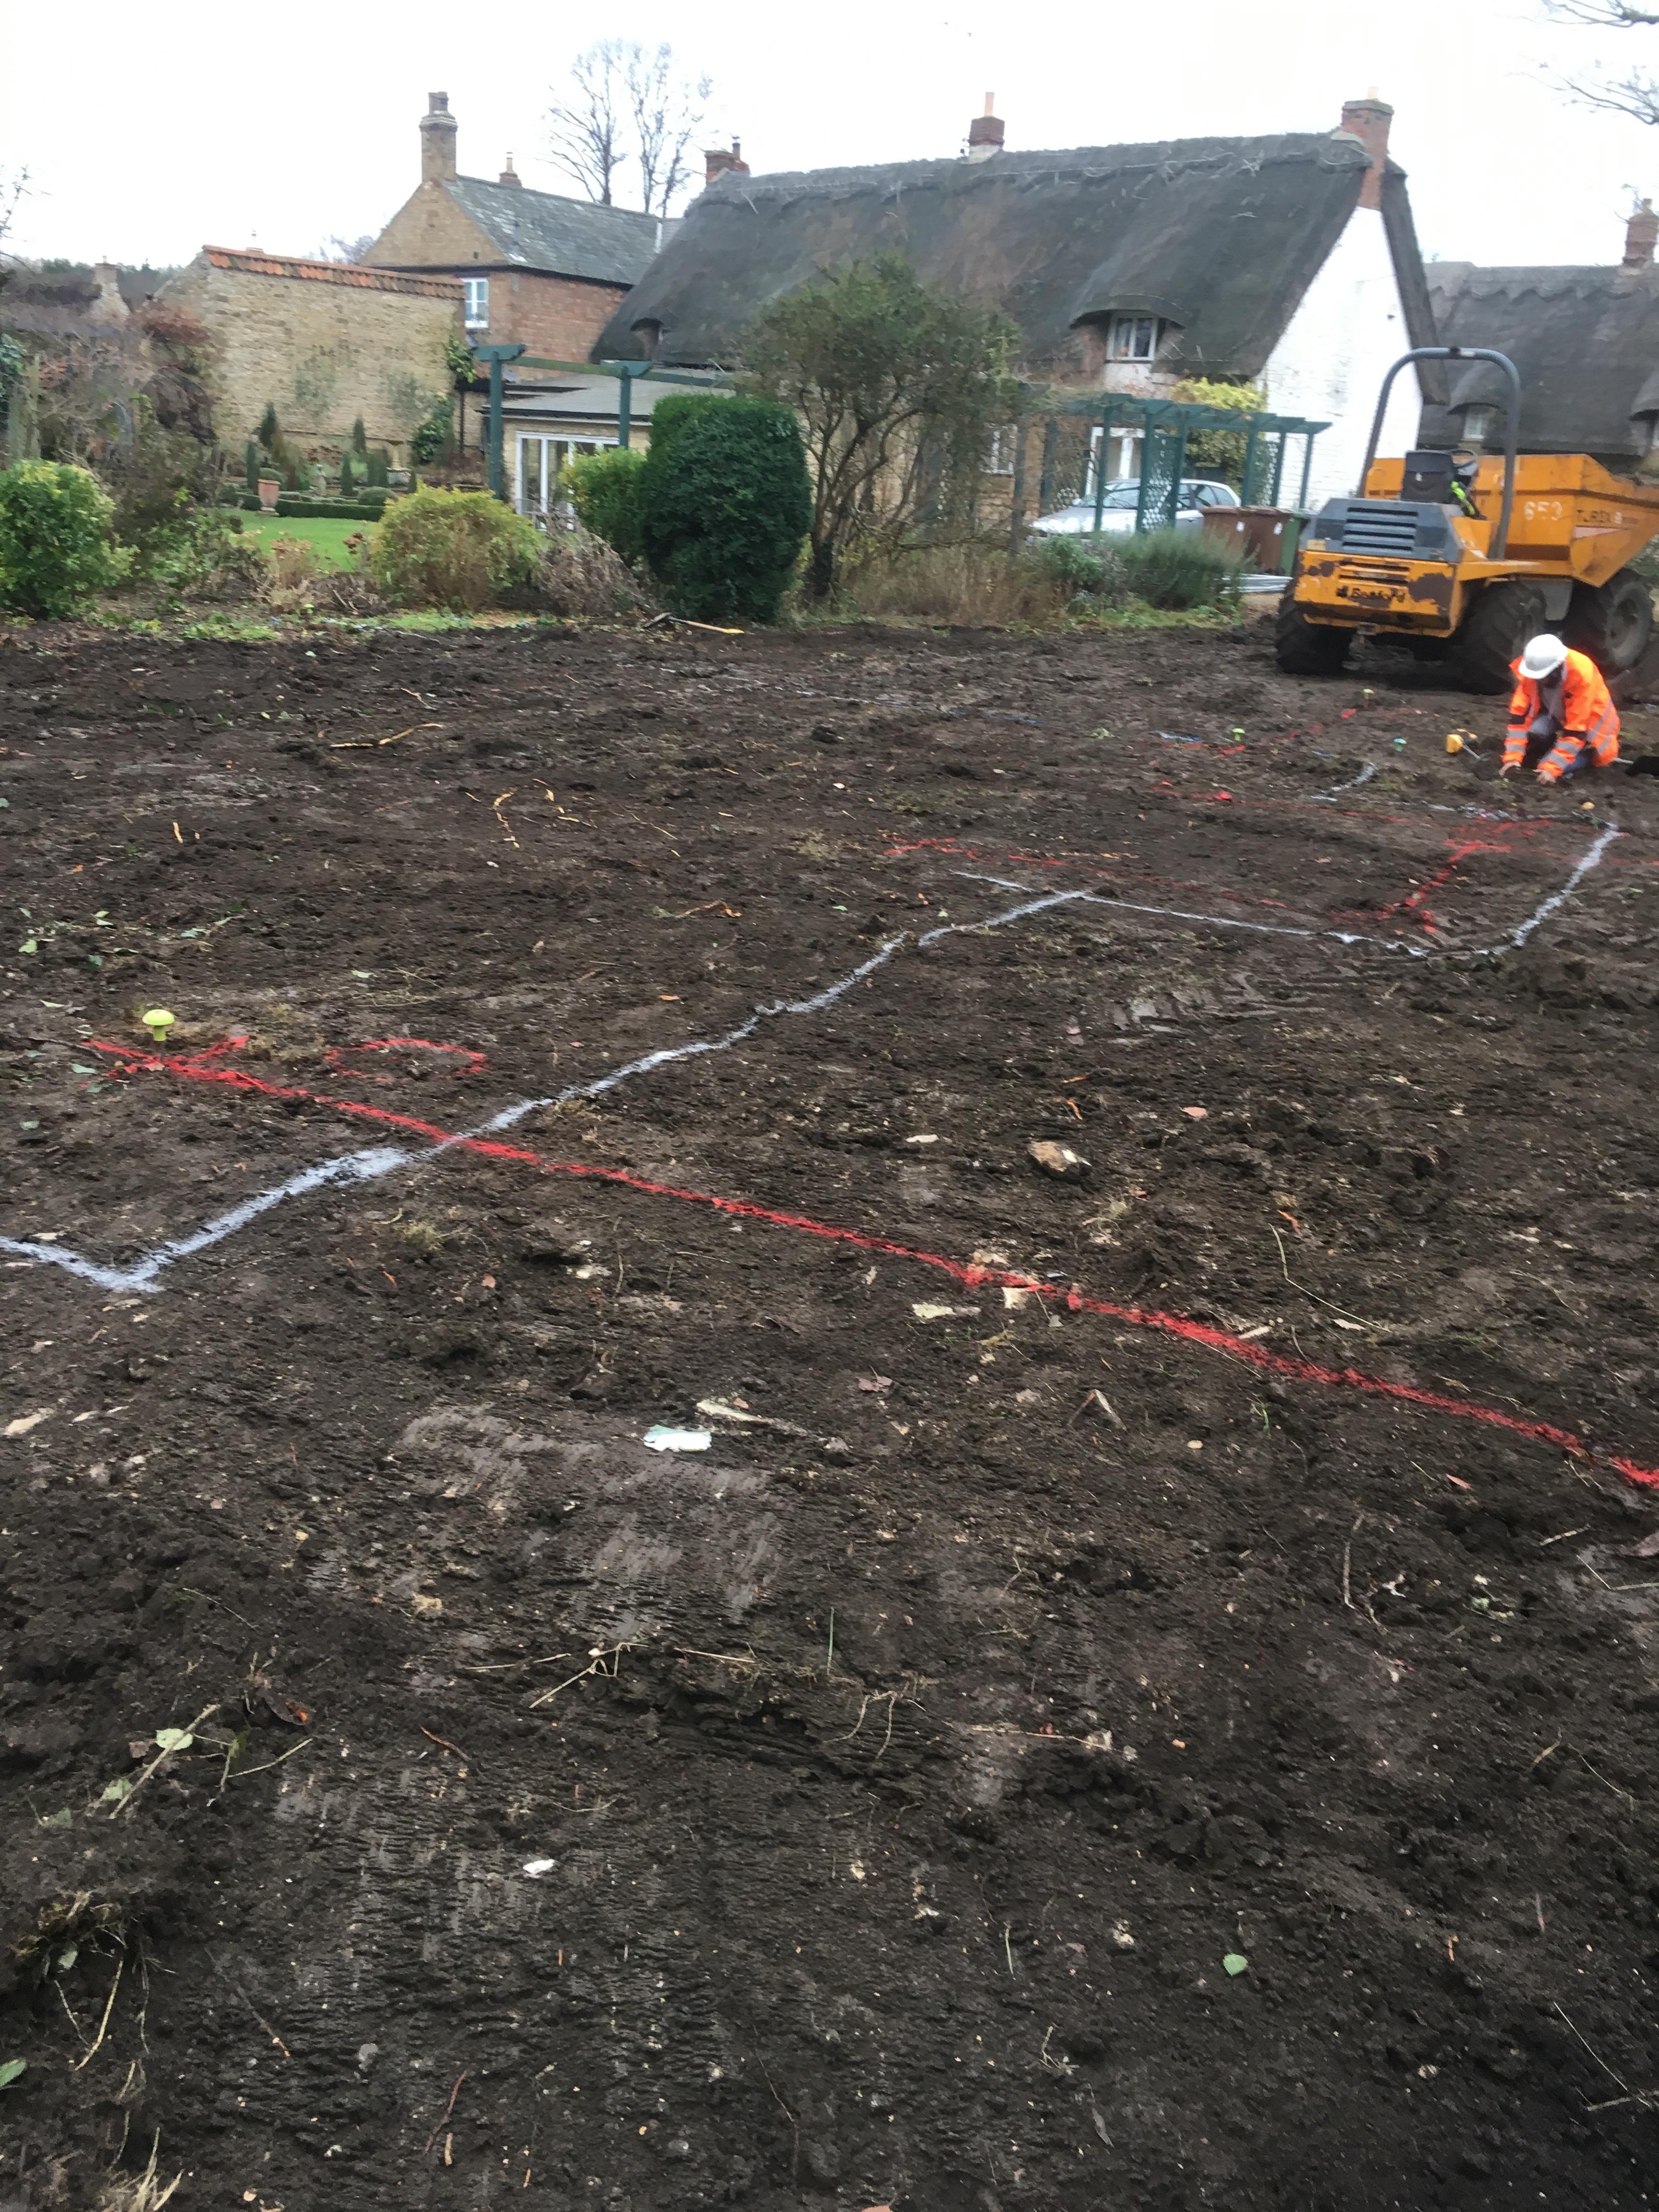
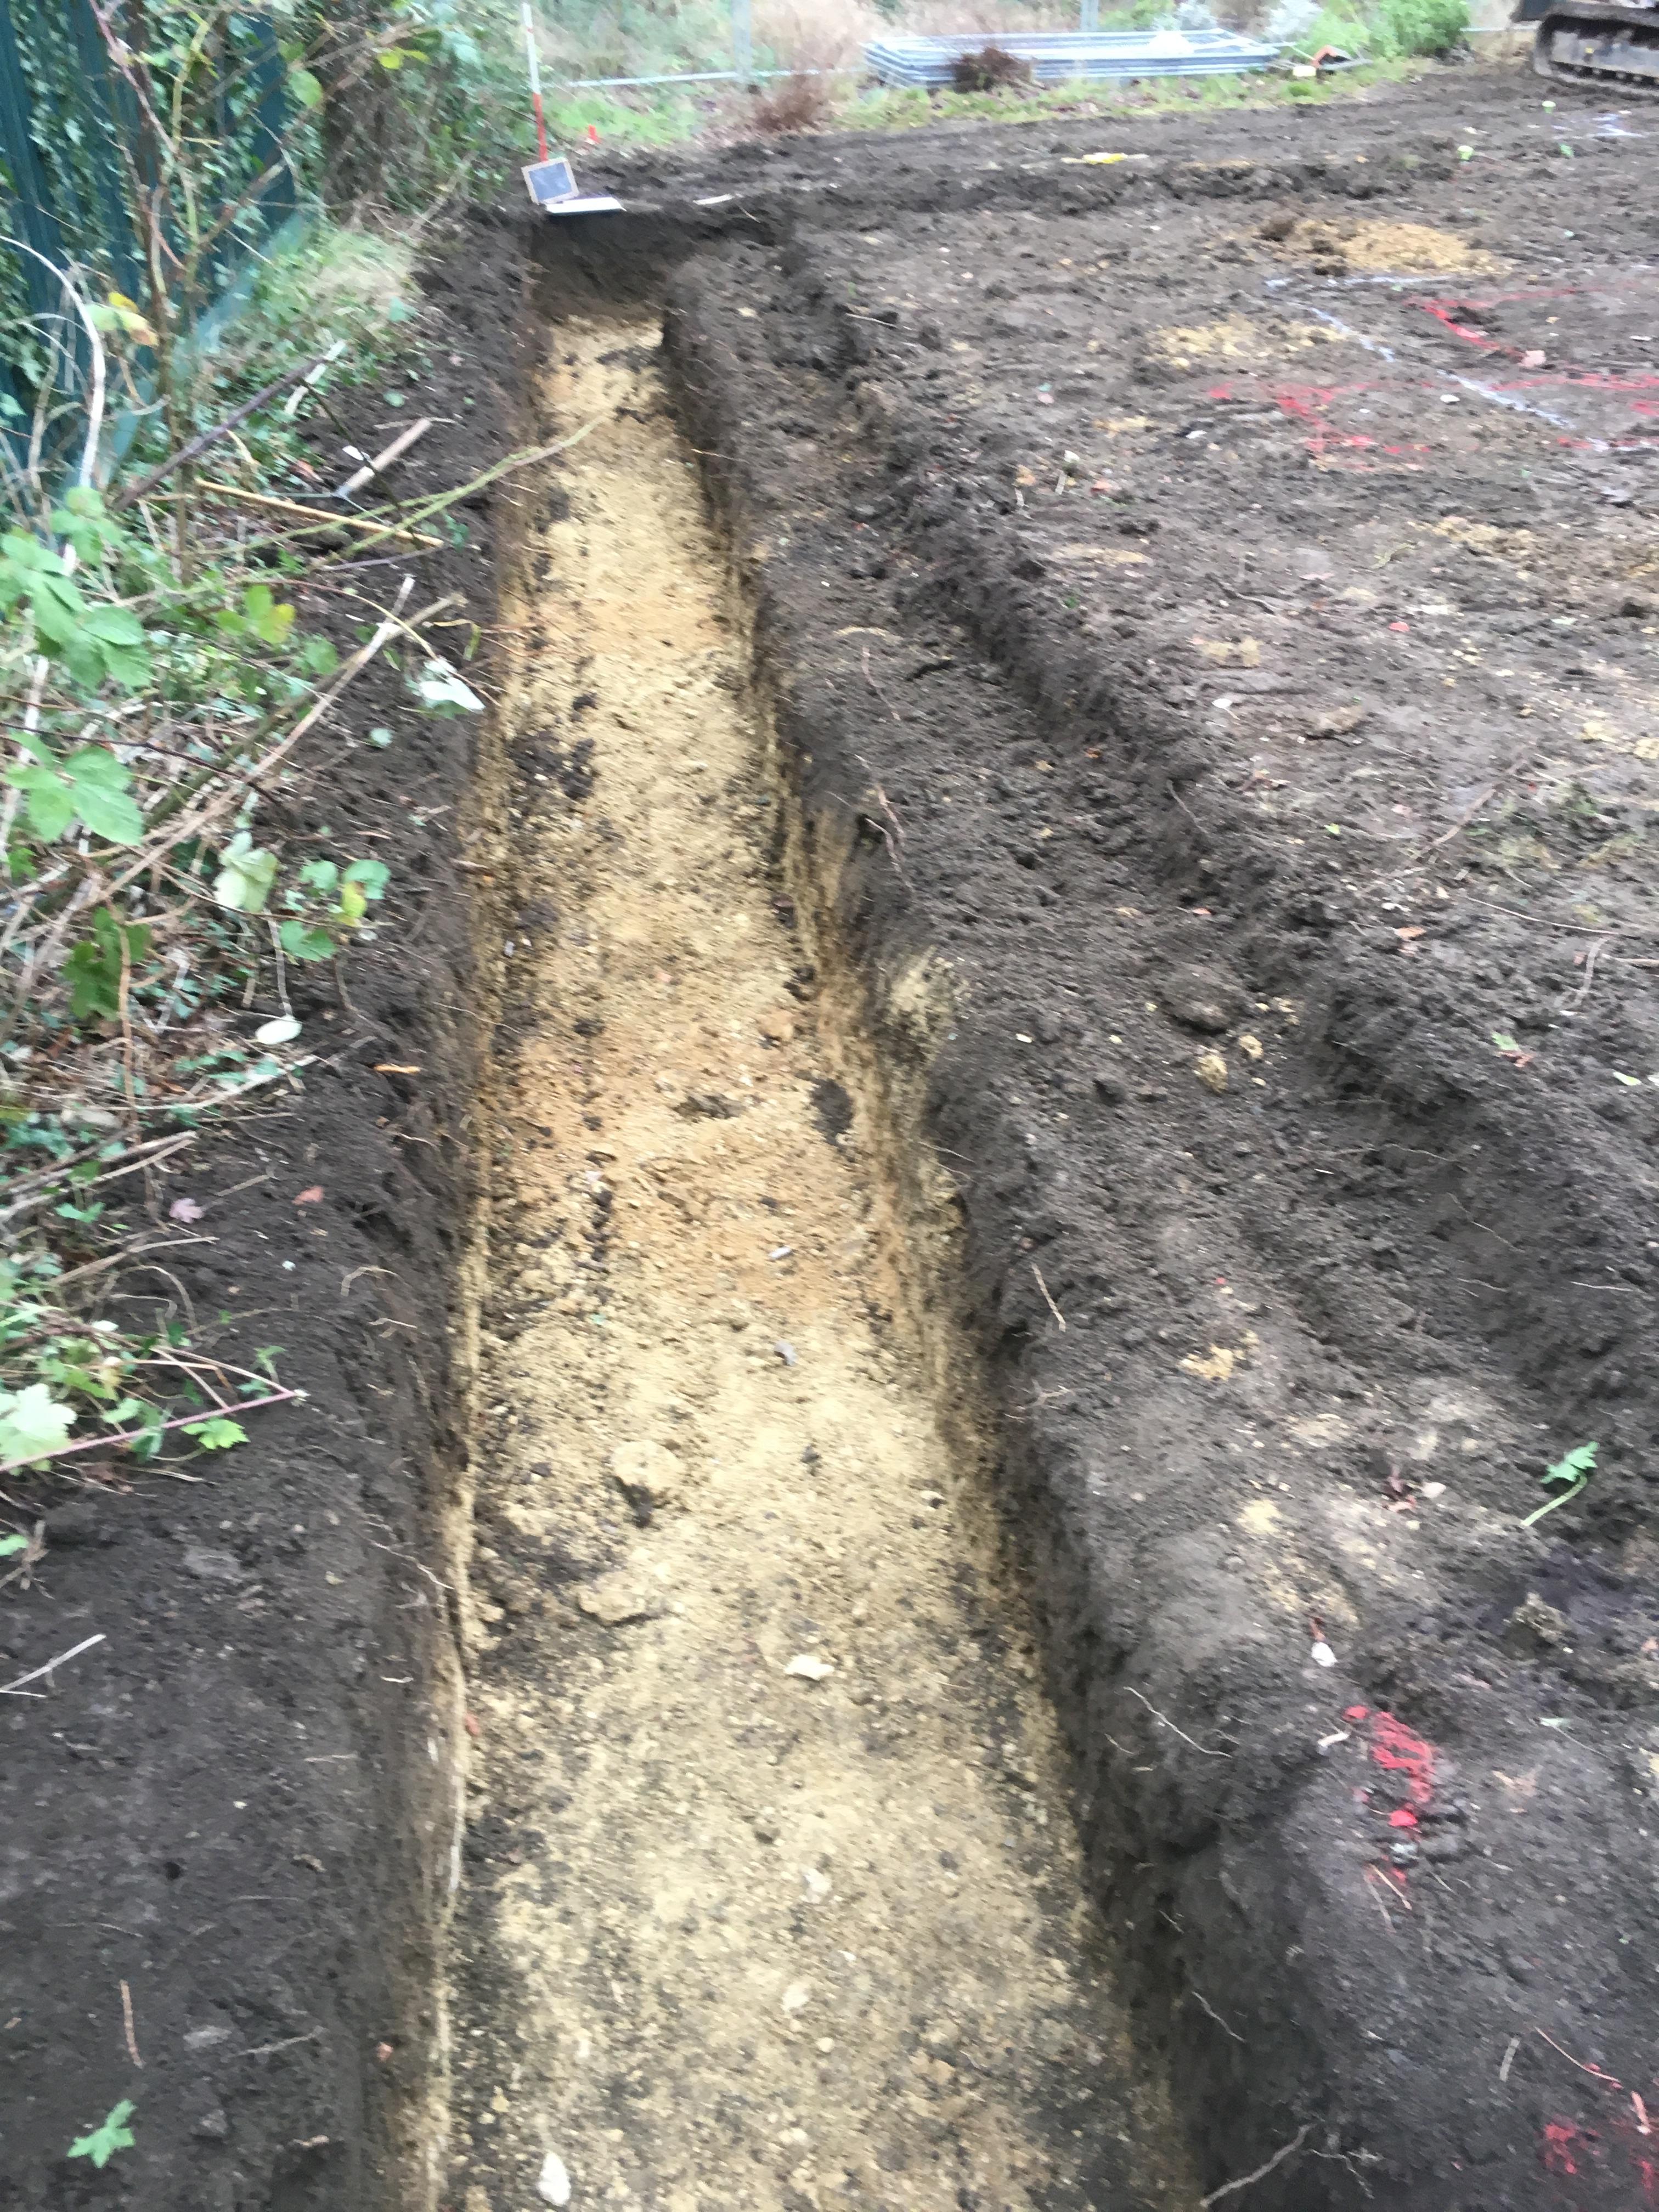
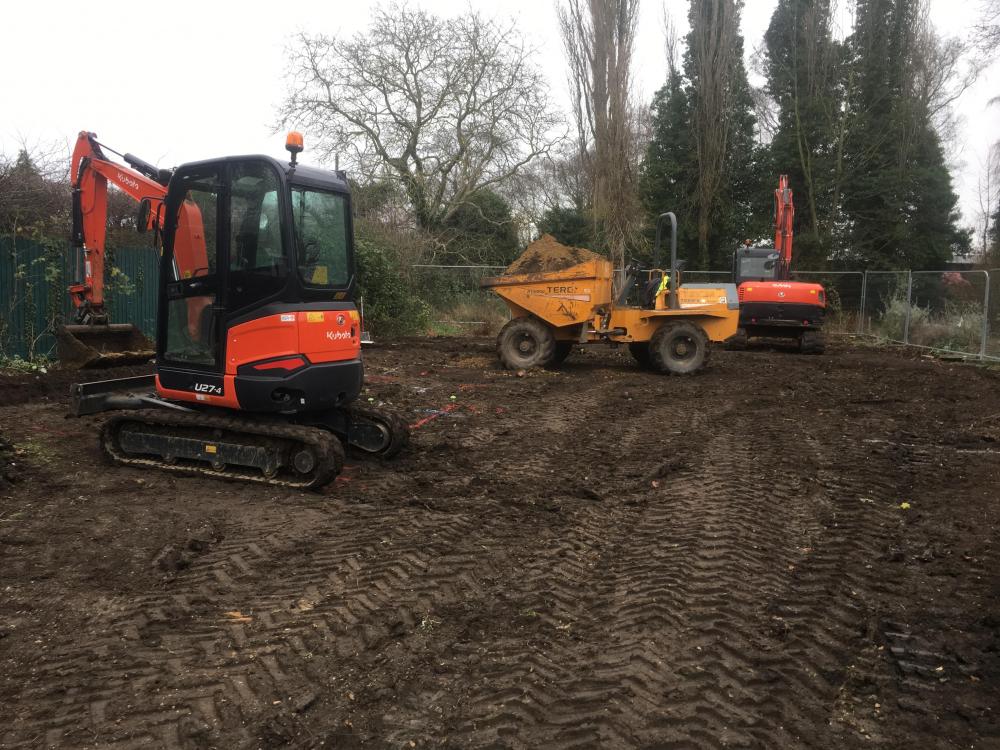
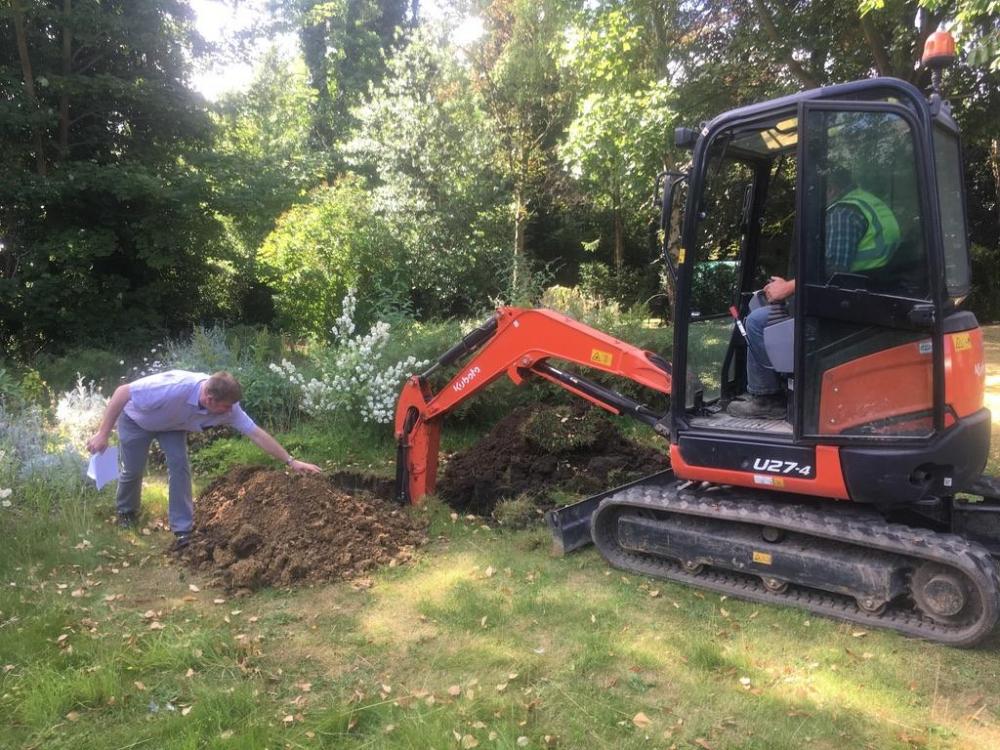
Well, it’s been a momentous day today. It’s taken us a couple of years to get to this stage but we finally broke ground today. All watched over by an archaeologist and in the grounds of a listed building, I’m pleased to say that nothing was found apart from a few copper nails and a few fragments of no significance. Groundworker didn’t encounter any problems and will be back at it tomorrow. Visit scheduled in from Building Control (using Stroma) scheduled for Thursday. Limestone ridge at about 1.5m deep, so a nice solid base to sit on. Here’s some pictures taken by the Groundworker. I’m working away at the moment unfortunately but can’t wait to see what’s been happening this weekend.


-
We used these in our last build. The blackout ones were very effective. We’ll use them in the next build too. They have a double honeycomb design called Architella now which is supposed to be more effective for solar gain/heat retention. Also can be motorised (called Powerview) and controlled via smartphone, Alexa etc. They’ve announced that the motorisation is Apple HomeKit compatible in the US but not in the UK (yet?) The Luxaflex UK website is not great so here’s a link to Vale Blinds who sell them: https://valeblinds.com/blinds/duette-honeycomb-blinds/luxaflex/architella-duette Not cheap, of course .....
-
The issues that we might face upstairs are that we have lots of dormers, south facing, with limited opportunity for solar shading. The plot is in the curtilage of a listed building, in a conservation area and with a set of planners who were split down the middle as to whether or not there should be planning permission granted and it seems all of the ones who voted “yes: for the original application have since moved on ☹️ . The south facing windows all face into the plot for the listed building. We basically can’t change much about the outside on the house to introduce some form of shading. The only possible option might be solar film but sticking an overhang or a brise soleil on the outside would not be acceptable to the planners. Add to that an other half who likes to be able to tweak bedroom temperatures constantly leads me towards thinking that UFH + Air radiators might be the way to go, if night time purging is insufficient. I’d like to keep the options open at this stage - I want to avoid and expensive split air con retrofit like I had to do last time around.
-
I too am reading this thread with interest because I need to start thinking about the heating and cooling solutions for my next self build, due to start in the next couple of months. In my last build (build 10 years ago, so not to anywhere near passive standard) I had UFH downstairs and radiators upstairs, powered by gas boiler, plus MVHR. We had rooms in roof and it became hot in summer, so we added a number of split aircon units to provide cooling only in the bedrooms. We occasionally used these to provide spot heating on the odd cold day - I really didn’t like warm air heating. We had one of the very rare (in the UK) forced air systems in a previous house and it wasn’t very pleasant or easy to get on with. We’ve spent a fair bit of time in colder climes in North America where warm air systems are common and I didn’t like it there either. For the next build, we have no gas, and will be building to near passive standard, so my current thinking on the solution is to have ASHP plus UFH downstairs. I wouldn’t have any other form of heating for the main living areas - UFH is excellent there. For the upstairs, again, we have rooms in roof but the thick Warmcel insulation should hopefully regulate temperatures better than the previous build. I was thinking about pairing the UFH downstairs with fan assisted radiators upstairs. Something like these from Panasonic (other suppliers are available): https://www.aircon.panasonic.eu/GB_en/product/aquarea-air-radiators/ With this set up, we can hopefully switch over to cooling the slab in the summer and getting cooling from the air radiators upstairs if needed. We’ll also hopefully have individual room control upstairs too. All still to be finally decided on though....
-
Estate Car to carry house doors inside, flat
Cambs replied to Ferdinand's topic in General Self Build & DIY Discussion
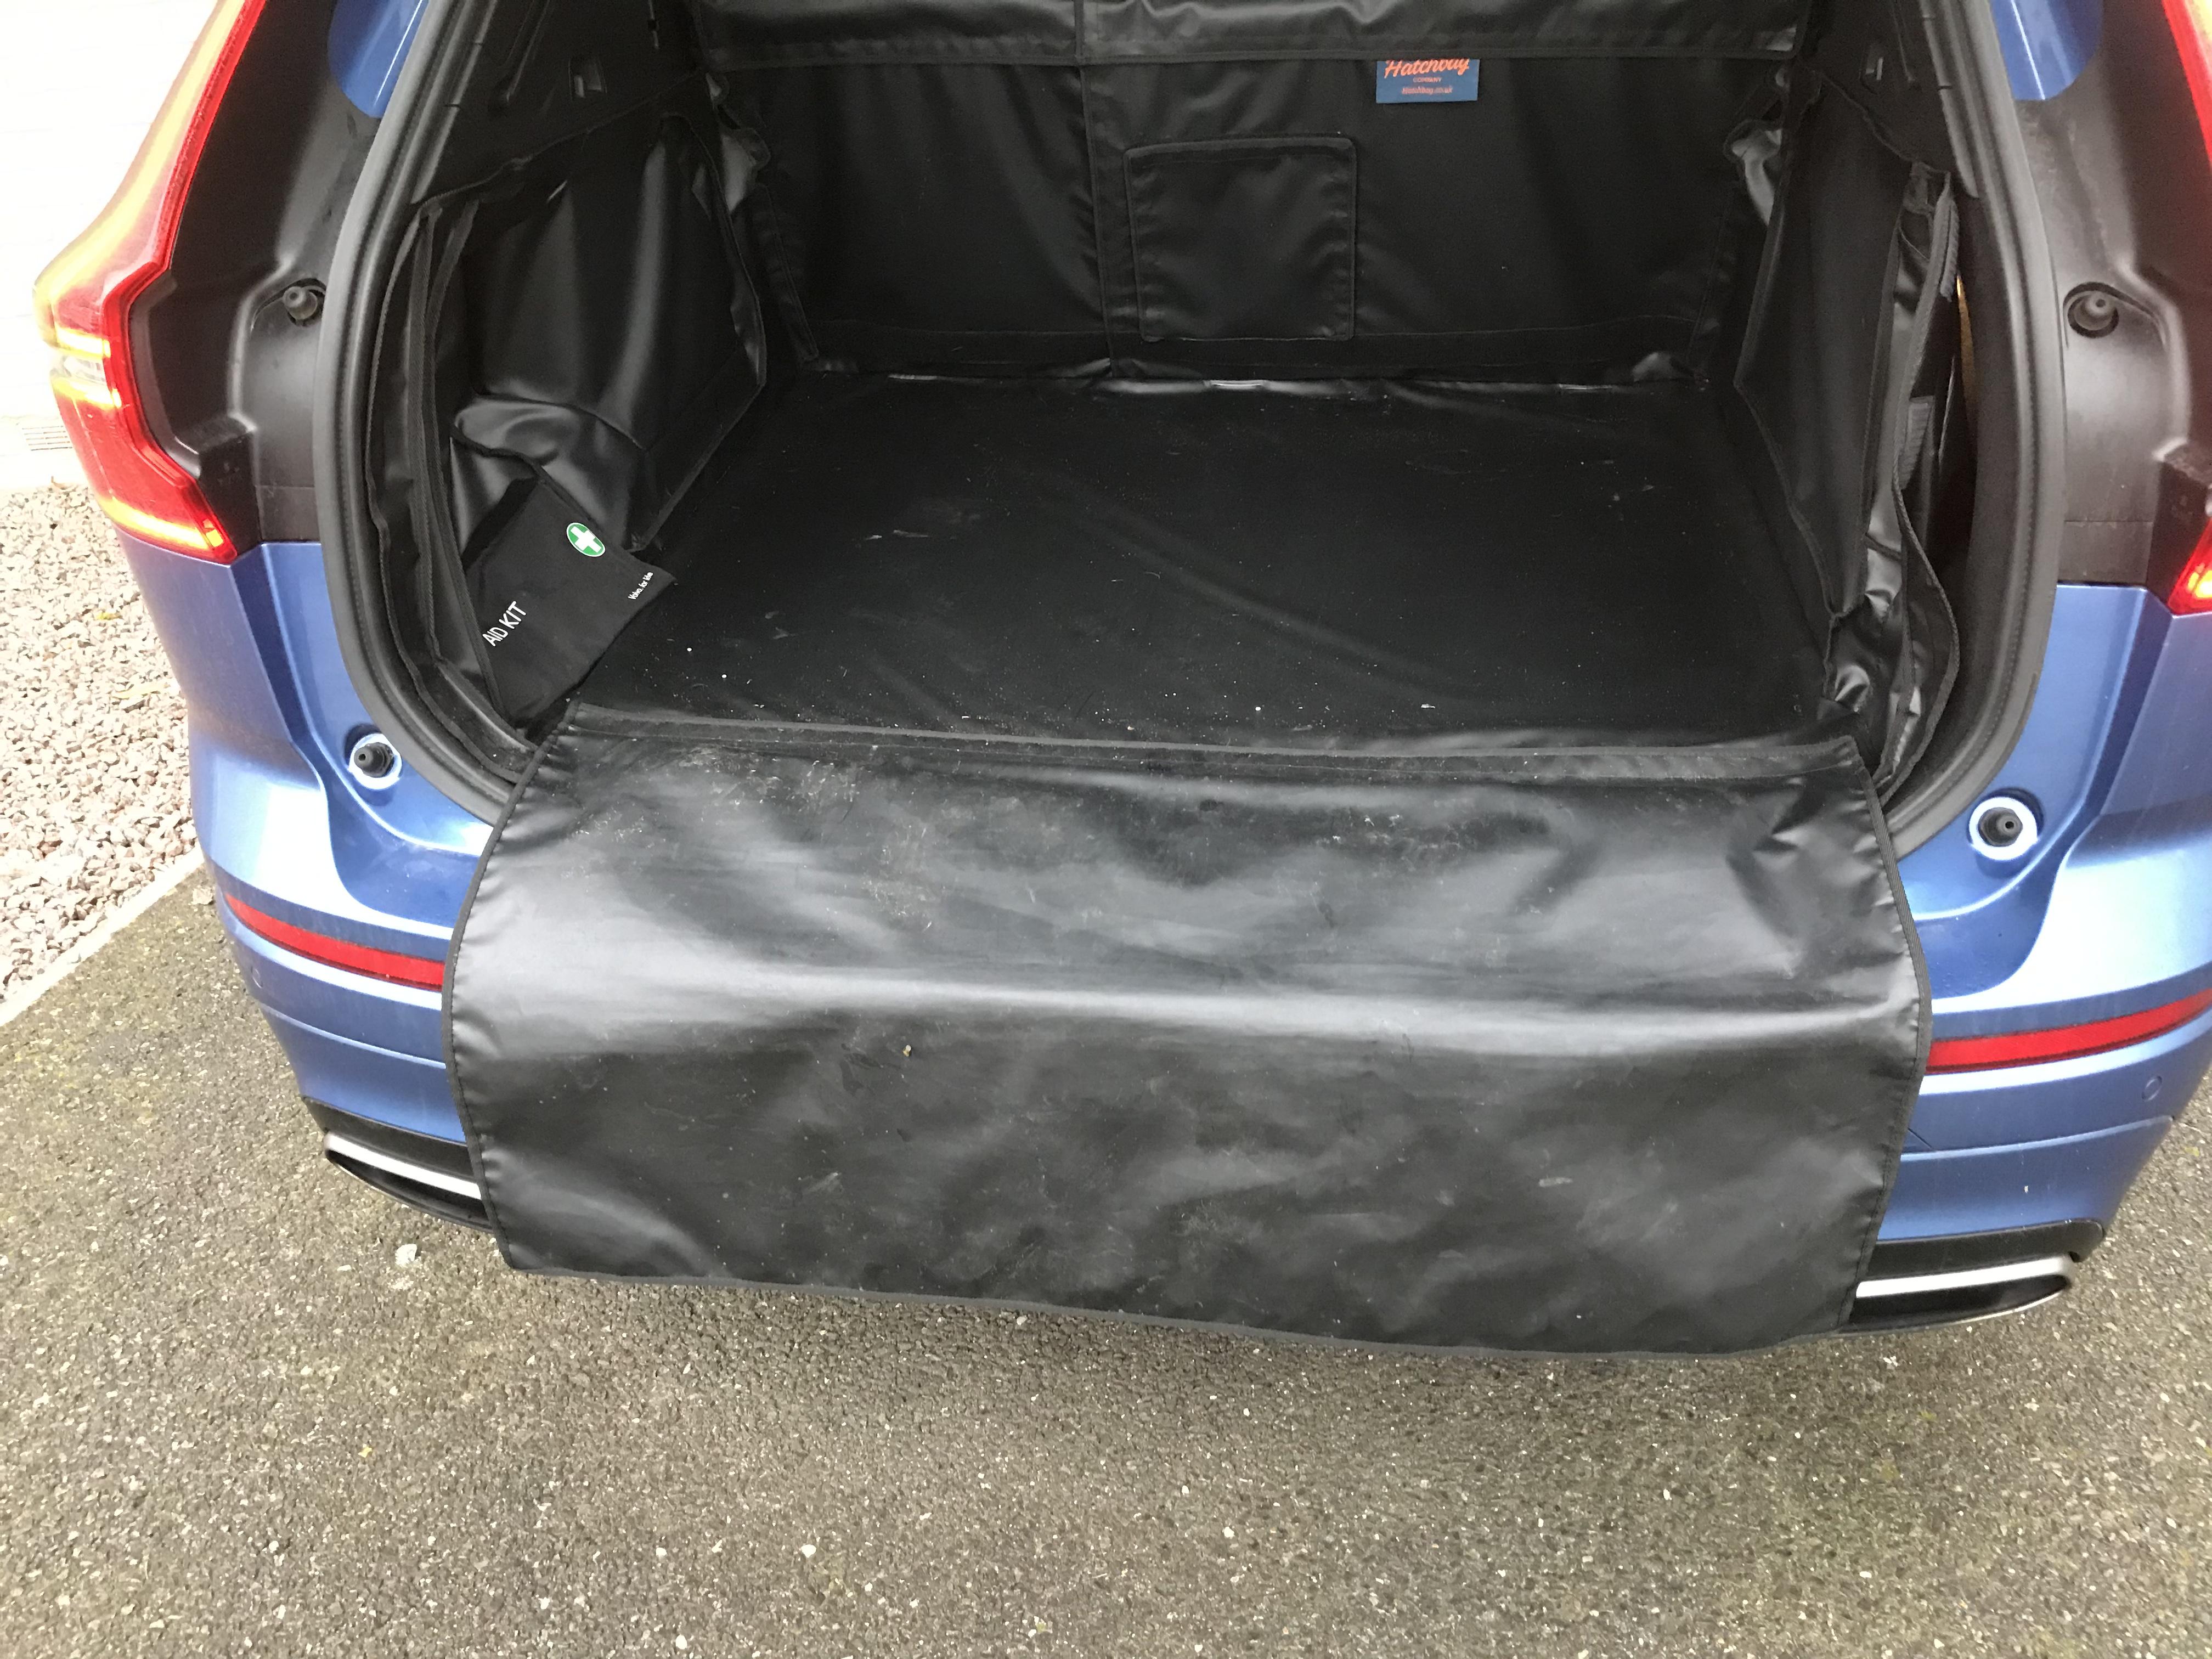
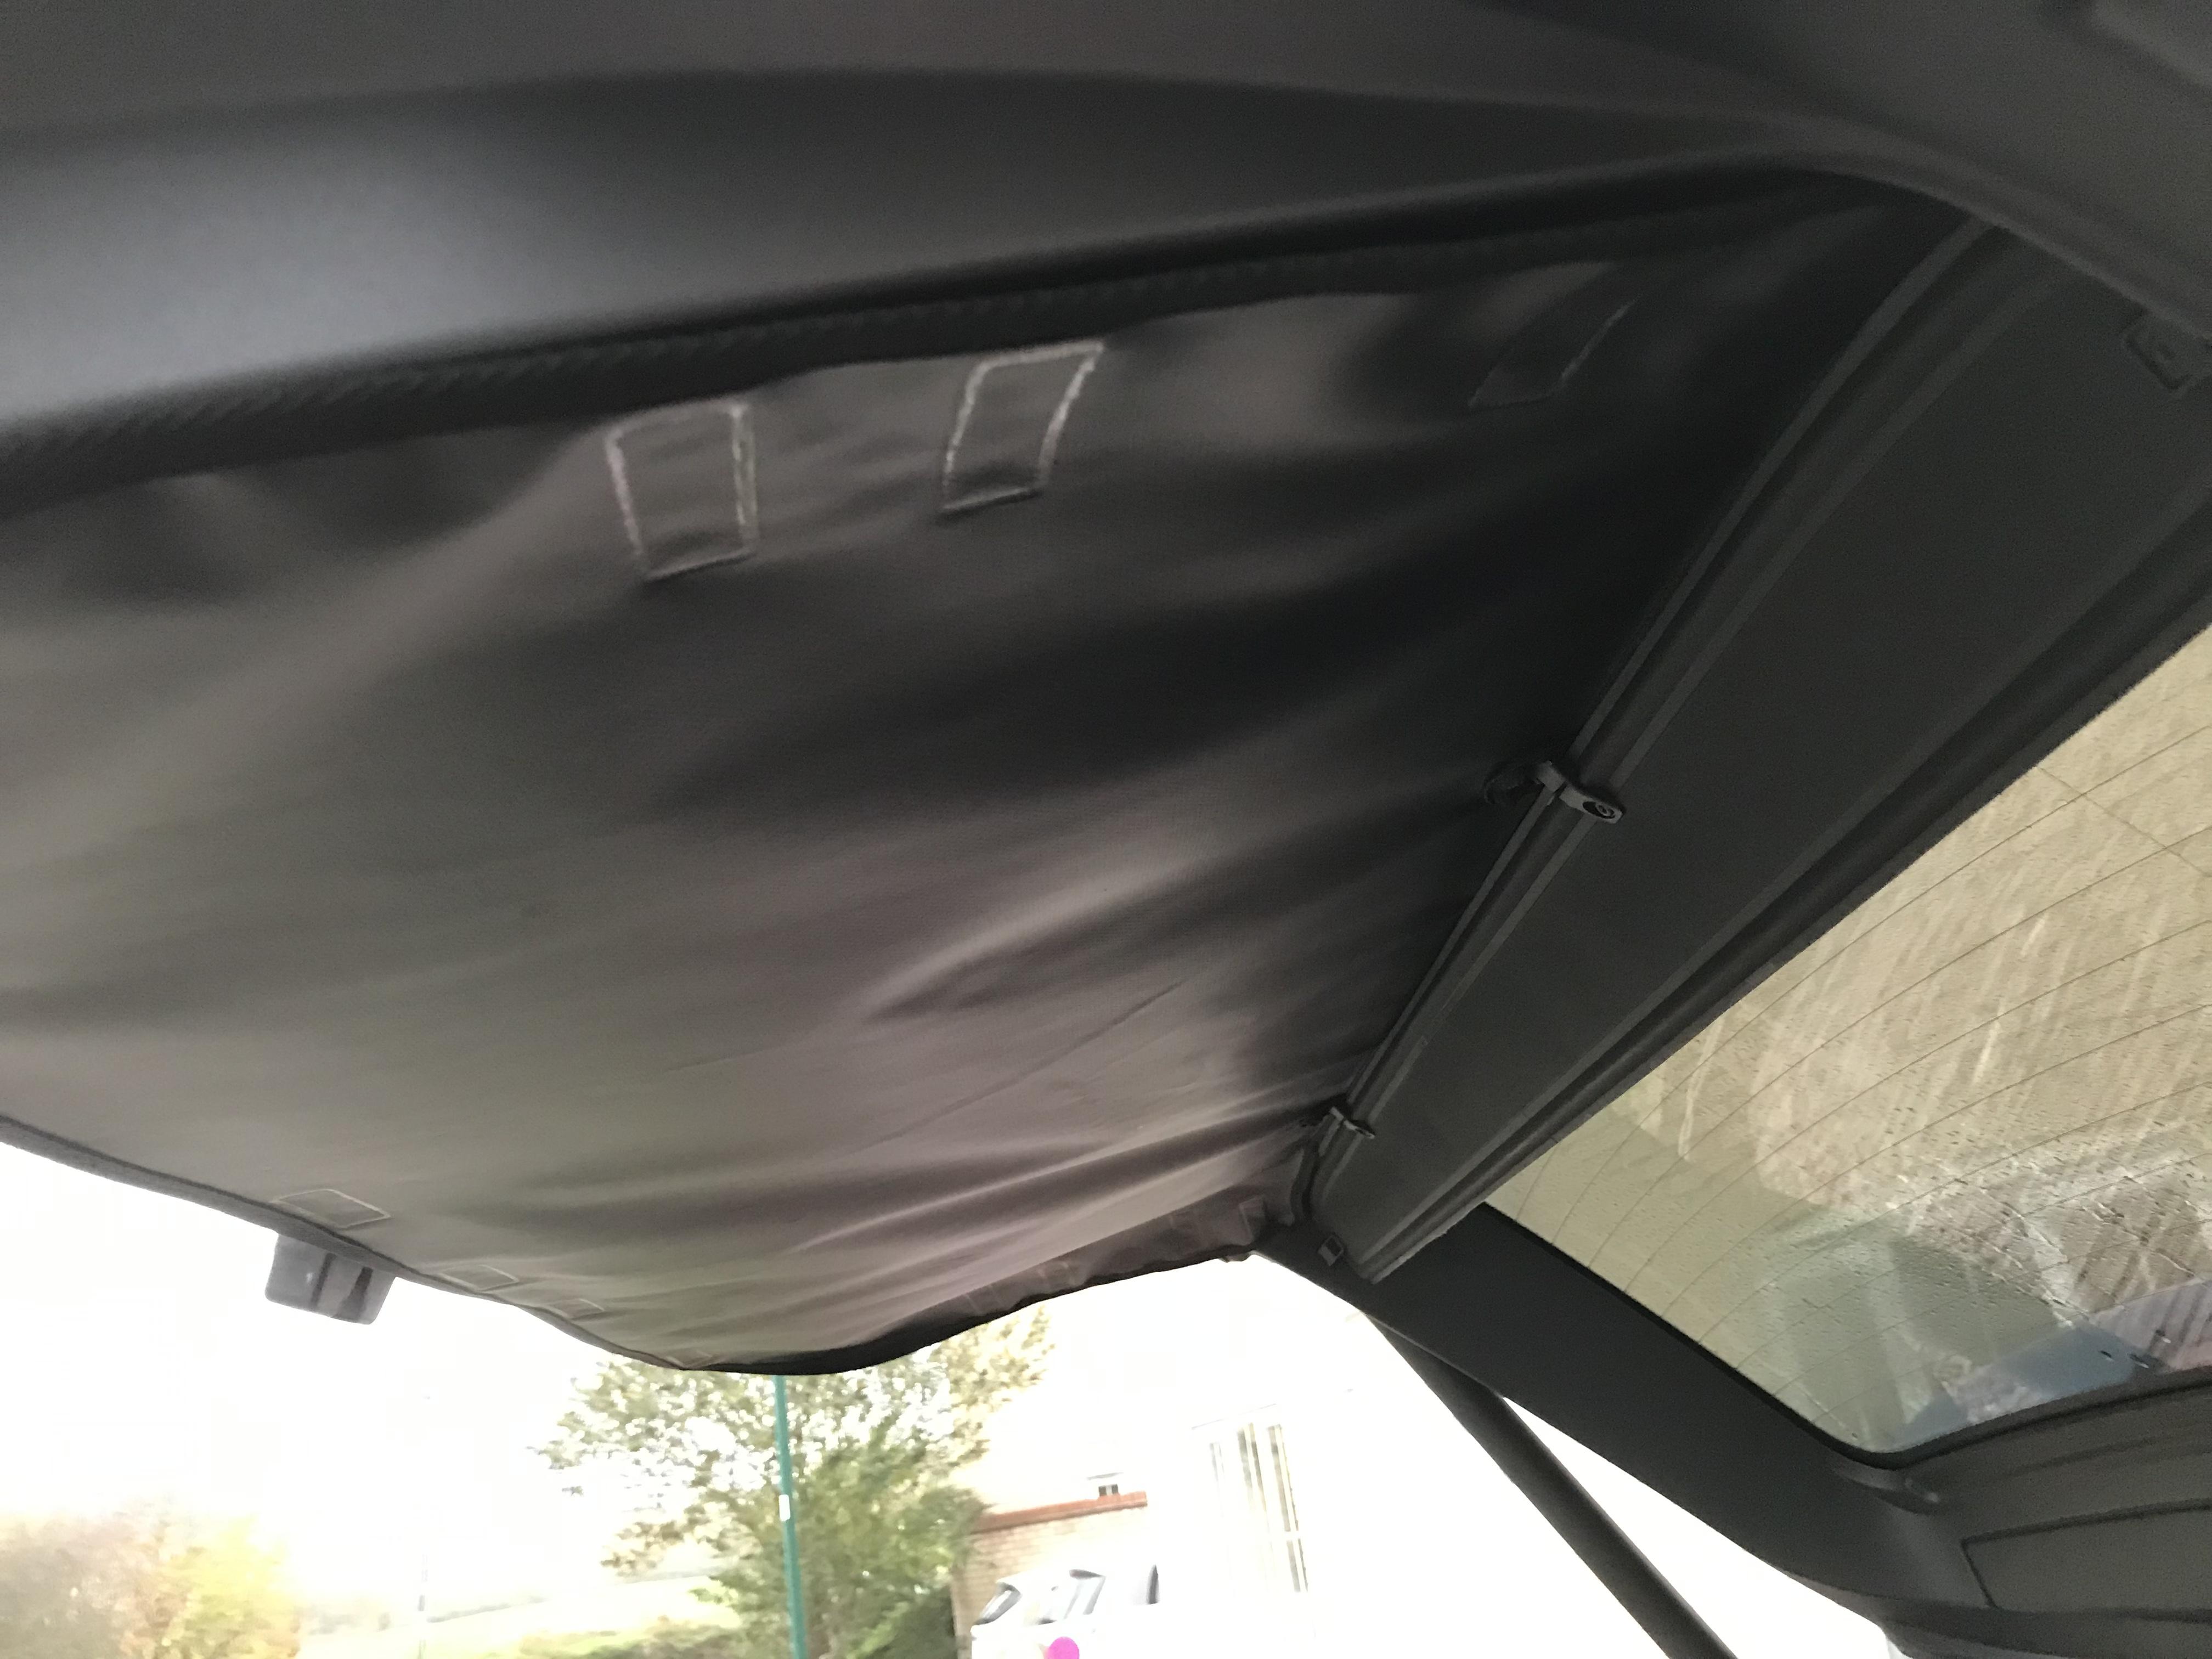
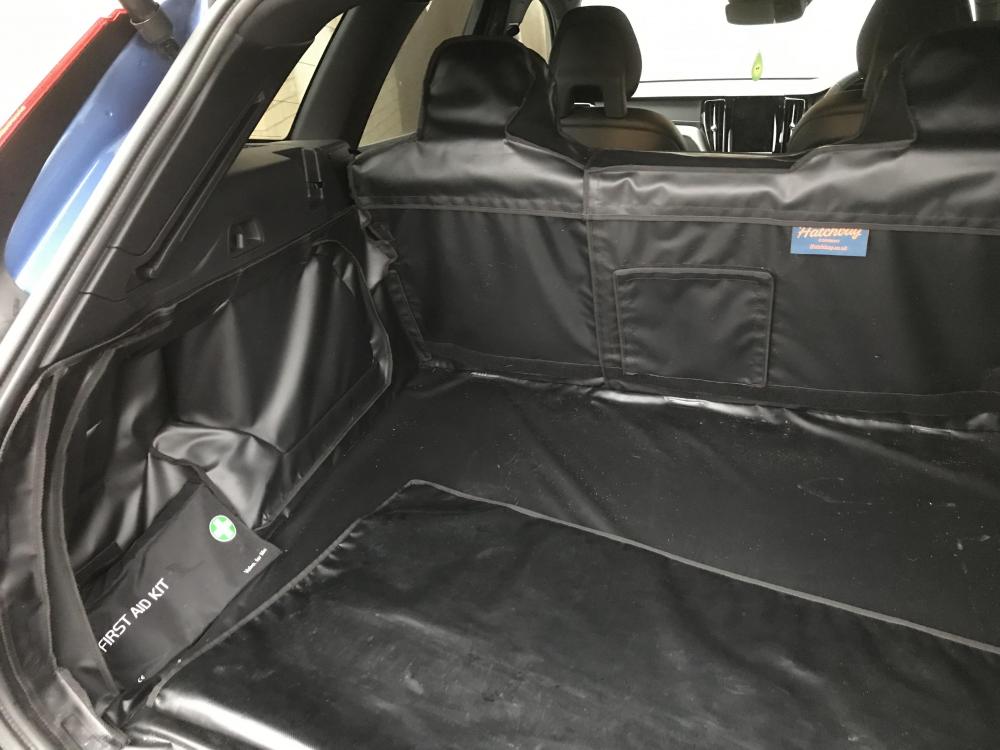
I've bough Hatchbags for the family cars for the last few years. They will likely do all the bits (including protection for the inside of the hatchback) you want and tailored to your specific car model. Not cheap but well made and a perfect fit. Vinyl like material, so if you are looking for a moulded plastic tray boot liner, they may not be for you. As a dog owner, if I changed my car, it'd be one of the first things I buy - makes vacuuming and cleaning a lot easier. https://www.hatchbag.co.uk With the bumper protector out. I usually leave it in and just fold it back in to the car when not in use... The one below shows the hatchback liner - Useful to stop scratches when things slide about .... The one below shows the tailored headrest protector - essential component for stopping Labrador drool ? I also have the boot liner extension (not shown) which Velcros around the front seat head rests and is for use when the rear seats are folded down.

- 77 replies
-
- 1
-

-
- estate car
- load capacity
- (and 2 more)
-
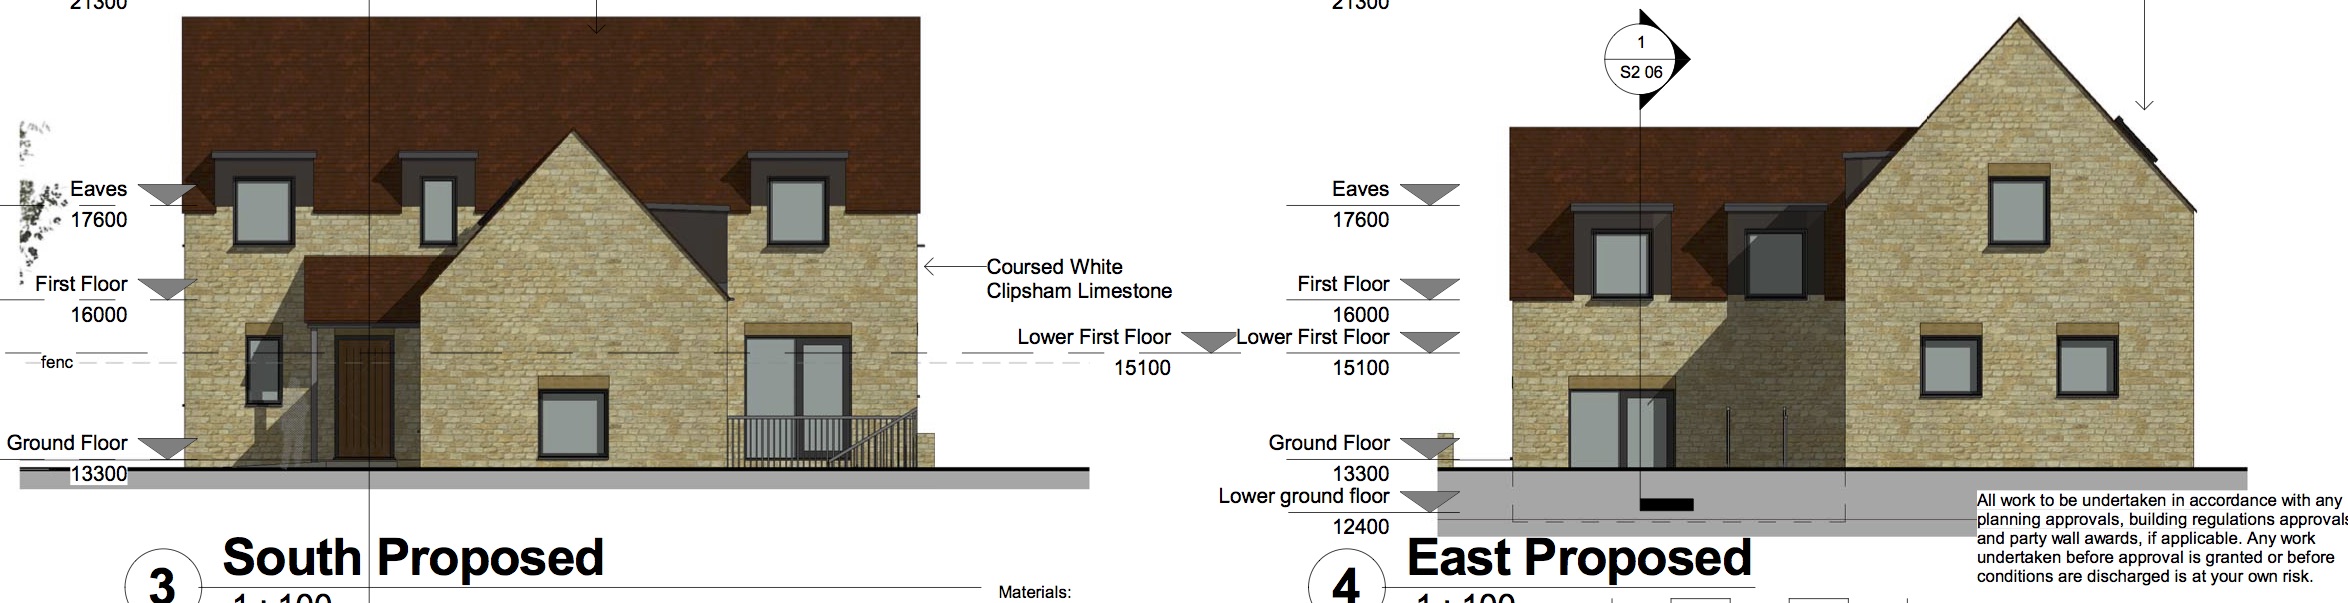
complementing colours window frames and brick work
Cambs replied to Sjk's topic in New House & Self Build Design
We spent a long time pondering over our choice of colours. Our build will be clad in limestone and we were worried about getting a complementary window colour. We began by buying a K5 RAL colour chart like this one: https://www.amazon.co.uk/RAL-K5-Classic-Semi-Matt/dp/B002LFVOZC/ref=sr_1_1?ie=UTF8&qid=1542230285&sr=8-1&keywords=ral+colour+chart+k5 The colour chips are a reasonable size, so that gave us a good starting point to narrow it down to a smaller number of colours. The next step was to buy a small sheet of ply and then cut it up into approximately A4 sized chunks. Then off to our local Brewers decorator centre - they will mix paints to any RAL colour and can do small sample sized pots (Albany brand, I think) for a few ££ each - can’t remember exactly how much but it was less than a fiver each. We bought about half a dozen, undercoated the ply and then gave it a couple of coats of the RAL colours. I’m pleased to say they ended up looking almost exactly like the RAL K5 colour chips and the larger size helps you narrow it down even further. You won’t necessarily get the right sheen but the colour was certainly a good match. It worked for us and got us to an informed decision, I’m pleased to say. It worked well for us - so much so that we bought some Farrow and Ball sample pots and did exactly the same for our potential kitchen colours. Kitchen will be a custom painted one from DIY Kitchens. -
Apologies if this has been posted elsewhere, but i had a search on here but couldn’t seem to find any guide prices for the latest Sunamp models. A quick google turned this up.... http://www.bublshop.co.uk/sunamp-heat-batteries-series-3/c326
-
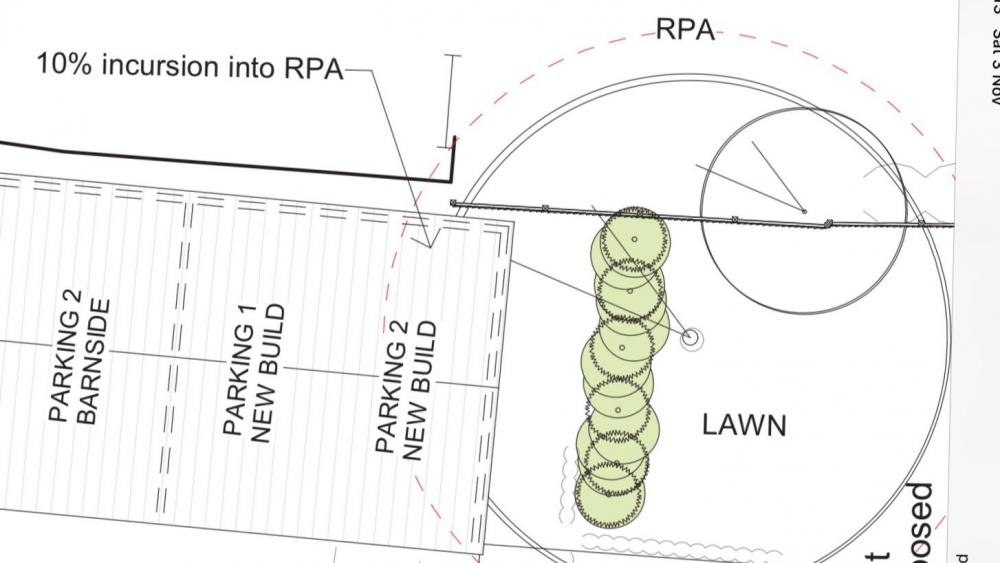
From the Woodland Trust’s website: How is a root protection area calculated? The British Standard 5837, RPA is calculated by multiplying the diameter of the tree at breast height in meters by 12 but is capped as an area with a radius of 15m. .... and then I guess my designer just calculated the area of the garage that was encroaching into the RPA and divided it by the area of the RPA to get to his 10%. You can find a copy of the relevant BS online in some places - it costs £224 to buy from BSI or just Google “Crawley BS5837” and you can see it for £0 ?. Have a look through that to see what is relevant for what you are trying to do but, for example, section 7.4.2.3 states “New permanent hard surfacing should not exceed 20% of any existing unsurfaced ground within the RPA.”
-
We’re building in a conservation area and trees are protected. The tree officer said : “The proposed site plan indicates the rpa incursion of 10% of a single tree. This is acceptable.” So you can encroach into the RPA. The attached is extracted from our application drawings.
-
Through Cavity Mailbox.....Recommendations?
Cambs replied to Rob99's topic in General Construction Issues
I’ve had one of the large drop boxes for a couple of years now. Got a clever mechanism that means you can’t fish the parcel out once it has been dropped in. Very happy with my purchase. I’m not going to have any kind of letterbox in the new build either, so this one will move with me. Still get the occasional delivery driver knocking on the door, but the postie told me he liked it! It’s very similar to this one: https://www.amazon.co.uk/gp/product/B016XUXJAS/ref=oh_aui_search_detailpage?ie=UTF8&psc=1 -
Grand Designs Live Birmingham
Cambs replied to ultramods's topic in General Self Build & DIY Discussion
A quick web search turned this one up - open to the public on 22nd September. Never been though. Might be worth a look at the Exhibitor list to see if it might meet your needs https://www.100percentdesign.co.uk/exhibitor-list -
Thought this might be of interest - found it via the Passivehouse Plus website. I'd not seen this build system before. https://www.glavloc.com
-
Here's a couple of This Old House videos showing how to epoxy a garage floor..... The first one says 20 mins working time and the second one says a couple of hours. Note the spiked shoes on the first video that allows them to walk across it. May not be good enough for a house floor finish though. https://www.thisoldhouse.com/how-to/how-to-apply-epoxy-coating-to-garage-floor https://www.thisoldhouse.com/how-to/how-to-upgrade-garage-floor-epoxy-coat
-
Cross posted same as JohnW above....
-
An alternative might be ClosetMaid - http://www.closetmaid.co.uk. I think it'll work out a bit cheaper. We've used both in the past - Elfa is a bit more heavy duty, I think, than Closet Maid but if it's not being moved from house to house it may not matter. We've moved our Elfa stuff about half a dozen times - currently used in the garage. Certainly no complaints about the durability of either.
-
Expensive, yes, but with that one incident it has probably more than paid for itself and you no longer have to go through life fretting about the money you spent on it..... It worked when it was needed and saved you a lot of money by doing so. Excellent result for you.
-
House Cooling ideas
Cambs replied to mike2016's topic in Energy Efficient & Sustainable Design Concepts
We did the same on our last self build - rooms in roof and conventional insulation meant that the bedrooms got really hot. Put in split a/c units and they worked a treat but an expensive fix that I’d rather have avoided. Next build has no gas so possible solution being considered is an ASHP with a cooling function. Cool the UFH in the slab downstairs and might go for fan coil radiators (e.g Panasonic Aquarea air radiators) for upstairs to cool. Hopefully won’t need it because next roof will be cellulose insulation so should perform better in hot weather. All still to be decided though. Still got to sort out shading etc. -
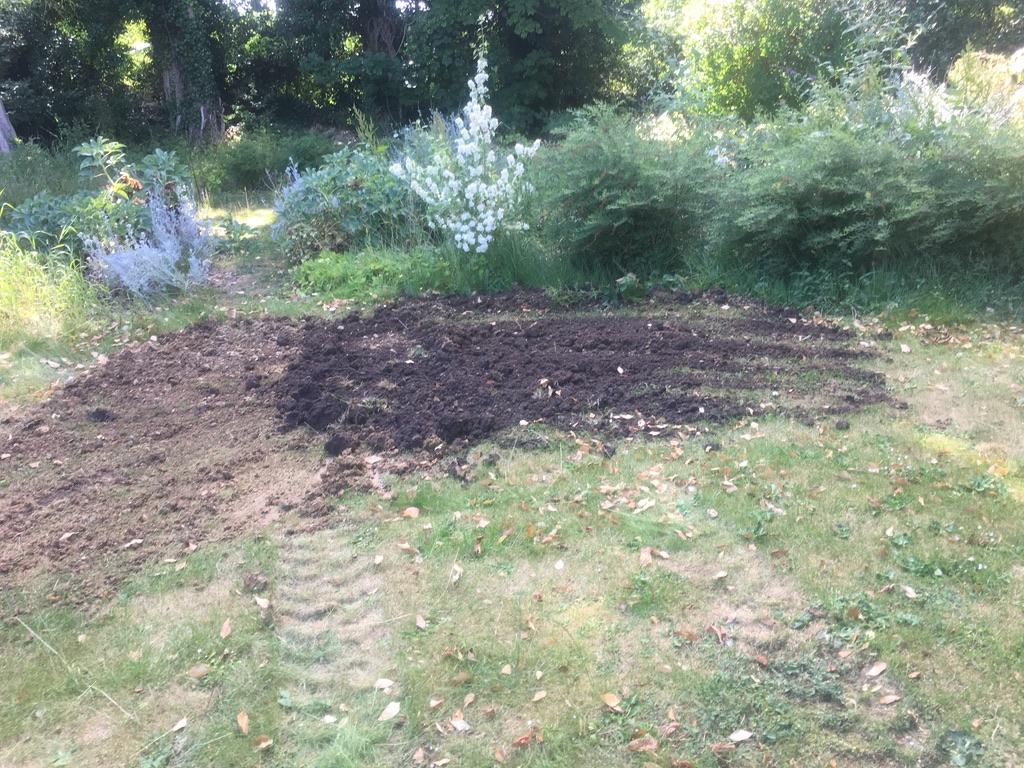
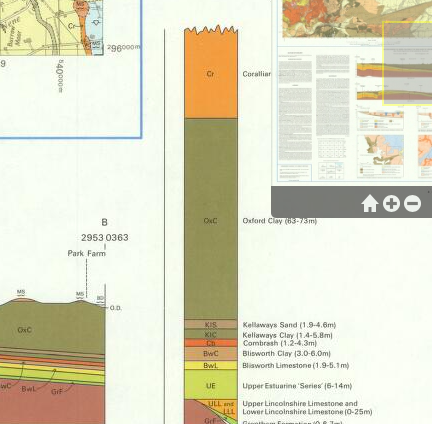
We had one that we had used previously but he had retired. Yell was my starting point - search term "ground investigation" + a county will turn up specialist site investigators + structural engineers who do this. Big specialist companies seemed to lack local knowledge and so quotes didn't necessarily reflect local geology, I suspect. Alternatively, they perhaps had a "one size fits all model" - they seemed to plan for drilling multiple deep holes. We went for a structural engineer. Our structural engineer was a small practice from out in the Fens, so about 20 miles east of us, but he was willing (had to, because of being out in the country) travel. He had a pretty good idea of what he would find before he turned up, because he knew the area. We provided the digger and driver and he was happy with trial pits. Give "Ground Investigation" or "Site Investigation" + East Leicestershire a try on Yell ........ It might be worth having a look online for the British Geological Survey map for your area. It was this series - "Geological Survey of England and Wales 1:63,360/1:50,000 geological map series, New Series" that our SE used, I believe. Here's a link to the region selector: http://www.bgs.ac.uk/data/maps/maps.cfc?method=listResults&MapName=&series=E50k&scale=&getLatest=Y&pageSize=100 Here are a couple of screen grabs from the online maps. Our area was one of the yellow ones "BwL" below - Blisworth Limestone, expected at 1.9m down and he found it at 1.6m.

-
Some will actually end up in next door's garden - it's their side garden that we've bought, but we'll keep what we can
-
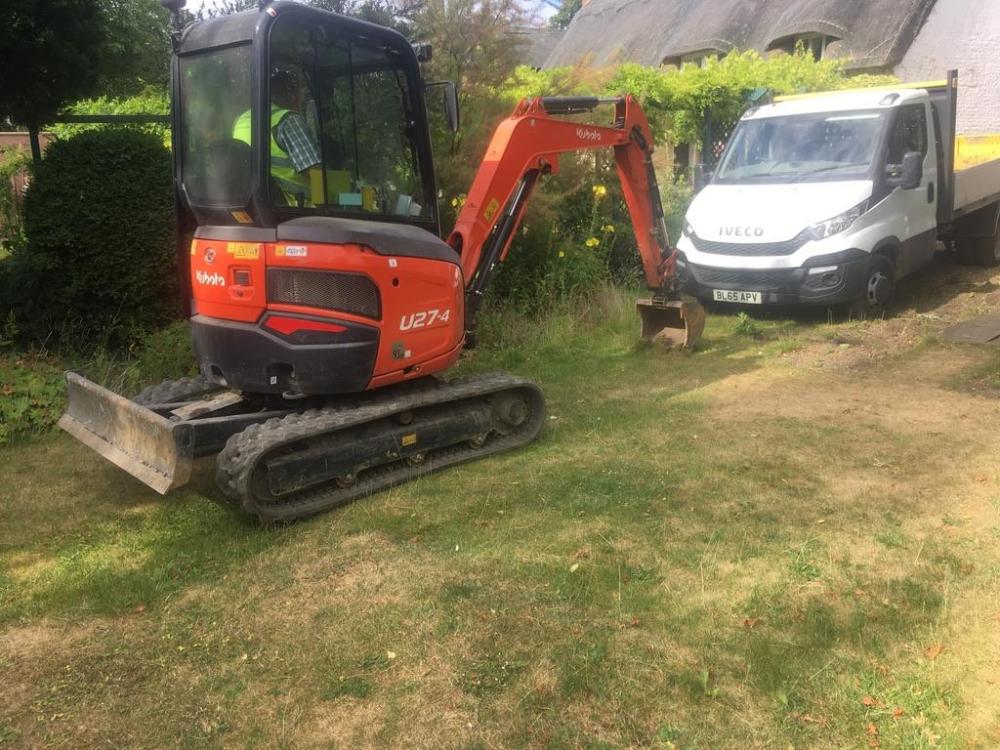
Following on from @newhome's post earlier, here's another good news story.... We had our soil survey done today, so it finally feels like we are getting started after two years of buying the plot and getting planning permission for our plot which sits in the curtilage of a listed building. I went out to four or five structural engineers nearby who could do the survey - prices ranged from £620 + we supply the digger and driver to almost £4K!! We went with the £620 one - his response was professional, they were a local firm and our groundworker knew of him and, I have to say, we weren't disappointed in how today went. The groundworker turned up just after 8am, unloaded his little Kubota digger, grubbed up a few bushes to make access easier and was on site within half an hour. The structural engineer turned up as promised at 9am, took his geological map out, looked at the area and said "I expect to hit sandstone at about one and a half metres down" He then said to the digger driver "Dig a hole there...." The groundworker is a bit of a JCB artiste, so we had a hole almost exactly one small bucket wide. We stopped about a metre down so the engineer could have a look and take some photos. After another half a metre there was a clank as we hit the expected solid stone. A few more photos, the engineer looked over what we dug out and said he knew exactly what we had, so need need to go any deeper Another hole dug at the back of the plot (there are some large poplars at the end of the plot) - same process again, dig a metre, stop, have a look and keep digging until the "clank" happens as we hit stone at about one and a half metres down. There are a few roots from the poplars among the mix of soil, light clay and stone, but nothing to worry about. Looking at what comes out of the holes, Structural engineer says no need to take "shear vane tests to estimate safe bearing pressure in clay soils" and no need to spend an extra £250 on further soil testing "if clay soils are apparent" - the bits in quotation marks are what was mentioned in his quote to us. Groundworker fills the holes in. You'd hardly know he had been there. We now wait for the structural engineer's report, but foundations should be fairly straightforward which is a big weight off any self builder's mind - you can plan for everything once you get out of the ground. Had a walk round with the groundworker and found the water - running in a straight line along the pavement a couple of feet from the front of the plot - as expected from the DigDat data that I had got earlier and then spotted the mains sewer (with a manhole we may be able to tap in to) in the middle of the road, again, exactly as expected from the DigDat data. Two more good outcomes..... Meeting the timber frame company on site to look at access later on today - hope that goes as well as this morning has gone. Here are some photos ....... The moment that ground was broken Let's see what we've got here ...... .... and after the second hole was filled in.

-
I was there on Saturday - first visit to the showroom but I got my last kitchen from them. The showroom was well worth the visit. Free cakes and biscuits, tea, coffee and soft drinks were excellent too ? Very helpful, non-pushy staff. I didn't speak to them about design but I think I heard them say that they are working on the planning tool being available again. I really liked the area where they had all the unit variants together in one place so that you could see pretty much all of the options available at a glance. You can see these in the online showroom - follow the link and the click on "Information Centre" -> ".....Examples" to see what I mean. https://www.diy-kitchens.com/about-diy-kitchens/showroom/ I know someone who has just installed a kitchen from them. They also got their work surfaces via them and had them templated one week and installed the next, with no problems. I'll definitely be going back to them for the kitchen in my new build
-
Planning permission (close to a listed building).
Cambs replied to Russdl's topic in Planning Permission
Well done for getting permission. Perseverance paid off. Now for the easy part ? You need to keep an eye out for the Planning conditions, especially with the listed building nearby. You might end up with an Archaeolgist digging your foundations with a teaspoon .... -
Are Cat 5 sockets required all round the house
Cambs replied to Jude1234's topic in Networks, AV, Security & Automation
I'd put as many in as possible - cheap and easy to do now, difficult to retro fit. Also avoids potential problems with neighbour's wifi using the same channel as yours and causing issues. I think that's what has been happening to us in our new rented accommodation. iStumbler seems to show a number of devices using the same channels as our defaults were set to....