


markharro
-
Posts
644 -
Joined
-
Last visited
Everything posted by markharro
-
Thanks @Mike thats helpful. 2 Should I fix the lower row of tiles first and wait until they are bombproof and then fix the upper tier above so that they get proper support from the lower level? Thinking more about this will this work because if I do it this way how do I use levelling spacers between the bottom and top rows to ensure that the top row ends up with the face level with the bottom? Is it maybe better to use this Ardex fibre reinforced adhesive - https://ardex.co.uk/products/tile-adhesives/microtec-cement-based-fibre-reinforced-tile-adhesives/ and fit bottom and top rows at the same time? 4 My last tiling was years ago using the basic "X" plastic spacers. Now I see things are more sophisticated with these types - https://www.protilertools.co.uk/product/rubi-delta-levelling-system-kit--1mm--03956 - which appear to give you set grout gaps but also allow you to level the faces of the tiles. This particular example appears to be ok for the 12mm tiles we plan to use but what does the 1mm in brackets refer to as other kits from this brand offer 1.5mm/2mm etc! Is this measurement the width of the gap between tiles? Can anyone comment on this? 6 Luckily we wont have to cut many tiles but I will a few. Could I use my track saw with a diamond blade and dry cut and get an acceptable result? Noted on the wet saw advice but how do you do right angled cuts eg for a niche? My point 9 below 9 We are planning on a shower niche and this would require an L or U shaped cut out of some tiles - this wouldn't be possible with the track saw so how would this be achieved?
-
Ultrasonic cleaner to clean power sockets for re-use
markharro replied to markharro's topic in Electrics - Other
Thanks @dpmiller but given that these sockets are already old and tarnished would it be a problem for my intended use ie to clean the dust and grime from the sockets and initially at least restore the copper metal surface? My thinking was to remove the sockets and spray WD40 on the metal parts to displace the water as they dried. Is that not realistic? -
Ive not finished the list yet......compound cuts with the mitre saw; special SS screws with black heads; oh and my partner's sub mm tolerances - well she has started to relent a little now thankfully!
-
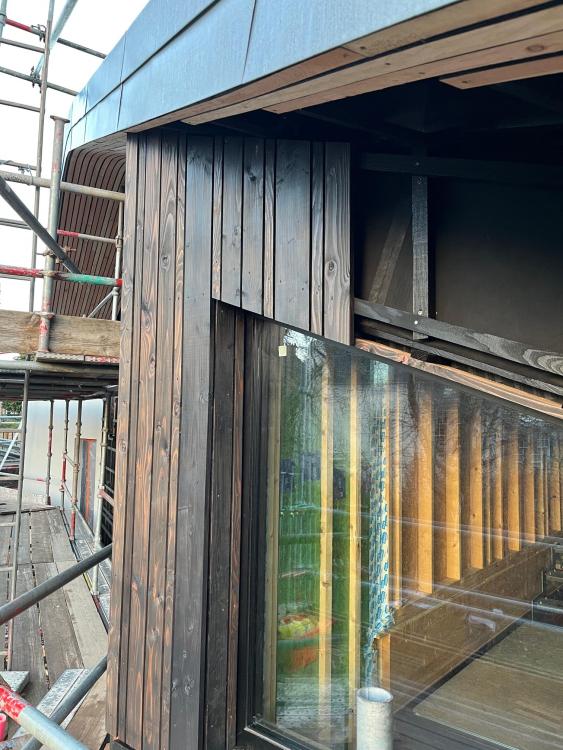
Thanks - yes black stained vertical battens; then planed the horizontal batten top to give a fall for rain to drip off; then those stained black; then Douglas Fir cladding stained, measured, cut and fitted. The mitre saw is paying for itself. Its taking a huge amount of time but the end result is now emerging.
-
This is just what we are doing at the moment. Not sure we are going the cheapest route mind you but pleased with how its turning out....... Top tip - you need the correct membrane at the back designed for open cladding. In the pro clima range its this one - https://www.ecologicalbuildingsystems.com/product/solitex-fronta-quattro
-
Ultrasonic cleaner to clean power sockets for re-use
markharro replied to markharro's topic in Electrics - Other
Im assuming that the metal inside the typical socket is either copper or brass or similar. Would a 20 minute immersion in distilled water followed by drying really be an issue? -
Ultrasonic cleaner to clean power sockets for re-use
markharro replied to markharro's topic in Electrics - Other
Hi @dpmiller I get the distilled water but I dont understand your second sentence. Do you mean if you use distilled water it causes tarnishing? -
I have built up a collection of pre-used sockets and switches etc and am now thinking about the best way to give them a spruce up - any reason not to use an ultrasonic cleaner for this purpose?
-
Yes anyway moving on can anyone provide any further comments on my original points - 1 Spacers for the first row of tiles. Is it realistic to think that I can just pull these out after the adhesive has set? If not how are they hidden? 3 Is there any specific gap between tiles for grouting for these large format tiles? 4 can anyone comment on these es - https://www.protilertools.co.uk/product/rubi-delta-levelling-system-kit--1mm--03956 - in particular what does the 1mm in brackets refer to as other kits from this brand offer 1.5mm/2mm etc! Is this measurement the width of the gap between tiles? 5 I have a notched trowel somewhere for the adhesive but should I be using a particular depth of notch? I guess this is linked to the depth of adhesive to use......how do I work that out? 6 Luckily we wont have to cut many tiles but I will a few. Could I use my track saw with a diamond blade and dry cut and get an acceptable result? 7 If so the saw is designed for a 165mm diameter blade. Would I need this exact size or would a slightly smaller one work? 9 We are planning on a shower niche and this would require an L or U shaped cut out of some tiles - this wouldn't be possible with the track saw so how would this be achieved? 10 Any other relevant tips?
-
remember these are wall tiles! and a year of self building starting with 18mm ply on the roof and now 25kg buckets of render and hefty fermacell boards has all served to build up the muscles! Back to the tile adhesive the Ardex tech support guy recommended rapid set I think for the reason that it would help to avoid the tiles sagging but I guess with spacers at the bottom and just doing the bottom row first that wouldnt be an issue?
-
Bit of a long trek for me from Edinburgh
-
I saw that but sadly you are at the other end of the country for me!
-
anyone offer any critique on this?
-
Best model acoustic insulation for studs and joists?
markharro replied to ashthekid's topic in Sound Insulation
Thanks - this indeed was very helpful - looks like the answer is a resounding don't bother. Hopefully someone might be interested in buying my surplus EPS now - currently advertised on the Marketplace -
Anyone know a good large format tile cutting company?
markharro replied to hendriQ's topic in Wall Tiles & Tiling
Looks good @hendriQ how did you do the ceiling? -
Best model acoustic insulation for studs and joists?
markharro replied to ashthekid's topic in Sound Insulation
ANother question on sound insulation. We have quite a few sheets of EPS100 and 300 insulation that was used for the tray for our slab left over. They are 100mm thick. WOuld these work specifically as sound insulation and if so how would they perform compared to say a 45 density rockwool batt? -
I have tiled before but I need to up my skills as we are planning to use 610 x 1220mm 12mm thick marble tiles in our shower-room. The plan is to mount on Hardie backer board in portrait format so that 2 vertically will span floor to ceiling. I have my head around doing the initial boarding now and have got some useful info from the supplier for the tiles eg use white rapid setting tile adhesive. There is also a need to seal the surface before grouting etc. The main gaps in my knowledge are as follows - 1 I need a gap I think at floor level (our concrete slab) - 3mm or so? I assume I just mount the tiles on spacers to give the gap? Will the spacers come out after the adhesive has set? If not how are they hidden? 2 Should I fix the lower row of tiles first and wait until they are bombproof and then fix the upper tier above so that they get proper support from the lower level? 3 Is there any specific gap between tiles for grouting for these large format tiles? 4 My last tiling was years ago using the basic "X" plastic spacers. Now I see things are more sophisticated with these types - https://www.protilertools.co.uk/product/rubi-delta-levelling-system-kit--1mm--03956 - which appear to give you set grout gaps but also allow you to level the faces of the tiles. This particular example appears to be ok for the 12mm tiles we plan to use but what does the 1mm in brackets refer to as other kits from this brand offer 1.5mm/2mm etc! Is this measurement the width of the gap between tiles? 5 I have a notched trowel somewhere for the adhesive but should I be using a particular depth of notch? I guess this is linked to the depth of adhesive to use......how do I work that out? 6 Luckily we wont have to cut many tiles but I will a few. Could I use my track saw with a diamond blade and dry cut and get an acceptable result? 7 If so the saw is designed for a 165mm diameter blade. Would I need this exact size or would a slightly smaller one work? 8 Will I cope with my 1200mm level or should I buy something longer? 9 We are planning on a shower niche and this would require an L or U shaped cut out of some tiles - this wouldn't be possible with the track saw so how would this be achieved? 10 Any other relevant tips? Many thanks.
-
How to wire my renovation
markharro replied to FrankHouse's topic in Networks, AV, Security & Automation
Hi @joth just revisiting this now that I am doing my wiring. Can I ask how you used these? Did you terminate the CAT6A into a wall faceplate like this - https://www.kenable.co.uk/en/networking/network-accessories/network-face-plates-modules/9323-shielded-rj45-face-plate-cat6a-toolless-single-port-with-keystones-009323-5055781241260.html ? And then connect a short length of ethernet cable surface mounted into the PoE to USBC adaptor? Or did you hide the adaptor in the wall and run a short USB cable from it to a USB female wallplate? This adaptor seems to be for USB A. Can you get something similar for USB C? I also have a plan to run PoE to allow an Apple Homepod mini to be used in the bathroom. The issue here is it needs a 20W supply at 9V I think. Any similar adaptor that I could use for this? I found this on a previous search which I think would work but its pretty expensive.....would much rather have something around the £20 level - https://www.networkwebcams.co.uk/microchip-pd-usb-dp60-poe-to-usb-c-adapter/ -
Its only between 50cm - 1m as a replacement for a standard power lead. It not getting boarded in anywhere and I will terminate in a standard power plug into a socket.
-
Hi I am making up a power cable with a special right angle connector and just want to make sure that this cable will be beefy enough to cope? I am assuming so as its a left over from our electrician wiring the house but best to check?
-
That stone looks nice - and expensive or did you manage to get a deal! We have a very similar space to outfit so interested in your ideas. Where did you source the brackets?
-
Hi @Nickfromwales there seem to be lots of variants of this Sikaflex stuff. You couldnt possibly post a link to the actual white one you tend to use? thanks
-
I am trying to work out how to attempt my own shower-room project so have been interested to read these comments. Atm I am thinking of using Hardie backer board as the tile backer board with their tape and screws as it seems an easy to comprehend solution. Our merchant has suggested STS construction board as an alternative which seems similar except it appears to rely on their adhesive between sheets (https://nomoreply.co.uk/installation-essentials/mega-strength-construction-adhesive/ ) and no tape which doesn't seem so confidence inducing!? On top we are thinking of using large format marble tiles. The floor is a (MBC) insulated slab and it was poured with a 900 x 900 shuttered recess with the idea that we will flush mount the tray with the slab - the powerfloated slab being our final floor finish. I will be calling on our plumber to help me put in the tray as I cant really get my head around it and the other area of concern is how to tank the interface between the walls and the shower-tray and also the tiled walls where they meet the slab more generally? We want to create an (almost wet room) but its challenging because we are not going to add any tiles or screed etc to the concrete slab. As I understand the tanking products you would normally use a combo of liquid waterproofing "paint" and special tape to "tank"? So a few questions - if either the Hardie or STS board is used and done in accordance with the respective manufacturer's procedures do I still need the tanking paint at all? Or maybe best to use it on the 3 shower walls at least? Next question is how to I waterproof the wall floor junction and wall/tray junction? Do I use the right angled tape and try to minimise the depth of tape stuck to the floor and tray to around the 12mm thickness of the marble tiles so that its hidden when the tiles are on? And to get back to the niche issue - I want to create one in the shower and am attracted to the Schluter product you picture. Did you consider the version they sell that has an integrated LED? With the one you used is it easy enough to instal? Does it come with instructions? Do you need to use any of what seem to be numerous other Schluter products to make it waterproof or can you use generic products? Any other tips or critique of my plans....perhaps from @Nickfromwales ? thanks
-
Zehnder Q350 + ComfoPost CW12
markharro replied to BartW's topic in Mechanical Ventilation with Heat Recovery (MVHR)
hi no i ditched the comfopost idea in the end as didnt think it was going to be worthwhile -
Im in a similar position and remember checking with Octopus that their meter does this and they said yes. We have 3phase into the house with an ASHP to be installed and 6kw of solar but with the potential to expand to 11kw. We have a 3 phase inverter I think. We are getting a Zappi with the higher 22kw charge rate but I am a bit clueless about the Viallant heat pump. Is there such a thing as a 3phase ASHP and should I be specifying thats what I need? If so why?


