


markharro
-
Posts
627 -
Joined
-
Last visited
Everything posted by markharro
-
Hi @sean1933 did you use this EzyJamb product? I was considering it as well but didnt realise it was £500 per door kit!
-
Hi @ragg987 we also have MBC and I am thinking of using fermacell with 75mm medium density rockwool. Are you completely happy or would you have changed anything? What do you mean by sealed air gaps?
-
the 250 Pro? Can I ask @nod where you got that for £320 as the prices I see online are quite a lot higher.
-
Dont blame me - it was the timber supplier's recommendation! But actually in a way it is less OCD as we have ended up not bothering too much about getting the screws level because of the camouflage
-
Slightly random addition to this thread but I am currently trying to work out the lighting for our utility room. The room is about 5m x 1.5m but it has a very high ceiling (3.5m). I "asked" Chat GPT and got this - Certainly! Let's adjust the calculation for a room with a reduced area of 8 square meters, a height of 3.5 meters, and aiming for an illuminance level of 500 lux: Room Volume (cubic meters)=Room Area (square meters)×Height (meters)Room Volume (cubic meters)=Room Area (square meters)×Height (meters) Room Volume (cubic meters)=8 square meters×3.5 meters=28 cubic metersRoom Volume (cubic meters)=8square meters×3.5meters=28cubic meters Now, use the illuminance formula to calculate the required lumens: Lumens=Illuminance (lux)×Room Volume (cubic meters)Lumens=Illuminance (lux)×Room Volume (cubic meters) Lumens=500 lux×28 cubic meters=14,000 lumensLumens=500lux×28cubic meters=14,000lumens So, for a room with a reduced area of 8 square meters, a height of 3.5 meters, and aiming for an illuminance level of 500 lux, you would need approximately 14,000 lumens of light. Adjustments can be made based on specific room characteristics and lighting preferences. 14,000 lumens sound like a lot so I thought I would ask what some of the experts on this thread thought? If its relevant I am planning to fit 3 flush ceiling lights (probably LED panels) then we will have a couple of directional wall lights lower down. thanks
-
closed panel walls fixings Fixing to the internal walls of a passive house
markharro replied to KevT's topic in Introduce Yourself
Our MBC frame is lined with Propassiv I think but then battened to take lining boards so there shouldn't be any need to screw into the Propassiv. I am trying out using Fermacell but I may regret it! -
Ultrasonic cleaner to clean power sockets for re-use
markharro replied to markharro's topic in Electrics - Other
That was my first thought too! I suspect its not so much the plugs' prongs scraping the metal but rather the wiring terminals inside the sockets that could be the issue? -
Ultrasonic cleaner to clean power sockets for re-use
markharro replied to markharro's topic in Electrics - Other
IPA = Isopropyl Alcohol? -
Thanks @Mike thats helpful. 2 Should I fix the lower row of tiles first and wait until they are bombproof and then fix the upper tier above so that they get proper support from the lower level? Thinking more about this will this work because if I do it this way how do I use levelling spacers between the bottom and top rows to ensure that the top row ends up with the face level with the bottom? Is it maybe better to use this Ardex fibre reinforced adhesive - https://ardex.co.uk/products/tile-adhesives/microtec-cement-based-fibre-reinforced-tile-adhesives/ and fit bottom and top rows at the same time? 4 My last tiling was years ago using the basic "X" plastic spacers. Now I see things are more sophisticated with these types - https://www.protilertools.co.uk/product/rubi-delta-levelling-system-kit--1mm--03956 - which appear to give you set grout gaps but also allow you to level the faces of the tiles. This particular example appears to be ok for the 12mm tiles we plan to use but what does the 1mm in brackets refer to as other kits from this brand offer 1.5mm/2mm etc! Is this measurement the width of the gap between tiles? Can anyone comment on this? 6 Luckily we wont have to cut many tiles but I will a few. Could I use my track saw with a diamond blade and dry cut and get an acceptable result? Noted on the wet saw advice but how do you do right angled cuts eg for a niche? My point 9 below 9 We are planning on a shower niche and this would require an L or U shaped cut out of some tiles - this wouldn't be possible with the track saw so how would this be achieved?
-
Ultrasonic cleaner to clean power sockets for re-use
markharro replied to markharro's topic in Electrics - Other
Thanks @dpmiller but given that these sockets are already old and tarnished would it be a problem for my intended use ie to clean the dust and grime from the sockets and initially at least restore the copper metal surface? My thinking was to remove the sockets and spray WD40 on the metal parts to displace the water as they dried. Is that not realistic? -
Ive not finished the list yet......compound cuts with the mitre saw; special SS screws with black heads; oh and my partner's sub mm tolerances - well she has started to relent a little now thankfully!
-
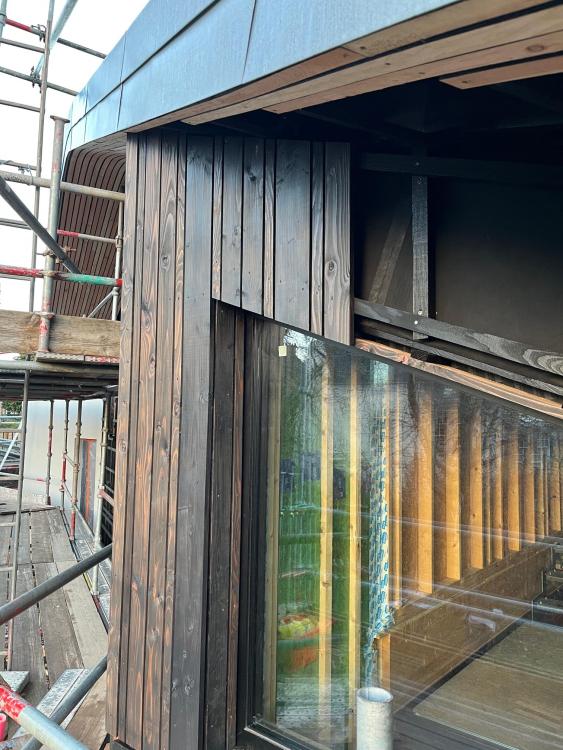
Thanks - yes black stained vertical battens; then planed the horizontal batten top to give a fall for rain to drip off; then those stained black; then Douglas Fir cladding stained, measured, cut and fitted. The mitre saw is paying for itself. Its taking a huge amount of time but the end result is now emerging.
-
This is just what we are doing at the moment. Not sure we are going the cheapest route mind you but pleased with how its turning out....... Top tip - you need the correct membrane at the back designed for open cladding. In the pro clima range its this one - https://www.ecologicalbuildingsystems.com/product/solitex-fronta-quattro
-
Ultrasonic cleaner to clean power sockets for re-use
markharro replied to markharro's topic in Electrics - Other
Im assuming that the metal inside the typical socket is either copper or brass or similar. Would a 20 minute immersion in distilled water followed by drying really be an issue? -
Ultrasonic cleaner to clean power sockets for re-use
markharro replied to markharro's topic in Electrics - Other
Hi @dpmiller I get the distilled water but I dont understand your second sentence. Do you mean if you use distilled water it causes tarnishing? -
I have built up a collection of pre-used sockets and switches etc and am now thinking about the best way to give them a spruce up - any reason not to use an ultrasonic cleaner for this purpose?
-
Yes anyway moving on can anyone provide any further comments on my original points - 1 Spacers for the first row of tiles. Is it realistic to think that I can just pull these out after the adhesive has set? If not how are they hidden? 3 Is there any specific gap between tiles for grouting for these large format tiles? 4 can anyone comment on these es - https://www.protilertools.co.uk/product/rubi-delta-levelling-system-kit--1mm--03956 - in particular what does the 1mm in brackets refer to as other kits from this brand offer 1.5mm/2mm etc! Is this measurement the width of the gap between tiles? 5 I have a notched trowel somewhere for the adhesive but should I be using a particular depth of notch? I guess this is linked to the depth of adhesive to use......how do I work that out? 6 Luckily we wont have to cut many tiles but I will a few. Could I use my track saw with a diamond blade and dry cut and get an acceptable result? 7 If so the saw is designed for a 165mm diameter blade. Would I need this exact size or would a slightly smaller one work? 9 We are planning on a shower niche and this would require an L or U shaped cut out of some tiles - this wouldn't be possible with the track saw so how would this be achieved? 10 Any other relevant tips?
-
remember these are wall tiles! and a year of self building starting with 18mm ply on the roof and now 25kg buckets of render and hefty fermacell boards has all served to build up the muscles! Back to the tile adhesive the Ardex tech support guy recommended rapid set I think for the reason that it would help to avoid the tiles sagging but I guess with spacers at the bottom and just doing the bottom row first that wouldnt be an issue?
-
Bit of a long trek for me from Edinburgh
-
I saw that but sadly you are at the other end of the country for me!
-
anyone offer any critique on this?
-
Best model acoustic insulation for studs and joists?
markharro replied to ashthekid's topic in Sound Insulation
Thanks - this indeed was very helpful - looks like the answer is a resounding don't bother. Hopefully someone might be interested in buying my surplus EPS now - currently advertised on the Marketplace -
Anyone know a good large format tile cutting company?
markharro replied to hendriQ's topic in Wall Tiles & Tiling
Looks good @hendriQ how did you do the ceiling? -
Best model acoustic insulation for studs and joists?
markharro replied to ashthekid's topic in Sound Insulation
ANother question on sound insulation. We have quite a few sheets of EPS100 and 300 insulation that was used for the tray for our slab left over. They are 100mm thick. WOuld these work specifically as sound insulation and if so how would they perform compared to say a 45 density rockwool batt? -
I have tiled before but I need to up my skills as we are planning to use 610 x 1220mm 12mm thick marble tiles in our shower-room. The plan is to mount on Hardie backer board in portrait format so that 2 vertically will span floor to ceiling. I have my head around doing the initial boarding now and have got some useful info from the supplier for the tiles eg use white rapid setting tile adhesive. There is also a need to seal the surface before grouting etc. The main gaps in my knowledge are as follows - 1 I need a gap I think at floor level (our concrete slab) - 3mm or so? I assume I just mount the tiles on spacers to give the gap? Will the spacers come out after the adhesive has set? If not how are they hidden? 2 Should I fix the lower row of tiles first and wait until they are bombproof and then fix the upper tier above so that they get proper support from the lower level? 3 Is there any specific gap between tiles for grouting for these large format tiles? 4 My last tiling was years ago using the basic "X" plastic spacers. Now I see things are more sophisticated with these types - https://www.protilertools.co.uk/product/rubi-delta-levelling-system-kit--1mm--03956 - which appear to give you set grout gaps but also allow you to level the faces of the tiles. This particular example appears to be ok for the 12mm tiles we plan to use but what does the 1mm in brackets refer to as other kits from this brand offer 1.5mm/2mm etc! Is this measurement the width of the gap between tiles? 5 I have a notched trowel somewhere for the adhesive but should I be using a particular depth of notch? I guess this is linked to the depth of adhesive to use......how do I work that out? 6 Luckily we wont have to cut many tiles but I will a few. Could I use my track saw with a diamond blade and dry cut and get an acceptable result? 7 If so the saw is designed for a 165mm diameter blade. Would I need this exact size or would a slightly smaller one work? 8 Will I cope with my 1200mm level or should I buy something longer? 9 We are planning on a shower niche and this would require an L or U shaped cut out of some tiles - this wouldn't be possible with the track saw so how would this be achieved? 10 Any other relevant tips? Many thanks.


