markharro
-
Posts
634 -
Joined
-
Last visited
Everything posted by markharro
-
CT1 and/or Sikaflex for a shower tray installation?
markharro replied to MAB's topic in Bathrooms, Ensuites & Wetrooms
Thanks guys. From the Bette website I see this - https://www.my-bette.com/en/product/features-and-installation/bettelevel So I think thats confirmed that the tray is fine without any full bed support. I am going to go with my plan - Sikaflex under the rim bottoms! -
CT1 and/or Sikaflex for a shower tray installation?
markharro replied to MAB's topic in Bathrooms, Ensuites & Wetrooms
Any takers on the above post? I was thinking I should maybe call Sikaflex tech support? -
CT1 and/or Sikaflex for a shower tray installation?
markharro replied to MAB's topic in Bathrooms, Ensuites & Wetrooms
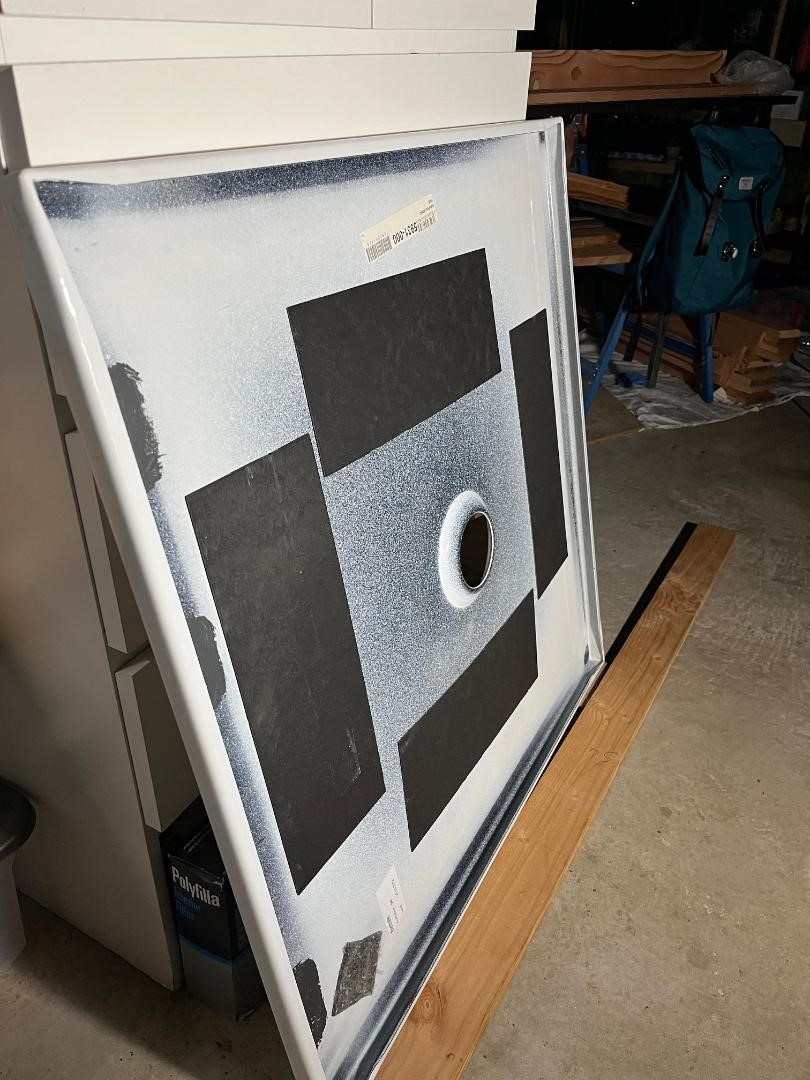
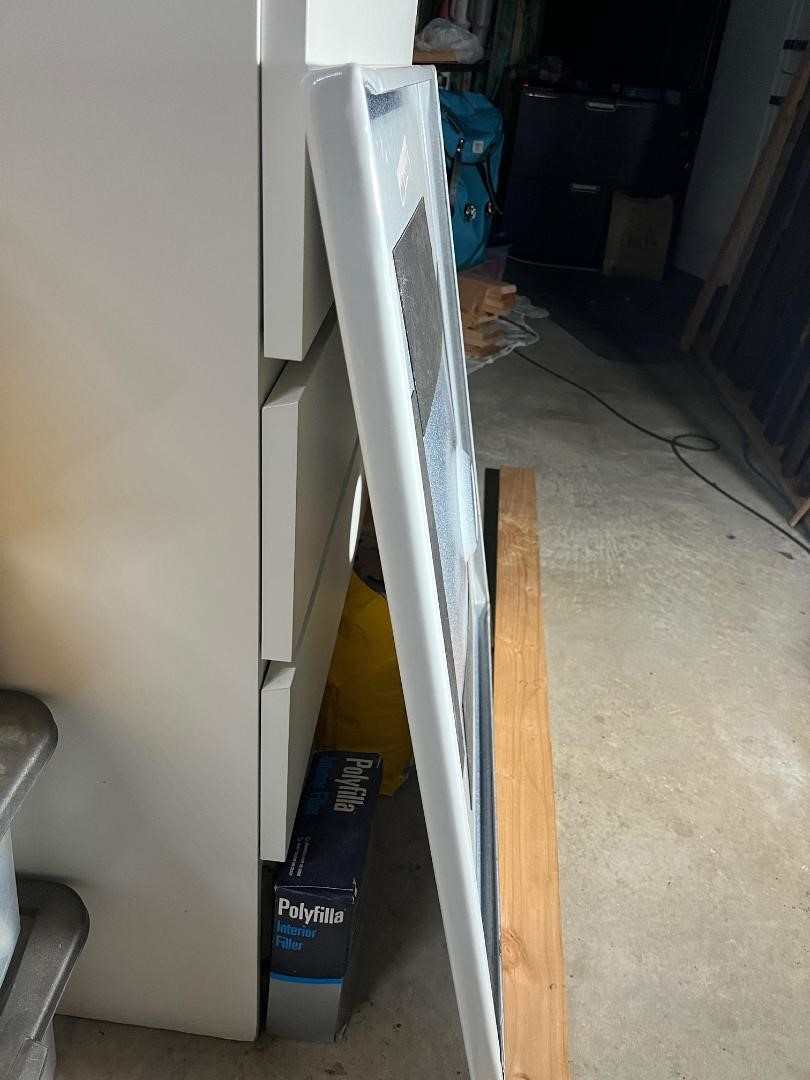
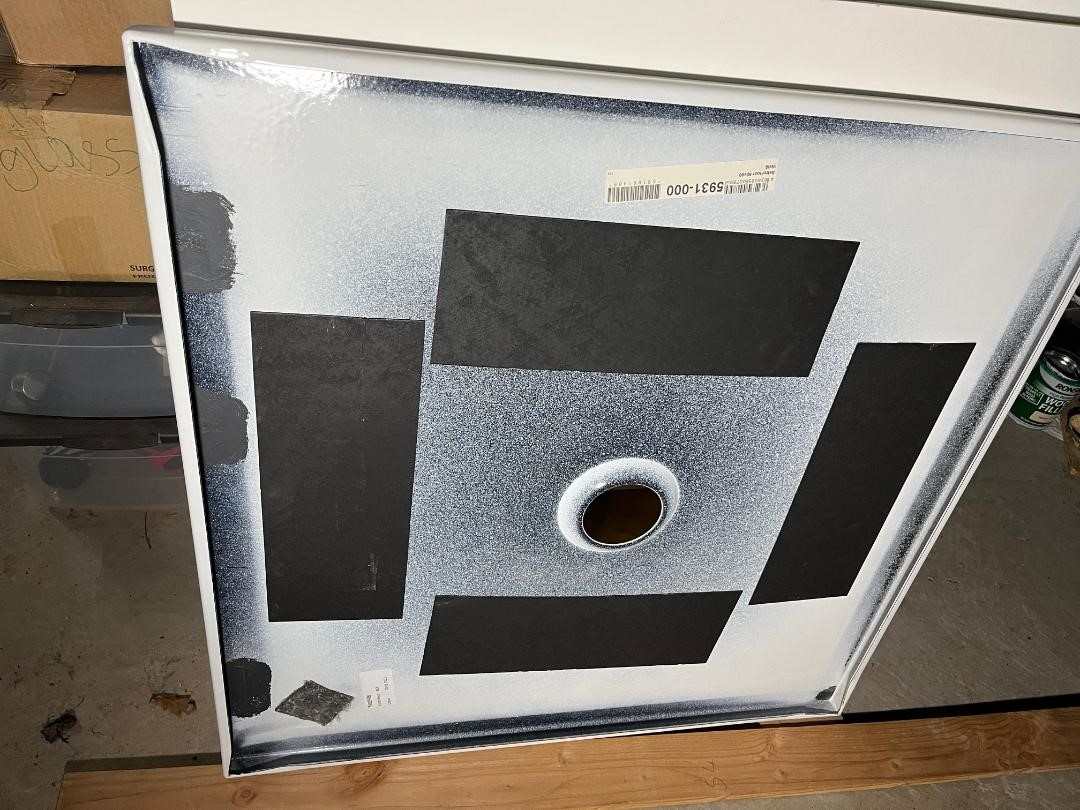
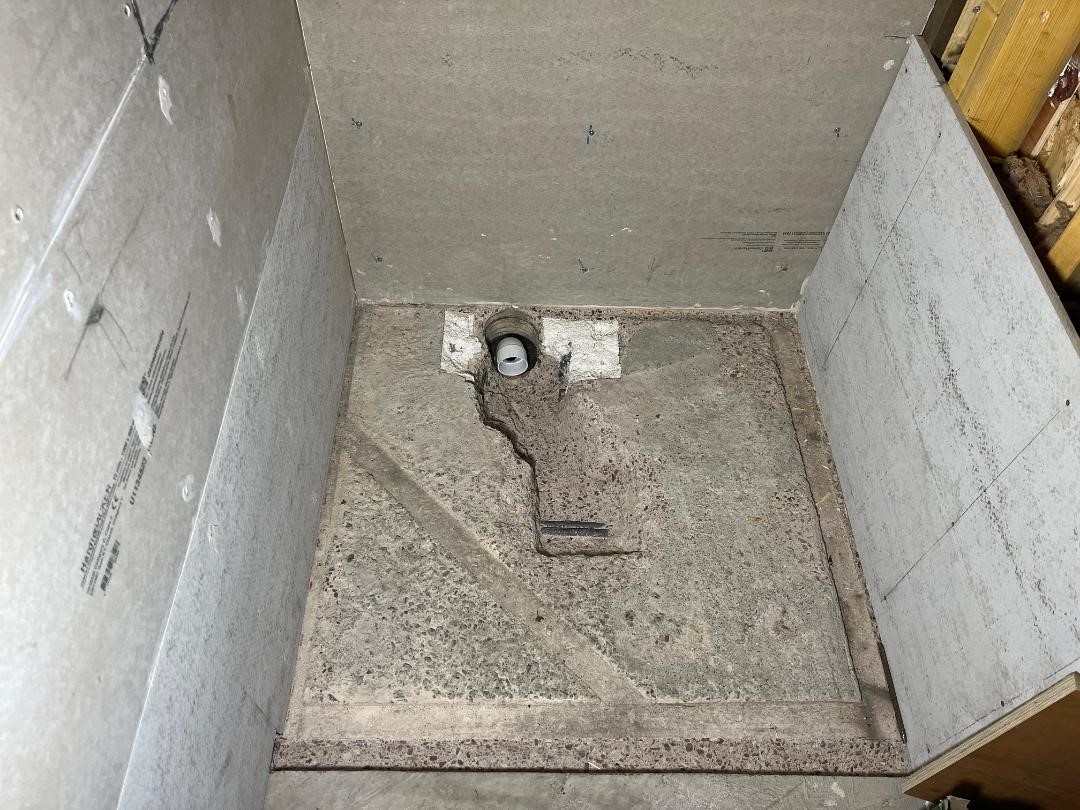
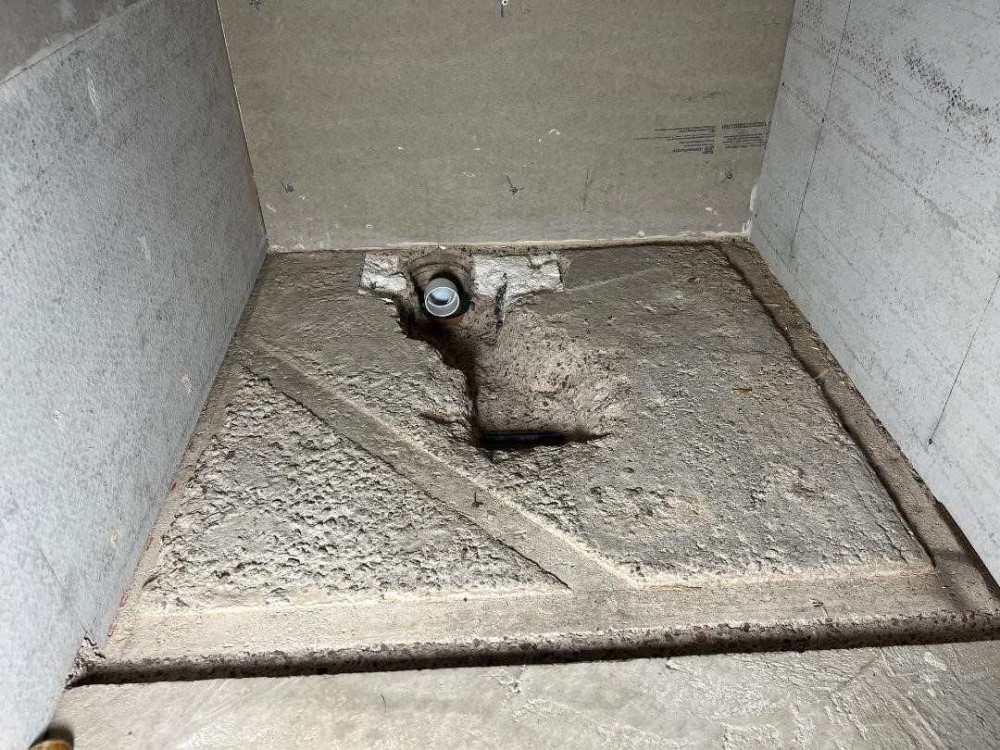
HI hoping to bring this thread back to life and seek the input of the shower tray maestro @Nickfromwales ! I have attached some photos of the current state of my own instal. I have a very heavy duty steel Bette tray that I am planning to instal in a recess in our concrete slab. First thing to say is that the concrete is the final floor finish and I know this makes it hard for ourselves. The recess is deep enough now to accommodate the tray and its lies flat although just a few mms below the surface of the concrete when dry fitted. My main question is how to bed it down? It is very rigid and it seems to me that it will be fine just supported on its 4 perimeters? So what to use under these? The plan is to use Sikaflex on the tray perimeter upstands to seal between these and the Hardie backer boards. Can I also use if between the bottom of the tray perimeter and the concrete or would it be better to use tile adhesive? thanks.


-
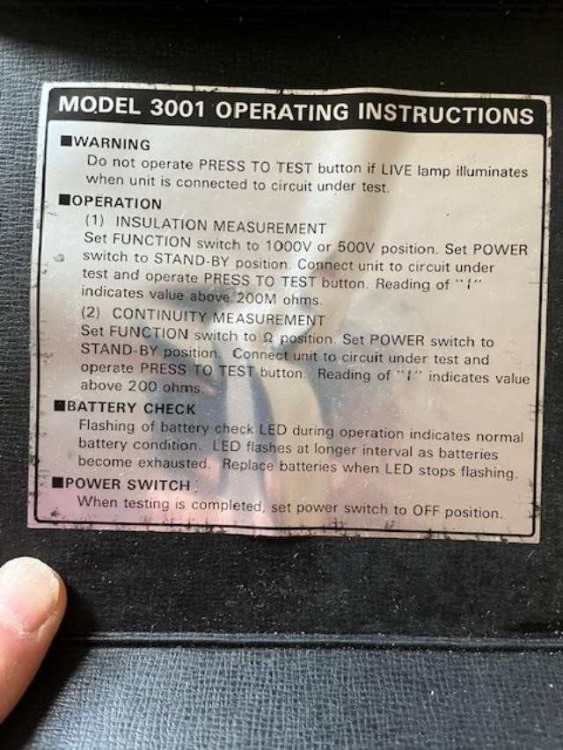
@ProDave Ive got the Robin tester now. You will see the instructions that came with it. I read this as saying that if the display reads "1" this indicates at least 200 Megaohms? I have tested one cable now and it reads 1 so that must be good. My question is the instructions dont say what the display reads if there is a problem! Will it read 0 or something else? thanks again
-
Yes we are. Good quality/price. The other thing is that the team at Uniwin are great. Very pleasant to deal with and patient!
-
We also used the MBC passive frame and used Uniwin windows!
-
Hi @Ted Hall we have a driveway that is hardcored but which is awaiting final finishing. We are in Scotland and building control have decreed that we need an accessible path via the driveway around to our back door. It looks like your system would fit the bill? Its looks like you recommend 20mm stone for cars but 30 mm if using wheelchairs?
-
Uniwin - near Edinburgh
-
I known that Makar - https://www.makar.co.uk/ - build to passive house standard and they are based in Inverness.
-
Brilliant thanks Dave. I will snap that tester up. One last question...how do I know if a reading is "good". Does the screen show literally "good" or "bad" as the result or does it give a numerical figure (if so am I looking for a figure above or below X to be "good" etc. Thanks
-
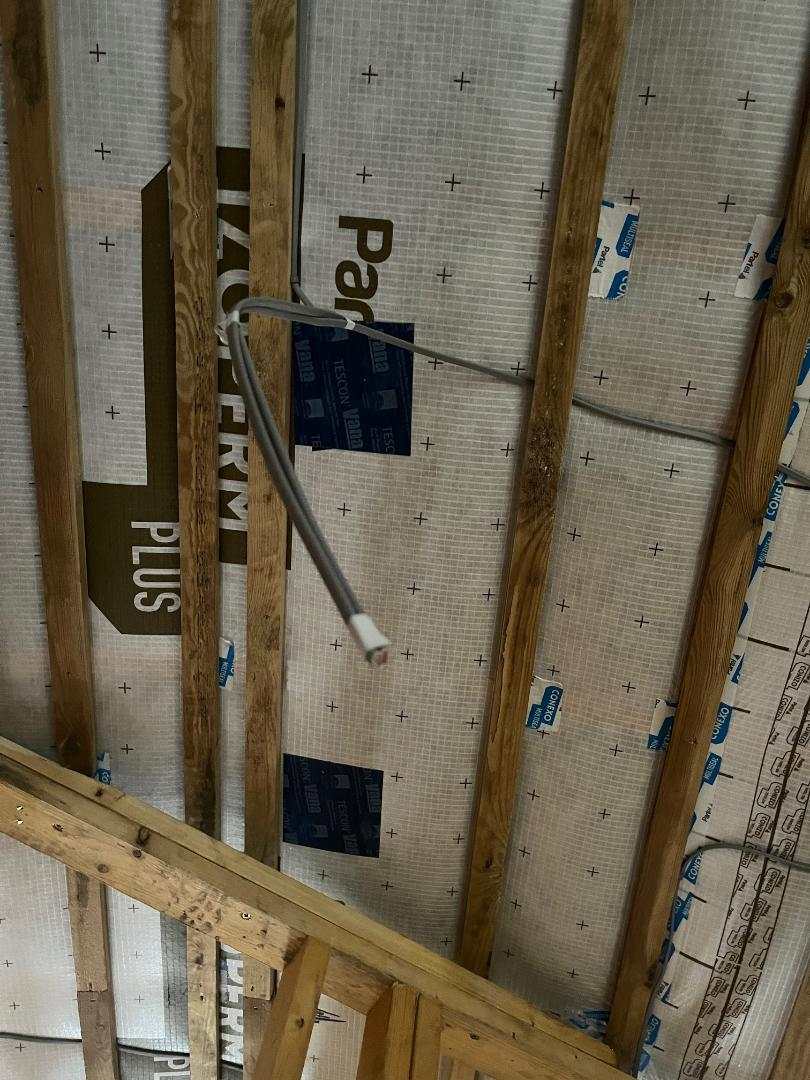
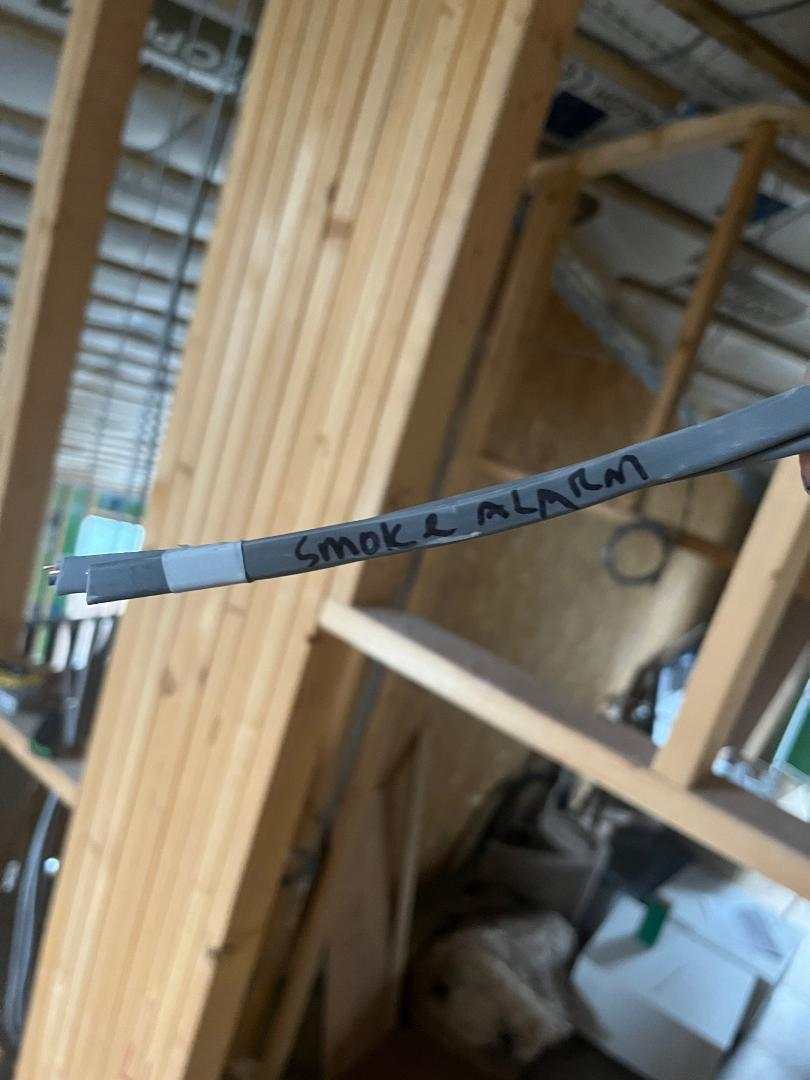
Ah thanks...so does that mean that I only need to connect at the one end of the cable run? It sounds like it from what you say? If so that's a whole lot easier than I'd imagined. Also @ProDave can I ask what I do with these doubled cable ends on the photos.....one for smoke detector and other for lights. Just do the procedure on both cable?


-
@ProDave thanks very much for the link. Thats cheap enough to buy and its only really 3 ceilings in the house I am concerned about. How do you use this instrument in practise though? So lets say I have a 3 core wire for a light sticking through the ceiling - I connect each core in turn to one of the inputs on the tester ie earth or line? then what? do I need to trace the cable right back to the consumer unit (where currently all our cables is just hanging coiled to be connected ultimately? Find the correct cable and attach the correct core to the other input? If so, how is this done because the rooms are upstairs and the consumer unit downstairs!? Do I need an extension wire and connect that to one core at the consumer unit end and then run that up the stairs and into the bedroom and plug it in to the tester? Thanks again
-
I was helping our joiner plasterboard some ceilings and I was asking him how you deal with stray screws that might hit a cable for lights/smoke detectors etc. He said it best to get the electrician to test the cabling before the ceilings are skimmed. Problem - our electrician is so busy it may be hard for him to find time to do this before the ceilings are fininished. So, is it possible to test myself without buying expensive testing kit? Is it easy? How is it done. I suspect @ProDave will have the answers!? thanks
-
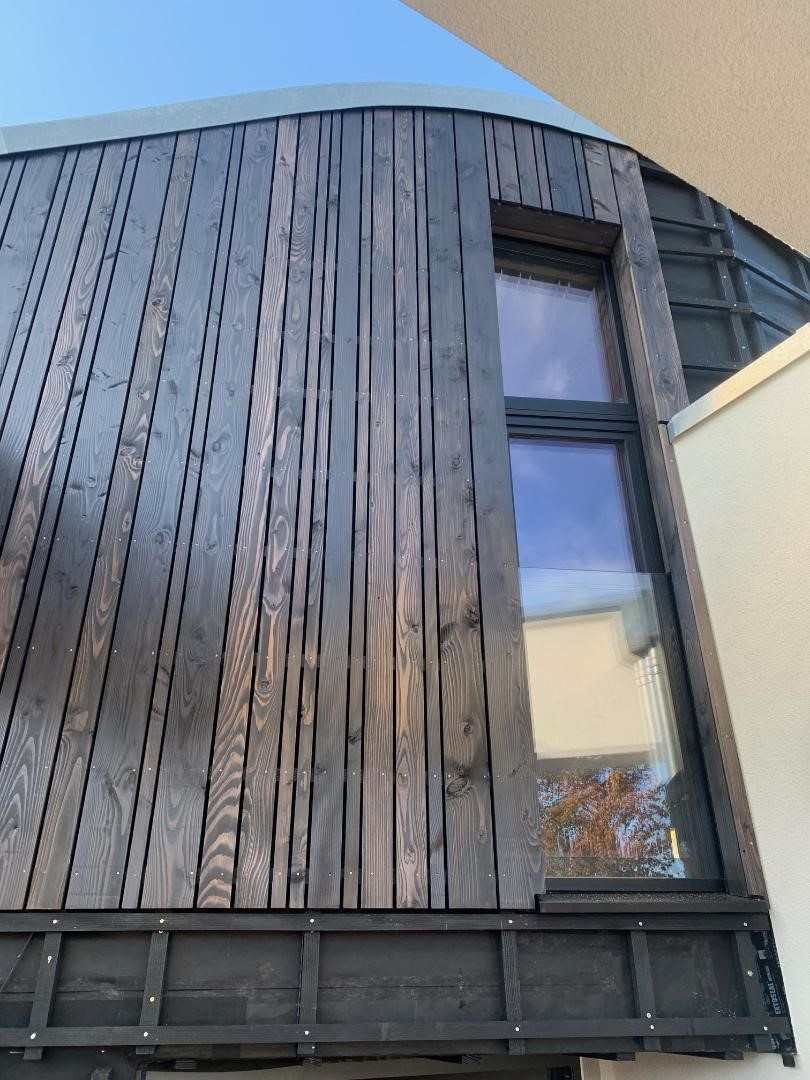
This is ours as work in progress. We used a black stain from Treatex on Douglas Fir

-
@garrymartin @zzPaulzz thanks for your replies. Sorry got waylaid with other stuff in the interim. I need to finish focusing on this now as I won't have much longer to instal the wiring needed. I think for powering an ipad etc I am probably going to go with one of these - https://uk.store.ui.com/uk/en/category/accessories-poe-power/products/uacc-adapter-poe-usbc - pretty much as I am using other Ubiquiti kit in the house. However there are still some issues - this will need to be buried in the wall cavity and once there it wont be accessible so will have to hope the wiring connections stay stable over time. But the other thing is how to bring the USB end out of the wall......I suppose I could use a media face plate on a 1 gang back box with a "curtain" like this https://www.screwfix.com/p/lap-modular-flex-outlet-black/49931 for the cable to poke through! Ideally it would be neater to instal a media module with a USB female socket. Something this externally - https://www.screwfix.com/p/contactum-media-modular-3-1a-15-5w-2-outlet-type-a-c-usb-socket-black/835rp But internally it would need another female USB to allow me to connect it via a short male to male cable to the Ubiquiti widget. I have tried to find a media module configured this way without success - do they exist? The other problem I am trying to solve is how to power an Apple Homepod mini in a bathroom - for remote control of a blind and music! These appear to be 9V and 2.2 amps in terms of power consumption. Is it possible to instal one of these in a bathroom compliant with (Scottish) regs - https://www.tlc-direct.co.uk/Products/SF63WMW.html?source=adwords&ad_position=&ad_id=&placement=&kw=&network=x&matchtype=&ad_type=pla&product_id=SF63WMW&product_partition_id=&campaign=shopping&version=finalurl_v3&gad_source=1&gclid=CjwKCAjw1NK4BhAwEiwAVUHPUJl6FBHFEK8EuFsI7roIi0CVcA-yFJE-RdeGka2YMdMwAW2FCkB5-BoC9KkQAvD_BwE If so would the Homepod mini work with this? THanks
-
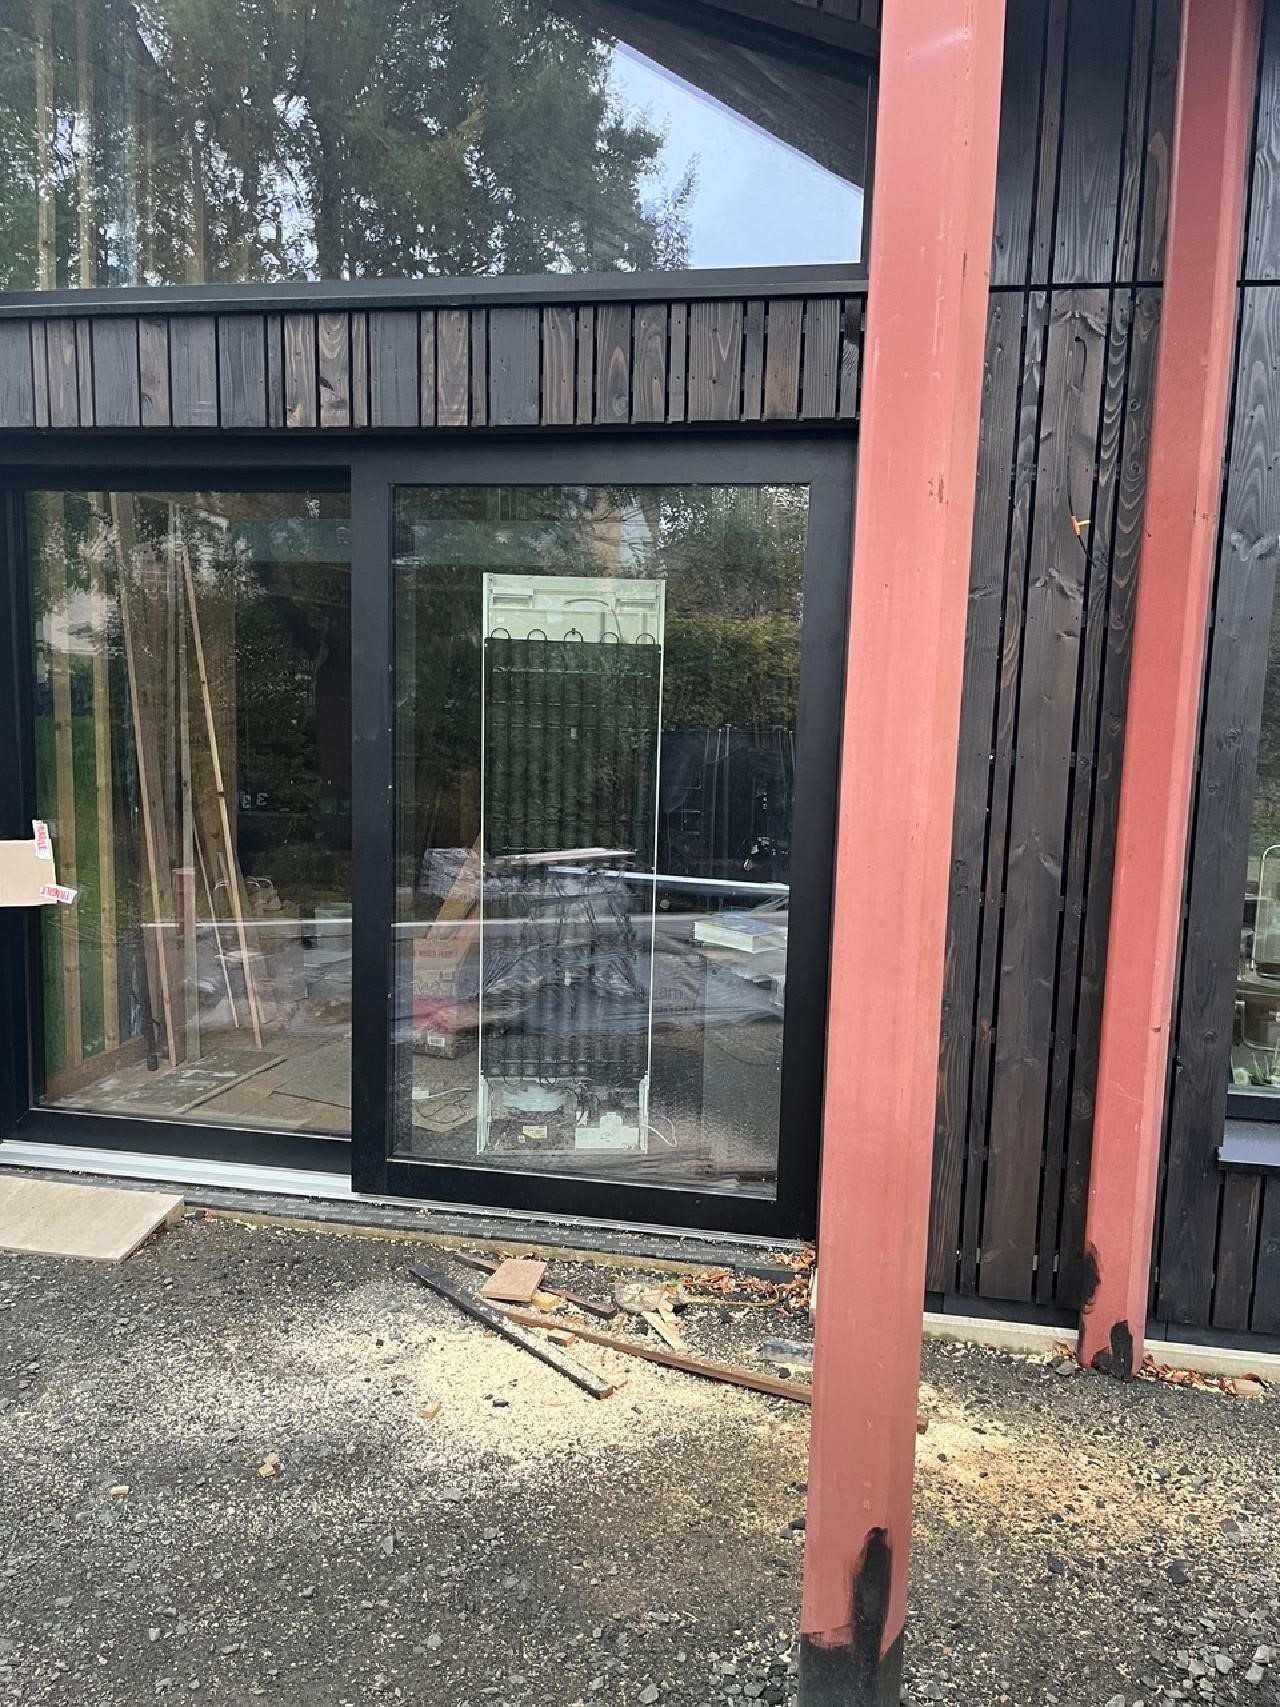
I wonder if someone could help me with my issue - I need to finish these posts. As you can see plain steel ie non galvanised. I want to protect the steel but also produce a visual effect to mirror galvanising as we will have some other galvanised metal parts nearby. I had planned to use this Zinga product - https://www.promain.co.uk/zinga-96-zinc-cathodic-protection.html but spoke to their tech support and it is meant to go on bare steel so that would mean sand blasting the posts and thats not really an option. They suggested maybe using this spray to produce as an alternative sprayed on after I sandpaper the posts first of all - https://www.promain.co.uk/zinga-zingaspray.html Does anyone have any advice? Thanks
-
We have bought 2 Bette trays. Very good quality thick gauge steel. Not installed them yet but working on one atm.
-
Smart meter external aerial last ditch attempt?
markharro replied to SuperJohnG's topic in Consumer Units, RCDs, MCBOs
Im in Scotland too and our "smart meter" stopped connecting earlier in the year. It took Octopus about 3 months to get an engineer out and it seems to be working again. The engineer appeared to be saying that if you make a real fuss they will install an external aerial for you but it seems this is the very last resort. -
Fixings for hardie backer to masonry (concrete) wall
markharro replied to markharro's topic in Wall Tiles & Tiling
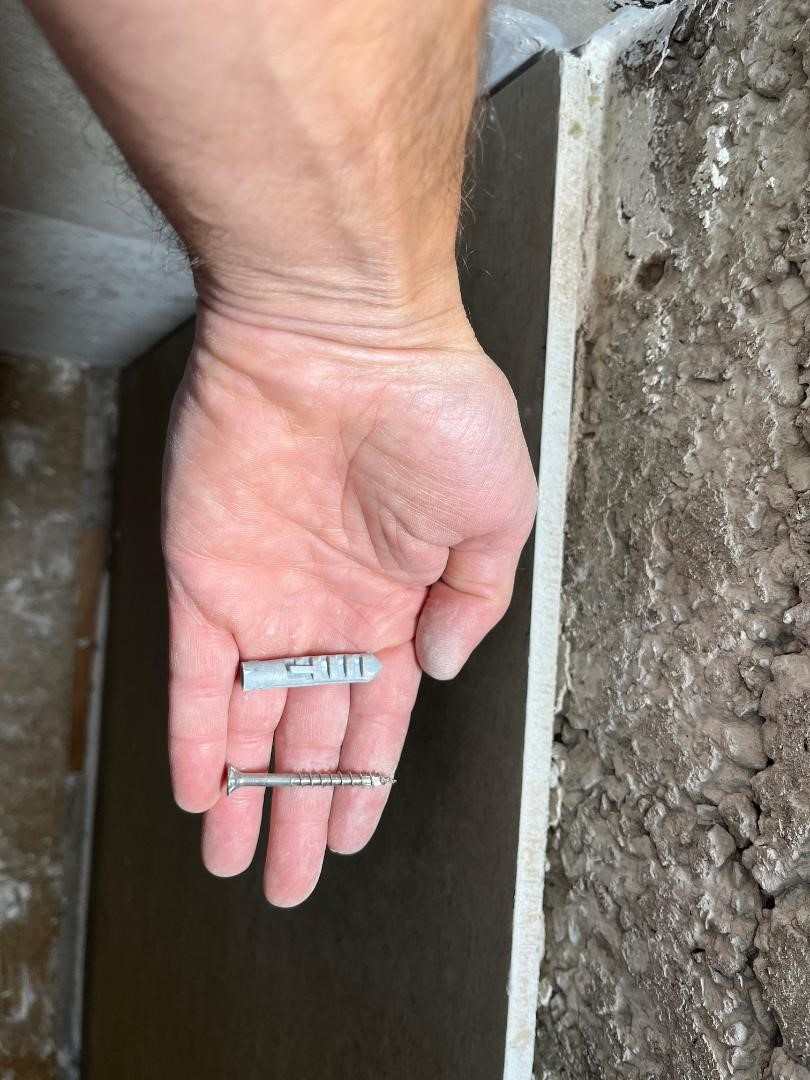
Thanks @Russell griffiths thats helpful. What about the screw length though - would 50mm be enough? Yes boarding up over the timber. I see what you mean about starting there and working down.....next time I will know better. I have planed the studs so that an 18mm ply spacer should level the board with the one below - hopefully! -
Fixings for hardie backer to masonry (concrete) wall
markharro replied to markharro's topic in Wall Tiles & Tiling
Is anyone able to comment on my post above? -
Fixings for hardie backer to masonry (concrete) wall
markharro replied to markharro's topic in Wall Tiles & Tiling
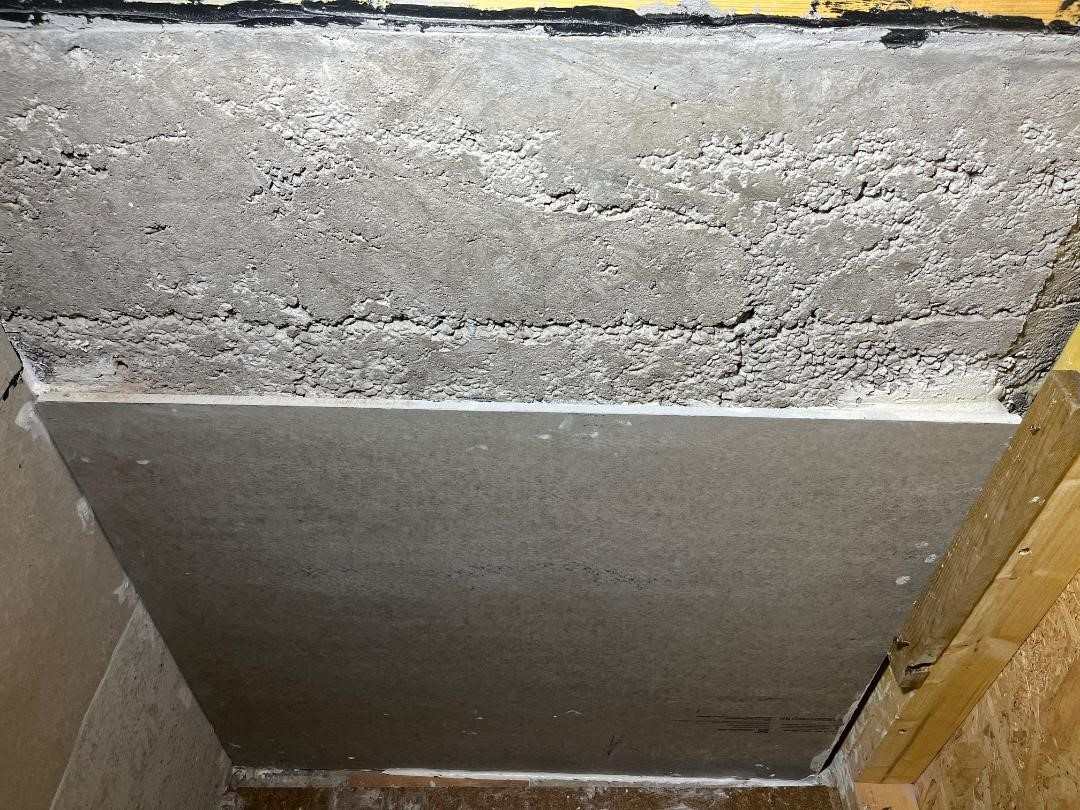
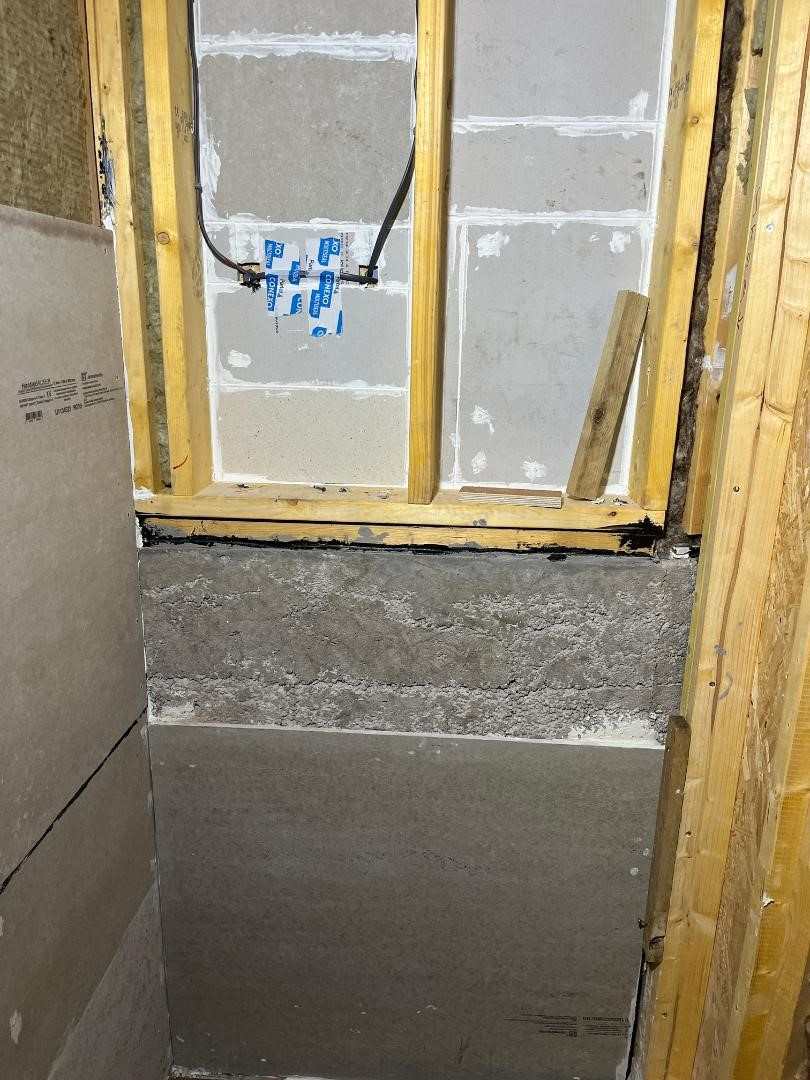
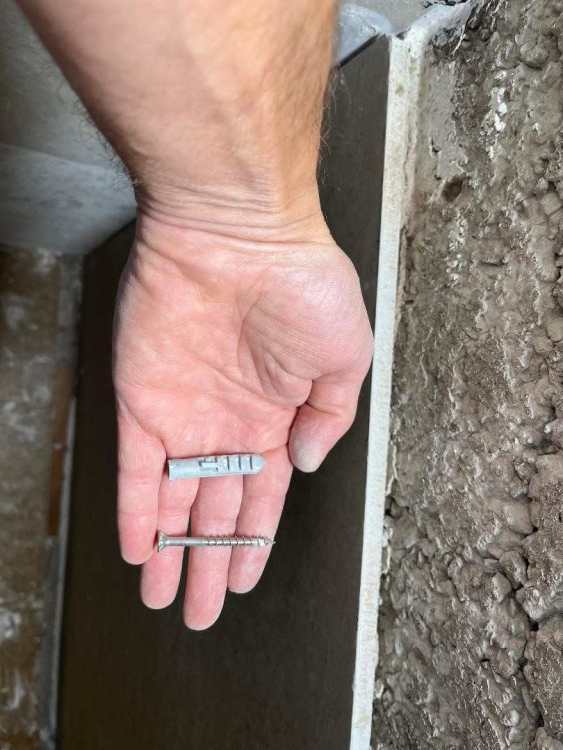
Thanks @Russell griffiths and @Alan Ambrose here is where I have got to so far. Next step to screw the board to the concrete. I have the fixings in the photo - the SS screws are 50mm. Will these be long enough? Also how many screws and what pattern for this section of board which is 800mm high by 900mm wide? thanks,

-
Fixings for hardie backer to masonry (concrete) wall
markharro replied to markharro's topic in Wall Tiles & Tiling
Thanks but I have already got the Hardie board and fitted half of it to studwork - just got this tricky bit over about 1m2 of bowed concrete to sort out! -
Fixings for hardie backer to masonry (concrete) wall
markharro posted a topic in Wall Tiles & Tiling
I think I need something like this - https://www.fischer.co.uk/en-gb/products/frame-fixings/hammerfix-n/hammerfix-n-s-d but will the washer be an issue when we come to tile? Is this sort of thing better - https://www.fischer.co.uk/en-gb/products/frame-fixings/hammerfix-n/hammerfix-n-p - although again the plastic sleeve head will stand proud of the board. Maybe this - https://www.fischer.co.uk/en-gb/products/frame-fixings/hammerfix-n/hammerfix-n-s ? -
I probably only need to mix up a 1/5 of a bag to use to stick hardie board to masonry at the back of our shower enclosure. Do I need to weight it and then accurately add the correct amount of water pro rata or is this overkill? Also will the rest of the bag contents go off once opened as I wont be using it for the main tiling for maybe another 2 months!?
-
Thanks Russell/Gary.......I guess we need to decide if we want a timber faced/solid door or a primed door for painting. Other than that there are 2 things - it seems hard to source a formaldehyde free door....the "prima plus" in this range is but it does not appear to be available in small quantities in the UK - https://halspan.com/product_type/3-layer-particle-board/?_product_range=non-fire-rated The other thing is that we are thinking of having flush doors using this sort of hinge - https://www.carlislebrass.com/ceam-3d-concealed-hinge-1266 It look like quite a deep hole needs to be routed for a hinge like this - would that be an issue with a chipboard door? I have found these which look like the Rolls Royce of doors but looks like they cost at least £600 upwards!! https://www.lathamtimber.co.uk/products/door-blanks/brands/moralt