


Gus Potter
-
Posts
2383 -
Joined
-
Last visited
-
Days Won
34
Everything posted by Gus Potter
-
Ok that sounds like a good move. Here is what I would do if I was you. Find the best and well repute self employed 3CX digger driver with their own machine that works local. Pay the extra. Get them round and ask them how to do it! Ask them how they want the found marked; inside, outside, centreline or all of the preceeding. Assume the weather is going to be pish and some marks get lost by accident. Set some pegs well outwith the dig so if the marks get lost you can run a string line to get you back on track. Work out what you are going to do if you hit soft spots. An experienced digger driver is going to be your best friend here. They may also say they will pitch up during the pour and can use the back actor to get the concrete in place. Make sure you take plenty photographs. Be careful not to over dig. There are some horrible examples on BH where over dig happens and it just makes things ten times worse, they fill with water, hit even softer ground deeper down. Go and have a look again at what your SE is expecting in terms of ground conditions. If in doubt ask. Ask your SE if they can be on the end of the phone or just come to site if you get stuck. Yes, I know you probably don't want to pay for an SE visit but at the end of the day it can save you a pile of worry and cash. You only get one real chance of making a good job of this so don't take daft risks. Take time placing any reinforcement mesh.. many ground workers just fling it in.. and you pay for it.. but it is worse than useless if not properly placed.
-
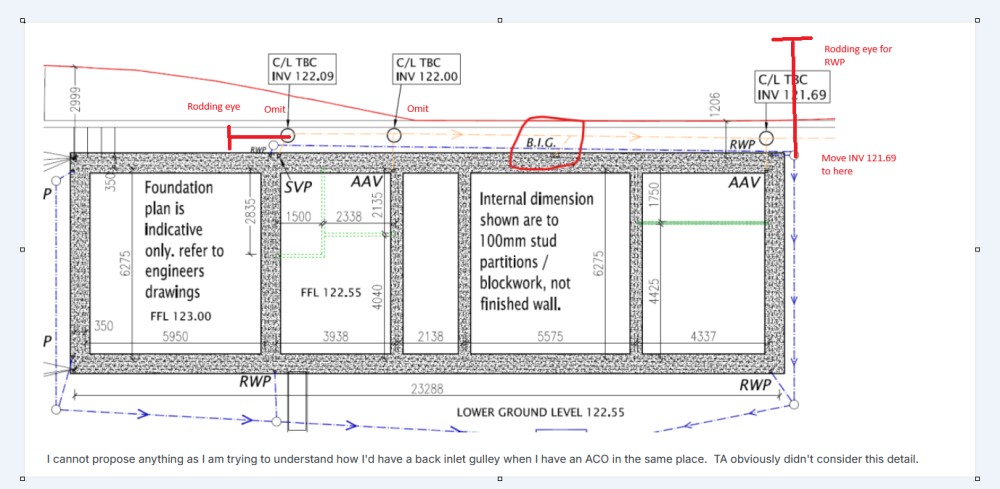
Bottle gullies are generally frowned upon these days. Ok you have posted a sketch but it's not enough detail. Think about how folk that have never seen this before can get their head around things. You can see it but we can't quite get our head around it all. I've, based on the sketch you have posted, over marked a suggestion for your soil drainage. Let's try and simplify that first. Here is the theory that lies behind my over marking. When you flush a toilet a "plug of water" goes down the pipe. It causes a vacuum behind it that sucks out water traps, say a sink trap. But that plug in a 110mm dia pipe rapidly flattens out and let's air pass backwards..reducing the suction. The stack balances all that out as the main thing. If you look at BS codes and the Eurocodes if gives minimum distances between the points of inlet between say a wash basin and a wc connection. This is generally between 150 and 300 mm depending on the type of connection (vertical / horizontal etc. @flanagaj. You have a much greater spacing between the connections. So that problem goes away. Next is to look at this from the other direction. Say you want to connect a kitchen sink waste into a 110 mm dia soil pipe. The sink pipe after the sink trap can be 40 mm dia or 50mm dia. Here if you chuck a bucket of water down the sink it causes this "plug effect" in the msaller pipe, that breaks the water seal in the trap. The codes say if a 40mm pipe run is more than 3.0 m it can cause this problem. But it looks like where you show an AAV (air admittance valve) the run of the pipe is nowhere near 3.0m thus a standard trap with a 75mm seal and a 40mm pipe at the sink trap should be fine. You have a pop up above the floor still in 110 mm dia and only then change from below ground drainage pipe to above ground pipe, 40 or 50mm dia. Thus here you can omit the AAV. If you introduce a rodding point at the end of the drain line you can then omit chambers with INV ( Invert level, the height of the bottom of the pipe called the invert) 122.09m and 122.0m. If you can, move chamber INV 121.69 beyond the corner of the building. This lets you rod in both directions. Go back and check your drain falls. See, if for the soil the fall is more than 1% ( about 1:50) and for the rain water no more than 1:80. If your workmanship is good then you should be good to go. Next plot this on a long section. If you set the soil pipes below the rain water pipes by the time you get to the corner the rain water pipe should be above the soil pipe and it can cross over the top of the soil pipe. Just a last couple of caveats. If the base of the gravel bed under the pipes is below the top of the foundation then check with your SE this is ok. If the top of you pipes are less than 600mm below the ground surface then check the regs in terms of how you protect the pipes. This can be by way of concrete paving slabs as it only looks like domestic foor traffic. Once you have done that then with a fair wind your Acco channel should sort itself out. You can take it past the main rain water drainage and then return it back and tie into the RWP drainage where it runs down the gable end.
-
Own tools on day rate?
Gus Potter replied to flanagaj's topic in General Self Build & DIY Discussion
This is a fair point. There are indeed many who trade below the vat threshhold. But the bonafide ones pay their taxes and keep their insurance up to date. Unless you are a sole trader, just yourself then it's hard to not breech the limit for registration 90k at the moment. There are a few (often older) trades folk that are really competent, above board who do this. But they are few and far between. They do have their own tools though in my experience. Now there is an advantage in keeping below the vat threshold as when doing domestic work it gives you a striaght up 20% advantage over larger firms. -
Post a sketch of what you propose.. that is worth a thousand words. Draw it on a bit oif A4.. take a photo and post. We won't test you on your drawing skills! I think you are getting yourself in a bind, the solution is probably simple. This is confusing. Let's see a sketch first.
-
Own tools on day rate?
Gus Potter replied to flanagaj's topic in General Self Build & DIY Discussion
The question I ask is are you paying cash in hand? Now we are all adults and know if you do this then there is a risk attached and you know you are winging it and you have to take the extra associated risk. It's not just the tax man, it's the fact that if they cock it up you will have to pay to demolish, buy new materails, the delay, the hurt you'l have to go through when you reralise you have been ripped off. That is the big boys / girls world. You can mitigate by standing over folk all day long and if you do that then you lose time / income so why not pay a little extra? I've said this many times before but quote Ruskin. “It's unwise to pay too much, but it's worse to pay too little. When you pay too much, you lose a little money - that's all. When you pay too little, you sometimes lose everything, because the thing you bought was incapable of doing the thing it was bought to do. The common law of business balance prohibits paying a little and getting a lot - it can't be done. If you deal with the lowest bidder, it is well to add something for the risk you run, and if you do that you will have enough to pay for something better.” Now in mitigation there is are still a FEW folk that just do work on a labout only basis, they do a good job. But unless you are an experience self builder then it's NOT for you! Maybe the easiest way to explain this is to put yourself in the position of a Dad / Mum that runs a building business and wants to hand that down to your kids. I have on my tender list a builder who's daughter is on the tools at the moment and he is wanting to pass the business onto her. She works her arse off, the reality is that she is not as physically as strong as the men.. but she has a great brain. We often have discussion around how much profit you need to add onto the basic labour cost to make a small buiulding business wash it's face.. it's around 40 - 50% just to keep the show on the road. Now this Contractor is not special.. I do get on well with him. I like him personally as he is honest, will fix his mistakes. but business is business and I'm not here for him.. I'm here to represent my Clinets. It's time for you to have an open and honest convesation with the folk you are dealing with. The labour only market is very much tough love. There are suggestion from other members about expectations.. have none.. you need to grow a big pair of balls! You have two choices.. get down and dirty with the dogs, maybe catch fleas or pay a bit more. To be blunt I suspect you are playing with the dogs and they are going to pull your trousers down. Now on the upside.. there are Contractors that may say to you.. we will pitch up.. get you out the hole for now.. we will charge you bit more . but be fair with you. They know they will get the rest of the build. I work with Contractors like this.. they know it's in their long term interests. The funny thing is. I have a list of Contractors on my tender list. The great thing for them is that as a desinger I get to meet the Client first.. I do some design.. I get to stress test my Clients.. if I smell shite then no way will I put the builders that I trust and who trust me to be fair and impartial at risk from a dodgy Client.. -
If you have a timber frame structure it's prudent to insulate the cold water pipes.
-
Recommendations for a Structural Engineer - Scottish Borders
Gus Potter replied to Stewpot's topic in Building Regulations
Can you provide a bit more info for example: 1/ Do you have an "Architect" that is taking the lead on the warrant submission? 2/ What are you building / designing? 3/ What is your time progamme / expectation in terms of getting warrant approval? Borders Council are small, but cover a big area, they don't have a lot of resources compared with South Lanarkshire for example. The key here is to first identify what your issues are. -
Agree this is the probable cause. Can of worms here. I've noticed that the adverts say 10 year guarentee.. but in the fine print often now there is a caveat of 7 years on the glass units, both 2g and 3g. For all. I often post about taking a pragmatic and philistine apporach to say underfloor heating, I recollect that I've said similar applies to glazing in the sense that we are looking for the things that "are built into the house" to last the design life of the house. Now it's true glazing units can last a very long time. I've seen some still hanging in there 20 - 25 years or more. But the reality is that a lot of glazing units are going to have to be replaced at some point often before the rest of the building fabric does. This is a hidden cost, you could call it a maintenance cost that comes around every decade or so. In summary, when desinging buildings I make my Clients aware of this "hidden cost"and let them make up their own minds. I have Clients that say.. this is our "forever home". OK, but if it is you have to be aware that if you select really high end / expensive glazing then there is going to be a sting in the tail later on when they fail. One way to reduce the long term cost risk is to use a lower spec glazing system and spend the money on the wall, floor and roof insulation that we know will last the lifetime of the building. I have some Clients that don't have a bean to rub together, others are well funded and happy to take the risk. It's a personal choice, so long as I inform them then it's up to them how they spend their money. You might get lucky as you might be able to slide the new glass in from the casement side? Hang fire taking off the cladding for now!
-
It is a bit. I see that on the inner leaf just above floor level you are maybe changing the material or masonry unit aspect ratio... be careful here as you may get longitudinal differential shrinkage.. this might result in a very nasty longitudinal crack in your wall just above skirting level with a plaster finish. I can see that you already have much of the substructure in place and it's much like trying to work with what you have. It's going to take a bit more thinking through. Is the insulation EPS boards or beads? My inclination is to have some form of barrier between the zone that could be saturated ( of partly) and the dry bit above.
-
is there a better kind of roofing / cladding batten?
Gus Potter replied to Alan Ambrose's topic in Building Materials
For all as a cautionary note. Selecting screws / nails can be a bit of a minefield. Screwfix for example say "corrosion resistant".. but how resistant? All fixing have generally some resistance. We often spend lots of time designing fixings and connections so we need to know the right fixings are getting used and we can have some data on their corrision resistance as that gives us confidence. In my specifications I often ask for a screw fixing corrosion resistance of Service Class 2 (SC2). I've copied an explanation from Rothoblass which explains it in lay terms: The reference standard (EN 14592:2022) classifies exposure conditions into service classes and corrosivity classes, helping engineers and builders make informed choices. Service class The service classes (SC1, SC2, SC3, SC4) describe the timber’s moisture content based on the temperature and humidity conditions of the environment: SC1: elements in indoor environments with low and relatively stable humidity levels. Moisture fluctuations are minimal. SC2: elements in partially covered areas or exposed to moderate humidity. This includes porches or semi-protected structures, where timber can occasionally absorb moisture. SC3: elements exposed to the outdoors or high-humidity contexts. Temperature and humidity fluctuations are significant, and the moisture content in the timber reaches high levels. You can find out a bit more here: https://www.rothoblaas.com/blog/timber-screws-corrosion-factors-and-durability -
Upgrading rafter ties to proper joists
Gus Potter replied to SimonD's topic in Garage & Cellar Conversions
Looks like you are your way to a cost effective solution. Watch these masonry bolts as if the expansive anchor type or say Thunder Bolts you can easily disturb / crack the masonry at the top of a wall. If you use the wrap over type hanger then then the wrap (if of say 70mm) does most of the work. Have fun! -
Good first go. A few comments: 1/ Your cavity tray is only one course above finished ground. BC will and I will pull you up on that. 2/ The insulation shown as a triangle just below the cavity tray is unbuildable as detailed . You are concentrating on the technicalities rather than balancing this with what is buildable, the cost and how you are going to make sure that what you are paying for actually happens on site. Don't blame yourself.. as unless you do this as a day job and have a feeling of build cost there is no way of you knowing this. 3/ You have a wide cavity. Why not thicken the perimeter insulation up to 100 or more thickness. Have a look at how MBC do an insulated raft slab and pinch their ideas. Then you can omit the Marmox block unless you want to spend money. You could be pragmatic and use the same money in a better way and in the round still achieve what you are looking to do.
-
Watch this like a hawk. You TA is probably in a loss position. Double check if you have any fire protection and if any changes alter the design intent. Check if you are changing the exposure rating and make sure this is ok in terms of your detailng and wind driven rain. Go back and just have a look at what you have done so far. You have learnt a lot. Don't bury you head in the sand and hope it will be ok. If it turns out you have dropped a bollock then now is the time to address.
-
Exploring the ratios and losses between building elements
Gus Potter commented on SteamyTea's blog entry in Energy Ideas
I'm very impressed from what I could see. It took you two hours!.. well you are sharp as a tack. No way could I have churned that out in two hours.. even the small bit I can see. You're probably a bit like me.. as an SE / desinger I spend most of my time thinking and how I'm going to communicate the information so everyone can understand it, lots of folk are reluctant to pay for that. I know I have to produce structural calculations.. which after a while are not that envigorating when doing day to day stuff. I like maths but up to a point and get excited when I have to design whacky stuff. You are more adapt and nimble at high level maths than I. Far all. The idea is that you do the thinking, plan out how you are going to set up the calculation pack do the supporting drawings, bite the bullet and just get on with it. Then you have to check your sums and design philosophy is still valid. Is there any way you can make it idiot proof at my end so I can open it in excel? The reason for me pressing is this. When I joined BH it was as a result of a prompt. At the time Jeremy Harris (JH) was someone that floated my boat, he popped up again a while back but then went back into retirement. His thermal loss spreadsheet must have been used by many thousands of folk. Life has moved on but your spreadsheet has, from what I can see has potential. It's something that I would want to interrogate, see where the limits are, the best way to use it. I design insulated raft slabs for example, done it for years. But I can see there is potential for tweaking the perimeter insulation to extend down towards the foundation. This can make a big difference if the site conditions are ameniable. The actual type of soil under an insulated slab and around the underbuilding can have a huge impact as does the mobility of any ground water. @saveasteading is probably the best exponent of this practical art on BH as he has actually built hundreds if not more. At the end of the day the key to designing for self builders is to keep it as simple as possible, even if everything is not prefect. This allows for example a local builder with limited knwoledge, who does not have access to specialist trades to compete for and have a chance of delivering what you are paying for. @SteamyTeaYour absolutely right to highlight the form factor for example.. that is one bit I could see. I tried to track you formulae but the references are not familiar to me. But in the round my feeling is that you are introducing the next generation spreadsheet. call it Jeremy mark two? -
It looks like from my end you have done your very best but are in a bit of a bind. The key thing here is not to blame yourself. Many find themselves in your position where you come to discover that the design packages you have don't cover all of the design and the interfaces don't fit up. Your strategic risk is that you make changes from what has been approved "in outline".. the BC inspector turns up later and says "you have changed stuff" and there is going to be no completion certificate until you justify the changes. Your design team to date are likely to wash their hands and set you adrift. At that point you may not be even able to sell the house. Have you considered trying to find a supportive designer that will take say a half day talking to you on the phone, then another two / three days reviewing your design, doing some fag packet calcs.. trying to to get their head round what you have done and the way forward, then at least another day talking to you on the phone, thrashing out you options. Call that 6 days work @ £400.0 a day = £2.4k You'll need a very experienced designer, one that undestands structures , maybe with a building background and with a bit of Architectural flair. Now that may seem a lot but even if they save you a weeks work and a day or so for a good trades person and a labourer then they have washed their face.
-
Upgrading rafter ties to proper joists
Gus Potter replied to SimonD's topic in Garage & Cellar Conversions
But of practical food for thought and info. 32 inches is about 800 mm. The ceiling ties you have are "economic and serving to hold the head of the wall against moving sideways. It's a basic garage after all. Next is if you have an attic say in a house what loads do the design codes prescribe? Well there are 3 types of load: 1 / The dead (permanent load) which is the self weight of the timber joists and the flooring. 2/ Where the space is habitable the load from people is 1.5 kN/m^2 (~150 kg/ sq metre) in domestic stuff = about 150 kg. This is an onerous load and not really applicable in your case. 3/ Attic storage is 25kg / sq metre.. but that includes the weight of the flooring.. so it works out at about 10 - 11 kg per square metre that you can use to store your xmas trees and empty suitceses etc. If it was a domestic floor (150 kg / m sq) then I would start using an old rule of thumb. It's ok to do this as your garage is probably built in feet / inches so why not use this as a basis. 3.3m ~ 129 inches which is about 11 feet. Divide 11 feet by 2 = 5.5 then add 2 = 7.5 inches depth based on a 2 foot spacing. 7.5" = 7.5 x 25.4 = 190mm! But at 400 mm centres that will drop below 170mm depth. Or lets say we can live with a bit more delfection and a reduced load. The rule of thumb is just to add 1 instead of 2 to the calculation above. This now gives.. divide 11 feet by 2 = 5.5 the add 1 = 6.5 inches depth based on a 2 foot spacing. = 6.5 x 25.4 = 165mm. In summary what I have done above just confirms your first thoughts are in line with normal expectation.. 145 - 170 deep timbers if you put them in at say 400 mm centres look at the moment adequate. I suspect that if you spent more time refining the loads then a 145 mm deep timber in C24 would be ok. After all there is only so much load you can get in there (unless you do something daft) due to the diminishing height as you appraoch the eaves. The main thing here is that the difference in cost between 170 and 145 deep joists is not a lot.. it's the head room and making sure you can open the doors that is key. Can you just essentially leave the roof as it is and introduce an independent floor? This might be possible if you have a timber wall plate on top of the wall. On the inside of the wall you fix a ledger piece, then use wrap over joist hangers with the wrp onto the existing wall plate. The beauty of this is that it's nearly all demountable so you get to recover the joists, flooring if you screw it down and not glue it, live with any squeeks! One last thing though.. you need to have a look at the walls and what they are sitting on, do you have any door openings below the new joists.. think lintel strength. If you add load you have to be sure the walls and founds are not going to misbehave. -
Exploring the ratios and losses between building elements
Gus Potter commented on SteamyTea's blog entry in Energy Ideas
From what I could see it look like a very useful tool. You are being bashfull! It's not something you knock up and check in an hour or so! -
Never again, unless... maybe...
Gus Potter replied to NSS's topic in General Self Build & DIY Discussion
Is this figure including or excluding vat? Even in Scotland say it's 2.5k inc vat. That is 2.5 / 1.2 = just over 2.0k ex vat.. unlikely to come anywhere near that. Or say its 2.5 plus vat = £3.0 per sq metre. At my end as a designer I would be looking at say 4.0k before vat if I was putting a high level budget cost on this. You have the designers fees, council fees and contingency. You are going to increase the occupancy so will have drainage etc, maybe power supply to sort out. It's a funny one as the land (large plot) has a special value, ammenity, so it's not all about the build cost of the house. I've concluded that I can't answer your question on the info provided.. so just made some comment. -
I have similar on part of my roof. The tiles are of an age where they are likely going to be a bit more porous. That in itself is not the end of the world. But a roof of this age (circa 1955) may have a bituminous underlay felt which may still be doing a little to catch wind driven water that comes in, or through the tiles due to porosity. Go up into the attic and see if you have felt or not. The main thing for now is to check your roof ventilation in the attic. If you are skint just now then add some extra vents to get it as windy as possible. Then plan / save up for retiling of the roof in the next couple of years.
-
Exploring the ratios and losses between building elements
Gus Potter commented on SteamyTea's blog entry in Energy Ideas
And that is a big problem I have at my end as a practicing SE. I have written spreadsheets that have stiffness matrices ( the maths can be challenging) for example that I use for analysis of whacky stuff. These are benchmarked and tested against industry standard analysis software. Basically I write these and check, validate and so on. These are then sent to other SE's for checking. It also works the other way when I act as a checking SE. On a commercial level ( yes I know I'm captured) it make no sense to swap to libre whan I can get excel for a couple of hundred quid. The excel platform is also very powerfull in the text function / interface.. how it interacts with many cad packages for example. SE use a lot of Greek and other symbols.. we can't be mucking about with these as they are really important in their meaning. But to cut to the chase. I can see @SteamyTea has put a pile of work into this. Many BH folk will have excel say at work? So it would be great if @SteamyTea's spread sheet could be converted into something that your average punter can open at ease. -
Upgrading rafter ties to proper joists
Gus Potter replied to SimonD's topic in Garage & Cellar Conversions
Ah, so you are looking for a temporary solution. Putting my SE hat on. I need to know what the span of the ceiling joists are, their size (width, depth and spacing) and a photo of the timbers so I can see what grade of timber would be appropriate to use as a basis for a design check. Often I would plump for what is now known as a C16 grade, equivalent to an older SC3 timber grade common in the 1970's say. Next I need to know just how much weight you are going to put up there. Now when we design this sort of stuff we first need to absolutely make sure it is not going to fall down. The next check is to see if the existing ceiling ties bend (deflect) too much. In your case you have no ceiling that could crack, thus deflection is not an issue. The last check is to make sure that the deflection is not too wild as this can pull the walls in.. for the techy as SE's we call this a second order effect / large rotational / displacement effects.. for example. It may be that what you have is ok to carry some extra weight as it's a temporary design? Now if it turns out that deflection is a major issue then to control that we can sister the timbers.. but I know from experience that we can often do this by sistering almost to the wall, the sistering often does not have to extend to the wall head support. Crucially often the sistered joists don't have to bear on the wall head! But what is important is that if you sister all the joists all on the same side the cumulative effect is to introduce twisting (a rolling effect) in the roof at ceiling level in your case. To avoid this we sister so they face each other in one bay, then miss one and so on. This technique is used in industrial mezzanine cold form steel floors as standard practice. Turning back to the forces. The bending force is maximum at the centre span and reduces to almost zero at the wall head. At the wall head the critical check is what we call the vertical shear check. It's likely that if you stop the sistering short of the wall then the existing ceiling joists will pass the shear check unless they have been notched at the wall head. To conclude. I would first see how much load you want to add, do you need to do anything? As a quick temporary solution.. sistering is probably the easiest, if you can stop them short of the wall head. If not then you can traingulate the roof starting like this. The way this works is an essay.. but before you do this you have to make sure the nails at the ridge and eaves are not rusty for example! What happens in your case is the ceiling joists get almost hung from the rafters.. this increases the axial load in the rafter and if your eaves nails are rusty or connections are ropey you have a problem.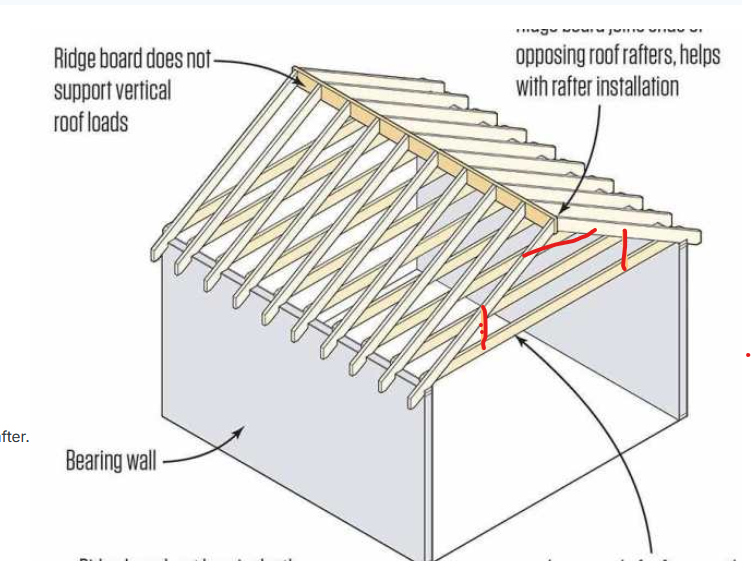
-
Exploring the ratios and losses between building elements
Gus Potter commented on SteamyTea's blog entry in Energy Ideas
Hiya. Can open it a bit in excel 2024, but it is stripping out a lot of info I think? Tried again with an earlier version of excel but most of the cells are not referencing. The charts are blank. From what I can see you have put in a pile of effort into this. It's not a five minute job, it must have taken a huge effort to develop this. It looks like a good tool. It may be a "jock" problem at my end" but I doubt it. Ask around and see what others say.. you do know why the animal called the Haggis has it two left legs shorter.. it's so the can run round a hill and still stay level! -
Ah you have opened up a topic that for the techy minded, can be a world of fun and no fun for most of the general population. Agree and generally true but.. and is likely in your case. Engineering bricks are selected from time to time for their strength, not just in compression but also for their ability to enhance the lateral strength of a wall, often when subject to wind. When combined with a higher strength mortar they can be a cost effective option. On most domestic applications a Class B is adequate strength wise. Class A's are so strong that often you find it's the other bits a round them that are weaker by a mile. But another thing about Engineering bricks is that they have a low water absorption. This matters particularly when we live in Ireland / Scotland as we want a brick that is not going to be attacked by frost, we call this the durability. @flanagaj my instinct tells me that a class B brick will be ok unless there is some reason not to use this. Just ask your SE as the bricks are protected by timber cladding to some extent as you well say. You also have DPC's etc. OK where would I consider using Class A Engineering brick? SE wise where I need to do something really bespoke and are looking for pure strength (compression and lateral strength) and want to spread point loads.. much like a big padstone. Can't recollect if I've ever done this.. as above due to the other elements often failing long before. But where I have done it is on refurbishments of old stone barns / stone tenement works etc. These often have no damp course. I usually use class B engineering brick as a few course of this acts as a DPC. In very wet places where there is a space constraint (often in foundation underpinning) I may use a class A, as you need less courses to act as a damp course. Now to circle back. On old buildings the walls can be often over the limit for what we call slender. In other words the ratio of it's height to thickness can be beyond the modern design codes. The last thing we want to do is to introduce a plastic DPC at the base of the wall as this creates a rocker bearing which can be very dangerous. By using an engineering brick as a DPC we get around this problem. There are thousands of traditional buildings all over the UK that use this method. You do, from time to time have to make a note on your drawings for building control so they know what you are doing and why.
-
Exploring the ratios and losses between building elements
Gus Potter commented on SteamyTea's blog entry in Energy Ideas
Hi Steamy. Having a bit of trouble opening your spreadsheet. Have tried it in Excel 2024 using the "all files option" Says the file is corrupt. Tried it in Excel 2013 version using the all files option, says it's protected with a password so won't open. -
Ok to bring this into the domestic context. I upgraded a 1920's conservatory, to stop it falling down. It needed some additonal structural skeleton and some crack stitching ect. The glazing is irreplacable as it the brick plinth at the bottom of the glazing. The roof is a modern abomination.. but fixed that. The top bit cantilevers over the bottom and the steels were rotted and needed replaced. Hat off to the Contractor who managed to install new steels , do other stuff without cracking any of the glass. The above is a work in progress. But you can see I've put a new timber structure (supposed to look modern) inside and tied the rafters with wire and turn buckles. Below is a bit off the drawing for the tie wires I selected this wire as it has less strands, less flexible but stonger. The wire you see has a factor of safety of 5.0, some ropes you see often have a factor of safety of 7.. but for good reasons which I won't go into here. So @SteamyTea you are right, the designer needs to select a cable that has the best balance between strength and flexibility.. the more strands, often the more flexible. One strand can fail with less impact, but you generally get a reduction in over all strength with many small strands.. the reasons are complex unless you use a fatter cable. If I was designing a ballustrade say at around the edge of a balcony I would not use this type of wire. I would go for something with more strands as it's more flexible and workable on site, even if it is a bit less strong. A common offering is a 7 x 7 rope that has 49 strands. The rope you see in the example above has 19 strands. So do I. There are many that swear by a D4 rated glue.. but this is not a stuctural glue. The D relates to the durability primarily. It does stick things a bit structurally but I won't sign off D4 glue (unless it also has a structural rating) in structural timber applications for example. One default timber glue is to use something like Cascamite.. a resin glue that has been on the market, tried and tested over 40 years.







