Onoff
-
Posts
21126 -
Joined
-
Last visited
-
Days Won
206
Everything posted by Onoff
-
Setting up for a hopefully neat silicone bead where wall meets floor. Tried masking to a 7/8mm tile first but figured that'll look too wide across the "flat": Very impressed with Frog tape in comparison to ordinary masking tape. Re did with a 5mm pack. I'll now run a very small bead of clear CT1 along the joint keeping it clear of the tape. When dry I'll go over with silicone, probably Mapei grey depending on how it looks.
-
Nice and neat. Did you mask it up?
-
I can't really be raking grout out for fear of going through the tanking just behind. It's got to be something that goes over the top.
-
"Interlock"...no mortar or "glue"? It never dawned on me!
-
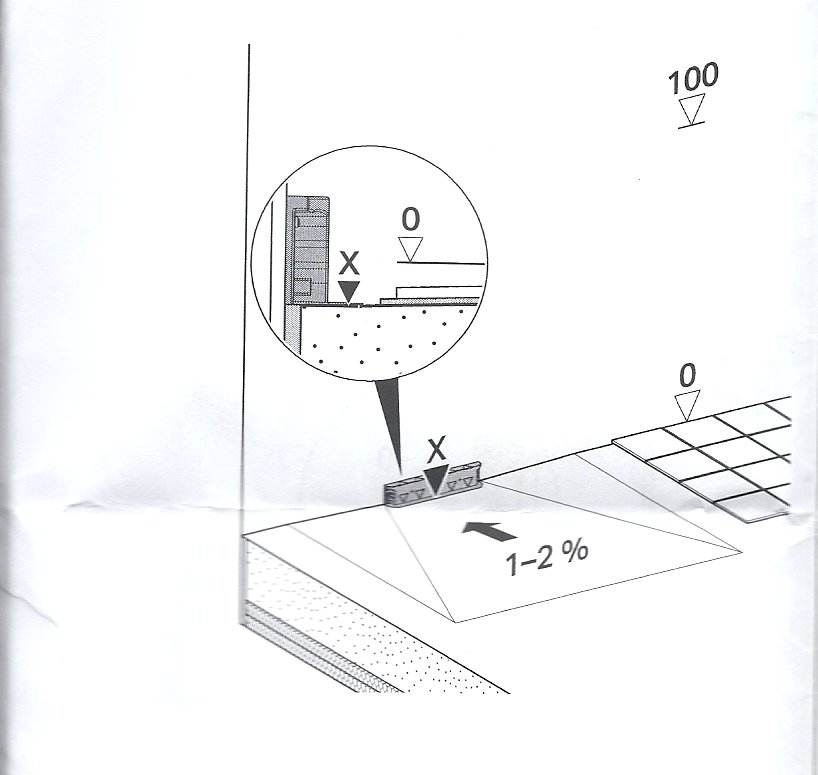
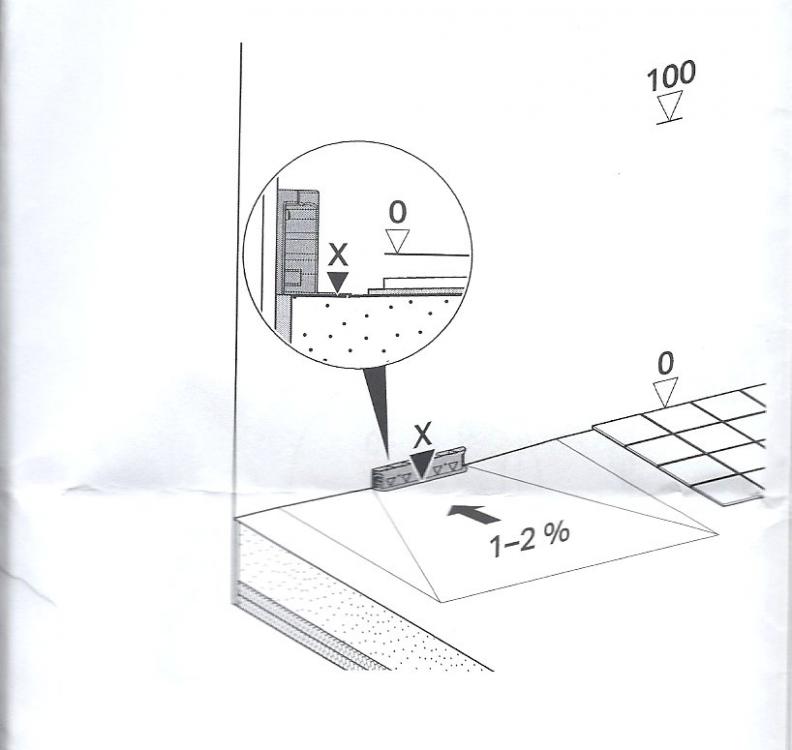
 I don't know about that, tbh its the main area that lets the side down imo. With hindsight I'd have probably aimed from the beginning for a 2% fall. Tbh I sort of did I thought. Calc'd a 13 - 26mm fall and reckoned I'd end up at 18mm from memory because of accumulative issues. There were constraints with bending the mesh down and worries over concrete coverage over the pipes. The use of the angle iron formers proved a great idea if I say so myself! Should be able to make out the fall lines: You can see the (decent?) fall here: It's got to be the tiling bed thickness where I went "wrong". Tbh the concrete was all dead flat due to screed rails being used so ideal or tiling straight onto. I should have used maybe a 6mm bed under the falls area and 10mm on the main floor!
 -
A problem..... The right hand grout joint of the mitre is quite wide. I've got cracks in there as shown below. I half worried about this as I've ply behind the mitre. I figure it'll expand / contract at a different rate to the wings either side where there's no ply. The mitre joints btw were taped and tanked. Do I re grout, CT1, white silicone? Cheers
-
Done after a beer but looks like 14/15mm just over the 1% fall wise. See how it goes in practice!
-
Thinking about it I scored some blue 10'x5' sheets from site about 15 or 16mm thick some years back. I used them horizontally. Soundbloc I assume.
-
Latest message: "*** has finally agreed to pay for a plumber as it’s beyond me to fix it... I’m admitting defeat. Do you fancy doing it for some money? If not I’ll book a plumber in, didn’t know if you fancied some extra cash x" Tbh cash job aren't my thing. I'd have rather had a look FOC before now. Have to let her down gently.
-
Travis Perkins do 2.7m. I had them in green, moisture resistant for the bathroom. Why you may ask? Because some idiot when he put his new ceiling joists in ended up with 2470mm as a room height and didn't want silly little bits of pb at the top/bottom. "He" didn't appreciate the knock on of this meant silly bits of TILE...
-
I think my fall came it at 18mm over 1.4m so about 1.5% I'll throw the laser line on it later.
-
You want 1-2% fall I think.
-
Are you tiling straight onto the concrete? What thickness of tile?
-
Fabric vs bling
Onoff replied to Ed Davies's topic in Energy Efficient & Sustainable Design Concepts
There you go, that's me happy! -
I didn't mean underground but fair heads up. Meant say where pipes come up out of the slab etc.
-
Cordless angle grinder is my weapon of choice tbh with a flap disc. You have to be confident with it though and I appreciate they scare a lot of people.
-
If you have any solvent weld stuff to do I'd get the same brand if you can. I've had some grief mixing and matching with too tight/loose. Not insurmountable but certainly avoidable. On the push fit stuff a can of silicone spray is a must and a chamfer tool v.useful.
-
I use these for drainage and ducting: https://www.drainagepipe.co.uk
-
I was talking domestic use. We've seen I think @Bitpipe? constuct a 4000L diy system based on second hand IBC tanks for very little money. I'm on a meter here and that would make a fair difference to me in the Summer. Appreciate not all have the land/space/ability to construct such a system and in that specific case a concrete enclosure for the tanks was incorporated in the build. I was just trying to get across that water is and will become more so just another taxable commidity. It'll be fresh air next! I'd I suspect be able to easily do a borehole given I'm in the bottom of a valley and either side about 100m away are capped boreholes
-
I had the opportunity to get hold of some out of date Dow stuff but never bothered. Was told it won't set?
-
Discount Offers of the Week
Onoff replied to Ferdinand's topic in General Self Build & DIY Discussion
Got to be a TOOLSAVE joke there... -
It's true about rainwater capture being illegal in some States. I just looked it up and in fact it appears CA repealed previous legislation and allowed it under the Rainwater Recapture Act of 2012. https://www.lexisnexis.com/legalnewsroom/top-emerging-trends/b/emerging-trends-law-blog/posts/california-s-rainwater-recapture-act-lets-state-residents-capture-use-harvested-rainwater
-
Discount Offers of the Week
Onoff replied to Ferdinand's topic in General Self Build & DIY Discussion
The Simba Shop? There's more to see than can ever be seen... -
I would respectfully beg to differ on that. I believe that in parts of the US the storage and harvesting of rainwater for domestic has been made illegal. On the surface this is to help stop the spread of certain water borne disease. I don't believe it's a coincidence that in some areas such as CA water is a scarce resource and this can be used as a form of control by forcing in effect the consumer to buy from approved sources at an ever-increasing price.
-
3 coats of satin black Bedec barn paint on my gates (new, pine scaffold boards) and it looks as good as the day it was done. I have NEVER seen a "paint" cover bare wood so well with just the first coat. Expensive though. £50/5L from memory. Dries super quick between coats too. https://bedec.co.uk/bedec_products/barn-paint/