


Onoff
-
Posts
21125 -
Joined
-
Last visited
-
Days Won
206
Everything posted by Onoff
-
 Just get one from abroad and boast it's "imported" 😂
-
Got any Australian or Kiwi mates? Or any mates at all even...😃 Clipsal and Legrand do them there. Both companies are owned by Schneider Google "clipsal black architrave". I've some Clipsal stuff here actually. It's alright. I could 3D print you a cover in matt black to clip over a screwed one.....
-
How does your garden grow?
Onoff replied to recoveringbuilder's topic in Landscaping, Decking & Patios
What are the pyramids? Just "art" or do they serve a purpose and cover something like a reservoir? -
How does your garden grow?
Onoff replied to recoveringbuilder's topic in Landscaping, Decking & Patios
Can't be that hard to corner a damp sheep and sprinkle a packet over it? -
How does your garden grow?
Onoff replied to recoveringbuilder's topic in Landscaping, Decking & Patios
Many a truer word said in jest! If you can grow mustard and cress on cotton wool, I don't see why lettuce wouldn't grow on the back of a sheep 😉 -
🤐
-
How does your garden grow?
Onoff replied to recoveringbuilder's topic in Landscaping, Decking & Patios
Unfortunately I won't be using that. Nematodes maybe? -
How does your garden grow?
Onoff replied to recoveringbuilder's topic in Landscaping, Decking & Patios
Very roughly below, the red lines show the plot front and side boundaries. The yellow line the approx bean trench which will run north east to south west. North to south which I understand is the ideal would offend my sense of symmetry! Saying that the feng shui may be better...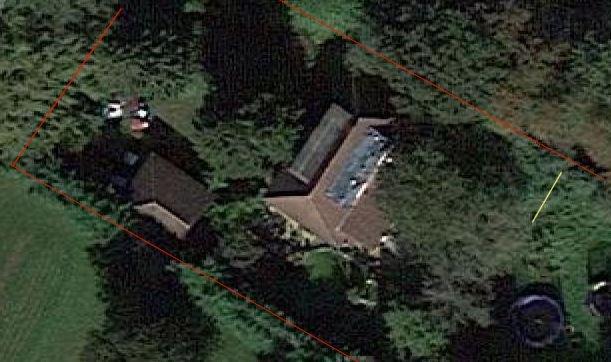
-
How does your garden grow?
Onoff replied to recoveringbuilder's topic in Landscaping, Decking & Patios
Could you not grow lettuce on the backs of sheep... -
How does your garden grow?
Onoff replied to recoveringbuilder's topic in Landscaping, Decking & Patios
Today I acquired: 4 bags of manure free from here: Kent Equine Facilitated Learning CIC A greenhouse frame with no glass from my brother. A frame for growing runner beans made from galv CHS Tubeclamp and fittings. I made it for my Dad 20+ years ago but he can no longer garden. I'm planning on "growing things"! At 55 I'm a later starter. Next to get a bean trench dug in a sunny bit of the garden. -
Kitchen: Wife's whims vs static design requirements
Onoff replied to MortarThePoint's topic in Kitchen Units & Worktops
New patio might be cheaper... 😉 -
I'd listen to the advice or you could be doing Meibion Glyndŵr's job for them!🔥
-
Looks great to me. Floor first afaic. Better detail at wall to floor joint. I did mine like it and just put Correx on the tiled floor afterwards, taped on around the edges. Yes a bit of cleaning up but then I'm time rich
-
Plus it's somewhere for him to proudly fly the English flag and attract even more unwelcome attention from his neighbours!
-
Maximum demand greater than 100amp single phase ukpn
Onoff replied to Newbuildnewbie's topic in Electrics - Other
EDIT: With thanks to @TonyTfor making me realise my mistake. I got my diversity and discrimination mixed up. Diversity is diversity. As Tony said discrimination has now become selectivity. Just goes to show you can get near 100% on your 18th (which is just reading a book) and still know f*** all. In my defence I am drinking a lot of late... -
Could he say concrete in a scaffold pole nice and plumb and attach his flue to that?
-
Maximum demand greater than 100amp single phase ukpn
Onoff replied to Newbuildnewbie's topic in Electrics - Other
Beware the Christmas dinner effect! It's all gone pc now with regard to overcurrent protective devices and say RCDs on the same circuit. Diversity between devices in that context is now know as selectivity 😂 -
In your words back in 2021: My Willis heater UFH was recently commissioned and within a few days the trades were asking for the heat to be turned down. We have no controls for it so it was turned off. A week later, in freezing conditions it was still pleasantly warm inside. Clearly it was functioning then. What changed since, who else f***ed about with it? Sorry, I just can't stop laughing! 😂
-
Maximum demand greater than 100amp single phase ukpn
Onoff replied to Newbuildnewbie's topic in Electrics - Other
Thinking about it my Triton Body Dryer has the same deal in it if you want to run it and a leccy shower from the same cable. -
Maximum demand greater than 100amp single phase ukpn
Onoff replied to Newbuildnewbie's topic in Electrics - Other
Best I can find at the mo. Relay on the left translates as "receiver priority" on the right "no priority". I'll try and find it in English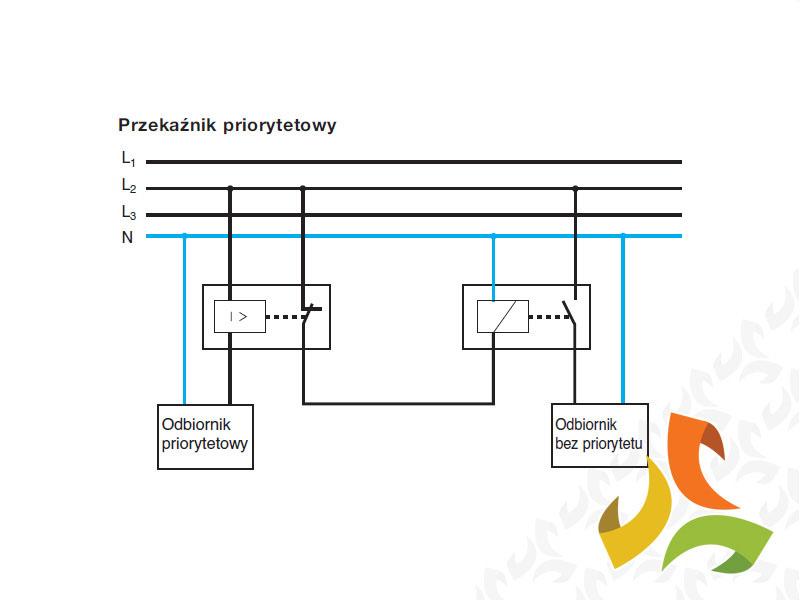

-
Maximum demand greater than 100amp single phase ukpn
Onoff replied to Newbuildnewbie's topic in Electrics - Other
Also called an intensity relay that: The priority relay is designed to prevent overloading of the building's installation due to the simultaneous activation of many large power consumers (e.g. a flow heater).The coil of the ED183 priority relay is connected in series to the receiver with priority.When this receiver is switched on, an output contact opens and the switch on the receiver switches off without priority. Bioenergy switch: • automatic disconnection of the supply voltage (phase cable) from the receiver or group of receivers, in the case of detection of no load, • automatic operation - disconnection of the power supply for 3 seconds when detecting no load or switching off the receiver, monitoring of the state of the powered circuit and re-application of the supply voltage after detecting that the receiver is turned on (electricity consumption) • manual operation (switching by means of a switch) - the voltage is supplied to the receiver continuously, without monitoring the load condition, • parameters of the output relay: 1NO 16 A 250 V AC AC1, • voltage monitoring the state of the receiving circuit: 15 V DC. also suitable for electronic flow heaters Output: 1 NC contact, 250 V / 1 A AC-1 rated current range: up to 39 A Relay operating current: 3.1?And?5.7 A flow heater: up to 27 kW -
So who closed the valve?
-
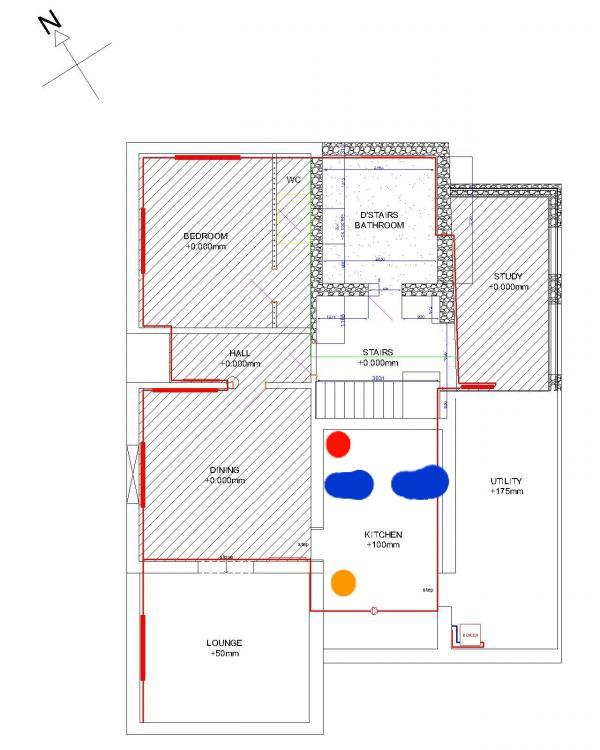
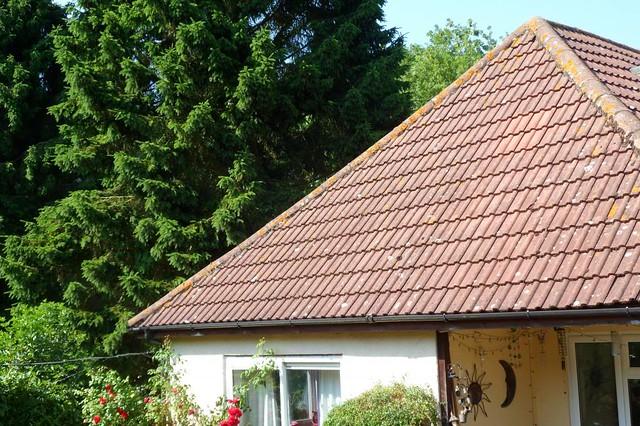
Just putting it out there as I'm trying to get my head round where I am with it all. The oil boiler is currently sat in the otherwise unheated utility. 4" block ling outer wall with a couple of large, single glazed windows, one DG window and a double glazed door. Seems mad to be pumping heat into that space where we're not living. The orange circle is the position of the HW cylinder that sits in the insulated loft space under the pictured, SW facing hip. SWMBO has a hankering for a pantry and we've discussed bringing he kitchen forward into what is currently covered external space where the hot tub is at the mo. Plan was to build a stud wall where the blue lines are. A thought here to, instead of a pantry make a mini plant room. Move the HW cylinder there plus any solar tank. That along with a UFH manifold. I suppose the first thing would be to move the kitchen "out" to line up with the lounge wall and end up with a functional "mini" kitchen whilst I gut/dig down the original. A slight bug in this plan is the kitchen floor is 100mm higher than the nominal floor level in the rest of the house. It all needs digging up and reinstating with a good chunk of insulation underneath and UFH. ? The losses here must be incredible. Sitting in the lounge with the 2kW fan heater on AND the 2kW oil filled rad. Still bloody freezing! Slowly getting warm.
-
Just putting it out there as I'm trying to get my head round where I am with it all. Oil is turned off as I'm pretty low on it and baulking at the prices for filling the tank at the moment. Living in two room heated by electric heaters. The study retains heat OK and is the warmest room in the house. The oil boiler is currently sat in the otherwise unheated utility. 4" block ling outer wall with a couple of large, single glazed windows, one DG window and a double glazed door. Seems mad to be pumping heat into that space where we're not living. The orange circle on the plan below is the position of the HW cylinder, that sits in the insulated loft space under the pictured, SW facing hip. SWMBO has a hankering for a pantry and we've discussed bringing the kitchen forward into what is currently covered external space where the hot tub is at the mo. Plan inside was to build a stud wall where the blue lines are, parallel to the "stairs" wall. A thought here to, instead of a pantry, make a mini plant room. Move the existing HW cylinder there (red blob) plus any solar tank. That along with a UFH manifold. I suppose the first thing would be to move the kitchen "out" to line up with the lounge wall and end up with a functional "mini" kitchen whilst I gut/dig down the original. A slight bug in this plan is the kitchen floor is 100mm higher than the nominal floor level in the rest of the house. It all needs digging up and reinstating with a good chunk of insulation underneath and UFH. ? The losses here must be incredible. Sitting in the lounge with the 2kW fan heater on AND the 2kW oil filled rad. Still bloody freezing! Slowly getting warm.
-
Socket Heights (English Regs)
Onoff replied to MortarThePoint's topic in Regulations, Training & Qualifications
Indeed. Watching my old man in his house on the nanny cam. Leaning down behind the sideboard to reach the TV socket right down low. Good chance of over balancing.


