Cpd
-
Posts
1627 -
Joined
-
Last visited
-
Days Won
7
Everything posted by Cpd
-
 I am a dreadful procrastinator in some areas of my project but I put this down mostly to my lack of knowledge in these areas. I have so much stuff to do in so many areas of my life that it’s impossible to spend the needed time on any one big project. For instance the cottage needs a heating and hot water plan, I need to re visit Jeremy’s spread sheet and get my shit together as it’s imperative that I have a solid plan in place SOON..... this is my biggest procrastinator.... I have always hated taking one step forwards and then one back because of rushing into the unknown, I just don’t have that sort of time to waste. Procrastination for me is ok as long as it’s done in my down time, during working hours I am always ruthlessly productive and results driven. Admittedly because of my huge work load I have to triage my daily, weekly and monthly “to do lists” and this has led to my cottage compleation date slipping further and further away.... this is somewhat depressing as I really really need to get this done as it’s now looking like this is a key point to my future financial security......
 -
The tale of the sale of our old house
Cpd replied to Jeremy Harris's topic in General Self Build & DIY Discussion
Aint that the truth ?. Amen...... -
The Optimum domestic hot water and heating system
Cpd replied to Triassic's topic in Other Heating Systems
The very decrepit system in my house is a standard hot water tank with an immersion, cold water in the bottom. The house is uninsulated and the tank had just the foam on it..... I did some measurements of how much heat was being lost overnight and was terrified! I insulated that tank to within an inch of its life and then re did the calculations and the difference was astonishing. Due to trying to cut down on my electric bill even further I installed a pumped electric shower and a few wall worts above sinks, yes it’s total shite but we get by and I was reducing my electricity consumption. Then I had kids and all that fluffing around trying to save a bit of cash went west..... way west. I am in in the early stages of needing to designing the new hot water and heating system for the cottage next door and will be following this thread and many others with interest, trying to learn all I can. -
I am sure it will be a marriage made in heaven! Did you buy unseen? A real internet bride ! I’m just envious of all you digger owners am still looking for a 1.5 Ton but they are like rocking horse shit up here on the west coast and fetch silly money. I am hoping to secure about £6500 for one in the not to distant future but will need a no VAT deal and a lot of luck !
-
The tale of the sale of our old house
Cpd replied to Jeremy Harris's topic in General Self Build & DIY Discussion
Good luck with the sale, I expect you will be much relieved when it’s sold, must be a constant niggle having to deal with a second property that your heart is not into. When I left Australia I sold all my large items (cars, utes, caravan, tractor, boats and trailers) as cheaply as I could afford to, had no time for tyre kickers and dreamers sell it at a good price and serious buyers just hand over the cash. I had a huge amount of stuff, gave most of it away to friends and everything else I put on the street with a “free” sigh beside it, it all went within 48 hours. -
Me to ! Now I luv um ! (German partner) I also have duel citizenship (Australian) Was there for 10 years, my dad is Irish and the family comes from Valentina island in the south so l geuss i could apply for another passport if needed !
-
‘‘Tis a labour of love ! Great stuff and keep going in this good weather.
-
The Build - watch out for the pot holes!
Cpd commented on Redoctober's blog entry in Our Journey North of the Border
Looking really great, I would call your problems no more than “teething problems” and a good chance for you to understand the cause and effect that so many decisions create on a self build. Thanks for being honest and sharing your dirty laundry so that we can all learn from it. But again it’s looking really top class, well done and good luck. -
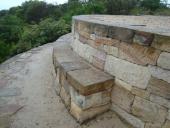
Come on now beef it up..... here is one I built about 7 years ago, 750 meters long with each block coming in at +800kg should look good in your neck of the woods. But seriously sandstone comes in all grades, this one was very hard and resistant to the salt erosion as it was right next to the ocean, we were driving over it with a tractor and a ton of stone hundreds of times without a problem.

-
Fanbloodytastic ! Some seriously class carpentry going on there mate.
- 95 replies
-
- 1
-

-
- stairs
- homemade stairs
- (and 2 more)
-
Anyone know of someone with a CNC router?
Cpd replied to Jeremy Harris's topic in General Self Build & DIY Discussion
Great SKILLS gentleman ! Wow really impressed and inspired, I have a lovely makita palm router that I would like to use to do something along these lines, @Russell griffiths What machine did you use and can I get the bits for my router ? -
Thanks very much @JSHarris some really good pointers in there and just what I was needing. the officer who inspected was quite impressed with my existing set up and could not have been more helpful. I am providing bottled water to “non residents” and will aim to do the work at the end of the season when all our visitors go to warmer climates ! That gives me time to track down all the essential bits and bobs and come up with a plan. I was considering putting the filters up the hill between the tanks in a “box” and then having the uv system as close to the house as possible, the only reason for this was that I thought that the particle filters could cause a reduction in pressure and if I put them up the hill this would mitigate this.(as there would be unrestricted flow from the pipe to the uv unit) I only say this because other people who have fitted similar systems always moan about blocked filters and lack of water pressure, I expect this has got more to do with poor maintenance and badly sized filters..... but is there merit in my plan to split the system ? Thanks
-
Looking for anyone with experience in the installation of UV and particle filter systems for the treatment of ground spring water. a bit of background information. I have a spring that is located 60m above sea level and is located 180m away from the house. The house is at 40m above sea level so the spring is 20m above my ground floor. Due to various changes i was advised by council to have my spring water checked and so they came round and took samples for testing. There was a technical report and a risk assessment but in the guys own words on an email to me. “Colin, Lovely spring water full of lovely things so passing except for the odd floating bit which filters will sort out. I can now get the assessment completed , hopefully before the weekend” so really pleased with the results and one if not the cleanest springs around these parts. The spring is very consistent and produces 8400 litres every 24 hours at its lowest ever recording in the last 6 years. I have also been awarded a significant grant to help upgrade the system £2400 my biggest concern is to not loose and pressure so i was thinking about the following. upgrade the tanks next to the spring with two 3000 litre tanks, with the first acting as a settlement tank. Instal a tap at the bace of the first tank to flush it out every six months or so if there is any particle build up. (I have a basic system that does this already and it works great) then put the particle filters between the first and second tank. ”there should be a complete filtration system with 20-30 micron and then a 5 micron media filter prior to ultraviolet sterilisation untit” i was then thinking of putting the uv unit down near the house as I have to run power to it and don’t want to run armoured cable 180 meters up a hill...... upgrade the water pipe between the spring and the main junction to the 3 buildings that the water supply services. So so my question are. 1. Does this sound like a plausible plan 2. Should I consider using a wider bore pipe from the spring down to the uv system 3. Any recommendation on uv systems and particle filters 4. Have I missed anything ! thanks for any help. Colin
-
Makes me want to go outside and knock my cottage down and start again...... watching a new build go up like this is fantastic but also mildly soul crushing when you got on the renovation wagon and missed the last stop..... looking great well done mate.
-
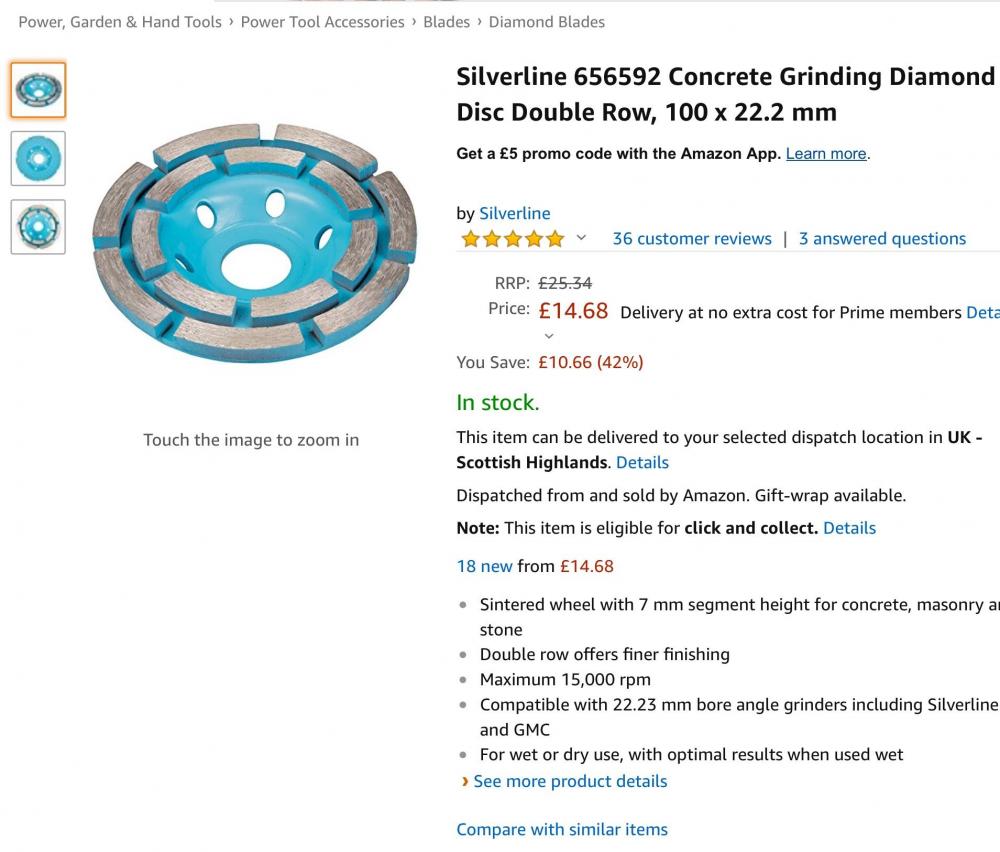
Not the best quality but should be good fir grinding sharp edges if required.
-
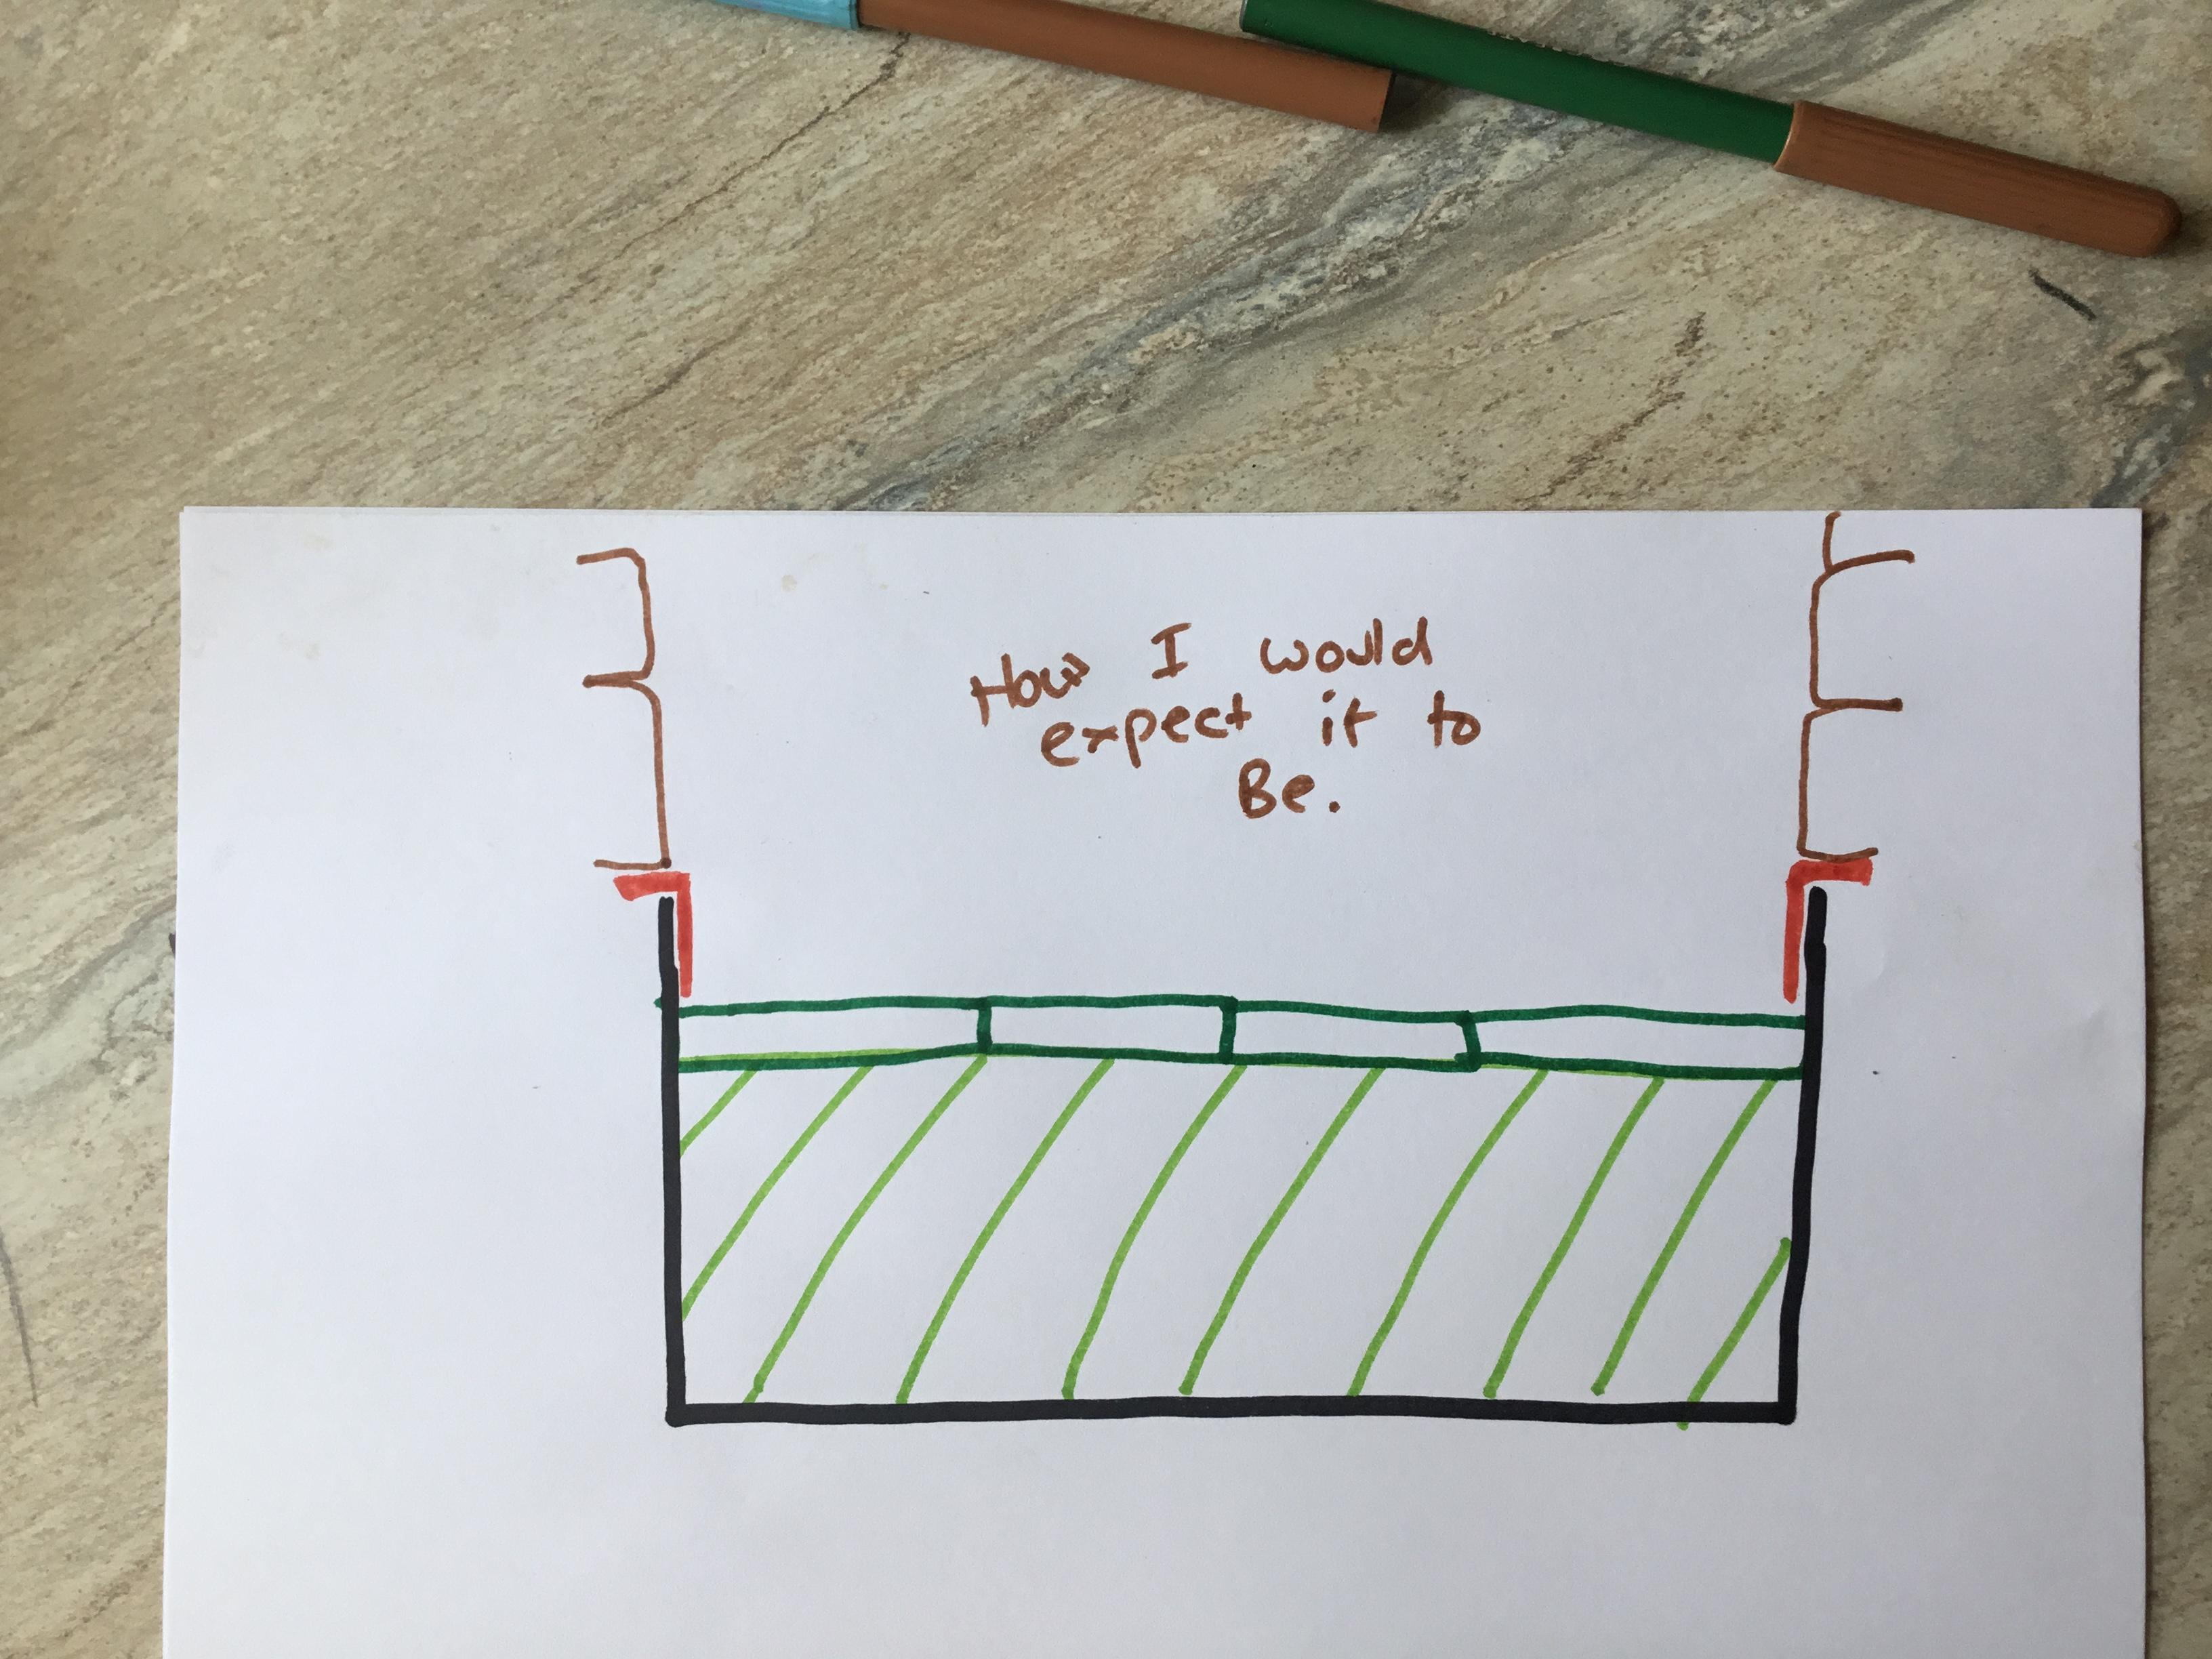
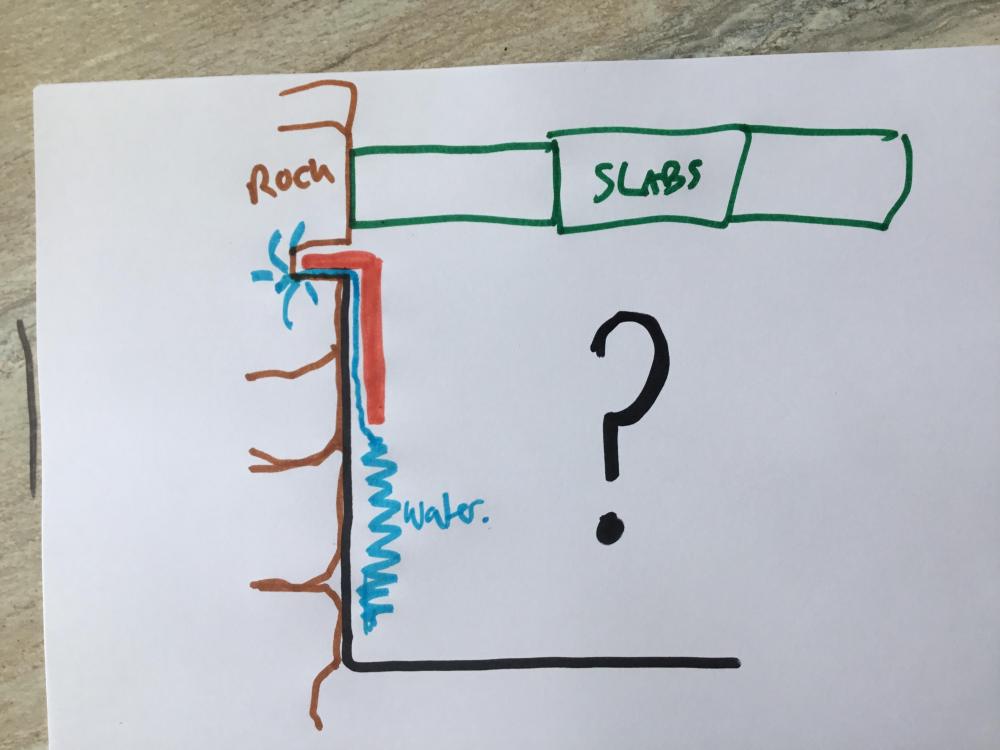
Another question..... the sky lights. How are these sealed to prevent water getting in, if you have a concrete / mortar build up and then slabs then your looking at a non permeable surround around the windows, is this going to mean water will pool around them ? Or are they fully bonded in ? Or am I looking at it wrong and they are higher than the finish slab level.
-
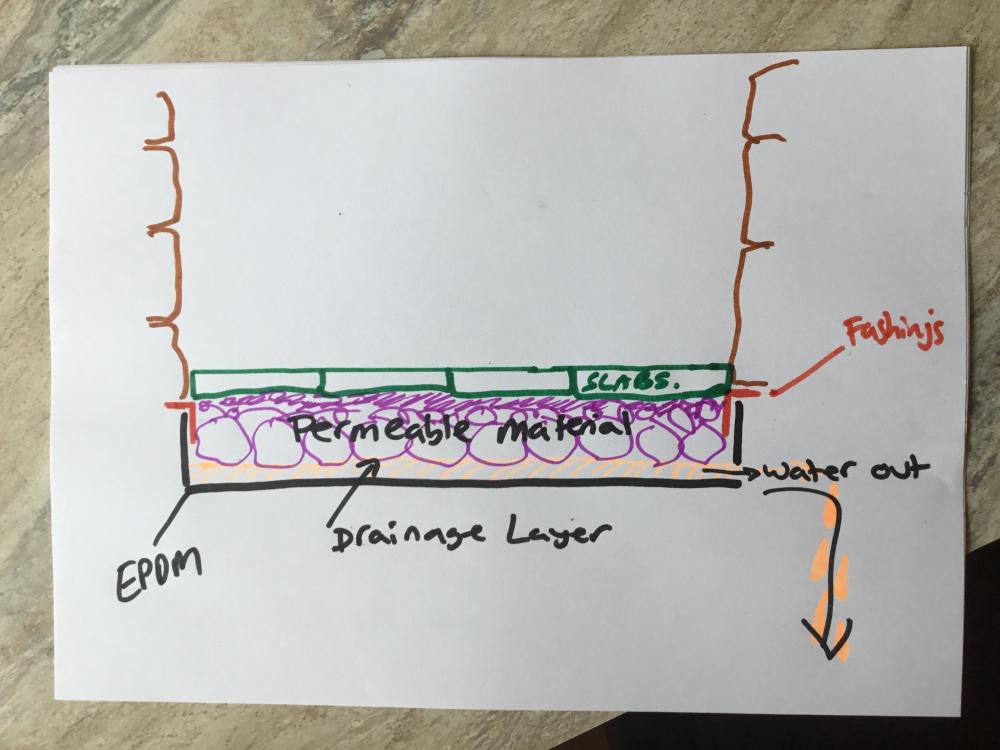
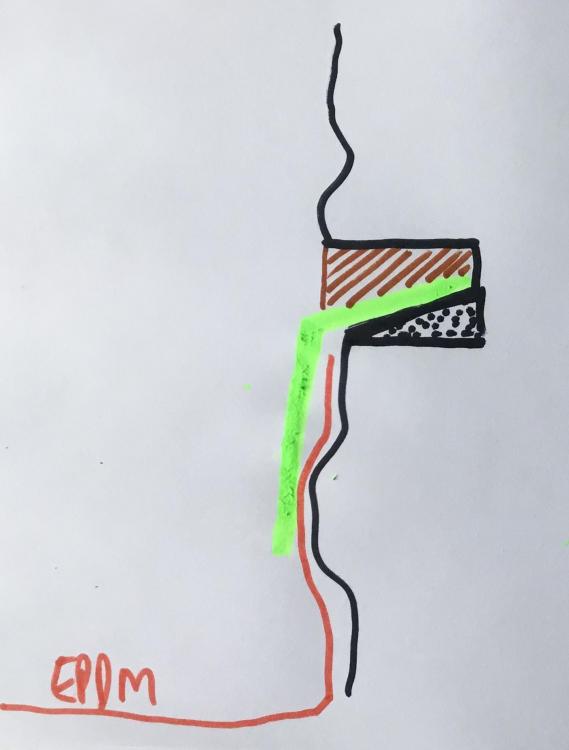
Filling with ct1 seems excessive as with the new and improved design this are will now be on the dry side of the epdm, yes I would fill it with something and maybe someone will be able to point out a good product, I really don’t know as it’s something I have not dealt with. Remember to trim any stones that will be between the top of the pavers and the top part of the flashing, do it with the diamond cutting disk, I have a diamond grinding disk for this sort of work and it’s fantastic but not something you would use again unless like me you were a stonemason in a former life. You now have a good opertunity to do this right and have it looking sharp and sweet. by trimming the stone you can get the flashing as close as possible to the wall, I would then be cutting a large enough slot that the flashing can be mortared in to fit in with existing mortar. you are also able to “hide” some of the walls imperfections by creating a nice parallel mortar line with only a consistent amount of the top of the flashing showing , or if the flashing is all the way back you can mortar right up to the top edge,Work out how far the bottom of the flashing should be from the top of the pavers, not my field but I would be looking to keep it between 10-20mm enough for the drip but not enough to be obvious, more an unobtrusive shadow gap. Again not my field and worth checking for pro recommendation. Maybe worth mortaring up from top of slabs to up behind the flashing (prior to flashing going on....) so that your seeing a consistent material rather than bits of random stone and mortar joints. Its an area that you don’t want to draw attention to. Function is the key. No idea I would not be putting a whacked enywhere near this.... the idea of whacking anything hard on top of epdm sound like a recipe for disaster, how would you know if the vibration caused a sharp stone edge to cut into the rubber..... I personally like the idea of concrete and then a mortar bed that the slabs are set into as this eliminated a huge area that water could and would sit. Maybe rethink the depth if concrete so that when it comes to mortaring in the slabs it’s exactly the right height for the correct mortar depth needed when laying the pavers, sure there is some set standards for this, it may be worth having some sort of plastic stands or some such thing so you don’t get any of the slabs subsiding as you work along, the stands under each corner just get lost in the mortar. I have cut up a 50mm slab into lots of squared before and used these as my stands, helped me get a perfect flat surface as I checked the stands with a laser level before I filled around them with mortar and then put the slabs on top, tapped them down and moved into the next line. I think this method will eliminate my concerns about water build up as there will be virtually no where for the water to go and it’s really fit and forget.
-
Either you want to be able to drain the water away or you don’t want water in the structure. How will it cope if water can get in but can’t get out and you get -10 conditions ?

-
How does the area drain ? I am only just starting to realise what’s going on...... yes the Edomite should of been up above the pavers and yes there should then have been the flashing that would have come down close to the top of the pavers but not below them...... sorry but I am concerned that if water can get in without the ability to drain away then it will just keep filling up until it overflows. If the lowest point for it to get out is behind the flashings and into your new cut recess then that’s where it going to go........ water will always find the easiest path. I had assumed that there was some sort of permeable drainage layer below whe slabs and BELOW the height of the top of the EPDM. That way any water would just run out as it got in.
-
Not sure what will work, sure someone will be along, truely feel your pain. I am lucky that I am in a situation where I do all my own work or am in charge of volunteers doing jobs for me, if it’s below slandered it’s my fault and mine alone.
-
God it’s painful to see how things are done by supposed professionals.... the last thing you want is water ingress after your all paved up...... get it flashed and sealed up 100% around those edges or your going to hate yourself in a few years when it starts to let water in.
-
I have done quite a bit of flashing onto rough rock walls and it’s definatly harder than a nice brick wall. You will need to work out your maximum depth needed to go into the wall due to the unevenness of the stonework, it will only be as good as the weakest link. Also I have found that cutting a single slot with an angle grinder and then pushing in the flashings leaves little room to properly seel it up. On walls like this I often take outa good 25mm -30mm slot by 50mm deep i then build up the bace on an angle and put the flashing in and then re- mortar the hole, that way if there is any difference in expansion and contraction resulting in micro cracking then the water will not track back into the wall because of the fall. Its al lot easier if the wall is prepped first so that you have your levels all worked out. But hay ho.... done correctly the flashing will hide a lot of sins and give you a good crisp finish. Prep a whole section before starting and mock up the flashings as these uneven walls can really chuck a spanner in the works if you assume anything..... I am not a pro and the use of fancy sealants may well be advised, this is just what worked for me.
-
Could not agree more and would have used a different type of insulation had I known then what I know now.......
-
It has been pointed out to me that kingspan and the like are great at insulating but have a very poor decrement delay, I have doubled and tripled up on plaster board in many areas to help with both noise reduction and to try and help even out temperature fluctuations...... out of interest I recently Ripped out a previously bricked up open fire, 1.2m x 1.2m it had been fully filled with brick and mortar with the flue from the wood burner going in at the top..... i insulated the cleaned up fire recess with kingspan and then built a block box recess somewhat smaller than the original due to all the extra insulation and re instated the wood burner. It now performs much better as previously the heat from the fire was just being lost to an unisulated stone wall. The point though and trying to get back on topic is that even after the fire has been out all night the block work is still radiating heat out in the morning and the kitchen is noticeably warmer than before. Doing this experiment has highlighted the need to add in extra materials into my renovations to help store heat and to help minimise the heat fluctuations that would be found with just kingspan and a single layer of plaster board.... Using an insulation with good decrement delay would have solved this problem but hay ho you live and learn...... well I try.
-
A day we thought would never come.
Cpd replied to Moira Niedzwiecka's topic in General Self Build & DIY Discussion
@Moira Niedzwiecka what a fantastic and modest house you have got there, if I could have done things diffrent then it would have been to build something like this rather than head down the renovation route.... but hay ho one always lives and learns and thank god for buildhub. (Though I wish i had found its predecessor 6 years ago..... ) looking forward to seeing the inside come together.