Declan52
-
Posts
4449 -
Joined
-
Last visited
-
Days Won
10
Everything posted by Declan52
-

I need to order some footing blocks, what types?
Declan52 replied to epsilonGreedy's topic in Foundations
Are you restricted on your overall ridge height?? As it's not even built yet I would bump that 195mm up to 225mm and that will be plenty gd. Come the time you can go with 150mm pir and a 75mm sand cement screed or if the wallet is still flush 175mm pir and a 50mm Flo type screed. Have you priced up the high performance type boards yet like the kooltherm from Kingspan. They aren't cheap. -
I need to order some footing blocks, what types?
Declan52 replied to epsilonGreedy's topic in Foundations
It's not just a matter of putting enough insulation in to make sure your house passes. As you are going for ufh you want as much of that heat coming up into the room. Not much point in going to all this trouble and the worms under your floor think they are living in Florida with the nice toasty b&b floor above them. The longer you have to run the ufh to get the slab up to temp the more it will cost you in either oil,gas or electric. You need to figure out this detail so you can tell the brickies that my beams will sit at this height X and my finished floor will be y above this. They can then work out how to get to these heights from the concrete in your founds. -
I need to order some footing blocks, what types?
Declan52 replied to epsilonGreedy's topic in Foundations
You kind of need to know your finished floor height before you start your founds as all your measurements will be based around this. Time to get the calculator warmed up. -
Designing for blown beads at the cavity bottom.
Declan52 replied to epsilonGreedy's topic in Heat Insulation
My cavity insulation went approx 300mm below my finished floor so there would be no cold spots. As you are going for a brick finish you could build in some weep vents level where you bring the concrete in the cavity up to. Then if any moisture gets that far it can seep out. https://www.wickes.co.uk/Wickes-Wall-Weep-Vent---10-x-65mm/p/224684 -
What has got them worried about gas??? Was it mentioned on the building regs submission. Will most of the fill not be stripped away on the section where the house will be?? Any site investigations I done for gas you could usually smell of there was something there as soon as you broke ground. Once you got to the water table then you could see it as well in some cases. Around here is a radon area so that type of membrane is in most cases standard practice. I don't think it cost that much more than good quality polythene anyway.
-
Designing for blown beads at the cavity bottom.
Declan52 replied to epsilonGreedy's topic in Heat Insulation
The beads won't be sitting at the very bottom though. By the time both walls are built the droppings of motar will have filled up an inch or two. As they are EPs type beads it won't matter anyway if they are submerged in water. If you're cavity is constantly filling with rain then something major has gone tits up. -
I need to order some footing blocks, what types?
Declan52 replied to epsilonGreedy's topic in Foundations
You should be looking at 150mm min pir type insulation. Been a long time since I used Jeremys heat loss calculator but you should put in 120mm and 150mm in the floor section and see what the difference is and take it from there. -
I need to order some footing blocks, what types?
Declan52 replied to epsilonGreedy's topic in Foundations
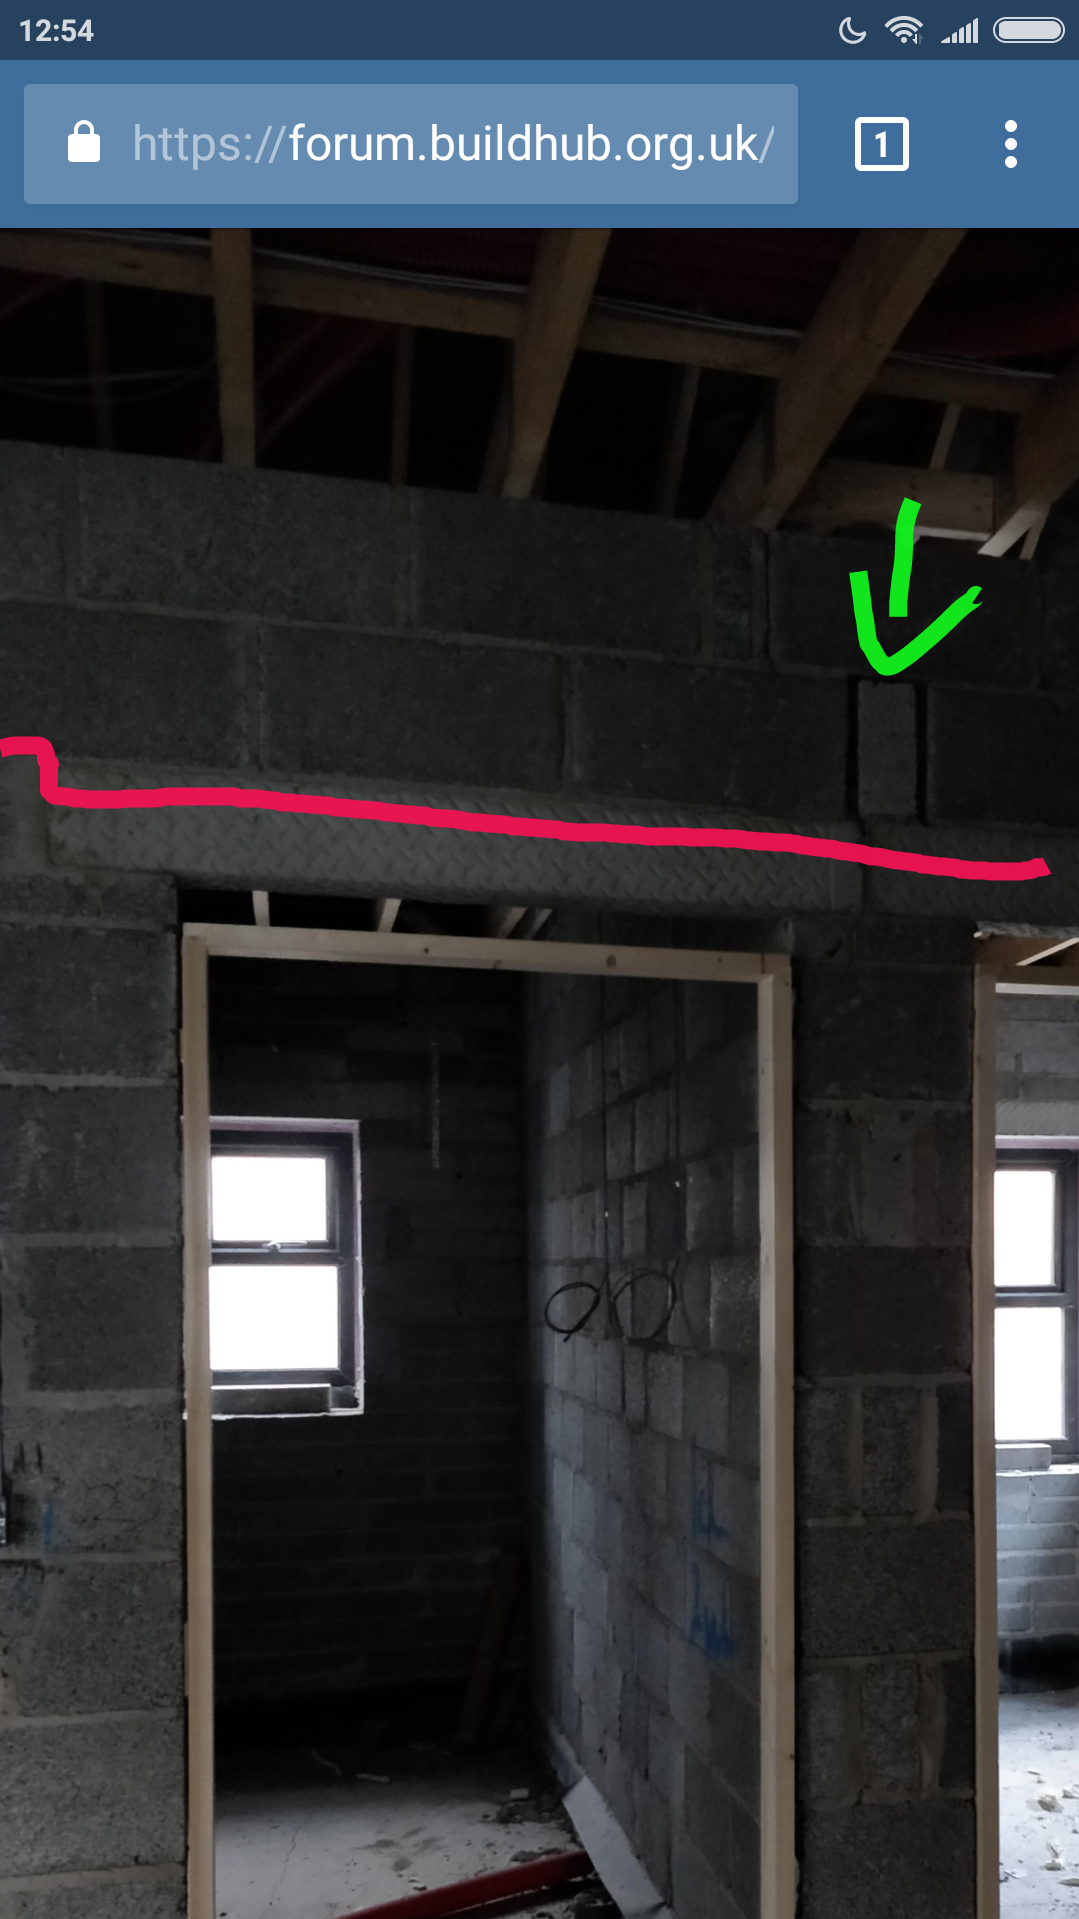
You could also start of with a course of soap bars and then you put your dpc on top of these then build away in block. This would bring your height down a further 75mm so your dpc would be under the brick I expertly drew in!! In your pic what red brick do you reckon will be your height of your pathway around your house. The beams sit on dpc so stops damp getting to the beams. What depth of insulation and concrete is going on top of the beams. -
I need to order some footing blocks, what types?
Declan52 replied to epsilonGreedy's topic in Foundations
Take the 2 course of brick out then it's only 225mm. -
A checklist from post-planning to DPC
Declan52 replied to Tony K's topic in Project & Site Management
The easiest route once you have settled on a design is going for a package from a timber frame company. They will all offer various different options. From these you can pick what one suits your design plus more importantly the wallet. Although not every timber frame company will do the foundations but some do. Once the frame is up and wind and water tight then you can get the trades you know to come in and do their bit. As always bear in mind that the founds is the great unknown element of every build. You don't know what's there until you start. As such it's the hardest part to price up. Have you thought about what kind of standard you are aiming for from passive to meeting building regs or somewhere in between?? -
I need to order some footing blocks, what types?
Declan52 replied to epsilonGreedy's topic in Foundations
Will the beams not be 150mm so if they are sitting on the top of them 2 courses of concrete bricks they will match the outside first 2 red bricks. If you build a soap bar, see link below, between the beams then you can start of with your blocks on the inside. Put the dpc on top of the first course of block and on the out side skin it will be on top of another brick in the pic. The blue lines would be the dpc with an extra layer under the beams. https://stowellconcrete.co.uk/concrete-soap-bar-blocks/ The 150mm high blocks.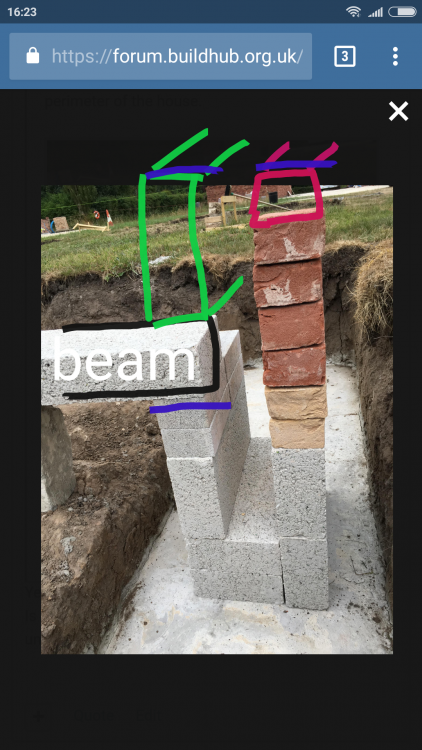
-
I need to order some footing blocks, what types?
Declan52 replied to epsilonGreedy's topic in Foundations
Yeah the 3 blocks when built will look like that Is there a specific reason for building 2 course of brick under what I assume is your beams?? -
If motar is crumbly is usually either poor sand or too much plastersizer. It goes like fluff. Or if it wasn't mixed for long enough. Plus as above might the cement have been dead?? If you have some ordinary cement around do another mix exactly as you done using the white cement and if it's crumbly then it's poor sand if not then it's your cement. Just before you start can you get a lorry load of sand delivered from the same place all the time. You want the sand to be the same for every mix. No point in having nice cream motar to start with then you run out of sand and your next delivery is a red/yellow sand and your top half of the build will end up a different colour.
-
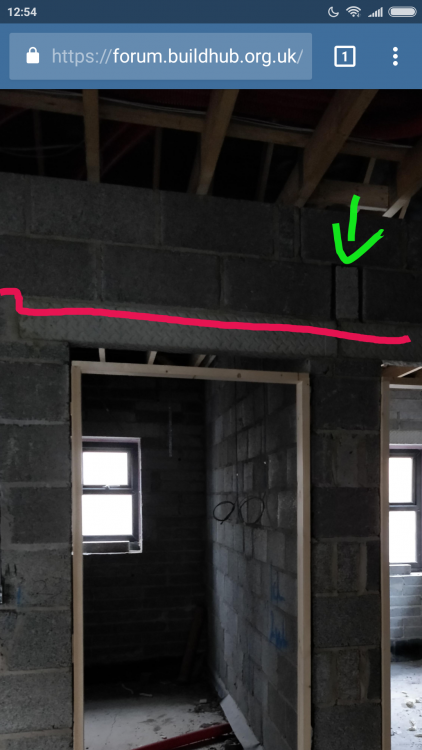
That's a brick under the head. A brick ,75mm, plus a 150mm concrete head gives you 225mm which is block coursing measurements. If they had of cut the brick down with a saw then they would have been out on the next row as the blocks on the wall beside it would sit higher. How would they have dealt with the step down in the wall as shown in the pic. They would have needed to bed blocks up 50mm in 2 courses. Good luck trying to get them blocks to sit. Plus the wall that is tied into this blockwork , green arrow, how would that have worked as it would be 40/50mm higher that the wall with the concrete head on it. It's just how every single block house is built. Unless they are going to start making concrete heads at 180mm to suit over door openings then there will always be a gap. Most builders don't even fill the hole. The scratch coat will come down a bit and the skim coat another bit and once the door architrave is on its hidden.
-
VAT Claim in
Declan52 replied to lizzie's topic in Self Build VAT, Community Infrastructure Levy (CIL), S106 & Tax
Maybe I was just lucky. -
VAT Claim in
Declan52 replied to lizzie's topic in Self Build VAT, Community Infrastructure Levy (CIL), S106 & Tax
Once it's there it doesn't take long. Think mine was paid out after a month. -
They weren't being lazy they have to build it like that to keep in coursing. If they had of built the head in at the height the brick sits at you would be chopping the bottom of all the doors. I put timber blocks in the gap and cut some cement board up into strips. Screwed these to the blocks on each side and put a mesh over and then the scratch coat came the full way down.
-
If it's your house skim it. Or tape it and when the sun comes up pull all the blinds down till the sun sets again as you will see every join.
-
I need to order some footing blocks, what types?
Declan52 replied to epsilonGreedy's topic in Foundations
What are you paying now. Mine where 33p 5 years ago. -
I need to order some footing blocks, what types?
Declan52 replied to epsilonGreedy's topic in Foundations
£6.17 a block!! Are you English mad in the head to even consider paying that. Don't even think about paying that kind of silly money for something that you will bury in the ground and never see again. If you can't source the 300mm block mentioned above just buy in bog standard 7n 440*215*100mm block. Build them 315mm wide. That will be two blocks on their flat and another on it's edge beside it. The 300mm block are used because they are handy to throw about and lay and will have very little waste. If you can't get them then do as above. -
There's your challenge right there for you. Do you absolute best to finish your house and then stand out at your gate with a big smug smile on your face and an even bigger middle finger raised when he goes by.
-
I need to order some footing blocks, what types?
Declan52 replied to epsilonGreedy's topic in Foundations
The blocks used here for founds are mainly 350*300*100mm. They are much easier to work with than them headstones you have listed above. If you want a 100/100/100 set up then you build them the 300mm wide way. If you want a 100/150/100 build then you go the 350mm wide route. They are just standard 7n concrete blocks and are no heavier than a 440*215*100mm block. If you are going for lightweight block on the inside skin further up then you're last course is built in these. So it's just 1 course right round the building. That gives you your thermal break. https://stowellconcrete.co.uk/foundation-trench-blocks/ -
I got a projector, 8ft, as my 50 inch wasn't big enough!!!
-
Gone off piste, need some footings design help.
Declan52 replied to epsilonGreedy's topic in Foundations
Will the beams not go front to back, the shortest span?? Build X amount of courses with a block on it's flat, 215mm, and then the last course on it's edge will be in-between 2 beams. Depending on how deep the concrete for your floor will be you might get 2 blocks high built here and then it will be easier to cut out and continue upwards when the time comes. You can cut strips of insulation and have them on top of the wall so it's only covered in 50mm of the finished floor concrete. Will be much easier chipped out this way. -
Gone off piste, need some footings design help.
Declan52 replied to epsilonGreedy's topic in Foundations
You can get blocks in all sorts of different sizes. Some people call them trench blocks or Foundation blocks doesn't really matter that much what they are called. To give you a 100/100/100 type setup above it's easier to use a block that is 300mm wide. However just to confuse things even more they can be 350mm long or 275mm if you go for 140mm deep blocks. These blocks don't need to be lightweight, ordinary concrete blocks work fine here.You just use a lightweight block when you start your cavity on the last course. But as there are plenty of block suppliers through out NI we are spoilt. What type you end up using will be more or less what your local merchant can supply.