


TerryE
-
Posts
3822 -
Joined
-
Last visited
-
Days Won
30
Everything posted by TerryE
-
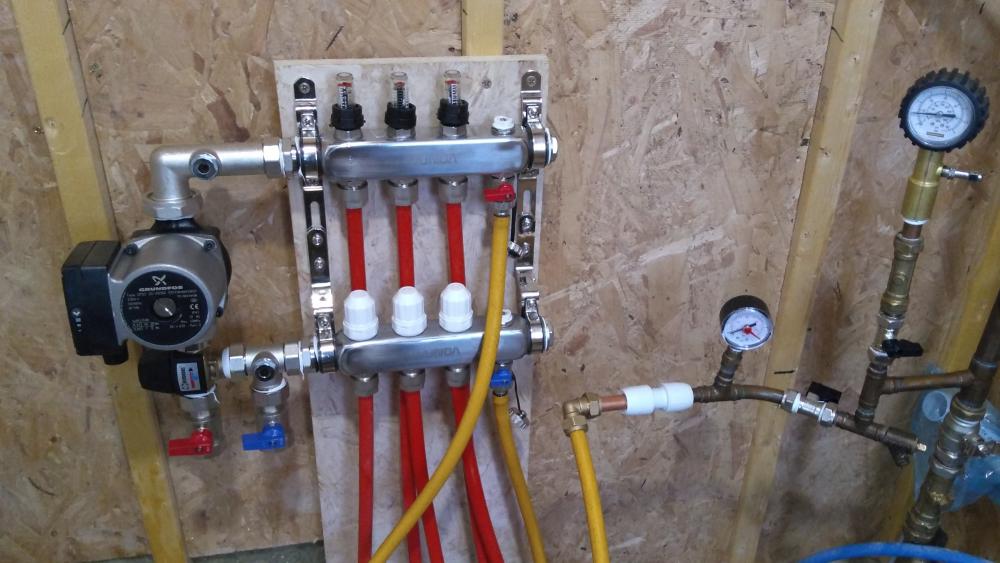
Also note my mounting the manifold on a mounting board. I did this partly because there's only OSB behind this, but if also proved very useful for another reason. MBC use PexAlPex UFH pipe which is a lot more rigid then the stuff Wunda supply and the tails only came up 60cm or so our of the floor. It would have been really fiddly trying to manoeuvring them into position with the manifold fixer, so I put the board in place, measured and marked the correct tail lengths, then took the board away again. I then cuts the tails to length, chamfered and fitted the insert fittings, before lowering the board into place and over the tails. I then screwed up the tails, and finally screwed the board back to the partition wall. This worked well and was painless.
-
One thing that did surprise me was that I did a flow test (after I had purged the circuits individually) by opening all three circuits and letting the mains 3 bar run from the filler though the loops in parallel and out into a bucket. It was quite slow. I think that this is time for a properly measured flow and some Boffin's Corner flow calcs And thanks for the hint about the air exhaust vent, Nick
-
@Barney12, yes on both accounts. Have a look at the Wunda videos on YouTube. The only difference is that I didn't buy the Wunda pressure test kit, because I already had my home brew one.
-
stand outside an look at the vent. If its condensing, it will come out as steam rather than turning to steam 10-30cm away from the vent.
-
So the timber floor board don't rot! Hang on a sec. What timber floor boards?
-
The UFH manifolds in and pressure tested. It's coming along. Next step to plumb in my Willis heater. @jamiehamy Is this one next?
-
I do have to wonder how you are going to use your boiler. Sounds like you need a buffer tank to me. If you want your UFH to output roughly 1kW then you'll only want the slab a few degree's above target if you are heating over extended periods but don't want to cook. Have a read of both Jemery's and my blogs where we discuss the design issues.
-
We adopted a similar approach to Jeremy. Our two internal stacks terminate in AAVs. We already had a branch to the kitchen, so we extended this round to our gable and have a ventilation stack there. Our intent is to use an external AAV if the BIsnp OKs it, and even if he doesn't we might just end up having an accident after sign-off. If we replace the full stack, then we'll use a short one with an external AAV.
-
The other thing is as Jeremy says the noise Over 1m/s and its audible. The sound will start to carry at 1½m/2 and by 2, you are starting to get cavitation in the pipes which will literally wear them out: those vacuum bubbles imploding on fittings and pipe walls will systematically erode them.
-
@jamiehamy was there a reason for using a 32 mm MDPE supply instead of 25mm? Broadly the 25 MDPE pipe has the same internal diameter as 22 copper, and 32 MDPE as 28 copper. You aren't really supposed to expose MDPE to direct sunlight, so you'd normally go from MDPE to copper on entering the house. So another option would be to use a 32 MDPE to 28mm (copper) stop cock where the MDPE enters the house and then run your main riser backbone in copper and T the 22mm pipes directly off that. If you are a bit wary of working in 28mm copper then you can always use the Pegler Tectite fittings which look neat and are demountable if you need to do so. @Nickfromwales, any comments?
-
Simple Qs, but the answer is complicated. The first thing to establish is what your rough average heating requirement is. This depend of a buck of losses: through the walls, slab, roof, windows, air exchange losses. In a house build corrrectly to the 2013 Bregs, this should work out at maybe 5 kW. However houses as built by most of the major builders are far below this one average and clearly the earlier your house was built then in general the less energy effcient it will be and the more heat losses that you will need to balance. At the other extreme you've got super insulated houses like Jeremy's and mine which need less than 1kW input in the depths of winter. So my Q1 back to you is: how much heat do you need to supply as a base input to keep your house in balance. So if you need 5 kW, say, and you have 200m2 of UFH area then the floor will need to deliver ~25 W/m2 of heat into your lining space which requires the floor surface to be at roughly ambient + 4°C. For your house this might be more or less, but if it is much more than 10°C then you will have problems with hot spots. So you need to work out roughly what the ideal floor temperature should be for your demands. Clearly this will drop as the weather gets warmer since your heating demands drop. So now this is the circle that you've got to square. On the one hand if you pump water into the slab a lot hotter than this, then your controls system will end up on a roller coaster of heating the floor and waiting for it to dump heat and cool down again, but if you have the water demand temperature too low then the boiler will continually short-cycle, which is very inefficient and this really kills the life of the boiler. As Jeremy mentioned in passing, the only sensible way out of this is to have a decent lagged buffer tank. Your boiler reheats this buffer on on/off temperature thresholds so that each heating chunk is a sensible amount - - say 30-40 mins of continuous output at its optimum output setting to lift the buffer to 40°C say. Your UFH manifold / pump / mixer then blends this buffered hot water into the slab at ambient + 6-8°C if you want to sustain +4°C, say. The boiler then run for 30mins every 3 or so hours, and the UFH pump circulates pretty continuously, trickling just enough heat to keep the rooms comfortable..
-
Just remember that you need to protect the external vertical face of the EPS with a rodent-proof barrier. The last thing that you want is Rattus Norvegicus or even Tommy Titmouse setting up home in your EPS and starting a family there. We chose a perimeter slab path and an engineering brick plinth because this was zero maintenance for the life of the house, but others have used steel mesh and render.
-
Maybe so, but for the 3rd or f4th time, I will say: these jubilee clips aren't some generic ones: we bought these as part of an installation kit from a reputable Gas supplier. I agree that all sorts of comments are relevant to auto changover set-up, but having now read through the guidelines, LPG configurations are divided into three categories: Cylinder installations -- that is where you have a static storage vessel which is typically refilled on-site from a suppliers LPG tanker Multiple bottle installations Single bottle installations. The best practice for these three is different. Jan and I decided from the outset that we wanted a single bottle installation. And that's what we have. IMO, it doesn't make sense to say: I would have had a multiple bottle installation and then criticise the installation for not following multiple bottle best practice. There's a lot of good advice here but maybe we should somehow tag the various points as relating to either single bottle or multiple bottle installation and keep the two quite separate.
- 98 replies
-
- 1
-

-
- gas safe register
- lpg
- (and 3 more)
-
Trying to ascertain if this is a load bearing wall
TerryE replied to Tennentslager's topic in Brick & Block
A good rule of thumb is that if the joist cross the wall and are resting on it, then its load-bearing, because it is -- bearing a load, that is. -
This and you should have rebar reinforcing through the tongue back into the ringbeam. As J says, the cut-out method allows the tongue to be formed in the same pour as the slab itself. Yes you will get some degree of bridging because of reducing the EPS upstand at the doorsaw, but it you do the heat flow calcs, this is only a small number of W so long as you maintain some insulation thermal break. We used FoamGlas because I had some left over but it could even have been 25mm EPS. (We slated over ours.) The critical issue is not the absolute W, but that you don't want any surfaces in the door reveal getting below the dew point for the room and therefore getting condensation.
-
Guys, as I said before: if you want to find who is correctly certificated then you can check with the Gas Safe registry by class and postcode. As to the supposed illegality of jubilee clips, as I said these came from a reputable dealer, and perhaps one of you better tell Calor that they are selling the same "illegal" fitting. Maybe this is why you should trust the registered professional.
-
Better consult the Lord High Executioner. I used 22/15/22s instead of 22elbows on the manifold loops and put the draincocks there. This is also for the pragmatic point that I can use this 15mm spigot as a fill point for pressure testing before the whole caboodle is complete. They can back siphon in pathological conditions, and you need to add some check valves on the branches to the DHW from the CW riser if you are concerned about this, but I would add that the DHW has to be potable in a modern pressurised system anyway, so there isn't any difference from the back flow risk from CW to CW tap.. Any taps or appliances where there is a risk of backflow should address this by design.
-
Jamie, for future reference you can get crossover fittings You also need to think about how you drain it down if you have to, so you might want to add some draincocks. IMO it's also nice to be able to isolate the entire hot or cold at the quarter turn of a valve and you can get decent full bore ballcock valve for this. But looking good
-
It doesn't work that way. Eventually you become a decrepit old fart like me and then its down hill all the way.
-
@Barney12, one of the hardest lessons that Jan and I had to learn is to accept that a build is going to take a lot longer than we initially planned. As a single self-builder you will have very little clout in making sure that trades will arrive on the date initially promised, and then when they do, it's a case of sods law and some other tradesman that you needed to complete before they could start is running late. The more that you crash the build timescales, the more stress you are going to have; the more its going to cost you; and the more compromises that you are going to have to make. Not good. You and your partner just need to ask yourself what the true cost financially and on your life is a 6 month slip going to make. An honest assessment. If the answer is that you aren't going to die in a ditch then I would suggest that you stretch the timescales. Add time contingency between the the key build phases. Then you are continually stressed to hell and having to reschedule trades. There are a lot of upsides to taking your time as well. In our case, there was a long lag whilst we got all of the planing and preconditions through the approval bureaucracy, then a flurry of activity in Oct / Nov 2015 when the slab, frame and windows went in. We didn't do boarding out and plastering until a year later, but in that time we could experience the space and in doing so we realised that we'd got things wrong, so we could shift a few internal walls, add another wetroom; shuffle upstairs room allocations. We also allowed the whole frame to stabilise and the slab to totally dry before the external stone skin went up and we laid the ground floor and boarded and plastered. Three months later we haven't got a single drying/settlement crack. Doing a self build is stressful enough as it is. Don't pile rocks on your back.
-
@JSHarris, Jeremy, I agree that there is a different sweet spot for professional plumbers who can have a high degree of confidence in the reliability of their joints, and this is also a case of time - money and the end customer might not be willing to pay. But @jamiehamy is a DIY installer, and I feel that decomposing the full down installation into separate sub-units and doing sub-unit testing is a sensible approach for him to consider as an option.
-
They use a rolling allocation: the team moves straight on from one job to the next. Our date ended slipping by 2 weeks.
-
Our TF manufacturer used a special to purpose air-tight OSB for the internal membrane and went to great lengths to address the vulnerabilities around the ends of joists, etc., and also contracted a guaranteed level of airtightness. Many of the high-end window installers (we used ecoHaus Internorm SW) make a particular emphasis of their installs being airtight as well. So it's a lot easier getting the airtightness sorted when the build technique is optimised for air tightness in the first place. Unfortunately, this isn't always possible, especially in the case of an upgrade to an existing property.
-
This test point issue does confuse me a little. I have a single pipe wending from a gas hob through a wall to a spigot where a gas bottle goes. The installer tests the pipe by sticking his pressure tester on the spigot end and thus tests the bits inside the house structure that are a safety issue, and then sticks the Propane flexible pipe on and uses his funny solution to look for leaks in the open air. Or he adds a tee and a test point, and does the test there? But how does he know that the test point isn't itself leaking when he closes it? -- Ah add another test point to test the test point, and before we know it (to misquote Terry Pratchett) we're test points all the way down. What I am really saying is that a test point makes sense to me in a conventional gas installation where you have one or more appliances permanently connected to a static supply or even an external static LPG tank and the engineer would be unable without it to test the integrity of the internal pipework for leaks. In this case we have a single pipe running through a wall with a gas hob on one end and a spigot for a gas cylinder on the other.
