MarkyP
-
Posts
152 -
Joined
-
Last visited
Everything posted by MarkyP
-
I'm planning on walling off a section of garden but would like to if possible avoid using movement joints. The wall will be long, more than 10 metres for each run to square off a section of garden. No brickie yet but I know a few and with sand and cement I'm expecting to be advised to incorporate movement joints which I really dont like, especially in a feature wall like this. We're on chalk ground, soil only about 12 inches deep and then it's solid chalk so nice base to build on and I will run a decent footing. If the wall was built with NHL 3.5 rather than sand and cement might that stand a chance of accomodating any settlement or movement without joints? it's going to be fairly high, in the order of 1.8m to 2m, 9 inch with piers at suitable spacings. Lots of old walls around this way without joints (or cracks) but I wonder if the lime mortar in these old period walls is pretty weak stuff and 3.5 might be stronger and relatively more brittle. Anyone chanced lime without movement joints? thanks
-
I opened an MKM account, I managed to get exceptional discount on timber and OSB but that was because the joiners I used were also a (big) customer and they secured their pricing on my account - I had them on a labour only deal with me supplying materials but when they saw my MKM quote for the timber they burst out laughing and a phone call saw it cut in half! othewise MKM werent much interested, was uphill getting decent prices on anything - insulation, blocks and so on, I gave up and went elsewhere. Had more luck with Travis Perkins, didn't open an account but got a trade card. With other suppliers, haggling worked often and just asking saw another 10% or 20% off their trade price but you need to be buying decent volumes of stuff, not dribs and drabs. Insulation I found best prices from the specialist suppliers like encon or the online discounters, builders merchants werent much interested in trying to compete and were better on timber, sheet materials, sand, cement, plaster, blocks, etc.
-
Yes those are what your brickie would call lightweights. The labourer would disagree!
-
Looks like others beat me to it, must type faster!
-
I have none on my rendered EWi which was covered with baumit basecoat and thincoat silicate top coat. Baumit tech rep said movement beads are pointless unless there is an underlying structural movement joint, it's one of those old industry habits that hadn't died out yet. This is obviously one opinion but which they warrant - no cracks so far along an 18m wide single storey elevation. If the underlying structure doesn't have a movement joint then render will expand/contract monocoque with the substrate, if the substrate cracks then a movement joint only in render won't help, might be in the wrong place as no one will have told the blockwork where to crack ? so the logic is if a movement joint is needed, put in render and substrate, not just one or the other. Talk to render supplier about their requirements, designers throw in movement joints in render by habit, may not be necessary. They are ugly, as are the plastic beads used with monocouche, my pref is silicate (mineral) thincoat, no joints or exposed plastic beads.
-
There's scope for confusion over the terms used for blocks but generally lightweights in trade speak are aggregate blocks and they are not that light! They are medium density and would be fine for this application. Dense concrete blocks are for foundation courses and very, very heavy. Aerated blocks are to be avoided here, these are lightweight, brittle and suck up water like a sponge. Personally would use 7n medium density aggregate, I.e. what the builders merchants call lightweights. Confused yet? ?
-
Heating Design on 1880s Renovation
MarkyP replied to Jeremy's topic in New House & Self Build Design
Do you have a link to an example of such a stove, would be interested to look into the testing standard. Most stove manufacturers are greenwashing their products like crazy with the gradual awakening of public awareness to the problems of smoke pollution. I'd be staggered if a stove could genuinely in normal use achieve zero fine or ultrafine particulate emissions through the highly variable usage that results from different size, types and moisture content of fuel, lighting up, refueling, air supply, poor flue draw and wind, de-ashing the pan, etc. Likewise the efficiency, will vary through a burn cycle and isnt very controllable, you typically generate far more heat than you need compared with other domestic heating systems which can be tuned and controlled. I do appreciate the aesthetic and pleasantness of the wood burner on a cold winter's day and am a relucant convert against stoves having previously been a fan. But I think they are a lifestyle choice rather than an eco one. Dont underestimate the interior air quality impacts during a burn cycle as well - very high levels of fine and ultra fine particulates emitted each time you open the door to re-fuel creating a warm polluted fug in your sitting room for the evening, you could not fit the stoves and take up smoking a couple of cigarettes in the evening instead. ? *getsoffsoapbox*- 25 replies
-
- 1
-

-
- damp
- waterproof
- (and 7 more)
-
i realise my density units are wrong! 1500kg/m3 is the typical range for medium density/aggregate
-
aha, block confusion. You'd think blocks were blocks until you start looking. I think you want to avoid aerated or low density blocks, these crack and in the case of aerated are very absorbant and I expect a bugger to render without copious priming. Aggregate blocks rated at 7n and in the order of 1500kg/m2 density are what I used. Confusingly, these are sometimes called lightweight blocks in the trade! I think this means they are lightweight relative to the super heavy cast concrete jobs used on foundation courses, etc. Personally I think a dense concrete block would be overkill for a wall, and your brickie wont thank you for choosing them becuase they are very heavy. Medium density aggregate blocks offer good key for render and are crack resistant, would be the typical choice for a blockwork outer skin in my opinion. Low density aerated blocks are still available in compressive strengths suitable for high loads but seem to have less flexural strength and be rather brittle, hence the reputation for cracking under stress. Note the block choice may affect wall u-value, esp if switching from aerated to aggregate. Not by much, but worth bearing in mind. I used these but all builder's merchants stock an equivalent https://www.tarmac.com/media/959459/hemelitestandard_shortcover_2017__itab.pdf nothing like an evening spent reading block data sheets, have fun ?
-
Wood burning stove fireplace, how deep is recommended?
MarkyP replied to epsilonGreedy's topic in Stoves, Fires & Fireplaces
We've recently decommissioned our wood burner - it's a 5kw Morso in a 40m2 room which is very airtight, 3g and insulated with 250mm combo of EWi and cavity fill. The room massively over heats very quickly and we end up letting it go out an hour after lighting so I took it out. The interior air quality issues as well - read various Danish studies on the impact of opening stove door to light or refuel on indoor air quality - eye opening. -
training Backhoe loader/180 Excavator Training.
MarkyP replied to BogBeast's topic in Tools & Equipment
I've got an 2.8t takeuchi digger which I've been using to clear over grown ground and gradually do my own landscaping. It's fantastic on scrub, saplings and tree stumps of younger trees but we recently took down a sycamore with a stump around 15 inches in diameter and it couldnt touch it, spent time digging around it, pulling up roots and then gave up and cut the stump lower than ground level, drilled some holes in it, gave it a dose of RoundUp in the holes and buried it. The digger is old but it's a strong machine, I dont think any mini/midi size digger would have dealt with the stump. if you have mature trees with stumps more than 12 inches+ then you'd probably be better off hiring an operated 14t machine for a day. Also dont under estimate the headache of what to do with the stumps, they are massive and dont burn very well. You then also have a nice bomb crater to fill in as well. Another option would be clear around all the stumps your own machine cant handle and get an operator with a stump grinder in a for a couple of days which is a way to tackle stumps without having to dig them up and dispose of them - depends whether you need the stumps out becuase you are building on the ground or just for landscaping reasons, I've quickly realised leaving them in the ground is the best bet where possible. I would definitely recommend buying a used machine if you have a large site and the time and inclination to do your own work. They are extremely useful for all sorts of things and you will do bits of landscaping and work you'd otherwise not bother hiring a machine for. I think the general consensus is tracked mini digger over backhoe or JCB as they dont like wet muddy ground. I've become pretty good at operating it now, with about 100 hours in the seat, nothing more satisfying than an afternoon scraping scrub and saplings up into large balls with the digger and then going back over the fresh earth with the grading bucket and getting it nice and flat. You also arent under pressure like you are with a hired machine to do the whole job in a day or a weekend and can do as and when. You will however, like me, quickly realise a digger is rather limited without a dumper so you'll end up with one of those as well. And then within a week you will find friends in the village you didnt realise you had once word gets out you have a machines on site ? -
is the ceiling board you are worried about under rafters or a floor joist? Could you access from above to inspect it without cutting through the ceiling? if you could access from above then taking a small piece and sending off for testing would put your mind at ease. I demolished a 1930's timber bungalow which was the original part of my house. I found all sorts of suspect stuff, none of which was asbestos - sheets of fibrous board lining the walls - turned out to be a non-asbestos insulating board product called superlux. Also sheets of fibrous tar lining paper, also not asbestos. But we took precautions and samples were sent to an accredited lab for testing and came back clean. In a previous house we had asbestos containing floor tiles but they were plastic and fibres were bound up in the tile, just heated to soften adhesive and lifted them and disposed of easily. You could take the view that even if it is asbestos and is now covered and not going to be disturbed then it's safe and not worry but if you really need to know then I would take sample and get it tested. You can readily find guidance on how to safely take a sample online - wear a mask, use a sharp blade, put plastic sheeting down, dont break or abrade, spray with water to prevent fibre release, etc.
-
to cut the skirting neatly without removing it you'd need an oscillating saw. If you aren't an avid DIY'er then this would be a fairly expensive tool to buy for a one off job. If you know someone who might have one then borrowing might be an option. But without one it will be impossible to cut a neat notch out of the skirting without taking it off the wall and cutting with a saw, and re-fitting either side of the bed leg. Easier and with a hand saw would be doing what Steamy says and cuting a notch out of the leg.
-
@Bri44 have you considered a social media campaign against the developer? Starting a blog and then linking it on their facebook page? Post on your own FB page and @mention the developer, twitter as well, tweet the MD if he/she is on twitter or FB message them, just make a complete nuisance of yourself, try the local paper. And do this every day, not just once, If this is a large developer you would quite quickly come to the attention of the marketing team and they will conclude that ending the negative publicity is worth the price of either sorting your house or buying it back from you.
-
Plasterboarding and Finishing recommendations
MarkyP replied to revelation's topic in Plastering & Rendering
I've always thought that for a given wall or ceiling board, a skim adds 3.5mm to 5mm of gypsum increasing both sound deadening and I would also think fire performance. Becuase this site applied finish can't be quality controlled by the manufacturer, I'm assuming they dont give performance data (or maybe they dont give data becasue my idea is nonsense ? ). But I would think side-by-side, a 12.5mm boarded partition wall with a skim either side would have approx 8mm or more gypsum than the same taped and jointed and would perform better in terms of both sound transmission and fire resistance. This is just my own speculaton, I have no data to prove it ? Skimming is a more durable finish IMO but the aesthetics of skim or taping will depend on availability of skilled trades to perform either. Having watched an office fitting crew at work some years ago, I saw that taping and jointing to a high standard was skilled work, they were fast but very attentive to detail and once painted you couldn't so much as see a joint or seam. I suspect that DIY would result in a lot of sanding and it may be very time consuming. Ofcourse another consideration is that skimming is not really something most folk would try DIY (give it a go, it's fun, but don't wear your best shoes). I did a plastering course many years ago as had heaps of plastering to do in a renovation and it was our first house (and we couldnt afford a plasterer). I can skim pretty well now but cant cover anyhting like the area a pro would cover in a day so I'm using a local plasterer on my renovation and extension/loft conversion this time around, with me doing the odd bit as needed. possibly relevent to the original post, if wet plastering solid walls then a basecoat is needed. this is a different feather in the plasterer's cap and some plasterers don't do it much now as on large sites it is always dot and dabbed boards (to hide the cracks that form in the blockwork and becuase it is fast) so the art of floating and setting a wall is slowly being lost. The postive to float and set is making the wall air tight with a nice coat of backing plaster and not creating an air space for convection and draughts behind dabbed boards where air leaks through the mortar joints or cracks in the external wall. Peronsally I wouldn't dot and dab ever, and definitely would not on on external walls of a period house. Dot and dabbed walls are also a pain to fix things into. Float and set is an art to get a decent flat finish in the basecoat, especially over a rough or variable background like old brickwork. The block or bricks also need copious priming with a dilute PVA to kill the suction and avoid the plaster drying too fast. It's then two coat skimmed to a finish. DIY approach to float and set is to set battens on the wall of suitable thickness (about 12mm) to create 600mm wide bays and fill with basecoat and rule off against battens with a feather edge, the take battens down and fill the batten voids, works well but is again time consuming and pro would smile watching you spend all morning doing something that would have taken them 20minutes. -
i have a 60mm anhydrite over 140mm PIR. as others say, super flat, fast install. Trad screed can be laid flat but will vary signficantly by skill of installer. Anhydrite does have a slight bounce on the insulation, no one else notices but me but it but I think 80mm traditional would much more more solid. Both take a lot of drying out and the laitance is a factor on anhydrite - but some installers will quote to come back and remove it. You can scrape it off a day or two after being laid, otherwise it seems to bake on and will need a floor sander so expect to pay something along the lines of £200 - £400 for the sanding job in the price, it's fairly obvious where it forms so you can tell when it's been sanded away. Care also needed to ensure later primers and adhesives are anhydrite compatible. It's really fast to lay, ours was done in a couple of hours and walk on the next day. Can be forced dried with UFH aftger giving it a week to cure. Another plus is UFH reaction time in 50mm anhydrite would be quick if that is important. We dont run our UFH much, an hour early evening and it keeps the floor and rooms warm, and I run a UFH temp of about 39 degrees C at the mixer manifold. if I had my time again I would have laid insulation under the slab with UFH embedded, the either floated or ground/polished the slab, or just run a thin coat smooting compound if the slab needed it before finish floor and done away with the screed altogether.
-
Slate roof repairs - hall hooks etc
MarkyP replied to DC5's topic in General Self Build & DIY Discussion
I had a few slates slip after they were broken by scaffolders clambering on them and hall hooks were easy to use and made a good repair which is invisible from the ground. I used a slate ripper to get the broken heads out but sounds like some of yours weren't nailed in the first place which sounds really dodgy. I also tried using jenny twin fixings which i found to be a fiddle and not easy to use, hallhook better and easier to fix IMO. -
If you are cladding then will you be battening over the PIR and fixing battens through to the joists? If so I would just screw fix the pir to osb from the outside clamping with a disc washer, if you fix pir mid span between joists then minimal thermal bridge. This would hold up well until battening later.
-
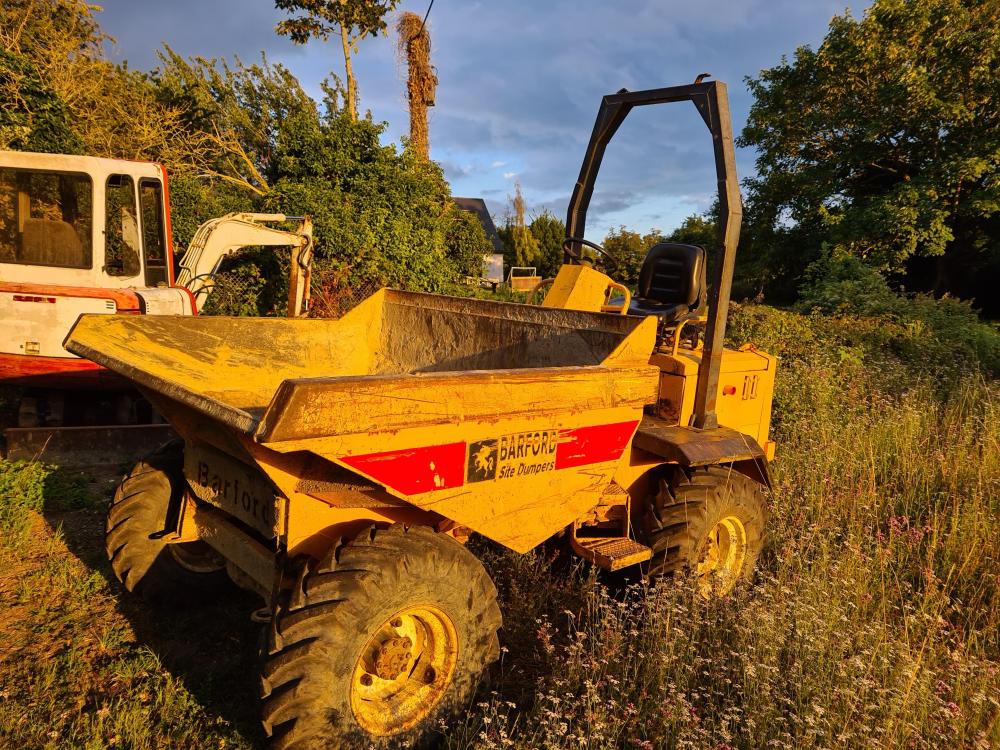
And here it is. Runs really well and can't find a fault with it at all. Glad I went for a 3t, it's a handy size.
-
I found a very tidy 3t Barford SX3000 last week, picked it up yesterday. Very pleased, it's in really good shape and has been well looked after by previous one owner. I was getting a bit fed up with looking at rust buckets and battered old machines so nice to find a good one at a sensible price. I'll add a pic later.
-
What EWI for 1930s solid brick (215mm) wall home
MarkyP replied to tanneja's topic in Heat Insulation
my 60% outboard method also included going over the face of the window frame slightly with EPS. The windows are fine and included a monster 1200 x 2400 3g picture window which is very heavy (I recall installing only too well!) The brackets were/are rock solid, the EWI hasnt moved at all (nor did I expect it to). There are lots of ways to skin this cat, it's a quesiton of what you and your builder feel comfortable with. I've seen the compac foam method - looked neat - battens of compac foam securely bolted to the wall face in line with reveal to provide an insulated outboard structure to fix to and window sits in this. You could also fit a 50mm x 100mm timber batten to the bottom of the reveal to extend the structural sill out 50mm and sit the window partially on that, and use angle brackets to the side. You have to weigh up the stress and complexity of the solution with the gain, Therm models show that the cold bridge is reduced significantly by partially outboarding and even more by fully outboarding. But your renderer will also want a bit of reveal to play with to render in and up to your frame faces so if you have 90mm EWI then you might not get away with going much more than 50mm outboard. remember at this distance you should still be able to sit your window on the structural blockwork and just angle bracket the sides. You can also run metal flat from the side of the window to the side of the internal reveal. I'd also consider running strips of marine ply (12mm) as straight strap from side of window to inside of reveal as well, much reduced cold bridge. If I had my time again I'd use ply strips over metal brackets but my windows were a shade tight to allow a reasonable thickness of ply. Dont lose too much sleep over this detail - the EWI will be a huge improvement, this is marginal gains stuff now though always do what you can where you can do it, and within reasonable cost. -
thanks for replies, I'm thinking that perhaps a 3t is the way forward. Seem to be fewer 2 or 2.5t machines around in any case. Looks like you can source retrofit roll bars which I think would be useful as we are on a slope. @scottishjohnthe site isnt wooded, the larger section is former unimproved pasture on a very well drained, south facing chalk slope which has really prevented trees taking hold - the soil is thin and very dry in the summer. I've been clearing sections thick with scrub and bramble and restoring, it must have been hay meadow as without any effort to re-seed and just an annual cut it is already proving to be quite a remarkable flower meadow so the soil much have had a decent seed bank. Already several uncommon species of flower including some orchids, the aspect and soil means grass stuggles to take over so it's perfect conditions for chalk meadow. We do have quite a few areas around the house with some sycamores that will be coming out, but that's all well in the domestic curtilege so no worries there.
-
What EWI for 1930s solid brick (215mm) wall home
MarkyP replied to tanneja's topic in Heat Insulation
building control should be flexible here, there is scope for them to compromise on insulation upgrades where there are significant limitations that might limit scope to achieve regs. And even 25mm EPS would be a huge improvement over nothing at al so I would be surprised if they wouldnt accomodate less if it was necessary. I cant recall whether with graphite EPS you need 100mm or 90mm, had a feeling it was the latter but maybe the regs have changed since I last looked. Your installer should give you a u-value calc for BC. maybe you already have a BC on the job, a chat would give you an idea. Mine was fascinated by EWI and hadnt seen it before, he took loads of pictures and several of his colleagues came for a look. one other neat feature to consider is using frameseal beads (pic below). These provide a gasket seal to the face of the frame and a mesh carrier for the render, they provide a nice detail for the renderer to work to and a neat finish along with a long term weather and wind seal to the frame, otherwise you'll be looking at rendering up the frame (can be scruffy) and a silicone joint which will fail over time. my renderer hadnt used them before but was converted and now uses them on all thin coat rendering jobs, EWI or not. They arent very expensive and take minutes to fit (self adhesive backing to hold to the frame until render is applied) if using a specialist contractor ask for some detail on the method and the products they are using, there's a lot of detail here and the stuff I mentioned above wasnt done by any of the installers who quoted me so I did it myself using a renderer on a labour basis with me fitting and detailing all the boards and sourcing the best product I could find myself if the soffit is going to be out during the installation, take the EWI up between the rafters and then foam in. You can then run loft insulation up the top of the EWI in the loft eaves
-
I bought an old Takeuchi TB125 digger a while ago as I have a plot of several acres which was neglected for decades is in places very over grown and is in need of lots of work to get clear and under control plus loads of landscaping to do, drives and old hard standings to dig out - all sorts. The digger has been brilliant and I've done jobs that I wouldnt have dreamed of tackling before. But, as a few friends warned me, the issue quickly arises where you have great piles of spoil to shift over distances or deliveries of top soil or aggregates to move about. "you'll need a dumper" they said. So I'm seriously considering buying a used dumper. I learned a lot about the used plant market when buying the digger and already have seen some rust bomb 30 year old dumpers which have been re-sprayed signal yellow and put up for sale on ebay for £3k! Any tips or suggestions on what to consider? Is 4wd sensible (large sloping plot)? I am not considering the old manual tip machines, has to be hydraulic. Size is another consideration - 3t would probably be most the most versatile but I need to consider storage, those 3t machines aren't small, so wondering if a 2t would be a good compromise. I guess a machine with a roll bar would be sensible, but wonder if I could retrofit as many older machines dont have them? Any other suggested things to consider? Also budget - there are a lot of machines from £1k to £4k, with some looking like complete sheds, others sounding like they've been on a farm under cover and looking half reasonable on original paint. I guess ideally I'd like to spend less than £3k.