

Super_Paulie
-
Posts
831 -
Joined
-
Last visited
-
Days Won
3
Everything posted by Super_Paulie
-
On setting 1 you have to be right next to them to know they are even on. I previously had a SS7, which I got based purely on the wattage they move but it was too noisy for me, I've got tinnitus so really sensitive to noises and I just couldn't get away with it. Basically brand new in the box, tested for 5 minutes and that was enough for me. Even that is not particularly loud but it would drive me insane if I could hear it, the SS5 are borderline silent.
-
For what it's worth I've got 2 plinth heaters, Smiths SS5. The heat they throw out is great, or at least the feeling of warmth is. I've got them as a backup incase the underfloor struggles in winter but they also can be set to just move air which is nice and cooling.
-
A bump on this, any thoughts anyone?
-
Belt sander would take take that down I'd imagine.
-
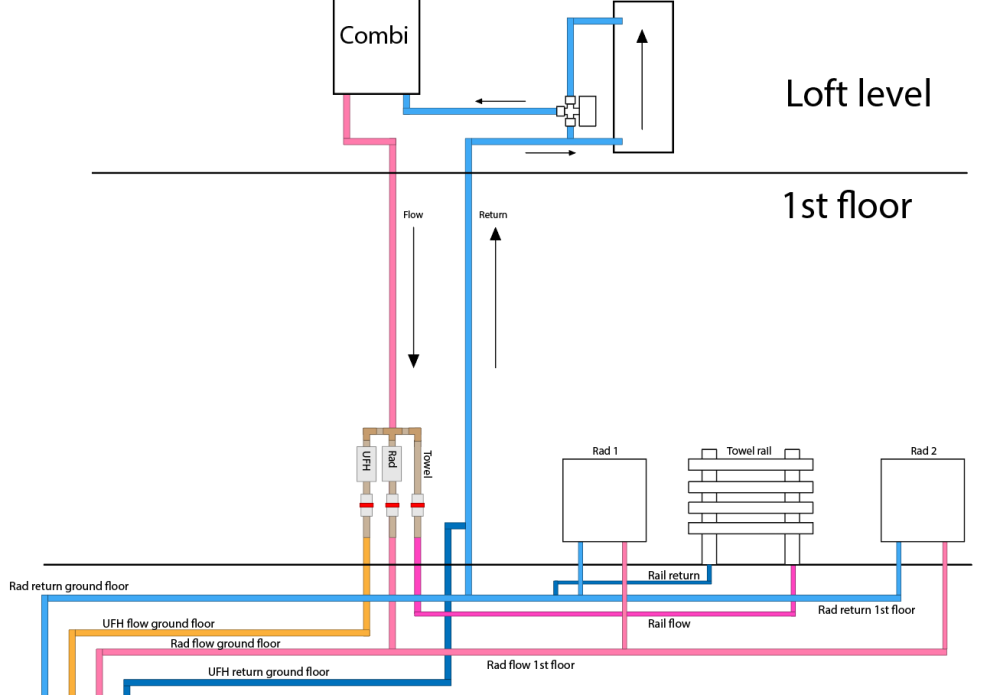
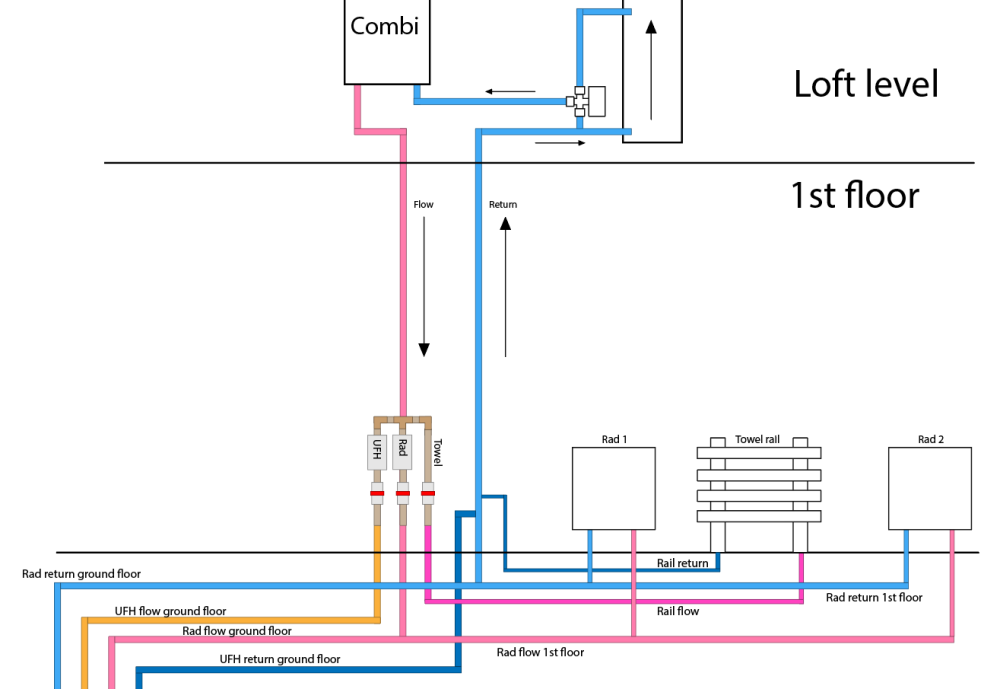
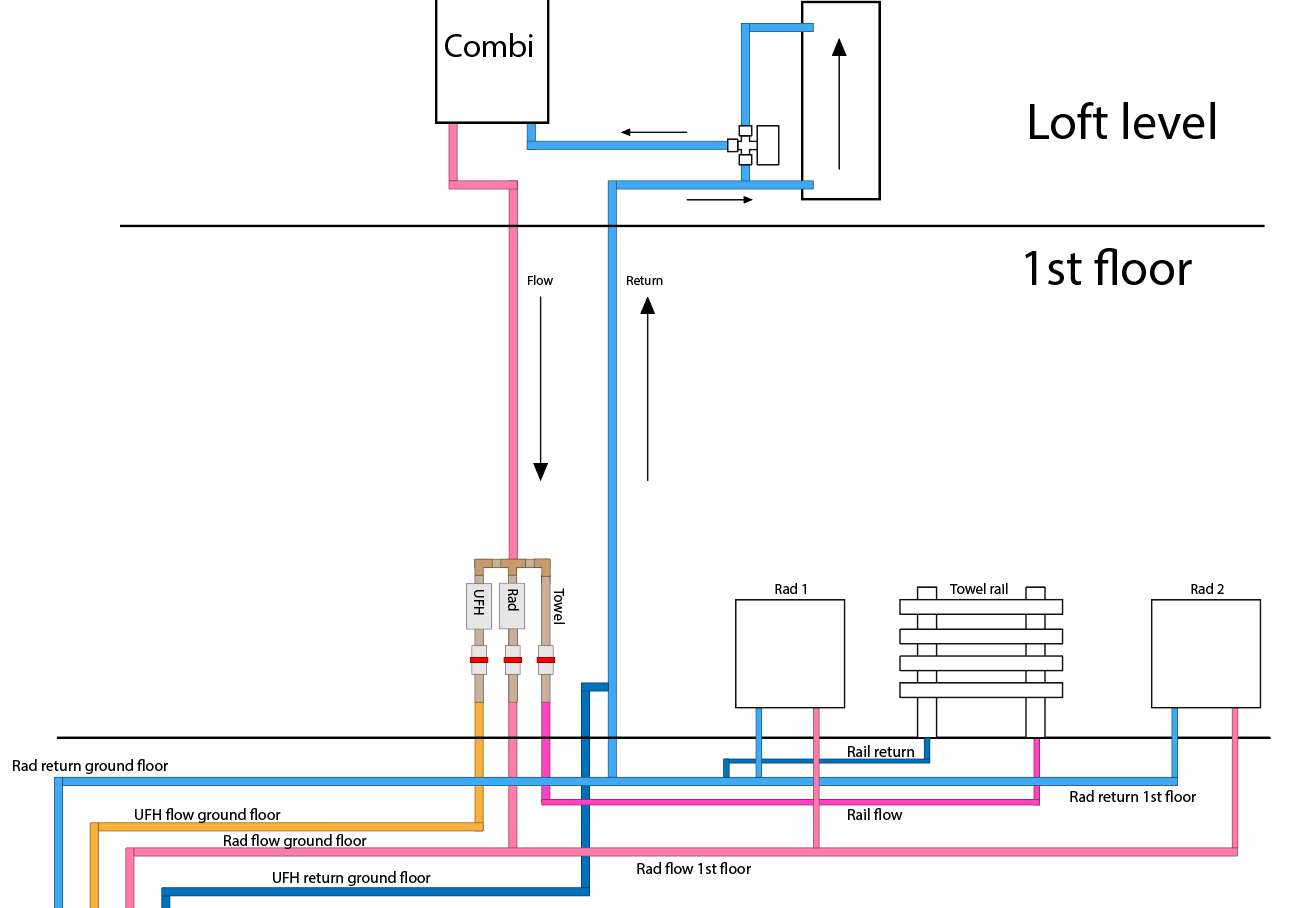
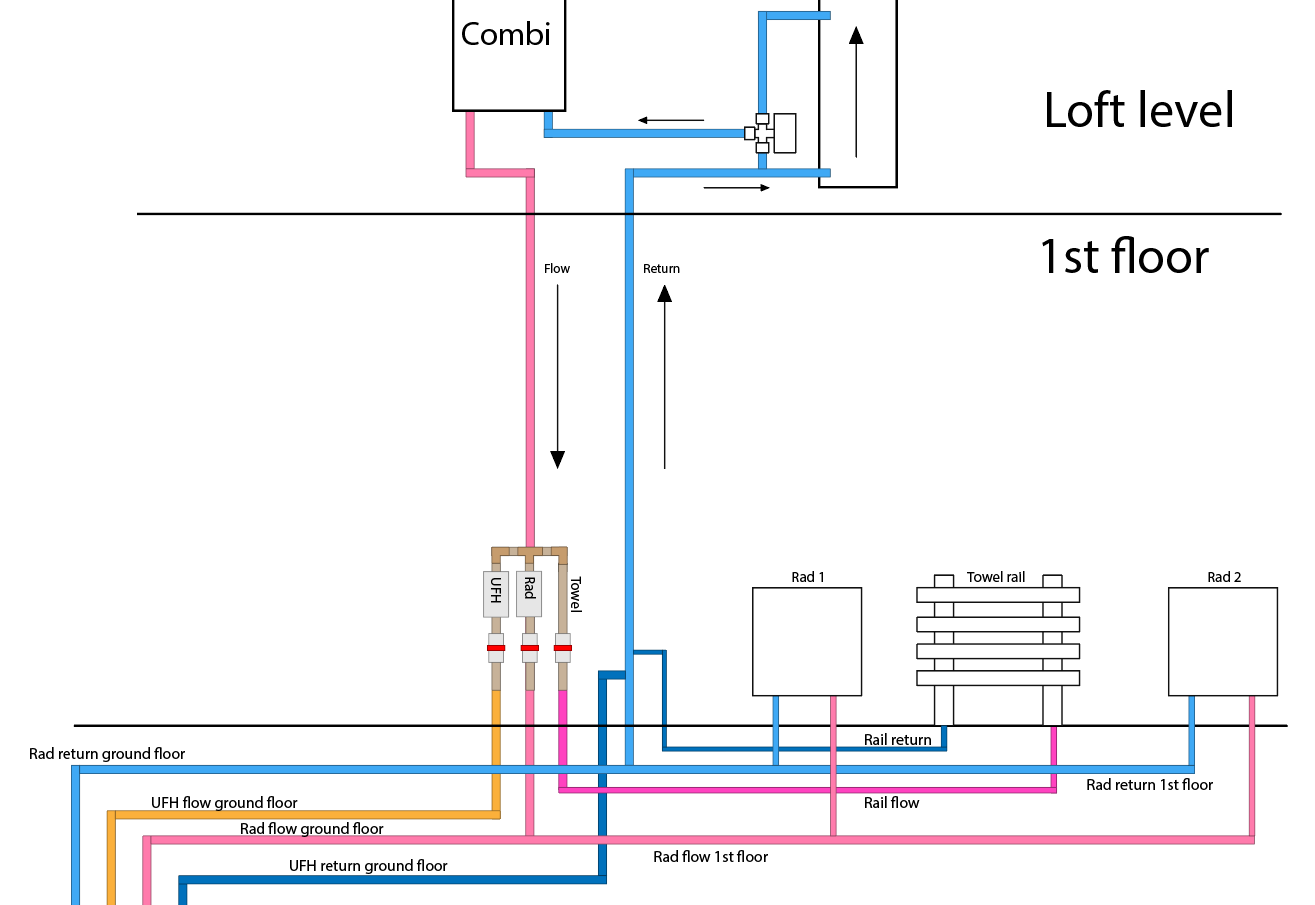
hi guys. Im getting a bit of reverse circulation i think on my system, see attached. (Rad 1, towel rail and Rad 2 are all in different rooms but in relatively close proximity) I have a bypass/towel rail that is "always on" no matter if the rads or the UFH are running. However when i run the UFH one of the radiators (Rad 2) in a bedroom also gets warm, strangely enough not the one nearest the towel rail return but one maybe 3m away in the other bedroom. Would tee'ing in the towel rail return higher up in the system, like in my second picture resolve this? If i close the lock on the towel rail then Rad 2 doesnt get warm. Not the end of the world as it gets warm rather than hot, but its still something i didnt plan on happening so if i can resolve this while i have no flooring then id like to. --------------
-

George Clarke's Remarkable Renovations
Super_Paulie replied to MAB's topic in Property TV Programmes
Seen plenty where they have freshly baked sourdough on the table, but upstairs is still a building site. -
"Within two metres of any boundary that fronts a highway"
Super_Paulie replied to Ryan Turner's topic in Planning Permission
boundary of your property according to historical records basically. Saying that, i put plans in that meant i was about 1m from the boundary and they got approved but i was worried at the time it would get knocked back but they didnt even mention it. -
just to hide the holes in the floor, if you cant remove that bit of flooring then i guess your options are limited. I dont think there is a way to check where the flow diverter is without a drain down. I wouldnt worry if the rad is heating up to your liking.
-
could be worse i guess, but id cap that floor somehow. When you changed the pipes around, a lot of those rads have a flow diverter inside that needs to go on the flow side, might be worth checking depending on how you jigged the pipes.
-
Whatever floats your boat! Either way it's not a structural screed. However it'll take me a week to get it down so the start might be dry by time I've finished anyways.
-
Water quantity is only what is in the sand on delivery, it's a dry mix. It will serve no structural purposes, it's thermal mass only.
-
Can go as low as 35 with my mixer. As it's just biscuit for thermal mass I don't need it to be structural, hence the 8-1 dry mix.
-
Even on a 8-1 dry mix? Plenty to do in the meantime, but it would be nice to just crack on.
-
gunna be putting the biscuit mix down this weekend, anyone any thoughts on if i can run the system to speed up drying? i mean its a dry mix but will obviously have water in from the building sand. As its only acting as a thermal mass can i speed up the drying time or should i just sit it out for the next few weeks?
-
Thanks a lot John, that's great knowledge and very welcome, appreciated. Looks like CP mode will do the job and I'll play with the speed and flow to get what I need. All coming together nicely 👌

-
Brilliant, cheers @Nickfromwales. That guy in the video is a man of little words...! Still not sure what the icons relate to all I'll do some research tonight. I still need to get my biscuit mix in, that's next week's job, but I've commissioned all the UFH now and so far, no leaks 😆
-
Thanks guys, I'll just have a play about. I have no idea what he curves are (the symbols) and what effect that would even have.
-
Before I turn on the UFH system for the first time, does anyone have any suggestions on what settings to run the Wilo pump on? I'll be honest, the curves etc mean nothing to me so any helpful advice would be awesome. 4 loops, 2 zones, 400m, 16mm Pex-al-Pex, biscuit mix between joist, Wilo Para pump as in the picture. Pipes tested at 5bar. Thanks gents, much appreciated.
-
i guess the theory is you dont want to warm up food in cupboards or dry out the traps under baths and showers? I avoided putting it under the units for those reasons and also that by doing so got me to give or take 100m instead of way over.
-
I thought biscuit mix had zero added water? The only water in it is what was in the bag when you hoyed it in the mixer. I'm doing a biscuit mix myself and was planning on giving it a few weeks after compacting it in, but I'm defo not adding any additional water.
-
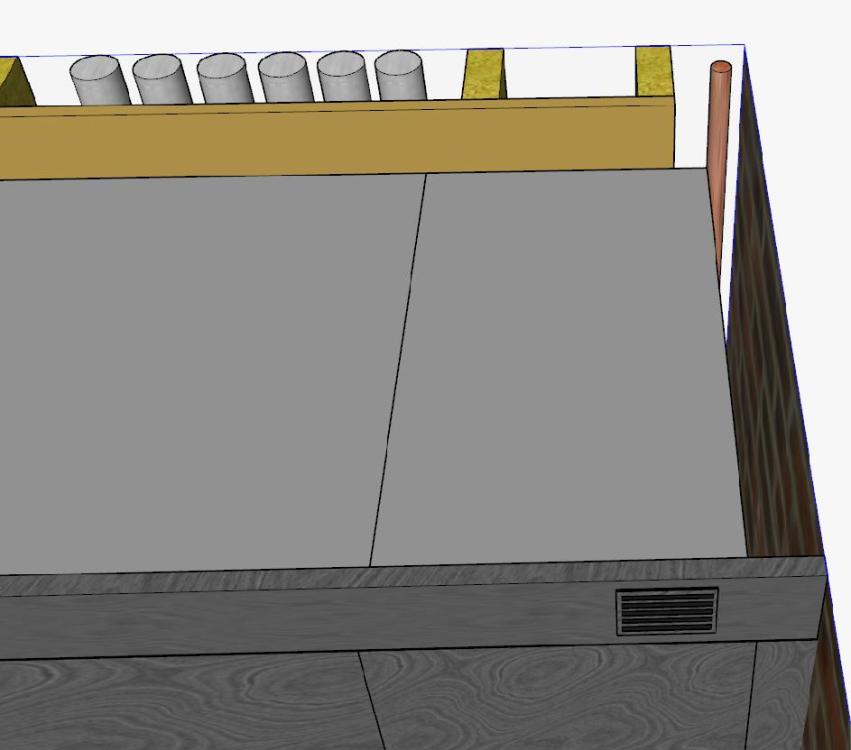
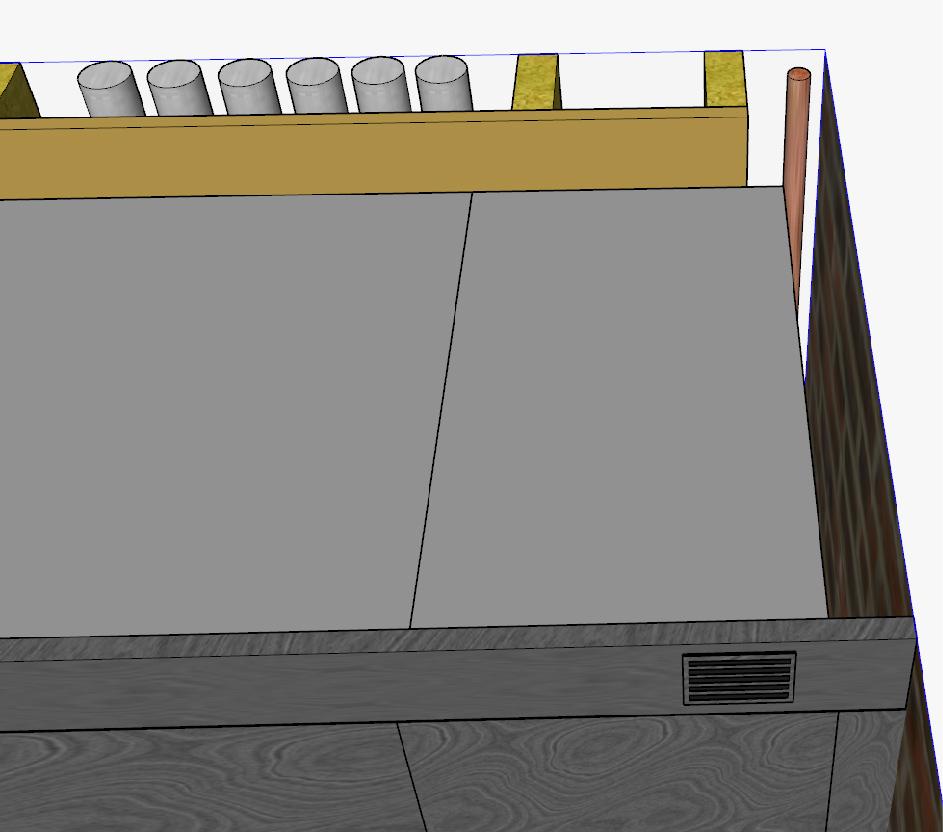
i wouldnt be opposed to a small ceiling level vent if it gets me out of a hole in the above studwork/plywood scenario.
-
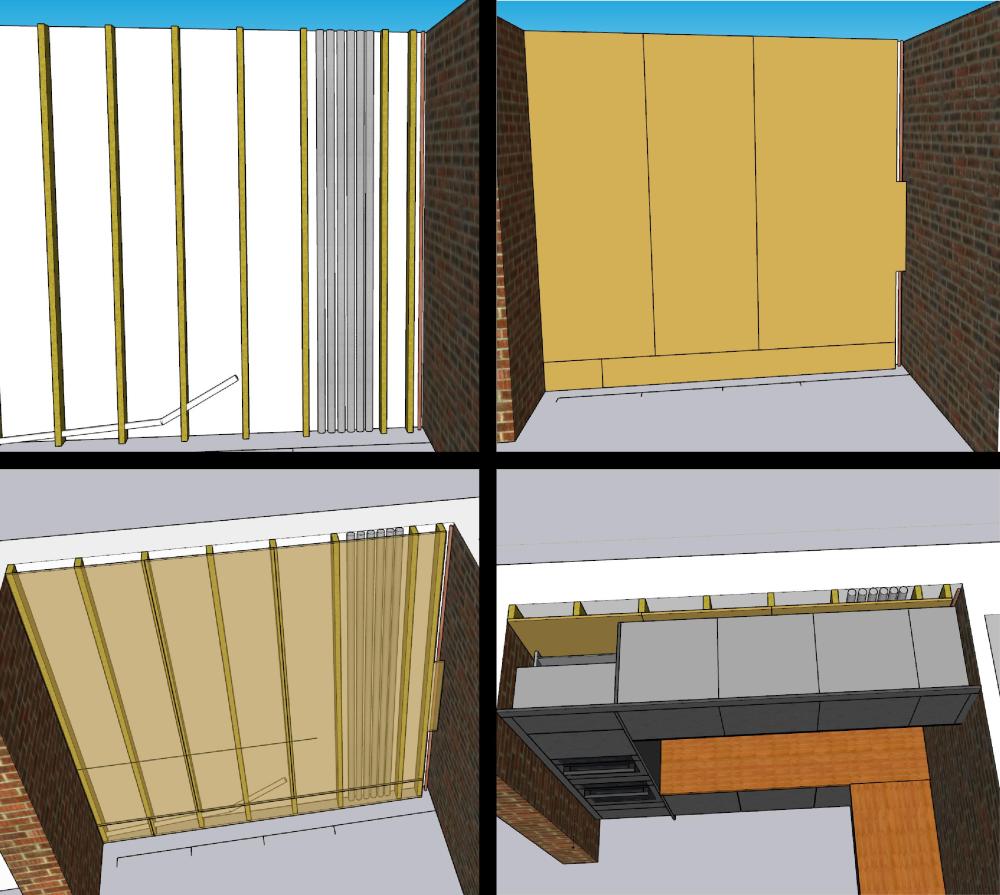
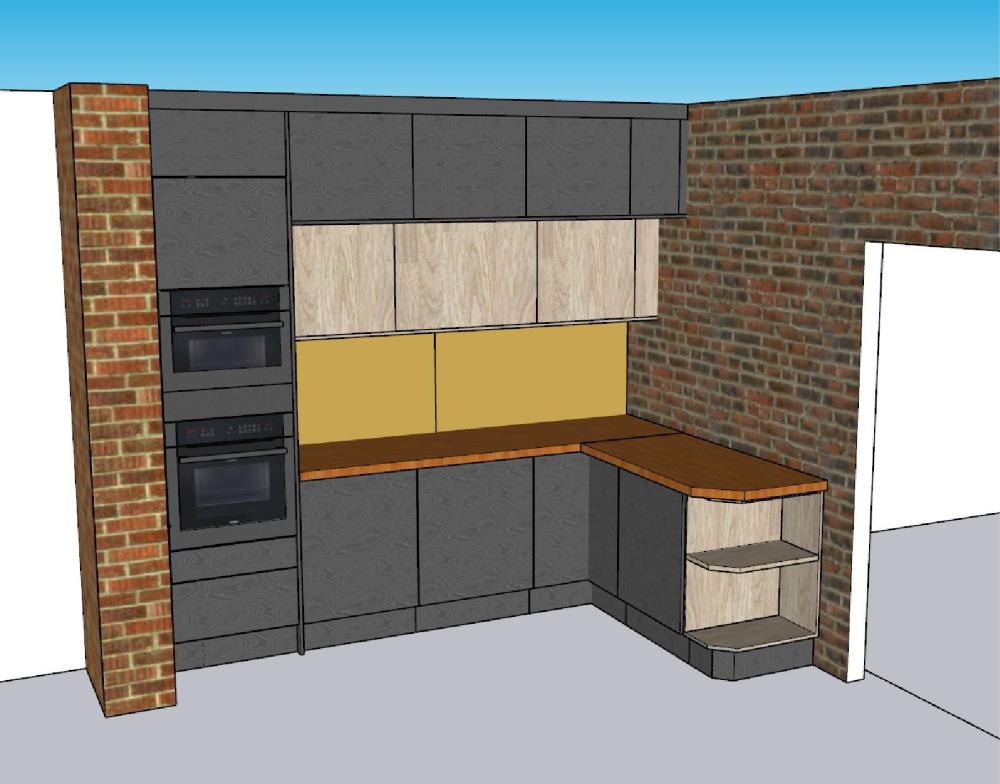
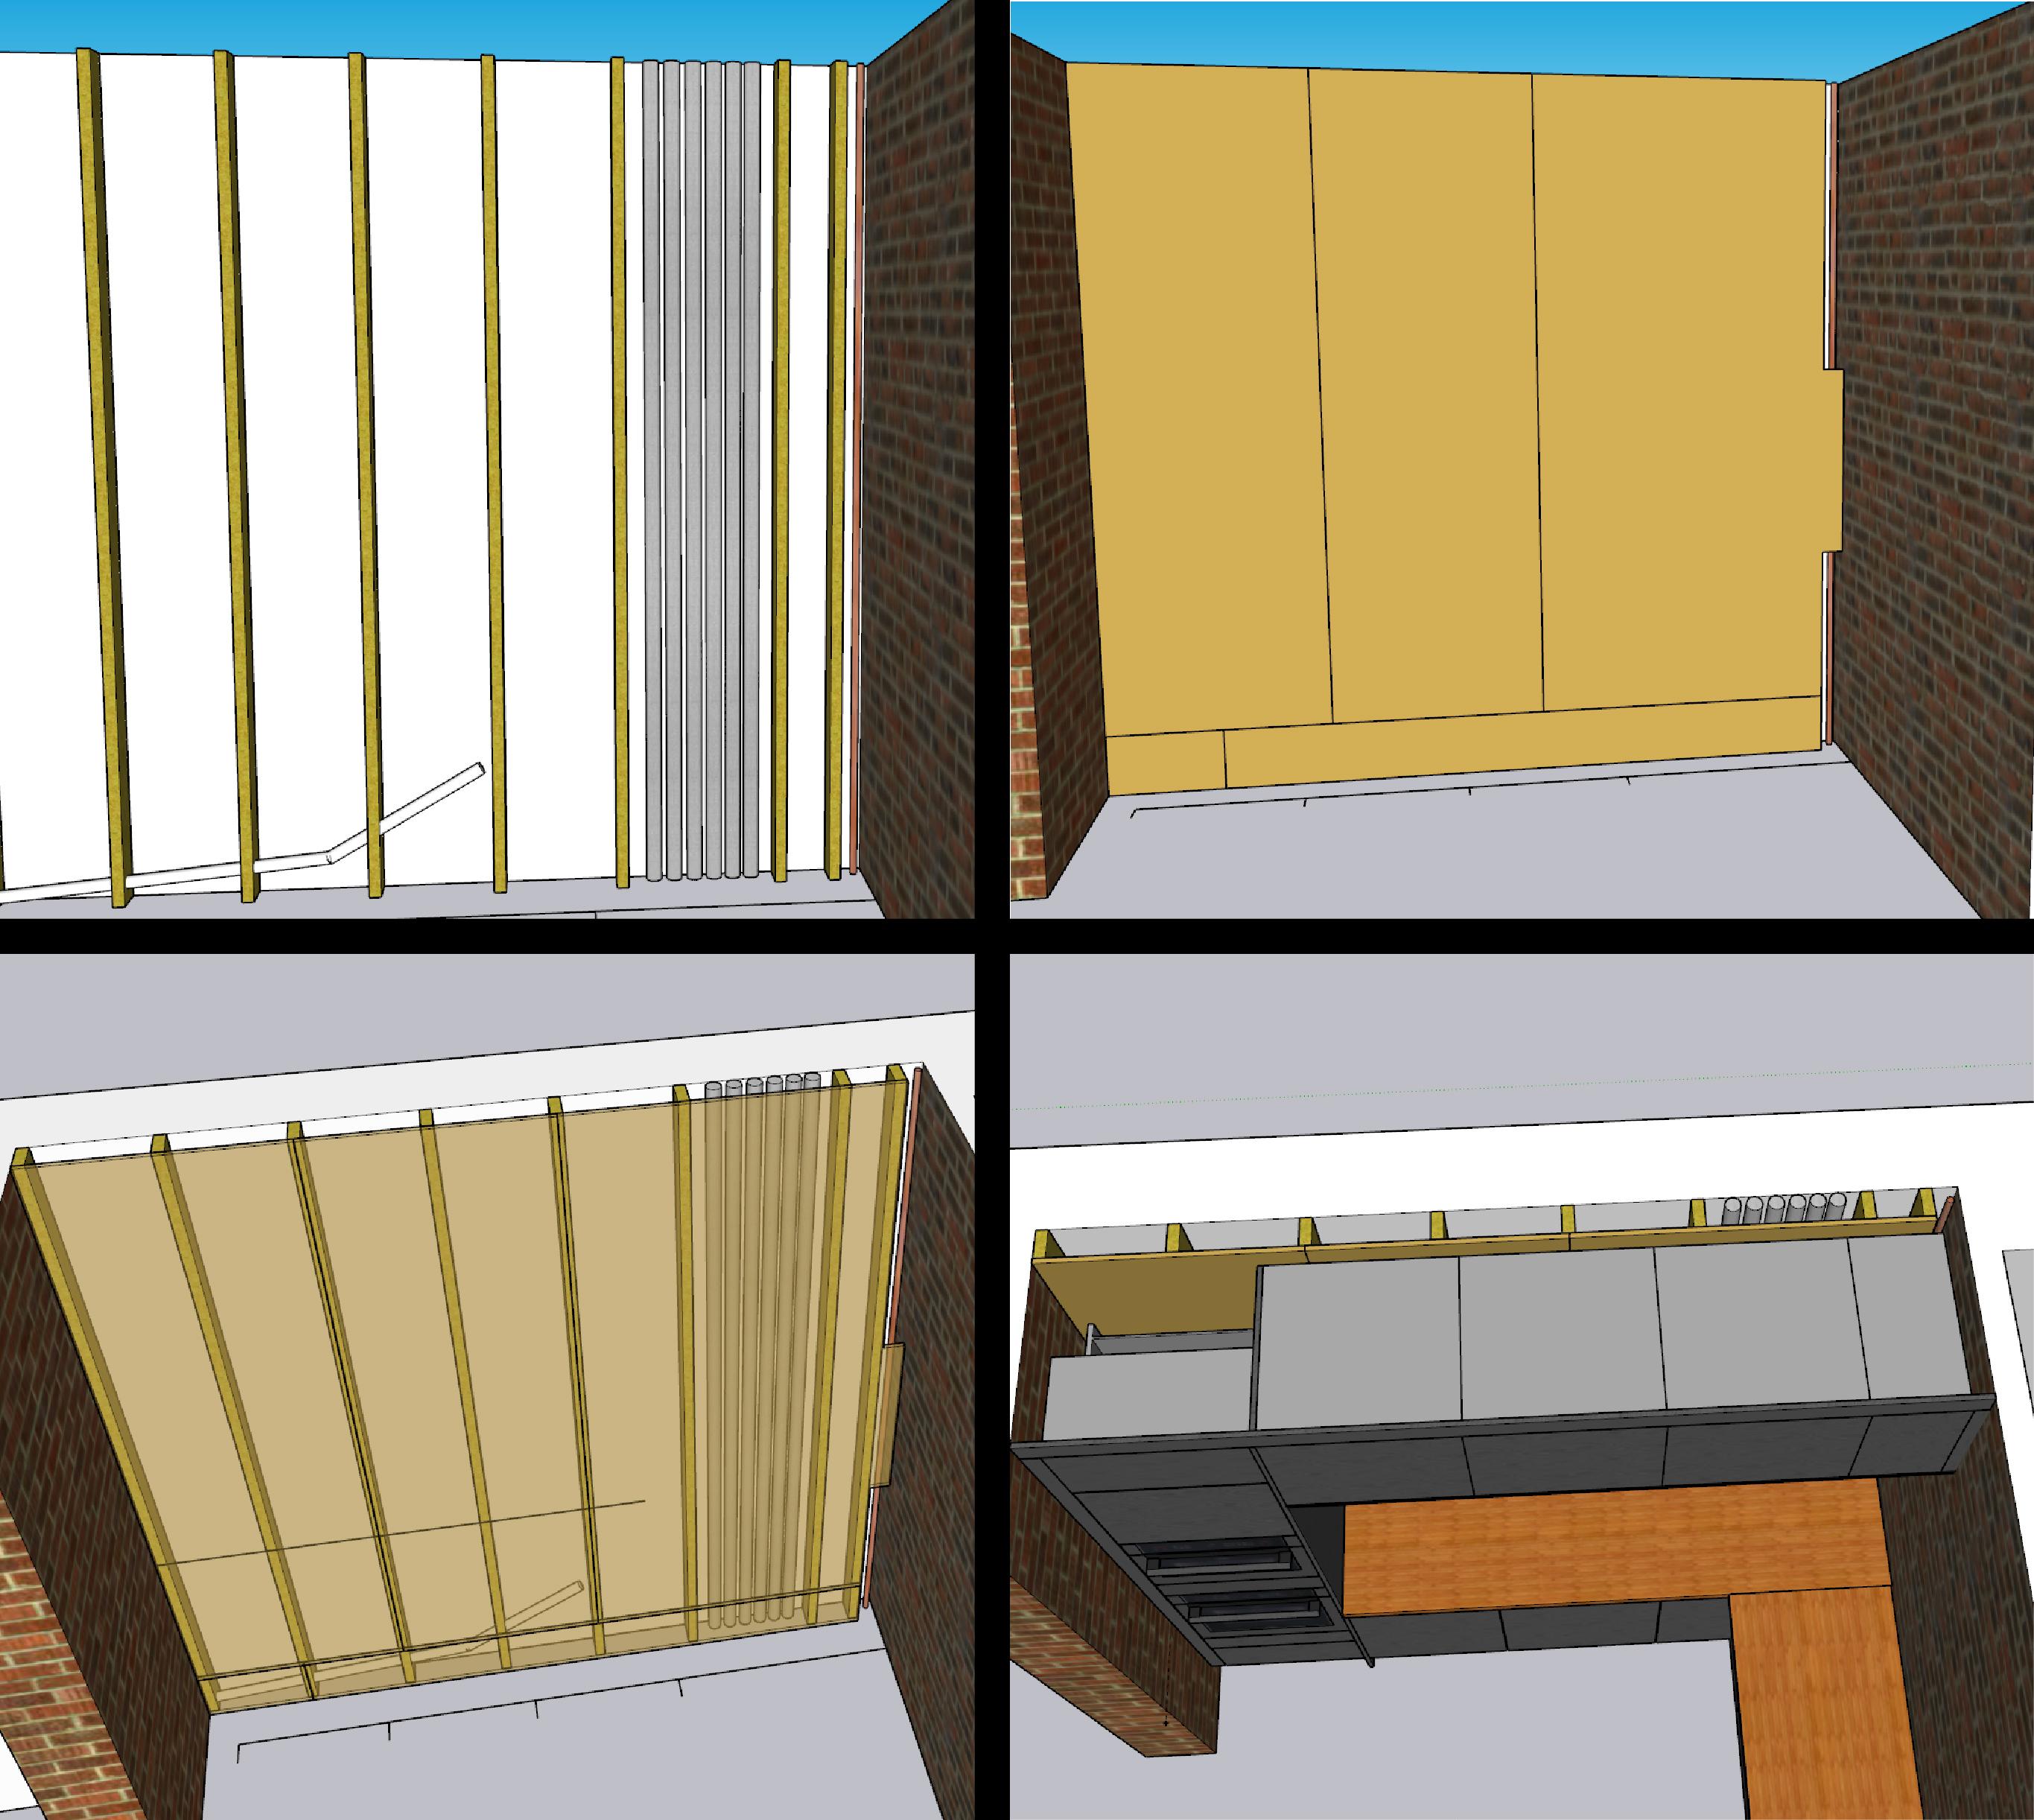
happy lunchtime guys. Im at the stage i need to stud my wonky kitchen party wall out to accommodate stuff like UFH, water pipes etc, I also have a gas line to contend with. My situation and question is as follows. The gas pipe runs up from the floor void in the corner clipped to the exposed brick wall in the kitchen. As i am framing that wall out it means i can hide the gas pipe, cladding with ply to hold the weight of my units but i don't know what's the best practice here. I could leave gaps top and bottom in the ply so its vented as i only need the ply to run to the wall where the tiles will go above worktop, and this would help with goons potentially drilling into the thing as its obvious it would be there. But as the wall units go up to the ceiling it would effectively be venting into another relatively sealed chamber up there. Same as below the units, although i could potentially put a crappy vent in the plinth or pelmet. Is this the best thing to do or should i be battening right up to the pipe and then fully encasing the pipe in something like illbruck fm330? Cheers gents, 3d images attached for your viewing pleasure, the gas pipe is very far right in all the images. Hopefully the above makes sense.
-
Is it ok for builder to leave pipes like this?
Super_Paulie replied to nmh's topic in Waste & Sewerage
im not entirely sure, you'll have to use a bit of improvisation. At the very least id clip that MDPE pipe to that concrete wall. If its a cellar and not exposed to the outside temperatures im sure it'll be fine freezing-wise but if thats unlagged heating pipes then its a really poor show. Its an awful job from an awful plumber im my opinion. -
Is it ok for builder to leave pipes like this?
Super_Paulie replied to nmh's topic in Waste & Sewerage
ah man, thats not great... in the void its basically outside temperatures, pipes need lagging to stop freezing. Also supported to stop water hammer and generally good practice. A minor gripe that they have used a yellow talon which would indicate gas but thats the least of your worries there. Heres a shot of mine that i did last winter but i think you know the answer to your own question im afraid 😞.thumb.jpg.1228bdd7d9d84ecad0e79013608ae73a.jpg)
-
i wouldnt be happy with that if it was my place, I think you are well within your rights to get them to look at it. Even if the pipes were in the wrong place initially it will just take a few bends to get them into a new, more appropriate position. At the very least the pipes should have been cleaned up, im not sure a actually plumber would put his name to that.




.jpg.2caba3c27860c2f9d39d0619a72dbc93.jpg)