


Ed Davies
-
Posts
1674 -
Joined
-
Last visited
-
Days Won
1
Everything posted by Ed Davies
-

Cement is 3 times more polluting than aviation fuel
Ed Davies replied to NSS's topic in Environmental Building Politics
Then you've read some bullshit. Peer reviewed articles show that, at least from the CO₂ perspective, PV panels “pay back” (in the sense of displacing emissions) in a small number of years depending on the way they're manufactured and where they're used. For some cases it can be as little as about a year, in others a few years. To be honest, I'm getting almost as sick of the anti-renewable bullshit as the AGW-denying bullshit. And the idiots who repeat it uncritically when some simple arithmetic should tell them it's wrong. 200 W panel, 800 hours a year generation for 20 years gives 3'200 kWh. Even at 5p/kWh that'd be £160. That's most of the cost of the panel which isn't primarily energy costs to start with (who knows the break down but mostly it'll be the capital cost of the manufacturing plant). -
American roof pitch to English degrees
Ed Davies replied to Russell griffiths's topic in General Self Build & DIY Discussion
12/12 would be 45°. 6/12 would be much shallower, 26.56…°. -
American roof pitch to English degrees
Ed Davies replied to Russell griffiths's topic in General Self Build & DIY Discussion
That happens to work when rise = run. For any other angle it'll be, at best, only an approximation. tan(degrees) = Rise/Run. E.g., for a 6/12 roof that would say 22.5° but it'd actually be atan(6/12) = 26.56…°. >>> for r in range(24): print("%2d/12" % r, degrees(atan2(r, 12))) ... 0/12 0.0 1/12 4.763641690726178 2/12 9.462322208025617 3/12 14.036243467926479 4/12 18.43494882292201 5/12 22.619864948040426 6/12 26.56505117707799 7/12 30.256437163529263 8/12 33.690067525979785 9/12 36.86989764584402 10/12 39.80557109226519 11/12 42.510447078000844 12/12 45.0 13/12 47.290610042638534 14/12 49.398705354995535 15/12 51.34019174590991 16/12 53.13010235415598 17/12 54.78240703180729 18/12 56.309932474020215 19/12 57.724355685422374 20/12 59.03624346792648 21/12 60.25511870305778 22/12 61.38954033403479 23/12 62.447188423282206 So 15° is between 3/12 and 4/12 (actually 3.21539…/12). -
Velux clicks, not quite as per instructions
Ed Davies replied to Ed Davies's topic in Skylights & Roof Windows
Thanks @Bitpipe , yes, gluing the bit of insulation I broke might well be the answer but I think I'll try Velux (next year) for the small parts at the top in the latching mechanism as the areas of the breaks are tiny for the amount of force involved. Yesterday I got the frame and sash separated OK. Don't know what the problem was the day before; maybe I just wasn't pushing quite hard enough on the buttons as they did need a fair amount of force. -
Velux clicks, not quite as per instructions
Ed Davies replied to Ed Davies's topic in Skylights & Roof Windows
This sounds like the problem I'm having but it's hard to tell. Do you mean that the latch mechanism on the top of sash was in the wrong position (open too far) to allow the little hook bit on the back of the operating bar/handle to engage? Having re-watched the centre-pivot version of that video at full resolution I have, I think, a clearer idea of how that should work and will have another look at it in detail later this morning. -
Velux clicks, not quite as per instructions
Ed Davies replied to Ed Davies's topic in Skylights & Roof Windows
Hmm, rewatched the video. Only thing I noticed is that the demonstrator had the bottom of the frame resting on the floor and the top on his leg which might have taken the weight off allowing the button to be pushed in. Will try tomorrow. Meanwhile, any other hints welcome. -
Velux clicks, not quite as per instructions
Ed Davies replied to Ed Davies's topic in Skylights & Roof Windows
Those jroofingsupplies videos are the main ones I watched. Think I might watch again this evening in case I missed something but it seemed to make sense at the time. -
Velux clicks, not quite as per instructions
Ed Davies replied to Ed Davies's topic in Skylights & Roof Windows
This one is a centre pivot (GGL MK08 2066). The other two in this batch are top hung so any tips on those would be very welcome, too (they're to be escape windows in the two end bedrooms). I'll be getting another four of the next width up (PK08) next year which will all be centre pivot. -
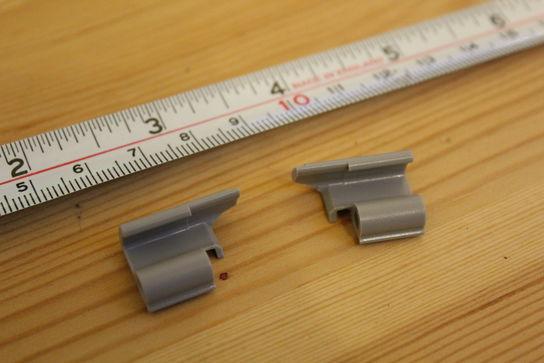
Today has not gone well, so far. Got first three Velux windows on Monday and opened the first one today. Have previously watched YouTube videos on installation and read instructions. All seems to make sense for the first parts, anyway. First job is to stand it up and separate the sash and the frame. Stand up. Remove white polystyrene packing bits, push handle bar into place. Doesn't click as convincingly as I'd expect, flops down with tongue of plastic free, couldn't get that to engage. Pull directly on lock mechanism, unlocks and swings open fine. Play with that a bit to see if plastic tongue could be engaged properly. Nope. In the process, break the pathetic bit of plastic I think it's supposed to engage on (pieces shown below). Oh well, implausible I can get that sorted before next year but we can live without for now. Pop polystyrene bits on top of sash and swing it down and get it on floor and frame more or less horizontal. Press buttons to release frame from sash. Nope, no click. Can't get them to budge at all. Careful look, doesn't seem to be any other possible buttons or anything. Press with tip of long nosed pliers in case chilly fingers aren't pushing enough. Still no click. While struggling with those manage to break a bit of the insulation in the top of the window. But that can be stuck back with appropriate glue, I hope. So, any tips on what I might be missing regarding pushing those buttons in?
-
Method for fixing JJI joists to solid timber rafters
Ed Davies replied to willbish's topic in General Structural Issues
Prosaically, they're just called timber connectors: https://shop4fasteners.co.uk/fasteners/washers/timber-connectors.html -
Would a multitool do it? Worry about flinging lead dust around?
-
Wouldn't a DIY system to jack a significant number of panels up and down likely twist them at least a bit? Panel lifetimes are set by the sealing of the enclosures so this seems like a good way to kill your panels quickly.
-
Sorry, I don't know of anything better. Generally speaking the elevation angle doesn't make much difference to the annual production but, as you say, annual production is not your main interest. Low angles do tend to hammer winter production. Ideally for mid winter the panels should be quite steep, somewhere between 70 and 80 ° and it begins to drop off noticeably once you get much below 60 °. I've gone for 60 ° for my design on the basis that that'll give a bit more of a trickle on the duller days as it sees a bit more cloud that the absolute optimum angle. Also E/W splits have a lot going for them in terms of production at times when it's useful but again really slaughter production in winter. For an arbitrary point up the river valley N of Alness with no major horizon problems, December and January monthly production in kWh for a 1 kW panel (i.e., effective hours) for various elevations facing due south and, for two elevations, facing quite a way round towards east. Elv Dec Jan Az -60° 90° 18 21.1 85° 18.3 21.5 80° 18.4 21.7 75° 18.4 21.8 9.77 12.2 70° 18.3 21.8 60° 17.6 21.2 50° 16.4 20.1 35° 13.8 17.4 8.42 11.4
-
Stiebel Eltron DHC-E 8/10 instant water heater
Ed Davies replied to ProDave's topic in Boilers & Hot Water Tanks
Since one of the more credible failures is the 2-port valve sticking, wouldn't it be safer if the overheat thermostat cut off the pump? But is there really a need for an overheat stat for an ASHP? Firstly, the heat pump will limit its own flow temperature to something reasonable. Then, if that fails too, by the time the tank gets up to nearly 100 °C won't the ASHP be operating so inefficiently, if at all, that it'll barely keep up with the losses from the tank. Actually, that would be an interesting experiment for next summer, see how hot the ASHP can get the tank. -
You asked for a good one so I'll go off-topic and mention one I wrote: https://edavies.me.uk/2014/05/cra/ It is, as the rubric says, a toy. It doesn't know any materials, you just have to input the physical characteristics you know (though it's reasonably flexible in how you do that but think carefully if the number you have is the resistance or the resistivity, etc) so at least you aren't limited to the ones it knows. There's a “Plot” button at the bottom to get the results. I never actually got round to doing the plotting, it just gives you loads of numbers (which aren't even rounded to sensible numbers of digits).
-
Is this an additional argument for the external Willis-style heater as that'd make it an A* rated heat store instead of a C rated heater? Just shows how bloody silly these ratings are.
- 186 replies
-
- 1
-

-
- sunamp
- energy efficiency
- (and 1 more)
-
http://kb.jungleproperty.co.uk/wp-content/uploads/2017/02/Grasslin-Towerchron-QE1-QE2-Installation-and-User-Instructions.pdf Page 4. There's a switch on the back for gravity vs fully pumped. For gravity it'll assume the DHW is heated whenever the CH is on. Had to change the (different) controller here when it was changed from gravity to pumped this year.
-
… and length of pipes to fill when turning on a hot tap.
-
MVHR running properly???
Ed Davies replied to joe90's topic in Mechanical Ventilation with Heat Recovery (MVHR)
Just sent Steamy an email drawing his attention to this thread. Hope he can chime in. -
Left a lot of my stuff in a container practically within sight of the north coast of Scotland for at least two winters. Mostly fine, no visible moisture any time I visited, but I would suggest stacking carefully to allow good air circulation against the walls and floor as one mattress up against the wall was a bit musty and some boxes and things stacked directly on the floor were black underneath.
-
MVHR running properly???
Ed Davies replied to joe90's topic in Mechanical Ventilation with Heat Recovery (MVHR)
Yes, he mentioned the sensors in an email about something else (refrigerators). Are they logging to anything, yet? Bottom line, an imbalance of 20% or so between your supply and extract airflows could knock the supply temperature down as much as you seem to be finding. -
MVHR running properly???
Ed Davies replied to joe90's topic in Mechanical Ventilation with Heat Recovery (MVHR)
Yes. I have a CO₂ monitor but it was about £80 though for the whole monitor including an ESP8266, temperature, pressure, RH and so on sensors. How decent it is another question but it seems to give reasonable readings. What's important is knowing when CO₂ is high and when it's low for your house, an absolute value in ppmv doesn't matter really. -
MVHR running properly???
Ed Davies replied to joe90's topic in Mechanical Ventilation with Heat Recovery (MVHR)
Suppose @joe90 's problem is imbalanced flows, how imbalanced would they have to be to see the temperatures he reports with decent efficiency in the actual heat exchanger? Suppose x is the eXtract airflow (kg/s or whatever) and y is the supplY airflow. Then the efficiency would become: e = [y × (Ts - To)] / [x × (Te - To)] The (im)balance ratio would then be: y/x = e × (Te - To) / (Ts - To). He says downstairs stays between 20 and 22 and upstairs between 16 and 18. Let's assume 21 downstairs and 17 upstairs with equal extracts from each so an average of 19 °C. His supply is at 16 °C and the outside air at 6.6 °C. Assuming 90% or 95% efficiency for the heat exchanger gives: y/x = 0.90 × (19 - 6.6) / (16 - 6.6) = 1.187… y/x = 0.95 × (19 - 6.6) / (16 - 6.6) = 1.253… In other words the supply airflow only needs to be 18 or 25% more than the extract airflow for 90 or 95% exchanger efficiencies respectively to get this somewhat disappointing supply air temperature. I'll admit to being a bit surprised, my hunch before doing this calculation was that it would be more like 50% difference. If only @SteamyTea had put some temperature sensors in @joe90's ducts ? -
MVHR running properly???
Ed Davies replied to joe90's topic in Mechanical Ventilation with Heat Recovery (MVHR)
I think there's a lot of merit in controlling the MVHR speed depending on the CO₂ and humidity levels in the house. Turn it down automatically when it's not needed, boost it when it is. Also drying the house out when it's mild and dry outside by running the MVHR a bit more to get the RH inside down then throttling back when it's wet and cold out to reduce wasting energy. -
MVHR running properly???
Ed Davies replied to joe90's topic in Mechanical Ventilation with Heat Recovery (MVHR)
It should be 90% of the temperature of the extract air relative to the outside air (not absolute zero) if the flows are balanced, there's no condensation going on and so on. e = (Ts - To) / (Te - To) where: e = efficiency (as a proportion; multiply by 100 to get percent, of course). Ts = supply air temperature (air going into the rooms from the exchanger). To = outside temperature (air going into the inlet from outside to the exchanger). Te = extract air temperature (air going from the rooms to the exchanger). The exhaust air temperature (air going from the exchanger to the outside) doesn't matter, that's lost and gone. So: Ts = e × (Te - To) + To or, if all temperatures are measured relative to outside, it's simply: Ts = e × Te
