Crofter
-
Posts
3451 -
Joined
-
Last visited
-
Days Won
10
Everything posted by Crofter
-

Shower, tray, tiles, and all the rest...
Crofter replied to Crofter's topic in Bathrooms, Ensuites & Wetrooms
Your second idea sounds good, thanks. I'll mark it out and see what it looks like in the flesh. Presumably I still take the centreline as the middle of the full height tiled area. -
Shower, tray, tiles, and all the rest...
Crofter replied to Crofter's topic in Bathrooms, Ensuites & Wetrooms
Only another three inches, ish. I used a hole saw to cut some chipboard reinforcing pieces, and the same saw to cut holes adjacent to the line of the shower screen (on the 'dry' side), then slid the chipboard pieces in behind the PB so that the screen's screws have something to bite in to. Then I glued the cut out piece of PB back into the hole. It was a skim finish so I can probably make it good again quite easily. -
Shower, tray, tiles, and all the rest...
Crofter replied to Crofter's topic in Bathrooms, Ensuites & Wetrooms
Thanks for those thoughts @Ian - you could be on to something. Of course I have somewhat b*ggered up the wall next to the shower screen yesterday when I cut into it to slip in some reinforcing pieces for the screen to screw into- I can probably smooth it over but the plan was to tile over so I didn't spend much time making it good again. If I paint these areas I'll need to get the filler and sandpaper out, not a big deal really. Tiles are already bought so no savings there A half way option would be to join up the splashback and enclosure tiled areas, but on the upper area just take it to the screen, or a few mm beyond, rather than the edge of the window. This means I only have to make good two of the three holes I made in the wall... -
Shower, tray, tiles, and all the rest...
Crofter replied to Crofter's topic in Bathrooms, Ensuites & Wetrooms
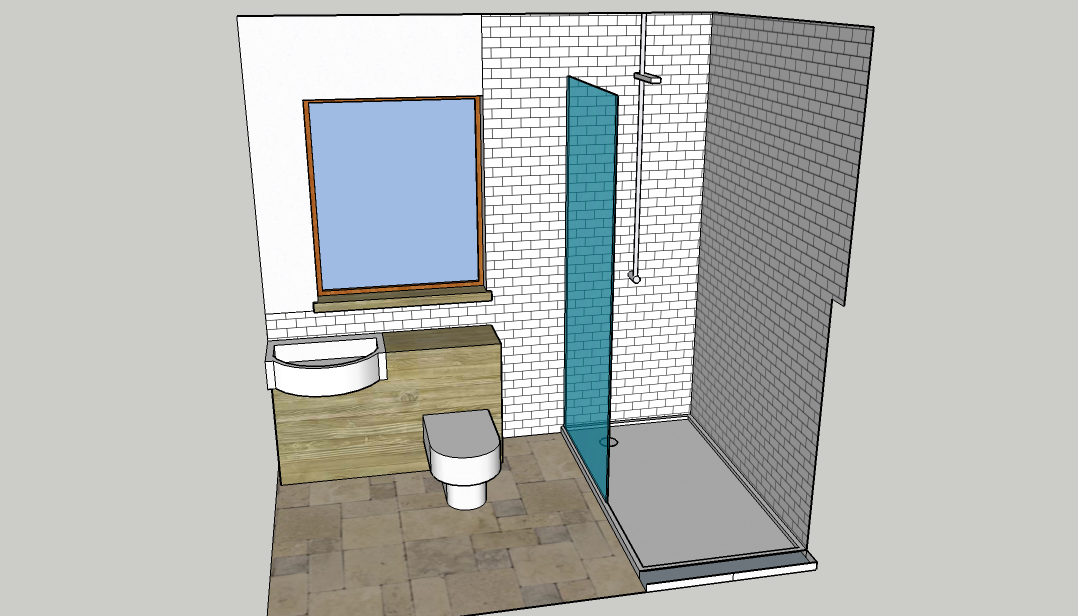
Time to set out some tiles (and it's November... how did that happen!) SWMBO has chosen metro tiles, 100x200 with bevelled edges. Oh goody. I guess this means lots of cuts. I will be using trim to finish off in a couple of places and I think the only way to make this look OK is if I ensure that only cut edges meet the trim, so that the tiles are all the same depth. How would you set out the back wall? (see image) a) take the 'centre' to be the halfway point between the edge of the window and RH corner of the room b) take the centre to be the halfway point between the edge of the WC/basin unit, and the RH corner of the room* c) start in the RH corner and match the tiles on the adjacent wall, either to mirror them or to create a wraparound effect *this looks, in the picture, as though it lines up with the window, but it doesn't. Thoughts (looking at you, @Nickfromwales)...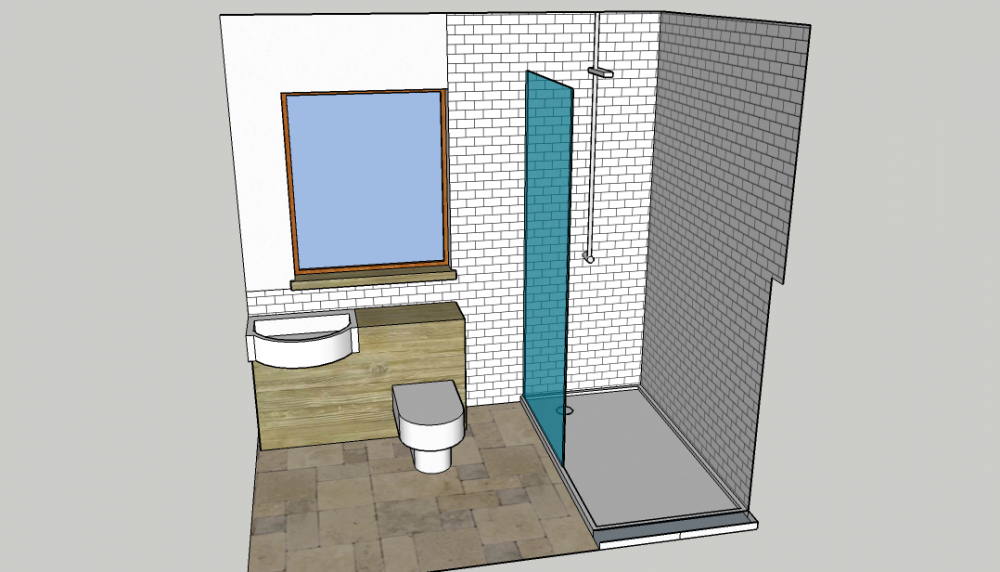
-
Thanks both. I'll start with the back of the cupboard door just in case- I've only got two doors in the whole house so not a big job!
-
Has anybody had problems using Polyx over veneer? Wondering whether to take the chance since I've got enough left in the pot. I could test it out on the inside of a cupboard door, I suppose.
-
Wot he said!! Turns out I got pretty lucky with my Hep->comp connections. I initially had a wc cistern set up like this for use as a temporary site toilet. When I put the shower valve in, I 'borrowed' this connection, stuck a compression tee on it, and fed this to the two sides of the shower valve as a pressure test. The valve and its Hep2O fittings were fine, but the temporary tee was absolutely peeing everywhere. Slapped some self amalg on it just to allow me to do my test but it's been enough to convince me not to rely on compression fittings on Hep2O for any permanent connections.
-
The switch furthest on the right has a black surround, all the others have white.
-
And of course if you have sarking, you need a non tenting membrane and also counterbattens.
-
Knee pads that don't slip....
Crofter replied to ToughButterCup's topic in General Self Build & DIY Discussion
I just have work trousers with knee pad pockets in them, I think they are JCB branded ones. Have worked well through most of the build but I am now sporting ever larger yellow patches at my knees where the fabric has worn through. They always seem to be in the right place though, and I forget I'm wearing them as they are quite unobtrusive. When the trousers finally wear right through I'll just buy another pair the same. -
Breather membranes should be OK with full fill insulation- that's what I've done anyway. It's the old fashioned felts that need a 50mm gap, which also has to be vented top and bottom via soffit and tile/ridge vents. Have you got anybody locally to you who does blown-in cellulose insulation? It should offer very good real-world performance, better than PIR because it tightly fills all the space (plus improved 'decrement delay' but I'll let someone else explain that one!). I don't know how it compares on costs, but as it's a totally different material to PIR it may not have bene hit by the same price hikes.
-
Having had one of each, I would put Wickes several notches above B&Q in terms of quality.
-
Cool, I'm on the right track then. Have fitted a bent 15x1/2" Hepworth tap con on the outlet, and used straight 15x3/4" of the same on the inlets, because bent ones weren't available. Just had to use a couple of (Hepworth) elbows after. It'll all get pressure tested before it get boxed in... and the flexis are going in the bin
-
Here's the offending item: http://www.ebay.co.uk/itm/Modern-Concealed-Chrome-Round-Thermostatic-Shower-Mixer-Valve-Kit-SM615A/370901516038?ssPageName=STRK%3AMEBIDX%3AIT&_trksid=p2057872.m2749.l2649 Chosen because of the idiot proof labelled controls and obviously it was a good price, with 10yr guarantee. I've fitted the tap cons onto it already, I used Hep connectors and have ditched the flexis. Whilst I'm more than happy to switch out fittings or even the whole valve if necessary, there's a time issue as it's currently holding up the rest of the bathroom.
-
Oh well the bits are bought now... I thought the shower needed tap connectors onto it... it's the right thread size anyway... Now that I've got them, is there any reason *not* to use them? The shower valve didn't come with any fittings- previous one I fitted did have elbows which I guess must be 'irons'. Likewise the outlet, which I had assumed was a 1/2" fitting and therefore needed a 1/2" tap con.
-
Hepworth don't appear to do a 3/4x22 bent connector either, so I'm just going to use a straight 3/4x15 and an elbow. Will take up slightly more room. Funny how when you flick through the BES catalogue it seems like every possible combination is available, and then when you actually need one it doesn't exist
-
Ok so it's not paranoid to avoid using them! Shame Hepworth don't appear to do a 3/4x15 bent connector as that would minimise the number of joints in the install. Looks like I'll just have to do the connection in copper and then switch to plastic.
-
Had a neighbour suffer damage due to a burst flexi. Has made me a little wary of them! And a bit of googling suggests that there is a definite failure rate. The application I have in mind is for my shower, so I really want 100% reliability before it gets boxed away and tiled over. The shower valve has 3/4" connections, and what would ideally do the job is a couple of bent connectors to meet the 15mm pipe- but such a combo seems rather rare (3/4 x 22mm is no problem). I just happen to have a couple of flexi connectors that I bought by mistake a while ago, which are 3/4 x 15mm, and also have built in isolators which would be handy. But they were very cheap! Has anybody actually had a flexi fail?
-
Have had a bit of a trawl through the forum to see what people are using to stick their skirting boards on with. Gripfill was going to be my go to option but found a few negative comments about it skinning over too fast. Jeremy suggested this stuff: https://www.screwfix.com/p/no-nonsense-11663102-solvent-free-grab-adhesive-white-310ml-12-pack/61428 Any other contenders? Roughly how much should I need to do c.50m of skirt/arc?
-
I think @NSS used it. I briefly looked into it myself but it was considerably more expensive than the locally grown larch that I ended up with. Has many advantages, though. I think you may have to drill all the fixing holes rather than nail gunning it on.
-
Fit an external layer of osb over the PIR, then the battens go onto that (fixed right through to frame) Will add mucho stiffness.
-
Ah so that's why I never won bakeoff. They're all still a million miles better than a hacksaw though...
-
Deep fried ones, obviously...
-
OK I was a few pence out! http://www.ebay.co.uk/itm/Mini-Tube-Cutter-Wheel-Roller-3-22mm-Copper-Brass-Aluminium-Plastic-PVC-Pipe-/162447571132?epid=512731603&hash=item25d2a138bc:g:FIMAAOSwuxFY2fm9
-
How did you originally cut the copper? It seems possible that you might have damaged it. One of those simple little donut-shaped pipe cutters is worth the £2 price even for a one off job like this.