


Iceverge
-
Posts
4501 -
Joined
-
Last visited
-
Days Won
32
Everything posted by Iceverge
-
Welcome. Smashing house! When I looked in detail nothing could come close to a concrete block cavity wall terms of price. Lots of your design is sub grade which rules out timber. ICF was very attractive initially given the supposed lego like buildability and excellent continuity of insulation . But I decided it was too expensive, tricky to prop and pour, and needed additional external insulation to reach passive levels. Of course many on here have great success with it so I'm willing to be corrected. Durisol certainly looks an attractive product. If you are going for a redesign, given your tight budget perhaps ask your architect to square up the building a little. After 3 sets of planning permission and many hours pouring over the costs I came to the conclusion my blocklayer mate wasn't far out "every extra corner adds £10 grand" Best of luck anyway!
-
@tonyshouse A picture painting a thousand words and all that. (BTW I took a lot of inspiration from your blog!Thanks) m
-
@MortarThePoint Apologies for late reply. My observations on Full Fill Bonded blown Beads, Are they Full Fill: Yes very much so, in our wide cavity at least. I drilled a few trial holes around windows and doors to check in awkward to reach places. All full with beads. Are they Bonded: Kinda, a little hit and miss really as i found out when coring ventilation holes and lost a few buckets. The remaining question: Will they settle.......? Time will tell. Would I use them again? Yes, but I would core all holes in the wall first.
-
Hi Joe, Those pictures look excellent. A perfectly continuous gap free insulation layer. Are you framing on site or purchasing a kit? What are your target U values? For a kit build an MBC 300mm twinwall or similar is a very elegant option as long as care is taken at the window+door openings. For a stick build your options are endless but something like @ProDave with rendered woodfiber as your weathering layer might save on the complexity. As with your rock wool duo, any external insulation does an excellent job of managing bridging at openings. A wider, mineral wool insulated service cavity can be a cheap way of improving u-value also.
-
I considered this but was turned off the idea as it would have been tricky to manage economically. The single 100mm inner leaf would have been too unstable to take it to wall plate without the outer leaf. This would have ment parging it's external face as it was built which would inevitably have ended with a cavity bottom full of sand cement parge coat and a load of half dislodged cavity ties. Now if you were to build the inner leaf as a 215mm " block on flat" wall with cavity ties built in, use a spray on airtightness paint and build the external leaf afterwards you might be on to something. It is the ideal place for the airtightness layer as it's away from all internal services yet still at the warm side of the insulation. With passive insulation levels you might be heading for a rather Bastille like 650mm wall though.......
-
 Hi Alex, I've given this a little thought. Although initial impressions mightn't stun, the house isn't actually that bad. Just wearing the wrong frock. I think on a modest budget you could make huge improvements. There is no visual break from the hard brown surfaces running from the driveway through to the low wall, the rockery/garden and the walls. The expanse of plain brick above the door also jars. I suspect this was done for ease of maintenance but lends to the "quarry floor" appearance of the whole thing. The windows are flush with the external wall giving a caravanesque, depthless quality, lacking the 3D appearance of solidity and quality. The roof and the dormer are what they are, but the combination of weathered tiles and various shades of brown give that feeling of putting a three course meal into a blender. My suggestions: 1. Simplify the colour pallet, choose 3-4 main complimentary colours and stick to them. 2. Improve the appearance of the house openings by adding some depth. 3. Break up the hard surfaces. You could remove the roof and replace it with 400mm I Joists, pumped with cellulose, externally insulate with 300mm rockwool with a modern thin layer render, new triple glazed windows €100k plus etc etc etc Meanwhile back in the real world with bills to pay, and if your primary objective is aesthetic improvement rather that comfort/energy upgrades, I've made some suggestions below, see what you think. Jonathan I don't think brick and a contemporary aesthetic are mutually exclusive. Buy some tile paint, and give the whole roof, including the shingles on the dormer a new lease of life. Consider some contemporary window mouldings to give the windows depth. Paint the windows and the fascia+soffit a tasteful colour. Update the front door to a more modern design. A coat of paint,some new glazing and some ironmongery might do this. Add a tasteful porch overhang to break up the large area of brick above the door and provide shelter. Change its colour as required to achieve the contemporary aesthetic. Dig out the area of limestone and plant lawn or tidy shrubbery in this area. Take up the last 2-3m of brick paving nearest to the house and replant with lawn or similar if space allows. This terraced effect would settle the house into its surrounds and reduce the feeling of living in a parking lot.
 -
Maybe I'm late to the party but I've bought 2 of these for different saws. Even I seem to be able to get a respectable edge. Pferd is the brand but you can also get a Stihl branded one.

-
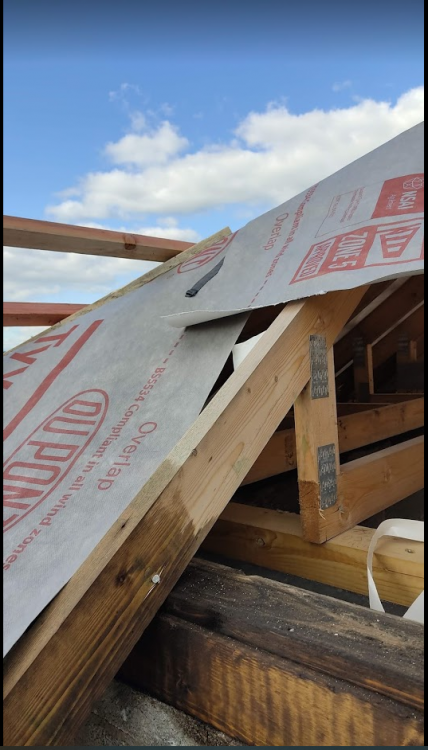
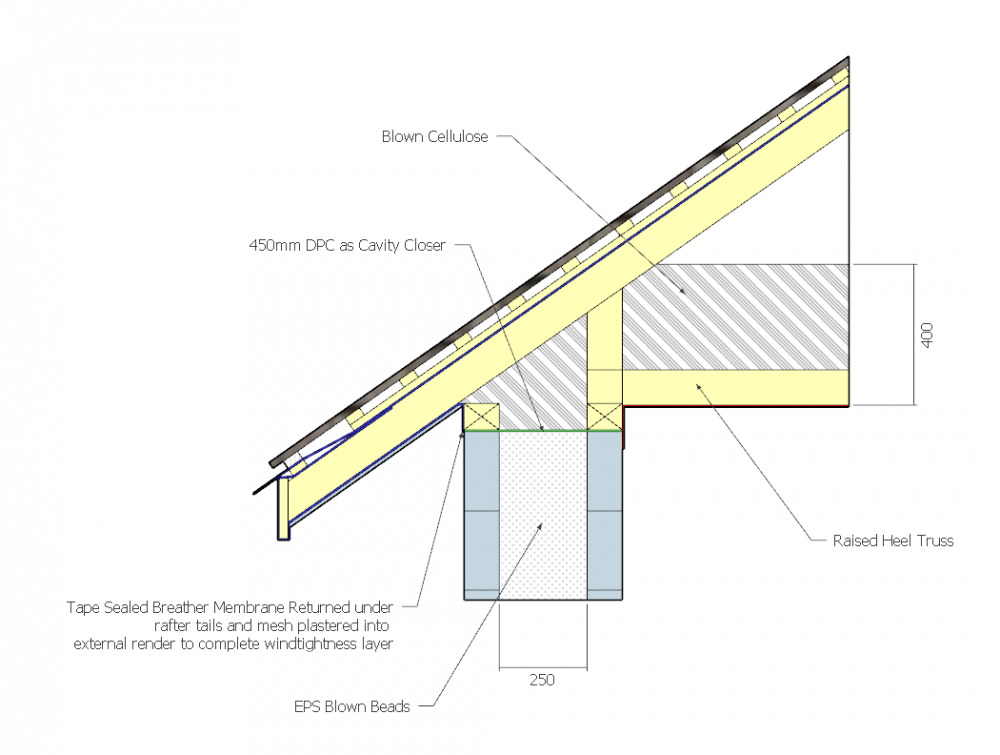
We've had a 250mm Cavity done this week with blown eps bead. I climbed into the attic earlier to have a look as I was sceptical the beads would fill right up to our cavity closer (450mm DPC). I checked the entire perimeter of the house and was pleased to find the beads had billowed up the DPC everywhere. Its given me confidence that around the windows and doors there's a tight fill as well. I may do some trial holes if I can find the time but thus far I'm more impressed than I thought I'd be.
-
No idea if that’s the right term. Just seemed appropriate. Beautiful house BTW
-
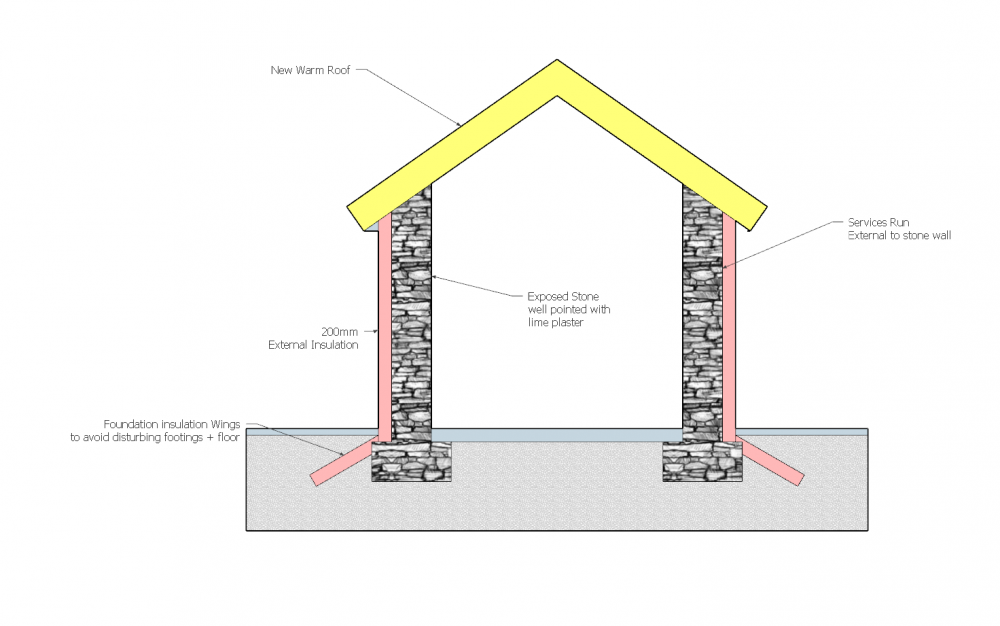
Hi Geoffrey, How thick are the walls? I had a quick peruse of this paper. https://www.historicenvironment.scot/archives-and-research/publications/publication/?publicationId=16d0f7f7-44c4-4670-a96b-a59400bcdc91 They measured old stone and rubble walls in situ . I didn't read too deeply but it suggests a conductivity of about 0.72 W/mK although they varied to about double this ( I suspect for walls with higher levels of dampness). If you were confident your walls could be kept dry and were say 600mm thick could you expect a U value of 1.2W/m2 K. Well short of the regs but maybe with very high levels of floor and roof insulation, good air-tightness and triple glazed windows you could create a very comfortable home with your exposed stone walls. Failing that, externally insulating would work nicely and allow you to run all your services from the outside-in avoiding conduit or pipes showing inside. If there was no proper footings, insulation wings as shown joining to the external insulation would do the trick. Jonathan
- 20 replies
-
- 1
-

-
- stone walls
- pp
- (and 1 more)
-
I'm still not 100% as to the layout of your site but on reflection would my plans be inline with what you were imagining?
-
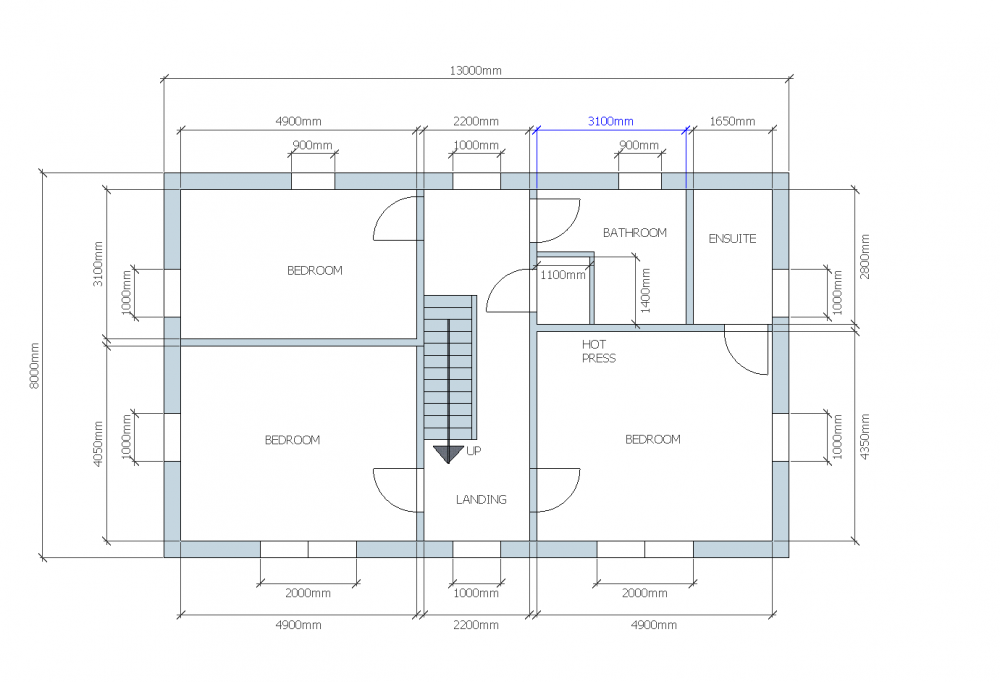
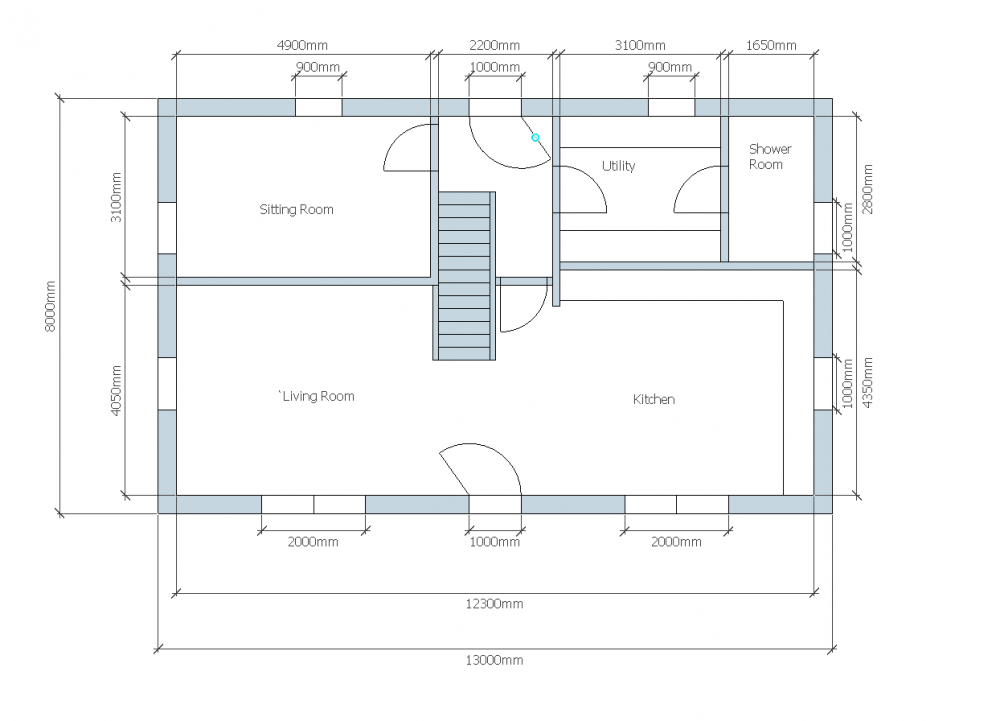
Hi Bob, Here are our plans. This was the final of many iterations but the fundamentals were. 1. Simple rectangular shape - Cheapest, easiest to build, easiest to make airtight. Less insulation needed as less m2 wall per m2 floor. 2. Water + wet rooms all grouped in one corner. Cheapest, less pipe runs, less waste pipe runs. 3. (almost) All rooms with at least 2 windows to allow for a natural light + cross ventilation etc. 4. Old age proof - Living room can be converted to bedroom and we will have level threshold access ( as per regs ) and an accessible shower room/toilet downstairs. 5. Hip roof to ease the insulation of the eaves and provide a large overhang of the walls. 6. A realistic view of the total number of rooms we'd need and minimising the floor area and house size to this requirement. 7. A balanced handsome exterior. ( although beauty is in the eye of the beholder!) 8. No unnecessary complications. I'll have a quick blast of sketchup and see what I can come up with.
-
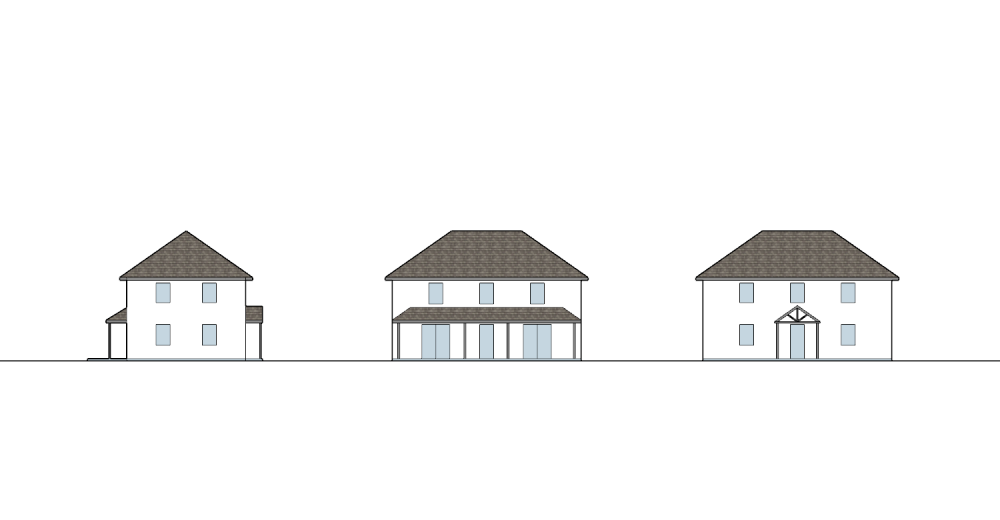
Hi @Amateur bob, What a lovely opportunity. We are in a similar situation in Ireland, currently at first floor level. For reference price wise, we are expecting to pay our builder €230k for taking the house from a field through to pre final interior fit-out for a similar sq meterage. I don't think your build only price is unrealistic given the £/€ rate and the fact you can reclaim VAT in the UK. I did pay a lot of attention to value (amateur)engineering the project however. Obviously profession fees/levies and final fit out will all add up. Couple of questions. 1. What is the maximum ridge height likely to be acceptable to the planners? 2. Is this likely to be a lifetime home? 3. How many bedrooms do you need ? 4. What direction from the house is/are (i) The Farmyard (ii) The nicest Views (iii) the access road 5. Is the farm dirt likely to be earthy or somewhat smellier?!! 6. Will you require a room that could be used as a farm office/study? 7. How proximate are your neighbours? I'll see if a similar house design to ours (below) could be adapted if you like..................................... Cheers, Iceverge
-
Passive House Mag has a article on this, https://passivehouseplus.ie/magazine/new-build/ireland-s-largest-passive-house-scheme-shows-way-to-nzeb Their quote about the hollow (cavity) blocks was " The use of single leaf walls of hollow blocks – which use some 30 to 40% less concrete than a comparable solid block, and are relatively quick to build with " I assume that as it was commercial development the cost was a deciding factor. Another thing that sprung to mind was the reduced weight of the walls, approx 454kg/m2 for 1m2 of block on flat vs 264kg/m2 for hollow blocks. This could bring savings by reducing the foundations needed.
-
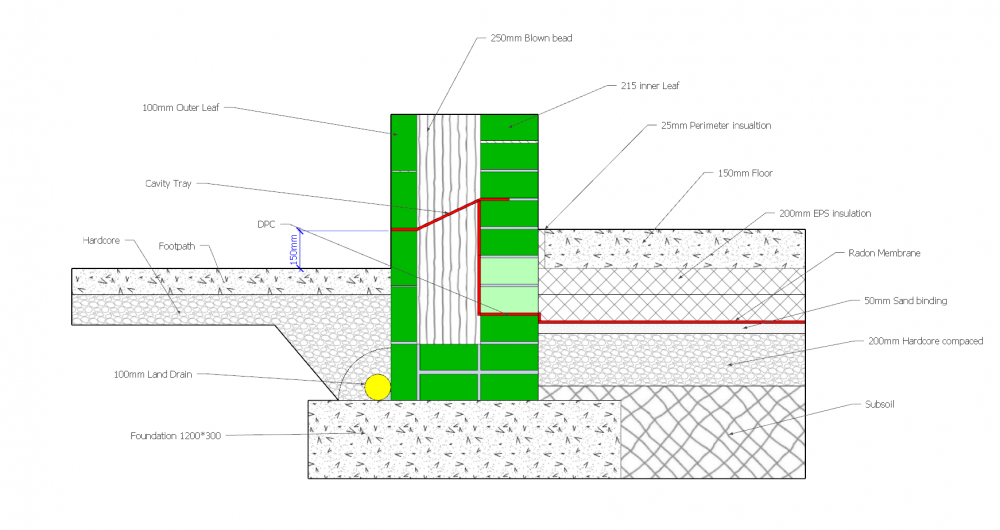
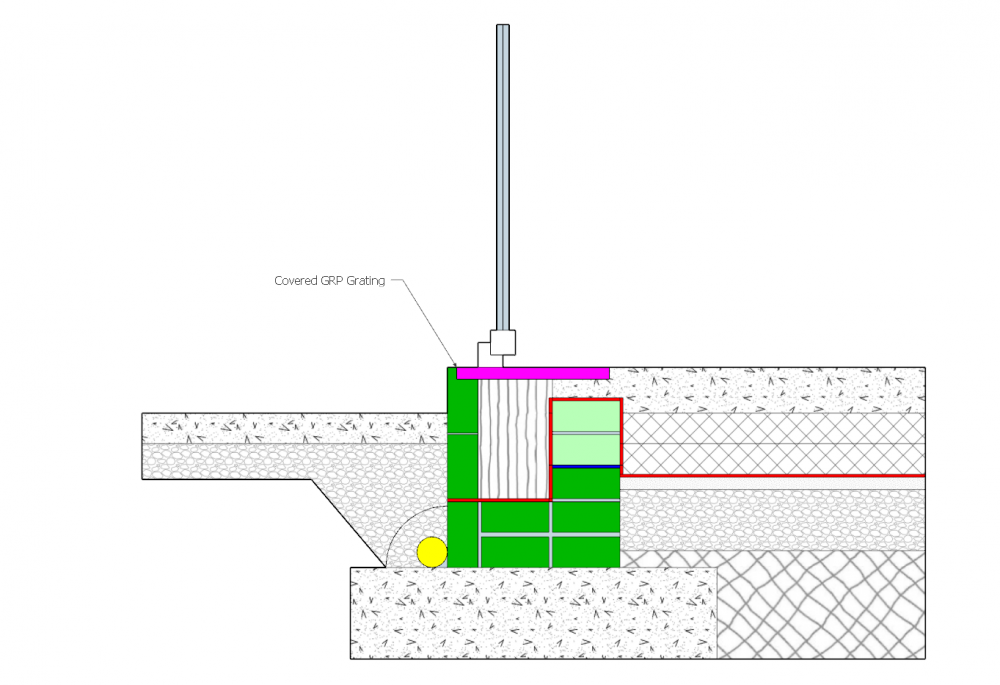
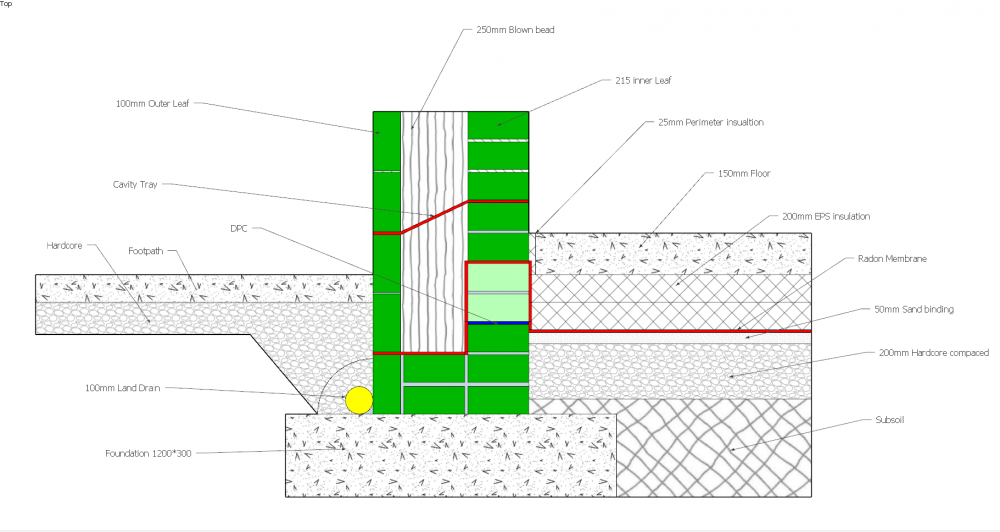
Thanks v much for all the input. I hope that the blown bead will be pretty resistant to soaking water as well. How about this? Notice I have't extended the tray entirely across the inner leaf to avoid plaster cracking. Thanks@ @joe90
-
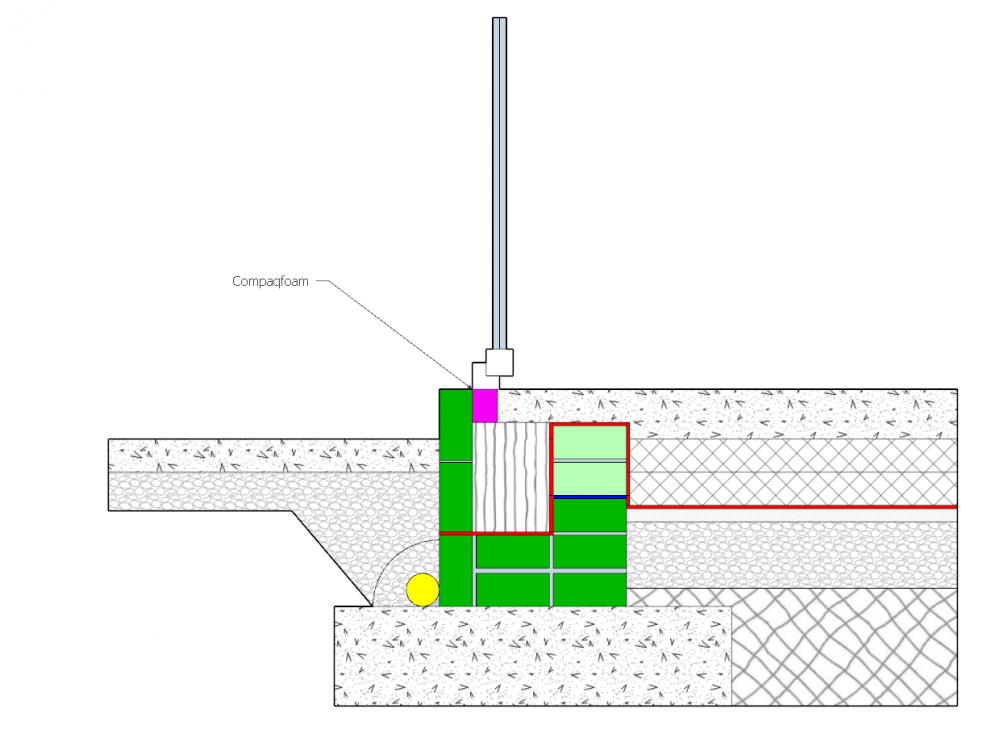
While we're at it, I'll include 2 options for the threshold. One with covered fiberglass grating and one with compacfoam. I'm leaning towards the GRP grating as it looks stronger and more tolerant of onsite shenanigans. Does anyone have any experience of these two choices or something similar?
-
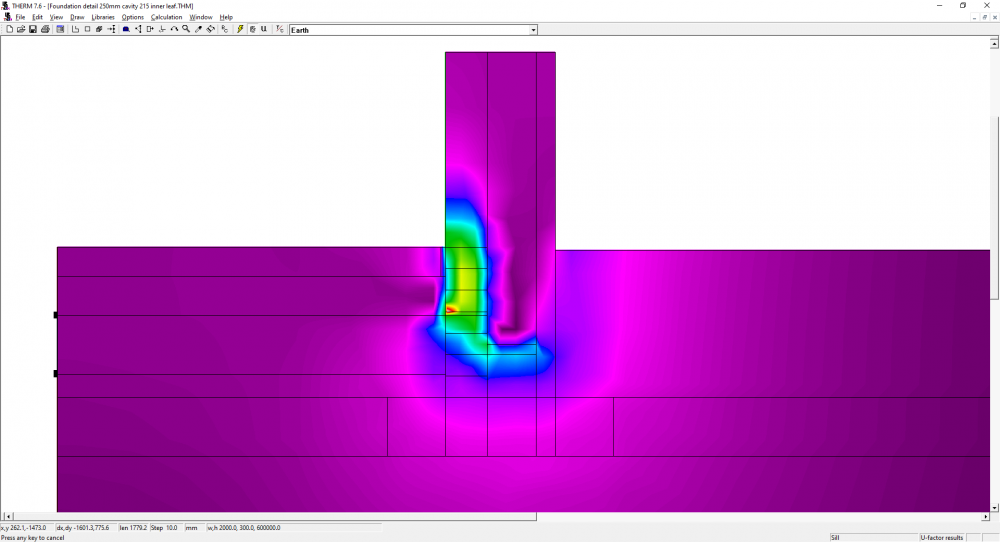
Here are some Therm Simulations I did. Apologies as it is a mirror image of the above diagram. The inside of the house is on the left in these drawings. The final two pictures probably tell the story best. You can see that without the lightweight blocks the heat soaks much further down into the foundations and subsequently escapes to outside. I found little benefit in going beyond 2 courses of these. Carrying the insulation down into the cavity helped a lot however. 1. WITH LIGHTWEIGHT BLOCKS 2.WITHOUT LIGHTWEIGHT BLOCKS 3.WITH LIGHTWEIGHT BLOCKS 4.WITHOUT LIGHT WEIGHTBLOCKS



-
215mm leaf specified by Structural Engineer due to lack of buttressing walls and loadings from precast concrete first floor. Upstairs will be 100/250/100 block/cavity/block. The footprint of the house was designed around these thick walls. Had we needed more space we could have added it in the plans. I ran PHPP with multiple options and was able to achieve 11 kWh/(m²yr) and 8 W/m2 with this amount so I didn't see the need for more. They are lightweight concrete blocks (k value of 0.17 W/(mK)) to help reduce heat loss to the foundations.
-
Hi All, Welcoming opinions on the below detail. Plaster and Air tightness omitted for now. Aerated concrete blocks shown in light green.
-
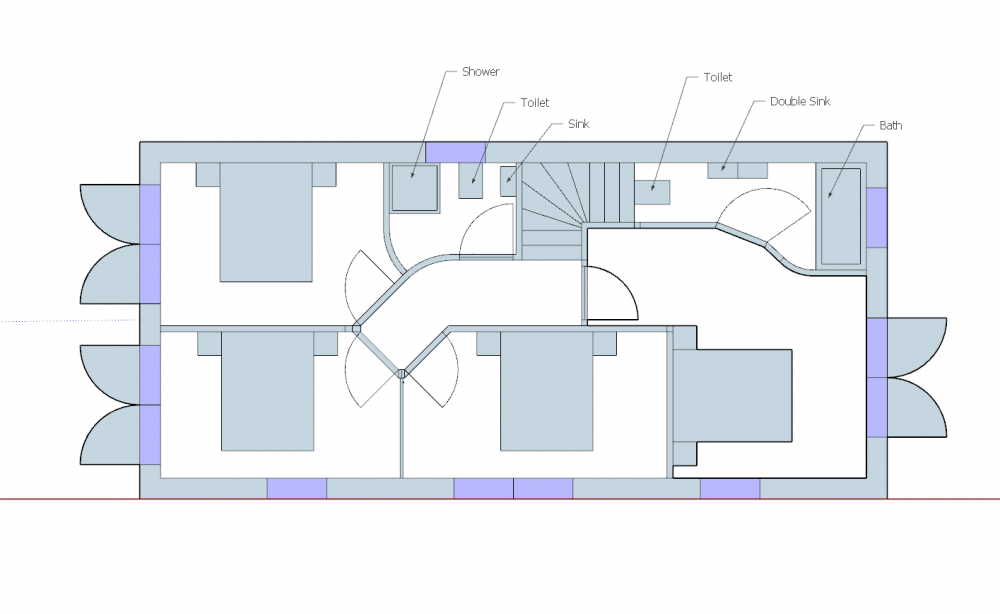
Right, I'll throw my hat in the ring. Its remarkable the things you achieve while your spawn is up at the witching hour sprouting new fangs. I've made a couple of assumptions. External walls 350mm, internal 100mm. All beds in the drawings are 1550x2000 (queen size). I didn't get around to drawing in any storage but I hope the locations I've left will be obvious. I hope you don't mind me changing the upstairs. I've included an extra room here that could be used as an office or sitting room. Failing that, as an extra bedroom should you ever find yourself too old or too drunk, or indeed too old and too drunk to tackle the stairs. Try as I could I wasn't able to fit a bath tub into the family bathroom downstairs at least not in a horizontal orientation. I've included a shower in the upstairs W/C for use with the aforementioned bedroom and as it's opposite the stairs should prove a welcome fallback just in case all lower ones are occupied. As per @Ferdinand suggestion I've endeavoured to extend 3 of the bedrooms into the garden with large doors. And the 45 degree doors seem to have freed up some space @ProDave GROUND FLOOR FIRST FLOOR SOUTH ELEVATION EAST +WEST ELEVATIONS
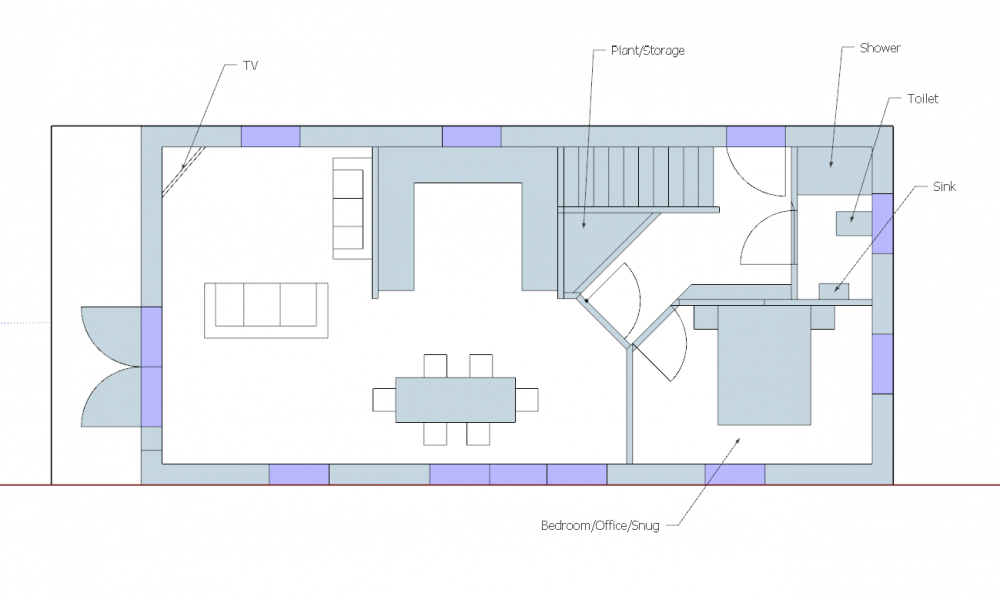
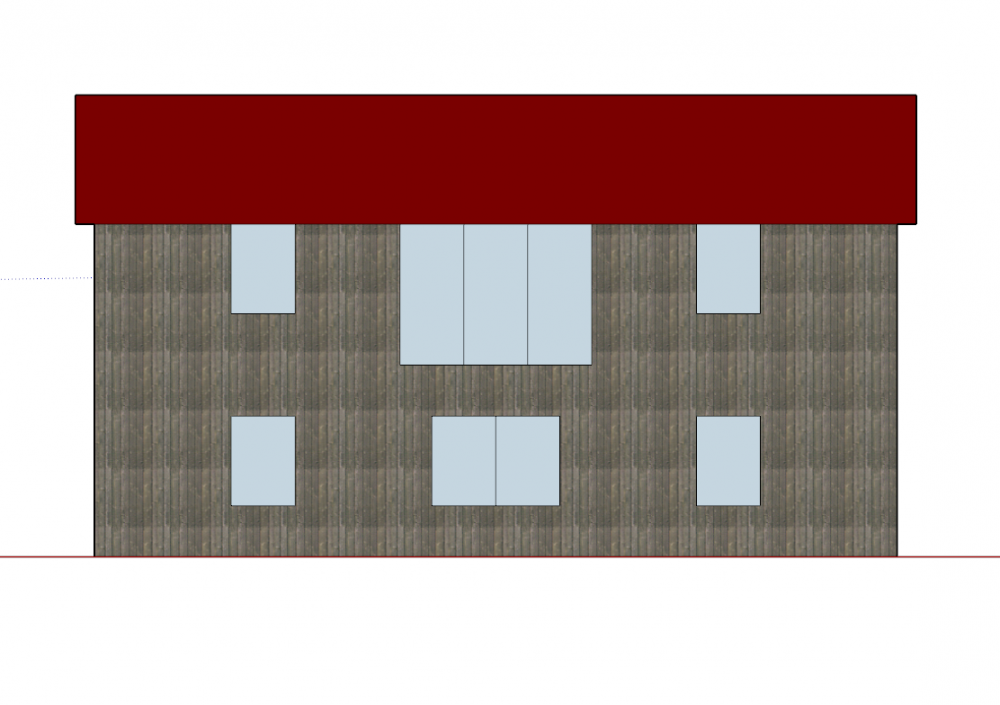
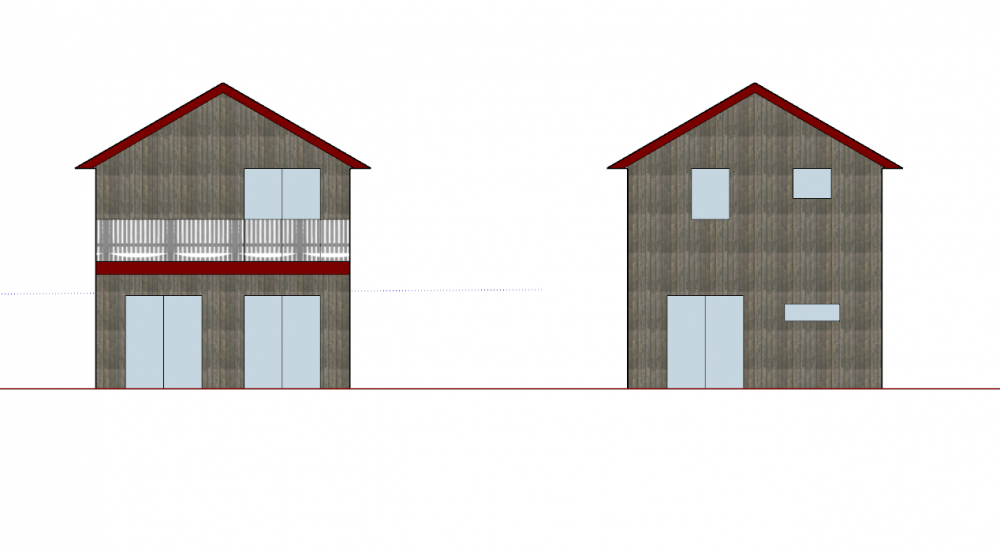
-
New house build inside old house - timber stud or SIP?
Iceverge replied to Hastings's topic in New House & Self Build Design
Hi Hastings, What a lovely project. What is the maximum depth you are prepared to loose from the room? It sounds similar to the Green Building Store retrofit of Stirley farm and I believe MBC have completed a similar project if you look through their facebook photos. They lost a lot of floor space however. How sound are the external walls? Might they be able to take a perimeter ring beam bolted to the stone with compacfoam or similar to create a thermal break? The joists could be hung from this and the external walls then internally insulated (carefully) with a breathable insulation like wood-fiber or lime hemp?





