Jeremy Harris
-
Posts
26430 -
Joined
-
Last visited
-
Days Won
360
Everything posted by Jeremy Harris
-
For under the floor I'd go with 120mm bare minimum PIR thickness, ideally 150mm or so. It really comes down to how much you're prepared to spend, but if you're doing the labour yourself (which is far and away the most expensive bit) then I'd say that I've never heard anyone complain that they've used too much insulation! It's one of those "fit and forget" things that keeps paying for itself forever.
-
I really don't know how companies like this can try and sucker people into thinking they have some sort of "miracle product", that apparently defies the laws of physics. It seems that no matter what regulations we put in place regarding advertising claims, snake oil salespeople will always find a way around them. Thankfully, there is a fairly widespread body of knowledge around on forums like this that can go some way towards debunking the use of products like this as supposed insulation.
-

Any special measures for a hot weather concrete pour?
Jeremy Harris replied to epsilonGreedy's topic in Foundations
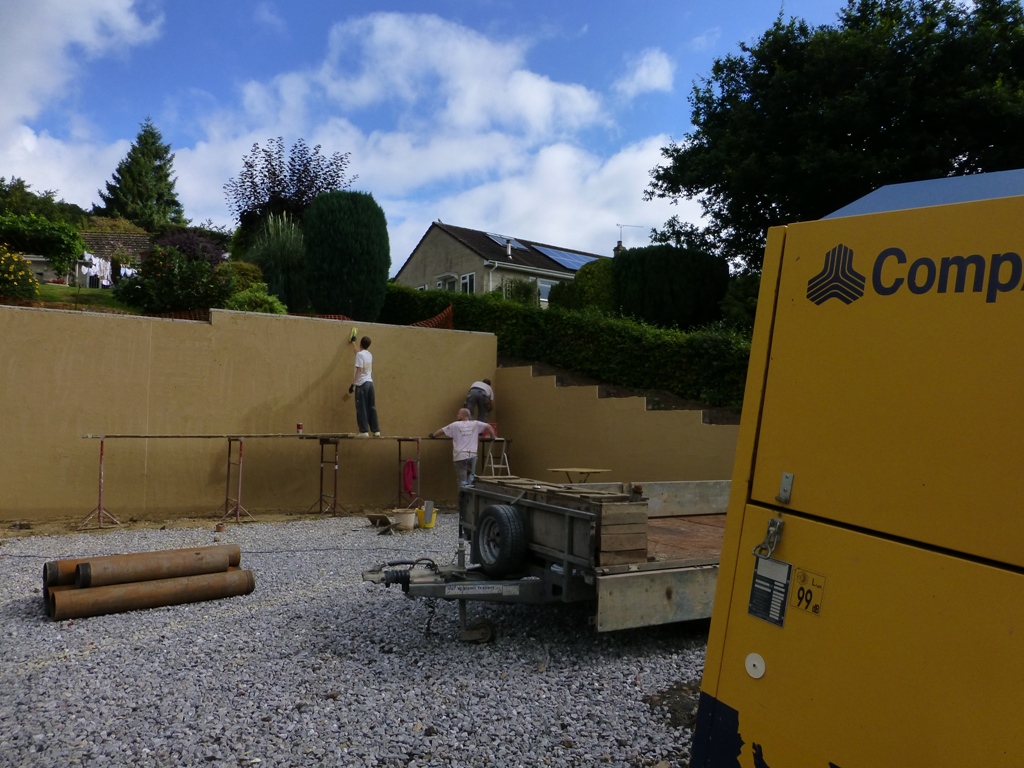
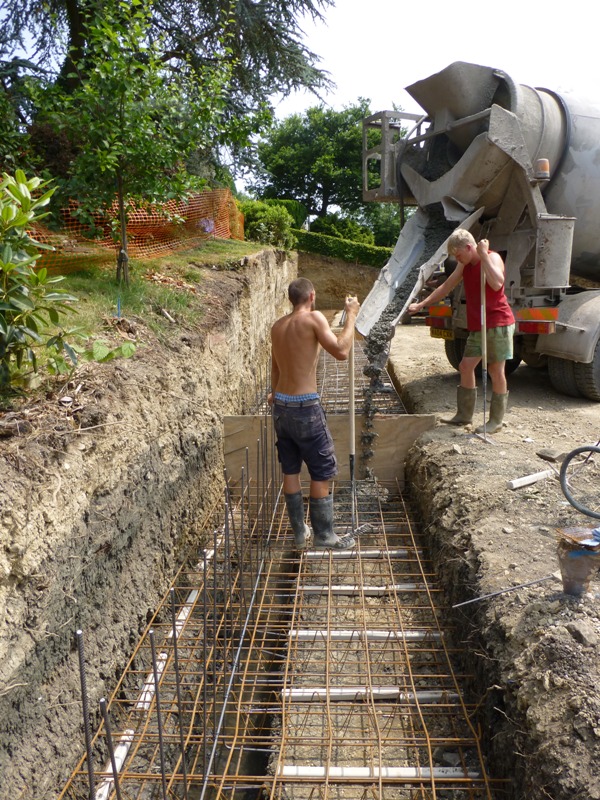
This wasn't the slab, that was poured in pretty dire weather in October or November, IIRC. This was the retaining wall foundation, that was poured in some exceptionally hot summer weather, up around 30 deg C. -
100mm is really a bit marginal for UFH, where the floor will be a lot warmer than it would otherwise be and so lose more heat downwards. If you can get spaced battens under the floor joists then that might be an option to support the insulation. Alternatively, you could try just bonding the insulation at the sides with low expansion foam. Low expansion foam bonds very well to both PIR and timber, and may well be plenty strong enough to both hold the insulation in place and seal it at the sides. It sets very quickly (five minutes or so) so with luck you should be able to work from one side, using temporary supports under the insulation to hold it up until the foam cures, with only the last bay being the slightly trick one where you only have access from above. Making that bit a really tight fit, so you can squirt some foam along the joist and then tap it down into place should work OK. I'd definitely go with 150mm PIR if you possibly can, you certainly won't regret adding more insulation. We have 300mm of EPS under our floor, roughly the same as about 200mm of PIR.
-
Any special measures for a hot weather concrete pour?
Jeremy Harris replied to epsilonGreedy's topic in Foundations
Worth remembering that concrete needs a lot of water to cure - water gets incorporated into it as it hardens, it doesn't "dry out" as such. If the top surface of the pour dries out too quickly, then it won't cure properly, and will end up weak and perhaps a bit flaky. It's a good idea to have some hessian sacks around that can be soaked in water and put over the top of any areas that are getting direct sun, or just cover it over with a bit of tarpaulin to prevent it drying too quickly. As your bloke says, a wet mix will tend to settle with a bit of excess water on top, and that will often be enough to make sure that there's plenty of water around for the stuff to start to cure properly. Because it was really hot when our wall foundations were cast, the blokes covered over the concrete with anything they had to hand, sheets of board, tarpaulins, whatever, just to keep the sun off a bit. -
I think it's a really big advantage, given the relatively high cost of scaffolding. It wouldn't be easy to get the cables through a modern breathable roof membrane, and would be a lot of faffing around to try and get the cable entries watertight, or at least arranged so they ran up under an overlap joint and were taped down, as well as the potential problems of having them in a warm (perhaps very hot) roof space, which may not be a lot better than having them under the panels. There's always the option of running a pair of cables from every single panel to an easy to access area., though. Cable losses are pretty small, as the current wouldn't be that high from a typical 250 to 280 W panel. Whether or not it's worth it is another matter.
-
My only concerns with microinverters are that they most probably run pretty hot, as they are under the panels, so must get a fair bit of heat from the sun, and the need to erect scaffolding to replace any faulty inverters. Inverters are bound to have a shorter life than panels, so although microinverters seem to be a really good idea, it's the practicalities that bother me. A failed microinverter could easily cost a couple of thousand pounds to replace if a full scaffold has to be erected in order to gain access. Replacing a wall-mounted inverter would be a lot cheaper, just isolate it, unplug the cables, unhook it from the wall, hook on the new one and plug it in and switch it on.
-
That's what our in-roof installer did, except the DC isolator switches (one for each string) were fitted outside, to a plinth that I fitted to the house frame that projected slightly outside where the cladding was going to go. 25mm flexible conduit ran up the wall (behind the cladding) and over the roof (under the battens) with the four runs of single core DC cable. The order of installation was fit the roofing battens, then fit the in-roof panel mounts (very easy to do as a DIY job) then install all the slates, fascias, gutters etc, then fit the solar panels to the mounts and connect them up to the cables, in two strings. Doing it this way minimised the risk, as the four cables coming from the two (turned off) isolators were not connected to anything, so could have plugs/sockets crimped on whilst they were dead. The panels all had flying leads with pre-terminated plugs and sockets, so it was just a matter of plugging everything together. The connectors are designed to minimise the potential to touch any live connection, so the plugs and sockets are safe to connect with the panels generating. If the order of work is planned out like this before hand then there should never be a need to have to terminate any potentially live cable. If the house is reasonably well insulated, then it's well-worth looking at fitting the inverter outside, as they do generate a fair bit of heat when running flat out. We have ours mounted at the back of the house, fairly high up on the North wall, so it never sees direct sunlight and is able to run cooler than it would if it were inside the house. Apart from potentially extending the life of the inverter by keeping it cooler, it also reduces the heat flowing into the house on hot sunny days, which is a definite advantage. Most inverters are IP rated, or have an IP rated version, making outside installation pretty easy.
-
A chat with SEPA would definitely be a good start, after the hassles that @ProDave had in sorting out how to discharge the treated effluent. I also was very drawn to the non-electrical ones, and went to look at one locally installed unit, a BioRock. It was working OK, but the owners had spent a fair bit of time getting it to operate correctly. They still had a mild odour problem from it when I went to see them, and were in the process of trying to arrange for a different vent pipe arrangement to overcome that. They had also had to have the media replaced (under warranty) because of an initial problem. I believe someone here has one, and had a few teething troubles in getting it to work OK. One things seems clear, they are very critically dependent on getting good natural airflow over the media, and the positioning of the vents to allow this seems quite critical. Local wind conditions can seemingly have a significant impact on effectiveness, as all these units rely on stack effect to drawn air in at a low air inlet and out at a higher one, with the air flowing over the media in order to allow aerobic bacteria to do their stuff and break everything down. I remain sceptical that there will be a consistent enough airflow under all local wind conditions to allow effective, odour-free, treatment, I'm afraid. The big advantage of all the pumped air systems is that there is always a surfeit of air, which not only keeps the unit working properly but also means there is virtually never any noticeable odour.
-
Deep Bore soakaways (prev RWH IBC and building standard)
Jeremy Harris replied to Sjk's topic in Rainwater, Guttering & SuDS
Depends on what arrangements you have for ensuring that the surge runoff tank is always going to have enough spare capacity to absorb a very heavy shower. If your IBCs are full, where is the water going to go? We have 20 off 196 litre membrane-wrapped Aquacell crates buried under our drive as a surge tank, and that drains over a period of around 24 hours through a permeable layer of soil. BC were happy with that. The critical case is winter, when water usage from any rainwater recycling system may well be low, so there may not be much reserve capacity, meaning that the tanks would not work with regard to SuDS. I'm pretty sure you can't really include rainwater recycling systems as part of a SuDS system, without an additional surge tank and drainage system. -
Any special measures for a hot weather concrete pour?
Jeremy Harris replied to epsilonGreedy's topic in Foundations
Yes, the plot was relatively cheap because of all the problems, thankfully. The drainage is handled by a perforated land drain pipe right at the bottom at the rear of the wall, with pea shingle backfill to allow any water from above to drain down to the land drain. The drain feeds to a soakaway, which by good fortune connects to an old Victorian clay pipe drain that runs down to the stream. My guess is that the clay pipe drain was put in to take spring water away to the stream, as there are a few springs that run out of the side of the adjacent lane. -
You put an impermeable membrane, like EPDM or GRP on the roof, then fit the stand offs and paving. Water runs down through the gaps between the load-bearing slabs and runs off down the drains/gutter. The big advantage is that there is no wear and tear on the waterproof layer and also the waterproof layer is protected from damaging sunlight, so will last for many decades.
-
Any special measures for a hot weather concrete pour?
Jeremy Harris replied to epsilonGreedy's topic in Foundations
The height is deceptive, as that bank is just over 8ft high at the far corner, plus the wall runs down along the far side as well. Yes, it was very costly. IIRC, the basic retaining wall and foundations came to around £25k, as it was two rows of 215 hollow blocks with vertical steels through the concrete-filled hollows plus horizontal steel rods along the mortar courses, laid in English cross bond, with the front and rear stretcher rows offset by half a block. The addition of a mixed block and stone dwarf wall at the top (topped by a fence) plus cream render to the whole exposed face of the wall, pushed the total cost up over £35k. This photo of the part- finished wall gives a better idea of the scale of the thing: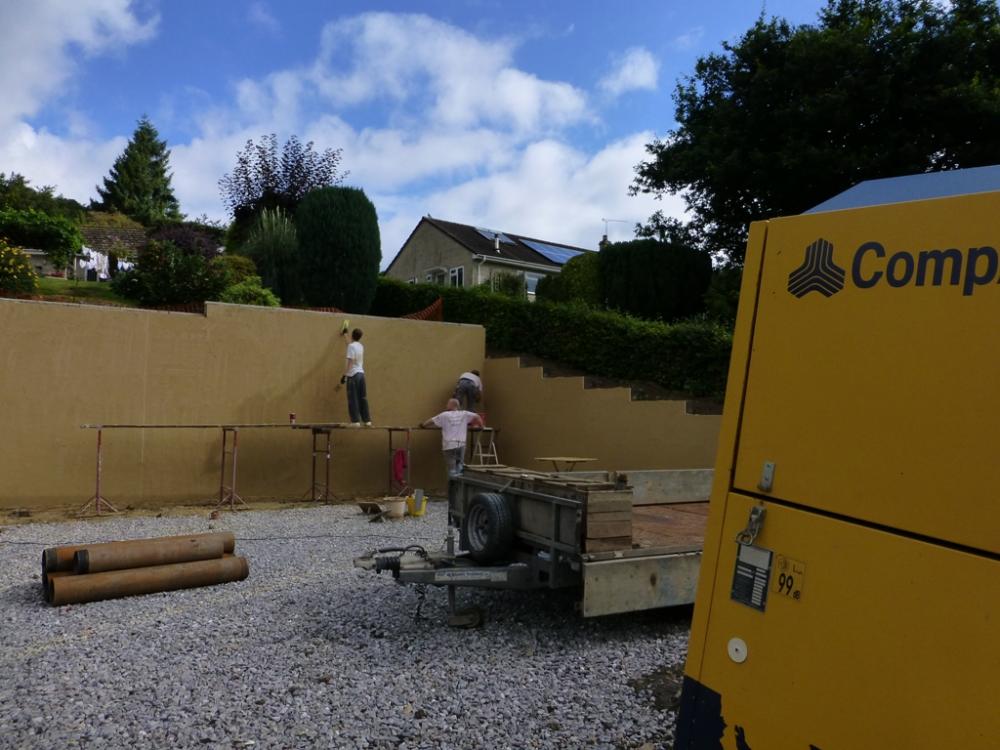
-
Mirrors our experience. I cheated, in that when we were ordering our kitchen we spotted that the kitchen company used another company to cut, supply and fit stone worktops (there was a label on one of the stone samples). I got a quote for the whole kitchen, supply only (except the worktops which were supply and fit) and then went to the worktop company directly and got them to quote to cut, supply and fit the stone. I'd done the design and provided all the drawings, so there was no question of misusing any work the kitchen company had done. The stone company quoted us around 60% of the price from the kitchen company, for exactly the same stone, including cutting and fitting. Even then the stone worktops were around 50% of the total kitchen cost, excluding appliances.
-
The general rule is that treatment plants are far and away the preferred option, a septic tank with tertiary treatment (usually land drains in aerobic soil) is acceptable if you have the land area for the drains and a cess pit is generally forbidden unless there is no alternative option. A treatment plant discharges treated effluent with a low biological oxygen demand (BOD), so can be discharged to a watercourse (subject to agreement) or can be discharged to a suitable land drain/soakaway arrangement. A septic tank doesn't aerobically treat the effluent, so it's discharge has a very high BOD which needs tertiary treatment. Traditionally this was done using a leach field of shallow land drains that allowed aerobic soil bacteria to do the final treatment, but these only have a limited life of around 10 to 15 years before they stop working, due to biofilm build up, hence the preference for an aerobic treatment plant. A septic tank can discharge to an alternative tertiary treatment system, like a reed bed, but although reed beds work well there is quite a lot of maintenance involved and a slight risk of infection when thinning them out and trimming them back. Generally, blower type treatment plants seem to be the best. There are some non-electrical units around, but opinions on them seem mixed - some have found that they work well when properly set up, others have problems with them. The ones I would avoid are any that have electrical operated moving parts inside the chamber, as they look to be a maintenance nightmare. There are lots of well-respected blower units around in the size range you're looking at, and several here have experience of some of them. We have a Biopure1, that suits 1 to 6 people, and have found it works well. Ours discharges to a nearby stream; an easier option to get consent for here in England than it is in Scotland, for some bizarre reason to do with different policies between SEPA and the EA. Others here have used blower units like the Vortex, which is similar to the Biopure but has the option of a timed blower pump (now also an option for the Biopure I believe) that saves energy. The hurdles you face are really to do with where you're going to discharge the output from the treatment plant. @ProDave had to jump though some hurdles with SEPA, so may be best advised as to how to handle things where you are. I got consent to discharge to the nearby stream from our EA within an hour of asking, but I gather that SEPA are a lot different to deal with!
-
That's it, I've had enough. I'm buying some. Which?
Jeremy Harris replied to ToughButterCup's topic in Tools & Equipment
That'd be me, then. I was a bit-part bloke in Poldark - a horse handler to be precise. Mind you, that was the original series, so time may have taken it's toll. I did enjoy holding Angharad Rees horse, though... -
electricity connections Extortionate price
Jeremy Harris replied to recoveringbuilder's topic in Electrics - Other
Does the Powerwall support a non-grid tie connection now? AFAIK, it didn't used to. I do know that the much cheaper Sofar system, using Pylontech battery modules, can run off-grid OK. Last time I checked it was around £3.3k delivered, inc VAT, for a 7.2 kWh system or £4.2k delivered, inc VAT, for a 9.6 kWh system. The only snag is that the peak output from the inverter is limited to 3 kW, IIRC. Still a great deal cheaper than a Powerwall though. -
Any special measures for a hot weather concrete pour?
Jeremy Harris replied to epsilonGreedy's topic in Foundations
We poured our retaining wall foundation on a day when it peaked at over 30 deg ?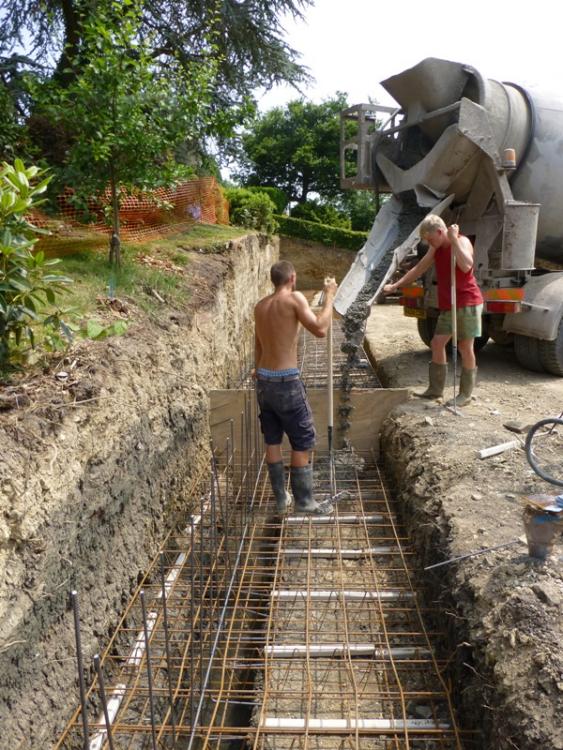
-
Gas boiler servicing cost?
Jeremy Harris replied to Jeremy Harris's topic in Boilers & Hot Water Tanks
£70 sounds about right, and about what I've paid before, IIRC. Two jokers have so far tried to ask for over £200 just to do an annual service, which I know full well is a quick and easy job on this boiler. I'm just going to get safety certs for both the boiler and the electrics, so we're in a position to get the sale done as quickly as we can. -
For info, I have all the parts to build a CNC router, but like many other projects it's been on hold whilst the house was being built. All the parts are stored over at the new house, but I can dig them out and take photos if anyone is interested. I was lucky, in that I picked up a super accurate Z axis assembly from a local lab scrap sale, and made a spindle, using an 8mm shaft diameter large diameter brushless DC model aircraft motor, adding an additional bearing to take the cutter loads and replacing the 8mm shaft with an 8mm shaft diameter ER11 collet chuck, like this: https://www.ebay.co.uk/itm/C8-ER11A-100L-8mm-Collet-Chuck-Holder-Extension-Rod-Straight-Shank-CNC-Milling/201894678514?epid=769118241&hash=item2f01dc4ff2:g:9fkAAOSwSypY9Ilr Although the Z axis is more or less complete, and I have all the extrusions, rails, lead screws and nuts, stepper motors etc for the rest of the build, there's a few weeks work to get the machine built, plus a few more weeks whilst I go up the CNC learning curve. When finished it should have a cutting area of around 800mm x 800mm, with about 150mm of Z axis travel.
-
I have a Seek Thermal camera, that works with any Android phone or tablet (but there are issues with some devices that have the OTG USB port facing the "wrong" way). I don't use it that often, in fact it's probably a year since I last used it, but it does work well. If anyone wants to borrow it I'm happy to loan it out. The Seek Thermal app is a free download and should work on any Android device. The sensor resolution is reasonably good, at 206 x 156, so a fair bit better than the 80 x 60 resolution of the FLIR One, and more than good enough for anything related to work on a house, from detecting heat loss from the whole house, to looking at details at things like a consumer unit. My main criticisms of it are that the field of view is quite narrow - good for looking close up at things, not so good for trying to get a wide angle view, My other criticism with the app is that it's easy enough to use, but it has the irritating habit of changing the screen orientation right when you don't want it changed. I found that using the free app Rotation Locker, before loading the Seek Thermal app, sorted this, in the main. Feel free to PM me if you want to borrow it.
- 12 replies
-
- 1
-

-
- thermal camera
- heat
- (and 2 more)
-
Neighbour protocol/ tree problem.
Jeremy Harris replied to zoothorn's topic in Party Wall & Property Legal Issues
When I was a teenager we used to buy boxes of "Swoop" garden bird seed and painstakingly pick out all the hemp seeds. I remember convincing my mother that the seeds I was germinating in the airing cupboard were for a biology project at school. We had a warm summer, and they ended up growing on the veranda roof, outside my bedroom window, and were then harvested and tied up against the veranda railings to dry... -
And for the avoidance of doubt, it was not one of those currently listed companies. I won't name them, but their name begins with the letter L
-
Wilco, thanks again.
-
Gas boiler servicing cost?
Jeremy Harris replied to Jeremy Harris's topic in Boilers & Hot Water Tanks
I'm not sure, but I think a safety certificate is most likely. As @Hecateh mentioned above, it may well be something that's driven by the lenders, so I may as well just get a gas safety chit and and elec installation chit to cover both bases. I've done a quick check on both ring finals and they look fine, just need to get up and do the lighting ring and a few earth checks and if there's nothing amiss then I'll disconnect and remove any sign of the illicit garage power feed (I installed that years ago and it's got no sign off at all) and get my friendly electrician in to do an EIC, or whatever the equivalent is for an existing installation.