Jeremy Harris
-
Posts
26430 -
Joined
-
Last visited
-
Days Won
360
Everything posted by Jeremy Harris
-
I can understand the annoyance, but dealing with these issues one by one: The layout is a PM cock-up - yes, the PM DOES need to be there and make sure the setting out is right - frame erectors are frame erectors, not project managers. The beam being the wrong length is a cock up. Cock ups happen on every build and need to be worked around. An SE can easily do a quick check to confirm that the bolted beam solution is OK as long as the point loads are within limits. Maybe push for a replacement glulam if it's on show. Tears in the external wall building paper/breather membrane are commonplace. Stapled on patches are normal, and you can be pretty sure there will be more tears that need repairing as other trades come on site. The internal VCL board needs to be structurally intact, but small dings can be fixed just like insulation fill holes with airtightness tape.
-
Tears in the external wall breather membrane (it's not, strictly speaking, a weatherproofing membrane at all) are commonplace, and fixing with patches is pretty normal. It's only really there to keep bugs out that get into the cavity when the house is finished, and act as temporary protection from rain during construction. I certainly patched a few tears in ours, caused be careless people bashing it with everything from scaffold poles to bits of external cladding. I went and bought a decent hammer stapler to do it. The project manager should have spotted the orientation error - seems a pretty fundamental laying out error to me and I'd be having firm words with the PM as to what he/she was doing at the time. Only an SE can comment on the solution for the replacement beam, but bolted together boards to form a beam are an OK solution, and were commonplace before glulam came along. The internal board damage needs fixing, as that's the vapour control barrier (it's not really the main airtightness layer).
-

My MVHR ...
Jeremy Harris replied to newhome's topic in Mechanical Ventilation with Heat Recovery (MVHR)
I think I was lucky, as I bought five pairs of filters from them before they reorganised and changed their online outlet. They were a lot cheaper than THE, looking back I paid £124.14 for five F7 intake filters and five G4 extract filters. With hind sight I should have purchased twice as many intake filters as extract filters; as @HerbJ rightly says, the extract filter doesn't really get anywhere near as mucky as the intake filter. Looking at the itemised prices on the invoice from Jasun Envirocare, they list the F7 intake filters at £12.19, plus VAT and carriage, and the G4 extract filters at £5.50, plus VAT and carriage. They charged £15 carriage for the whole lot of ten filters. IIRC, THE wanted over £25 per filter at the time, which seemed expensive to me. I'm trying to find someone to make up metal frames that will take washable foam filters. When I originally spoke to Jasun Envirocare they offered this service, but now don't seem to. Rolls of filter material are relatively cheap, and it seems a lot better to be able to just wash and reuse a filter than have to throw it out. I have tried using the vacuum cleaner to clean up dirty filters, and it sometimes works, but I found it easy to accidentally damage the pleats in the filter. -
I just taped plastic bags over both duct ends, with the tape holding the draw cords in place. I just pulled a plastic bag over the end of the duct, with the draw cord folded back down the outside of the duct, wrapped the draw cord excess around the bag and duct a few times then wrapped tape around to hold it all in place.
-
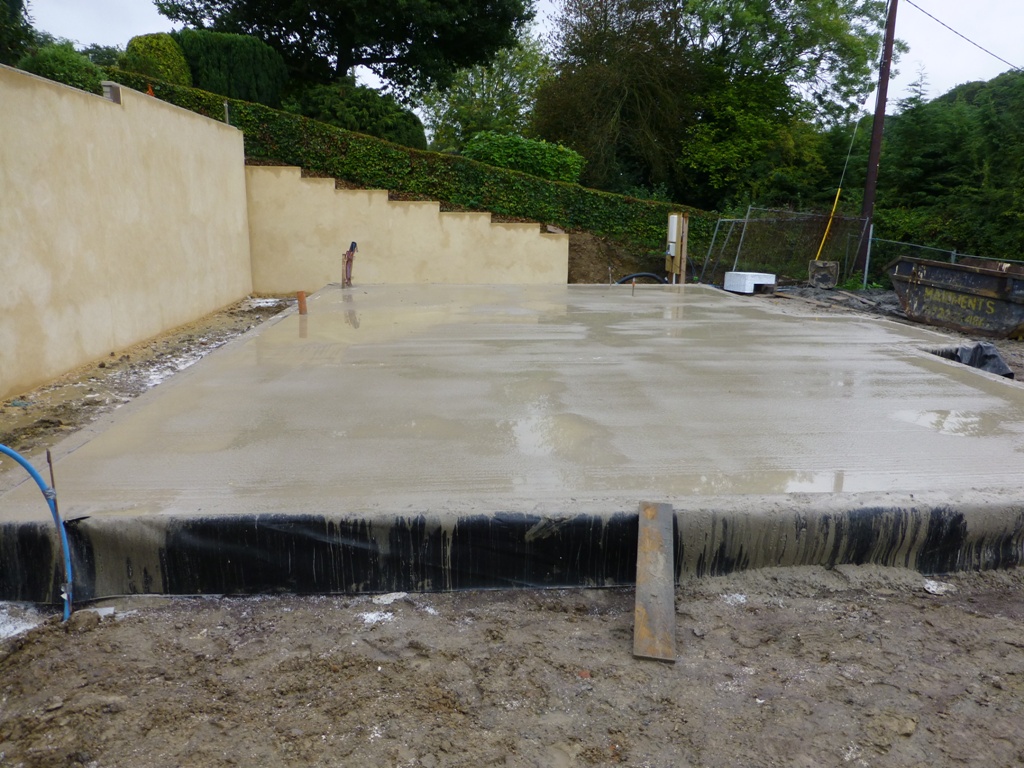
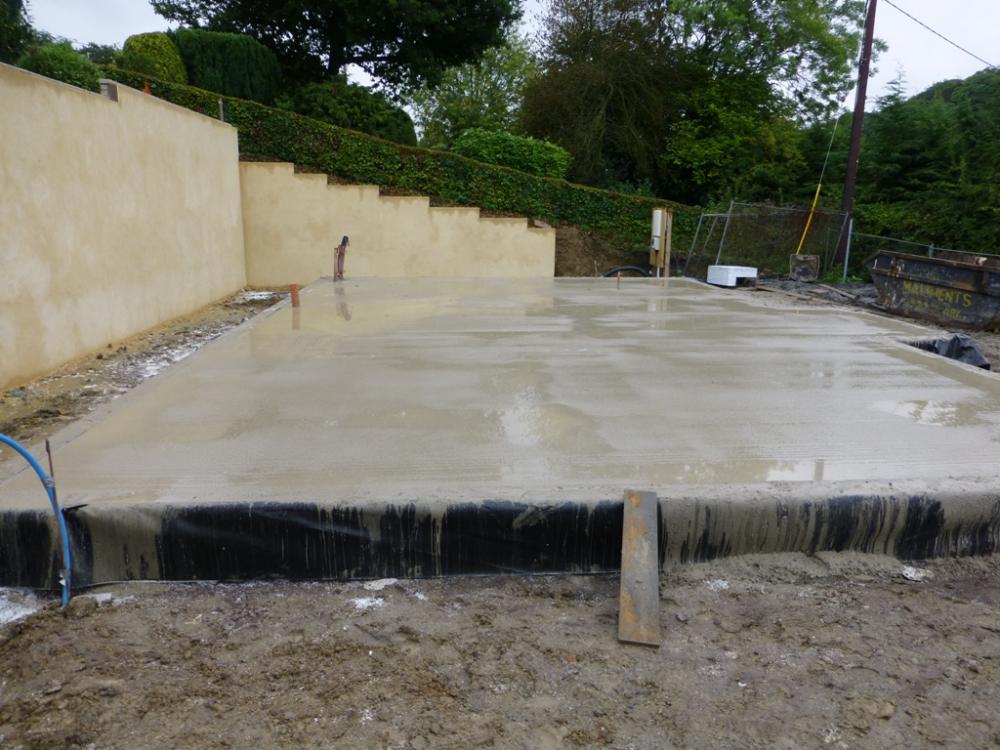
Just make the ducts way too long and leave them stick out above the pour. They will stay vertical, held by the holes cut in the insulation. Here's a photo, showing all the ducts tied together and poking up in the far corner. When the concrete had cured I just cut the ducts off flush:
-
I ran all the ducts, and the soil pipe, at around 600 to 700mm down below the slab sub-base top level and just bent them up through 90 deg where they came up through the sub-base. I used 50mm flexible duct, except for the telephone, which used grey, rigid BT Duct 56, with a hockey stick bend where it came up through the slab. I had no problem pulling 25mm MDPE or a three core 25mm² SWA cable through 50mm ducting. In practice a 90 deg bend in flexible ducting is a pretty gentle curve. Not sure it BT insist on Duct 56 being used for the run to the house, but they free-issued us with enough of the stuff, with hockey stick bends, to fit it anyway.
-
My MVHR ...
Jeremy Harris replied to newhome's topic in Mechanical Ventilation with Heat Recovery (MVHR)
Well worth doing. I've been changing the intake filter every six months, but have noticed today (as it's very hot again) that the house cooled down very quickly after I'd changed the filter (our MVHR has a built-in air-to-air heat pump, so in hot weather it pumps cold air into the house like an air con system). Looking at the filter I took out it's very clogged indeed after just six months of use, so I'm guessing that it probably needs changing more frequently. As these filters are expensive, even when bought in quantity from a cheaper supplier (I use Jasum Envirocare) I'm seriously investigating getting a re-usable metal frame made up so I can use much cheaper washable foam filters. Right now I'm sitting here designing a metal or plastic frame to fit the MVHR that can take a reticulated foam filter, as you can buy large sheets of that sort of filter foam relatively cheaply and it's easy to wash clean. -
DIY Heat Exchanger
Jeremy Harris replied to Onoff's topic in Mechanical Ventilation with Heat Recovery (MVHR)
Sorry, missed that - didn't go back to last year to the first page... -
Thanks, that's very reassuring indeed - I can stop crawling around in the eaves looking for signs of beetle holes...
-
My MVHR ...
Jeremy Harris replied to newhome's topic in Mechanical Ventilation with Heat Recovery (MVHR)
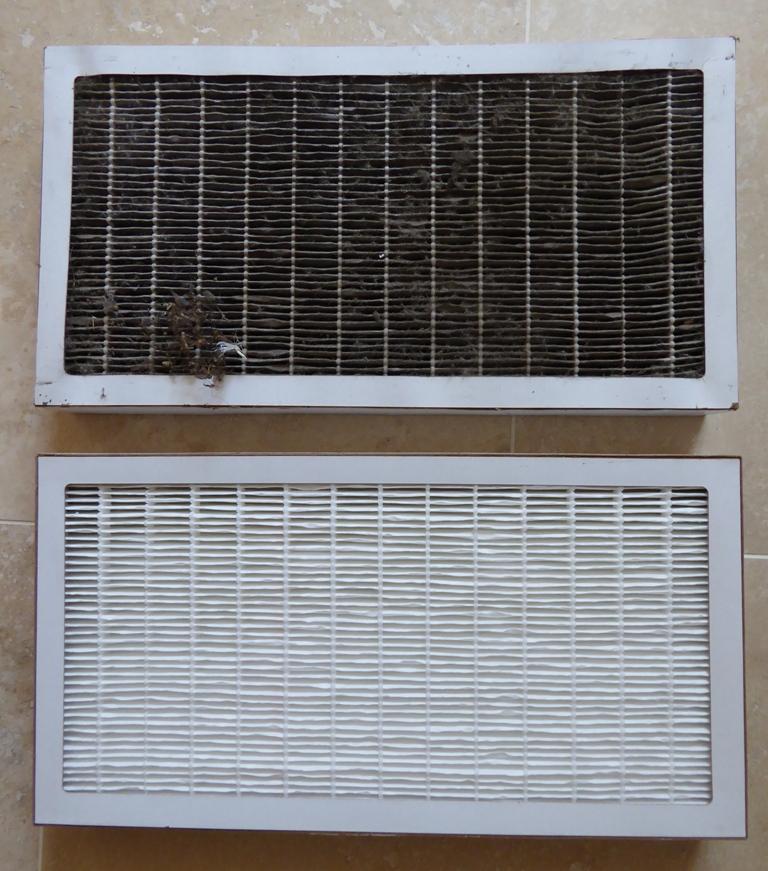
By complete coincidence, the change filter alarm on our MVHR came on this morning, so I've just been in and changed the filters for new ones. This photo shows what an intake F7 (pollen) filter looks like after 6 months use, compared with the new intake filter below: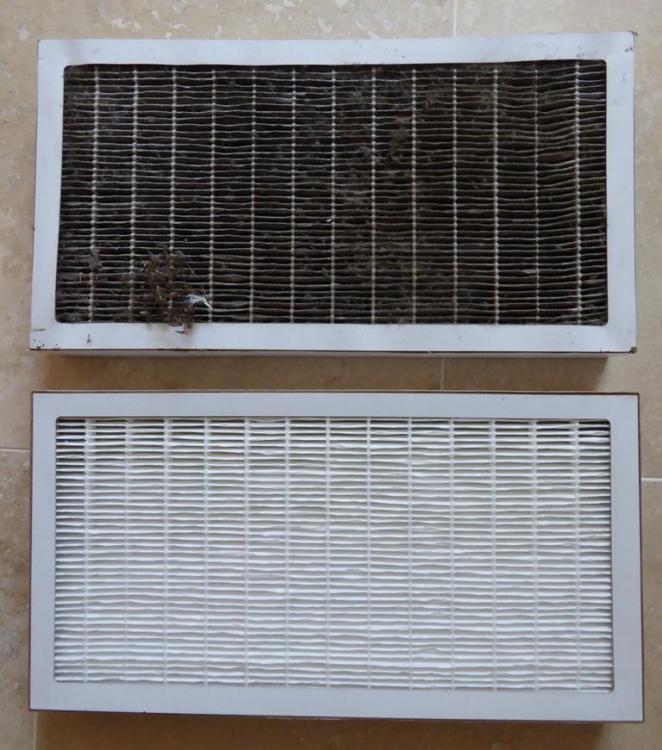
-
Very many thanks, @Ian. That confirms my thought that the larvae were most probably in the bit of wood before the bed was made and have spent the last year or two maturing in there before making good their escape. I was reasonably sure that there was no real risk, but as the whole house is made of timber there was a niggle in the back of my mind! I think the chances that any of the half dozen beetles that escaped could have found anything to suitable to lay eggs on will have been miniscule. From your info, I think the most likely culprit may have been the "pinhole borer", as the holes are around the same size as those from the common furniture beetle, certainly no bigger than 2mm, and closer to 1mm, and I'm certain that the furniture was imported from the Far East. It's some species of oak, but doesn't look at all like either European or American oak to me. It didn't come from Oak Furniture Land (who I know import all their stuff from the Far East) but from a local supplier who seems to have access to the same manufacturers that Oak Furniture land use, but who has more honest and reasonable sales practices.
-
Can you just fix it with low expansion foam? It cures in around 5 minutes and bonds very well indeed to foam. Might be a quick and easy way to hold the insulation in place. and seal it up to the relatively rough surface of the Durasol cut block edges.
-
This morning I've just spotted some tell-tale piles of dust on the floor under our year-old new oak bed. Closer examination has found half a dozen exit holes in one area, and no sign of anything anywhere else. The bed is made of some species of oak, most probably from the far east, and the exit holes are through a lacquered surface. I've had the mattress off and examined the frame closely with a bright light and as far as I can tell the infestation is restricted to one single area in one piece of wood. That bit of wood seems to be lacquered all over, not just on the outer surfaces. I've probed the inside of the bed frame in several places and it seems to be dry as a bone; I'm getting readings of around 5% to 6% everywhere, making sure the probes go through the lacquer and into the underlying wood. I'm pretty much convinced that the infestation occurred in the timber before the bed frame was manufactured, as I can't see how the eggs could have hatched, and the larvae chewed into the wood after it had been lacquered. As such, I don't think I really have cause for concern, as the house is dry (RH is currently 40%), the timber is dry (no higher than 6% MC) and my understanding is that in order for eggs to hatch and larvae develop they need to be laid in sapwood with a fairly high moisture content. As a cosmetic measure, and as a precaution against the emerging beetles having laid their eggs in the exit holes, as I believe some species do, I've filled the holes with a paraffin-based brushing wax, pushed deep into the holes and buffed over. I'm reluctant to try any other treatment as the furniture seems to have a good lacquer finish all over (I suspect it was sprayed all over after being built). I don't think there's a significant risk, because of the low moisture content in the wood, the relatively low RH in the house and the lacquer finish, but does anyone else know any different?
-
DIY Heat Exchanger
Jeremy Harris replied to Onoff's topic in Mechanical Ventilation with Heat Recovery (MVHR)
I don't think it's polycarbonate, more like some sort of polyethylene or perhaps polystyrene. I know that it's stocked in model shops, as when I was buying stuff to make architectural models our local model shop had sheets of it for sale quite cheaply. IIRC, the sheets were around 5mm thick overall, as I went around measuring all the easy to cut sheet material they had to get a combination that gave the right scale thickness for the models I made (I settled on foamboard laminated with Liteply to give the exact scale thickness for our outside walls) -
DIY Heat Exchanger
Jeremy Harris replied to Onoff's topic in Mechanical Ventilation with Heat Recovery (MVHR)
@SteamyTea made one, using thin plastic sheet, IIRC. I'm pretty sure he made some measurements of it's performance, too. I can't see why a coroplast counterflow heat exchanger couldn't be made to work every bit as well as a commercial unit, as long as you're prepared to put some time in to optimising it. For an MVHR that has to fit within a defined space an shape a DIY one may well be a better option, especially if you can make use of some of the space available to form a part of the casing. Variable speed fans are readily available cheaply, at least for a unit that doesn't need to service a large volume. I bought some PC cooling fans a while ago that had PWM speed control and even a tacho lead output to give feedback on the set speed. -
DIY Heat Exchanger
Jeremy Harris replied to Onoff's topic in Mechanical Ventilation with Heat Recovery (MVHR)
Go with what you can get, but I'd say the thinner stuff, with gaps that are around 3mm to 4mm wide might well be best, as that corresponds closely with the sort of spacing in commercial units. Here are some plans for a coroplast MVHR from years ago: https://www.builditsolar.com/Experimental/DIYHRV/DIYHRV.htm -
I reckon that the real half way point is when you think that the build is around 90% complete: http://www.mayfly.eu/2014/04/part-twenty-eight-90-finished-so-only-around-90-left-to-do/
-
I'm in the old house - all the doors and windows are open and it's the same inside as out...
-
The panels in the shower room are new sandstone, slightly textured, finish ones, the other bathroom is done with left over travertine style gloss panel offcuts that I'd saved from when I refurbished the bathroom in our old house, so were around 6 or 7 years old when I installed them. I've just checked, and the panels in the old house were installed in 2010, so are 8 years old, and they still looks as good now as they did when I fitted them.
-
Right now we're at 26 deg C, 80% RH, zero wind speed. No indication yet of it cooling down, as the sky is still overcast, so is reducing radiative heat loss. I fear we're in for a hot and sticky night.
-
It's like a bloody steam oven here - overcast, hot, humidity through the roof and no wind. In summary, bloody uncomfortable...
-
There are some photos of the bathrooms in our new house here if they help: http://www.mayfly.eu/2014/09/part-thirty-three-system-details-and-the-bathrooms/
-
DIY Heat Exchanger
Jeremy Harris replied to Onoff's topic in Mechanical Ventilation with Heat Recovery (MVHR)
I've seen old estate agents signs used as reasonably effective counter flow heat exchangers. Just space layers of them so that all the internal holes run in the same direction, with the gaps between them running in the opposite direction. You end up with a square heat exchanger where the airflow in and out is on each diagonal face. -
We've had the plain finish Multipanel in the bathroom at our old house for a few years now, and been very impressed with it. Easy to keep clean, no grout lines to clean and get mould off, and a smooth surface that is easy to just wipe clean and remove limescale from. We're so impressed that I've used plain finish Multipanel in the new house, really just because it's easy to clean and stays looking like new for years. Not sure about the simulated tile stuff, TBH, it looks as if it's trying to be something it isn't. The plain Multipanel doesn't pretend to be anything other than what it is, a laminated ply waterproof wall board.
-
All I can say is that Cornwall felt a lot more comfortable today than Wiltshire does. Just back and it feels really muggy and hot here, no real breeze and generally pretty unpleasant. The temperature in Cornwall was around the same, but it felt a lot more comfortable, probably because of the breeze. I don't miss Cornwall at all, except for that near-constant breeze - here we often seem to have too many hot and very still days.