Nickfromwales
-
Posts
30328 -
Joined
-
Last visited
-
Days Won
296
Everything posted by Nickfromwales
-

Cladding battens, Pressure treated or not
Nickfromwales replied to gavztheouch's topic in General Joinery
I almost got sucked into the vortex of looking at the many different screws I could buy and put into organisers, that may possibly get used, maybe,.......but I'd have them, lol. -
.....evening boss, sorry I'm late! Ok, so the real elephant in the room is the AVCL. If they miss, then they'll withdraw the fixing, and go again, making lovely holes in your airtightness layer; a crime punishable only by a slow and painful death afaic. This is the real crux here imo.
-
Clearance for a standalone washing machine
Nickfromwales replied to Question's topic in Kitchen & Household Appliances
If it's in the hole, put a load in and rinse then spin. Proof/pudding -
Services issue post purchase with inaccurate PEC
Nickfromwales replied to DC5's topic in Party Wall & Property Legal Issues
You could fit 4x 1000L cold mains accumulators in an outbuilding, and keep a reserve of 2000-2500L on site; these don't fill completely, so you won't get 1000L of water in each vessel. You can have an alarm that notifies you when the incoming pressure drops or disappears, so you know you're on 'rations'. You can gauge consumption and then maybe increase the number of accumulators, if needed. These take pressure from the static cold mains and recharge with pressure 'borrowed' from the network water. I'd try with no pump at first, and then see how you go, and add a suction pump if so necessary. You could also do 1 or 2 of these for potable, and then one more fed from 3-4000L of water held in some IBC's, pumped out to do everything non potable. -
Shower Enclosure - Extraction
Nickfromwales replied to richo106's topic in Bathrooms, Ensuites & Wetrooms
If you're going floor to ceiling glass, I'd want the extract in the shower area, at the end opposite to the shower head. Others will say it's not supposed to be in the shower area, I say it makes zero difference. I'd want the shower area to have the most amount of cross-flow as possible. -
-
You'd push EPS down into the cavity, then you'd create an insulated upstand against the outer skin of masonry, with the XPS board, and then you'd fill the cavity with cement, level with the reduced celcon. Then you would use the XPS backer board to stop the cold rising connection, and then SLC.
-
The XPS backer board would be the closer then.
-
If it's going to take foot traffic, and then LVT, you ideally need to multi-tool the celcon blocks down by -22mm, install a 12mm XPS backer board (defo do not use cement board as it'll cold bridge like crazy), and then pour 10mm (min) of SLC to the required height to take the LVT over ply. Multi-tooling the blocks will take an hour or so so that's easy enough to do.
-
So, in summary, it's too late to add a basement is what you're saying yes? lol.
-
Where are they installed?
-
Self level the slab before you start to get it nice and flat/level, and have zero screed? Check how out of level it is and fill to get it dead flat. Lets assume 10mm of SLC goes down. Just put down PIR and then top it with 2 layers of 18mm P5 deck boards, staggered joints and glued and screwed, and then put your finished floor over that. You'll be surprised at just how solid a floor this gives. The SLC prep makes the sub-floor flat and level, so don't skip that bit! Levels are achieved by mixing 2 layers of insulation at different thicknesses to get the height you need; 170-10mm = 160mm to fill, so allow for 1x18 +1x22mm=40mm deck, then 2x layers of 60mm sheets of PIR. That's 170mm total build up. 1x 120mm PIR sheets sounds faster and simpler, but won't conform and settle down as well as 2 layers. DPM/DPC's as required.
-
If you want problems, then go for the gaps. If, however, you'd like a solid slab with no cracks or breaks, do NOT do as you state. On a 140m2 L-shaped MBC raft, with only 100mm concrete depth between intermediate beams, we tiled that with 1200x250mm porcelain and not a single issue for the 12 months it was down for whilst we completed the rest of the job. No decoupling membrane etc, just flexible tile adhesive straight down. Just "NO"
-
The cross battens will be visible, and after placing the 100mm PIR you'd just run a marker to show where to put each fixing. I think this is an overcomplicated question for a simple install, and will become apparent how simple this is once these start going on. Basically, AFAIC, they can't miss? If the chippys are installing this then I'd suspect a bit of micro-managing is creeping in lol.
-
They looked to be a finely oiled machine tbf. Hopefully nobody got burned.
-
Services issue post purchase with inaccurate PEC
Nickfromwales replied to DC5's topic in Party Wall & Property Legal Issues
Do they draw constantly, or does the supply come back at night/other time? -
You’re getting close to having your muzzle back on again. Off topic section is for you, to be honest we should have just called it Pocsters Folly.
-
With such a thin particle board worktop, the risk is over tightening the tap and it slowly compressing itself into the surface. Is the tap a standard diameter unit? So a 28-30mm hole give or take?
-
If the intended patio has a step at the perimeter, then you could just duct that air brick out to meet that. The ACO drain would just stop and start either side of it with the ‘lid’ flying over (continuously) so you don’t see the break.
-
Discharging rain water onto flat roof.
Nickfromwales replied to paro's topic in Rainwater, Guttering & SuDS
I’d look at fitting another outlet, and instead of the water running undirected, you’d contain it within a run of down pipe until it’s out and off the flat roof, and only opens to a hopper when below that level (matching the way the existing outlets discharge off the flat roof; only if you’d rather not have untamed water from the original roof adding to what goes across the flat one? -
22mm chipboard with thin laminate, or 22mm solid laminate?
-
Good luck. If you’re literally self building and have good mates for plumbing and sparking, then you may choose to spend more on the plot and then just finish the house to the very bare minimum to get signed off. Then slowly go at it room by room to cross the T’s and dot the I’s, after you’ve moved in. Stick building is a plenty good enough option, but you may want to consider I beams to get you to a superstructure a bit quicker, depends on where you’ll be living during the build of course. A cheap static (for welfare only ) may be a good option, which you defo wouldn’t then hide in.
-
Fitted lots of Veka in previous renovations / extensions etc. Nothing bad to say about them tbf, and that profile shows quite good seals for a upvc offering.
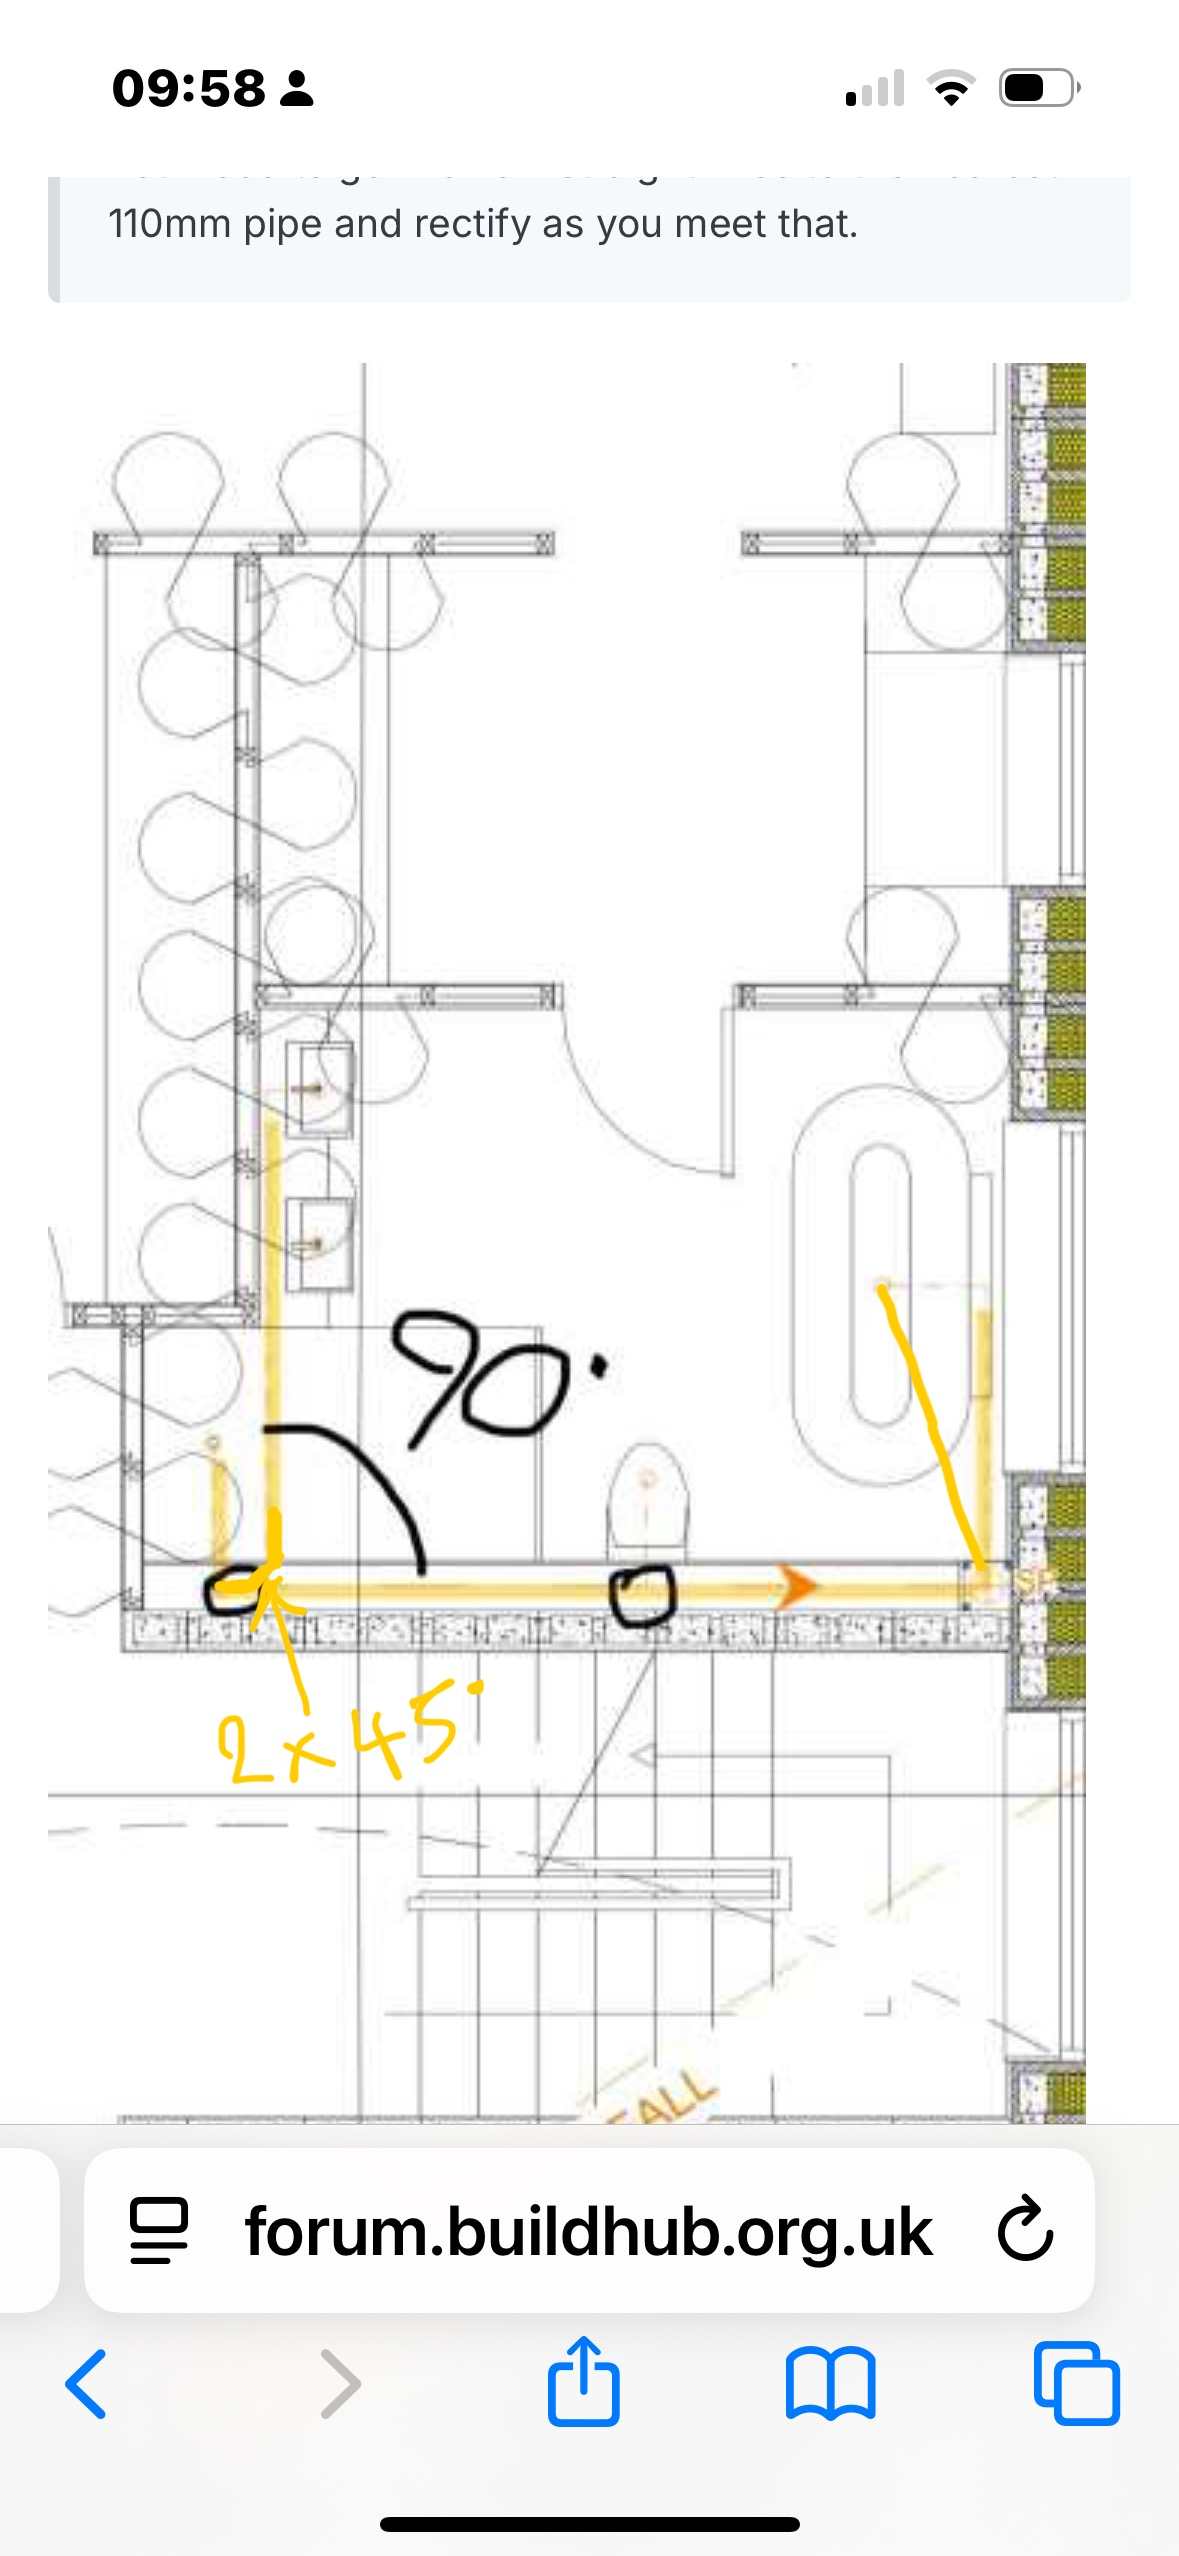
-
Respectfully, the SE isn’t a plumber or M&E consultant per-se. The 110mm boss connectors have 3 bosses, one open and 2 blind. The one that takes the bath would be rotated so the open boss is pointing directly at the bath. The one for the shower would be dictated by the shower, as currently you only have an indicative location for where the waste will be I assume? Once that’s established, the basin can be connected as shown, to keep it completely separate (which is the best option), and you just use 2x 45° bends vs an elbow there to smooth the flow.

-
Congrats. Any planning constraints, or a green light to fill your boots?